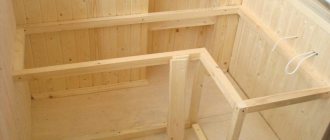
Low ambient temperature significantly reduces labor productivity and living comfort. Therefore, heating domestic and industrial premises performs an important function that requires significant financial costs for the purchase of special equipment. To save money on heating appliances, you can assemble a heater yourself. Which is especially important for those rooms and locations where there is no need to care about its aesthetic appearance and design.
Operating principle and main elements of an infrared heater
To make an infrared heater from scrap materials, it is necessary to study the operating principle. How can you do something you know nothing about?
All heated bodies radiate heat, just like the Sun does. The rays emanating from a heat source are electromagnetic waves that heat bodies encountered in their path: pieces of furniture and people. In this case, the air does not heat up: the air receives only part of the heat during heat transfer from already heated bodies. Infrared heaters operate on the principle of thermal radiation, which includes two main elements:
- Radiation source . In industrial heaters, these are thin metal filaments that heat up when an electric current passes through them, or lamps (incandescent, halogen, quartz and others);
- Reflector . This is a highly reflective body, the function of which is to reflect infrared rays to disperse heat throughout the apartment or form separate heated zones.
Advice! To check the effect achieved by the reflector, take some food foil and hold it near your hand for a while. You will feel the heat, which is reflected and directed towards you.
Another important part in industrial infrared fireplaces is the controller, which regulates the degree of heating of the emitter. It may not be present in homemade designs. But its installation gives the advantage of being able to set the desired temperature range. The controller automatically causes the device to heat up if the temperature drops below normal, and cool down if the temperature exceeds it.
If you study the infrared ceiling heater, the operating principle will be the same as that of the floor/wall design. The only difference is in the installation method of the IR fireplace. But it depends on him which zones in the room will be more comfortable.
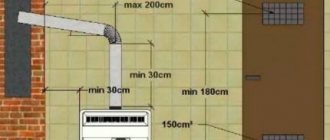
The figure shows the advantage of infrared heaters: heat reaches physical bodies and is absorbed by them, remaining there. Therefore, it may be warmer on the floor than under the ceiling. And when heating a house using the convection method, the floor is always cold: the coating itself does not receive heat. Heat is carried by air, which, when heated, rushes upward, and a new portion of cold air falls down.
Idea N3: Oil heater
Since technical oil has good heat transfer functions, it is widely used in heaters. You can assemble this oil heater yourself at home. To do this, you will need an old heating radiator (cast iron or bimetallic battery, register or other tubular structure), a tubular heating element, the oil itself as a coolant, sealed plugs for placing the heating element.
Rice. 11: Example of using a register control unit
To maximize the safety of the oil device, it can be supplemented with a heating sensor, the open contacts of which are connected to the power circuit.
The manufacturing process of an oil cooler is as follows:
- Take the old radiator, it is important that it is replaced due to the modernization of the system, and not due to a violation of the integrity of the case. It is advisable to verify this yourself by adding liquid or at least through an external inspection.
Rice. 12: Take an old radiator - Prepare two holes in the heater - for the heating element and for filling the oil. The first hole must be equipped with a thread and located in the lower part so that the heated masses rise upward. It is more convenient to place the second hole in the upper part; when putting the heater into operation, it will also have to be sealed. In addition, holes can be made for draining the oil and for the emergency pressure relief valve.
Rice. 13. Prepare two holes - Screw the heating element into the hole on the radiator. When choosing a specific heating element model, it is important to make sure that the thread diameter matches the hole diameter, and that the kit includes oil-resistant rubber gaskets.
Rice. 14: screw the heating element into the bottom hole
Another important point is that the diameter of the heating element must be such that it never touches the walls of the radiator. For sealing, linings, special compounds and tow are used.
- If you left necks for oil drainage and for installing sensors, install the appropriate equipment in them. Seal all holes that will not be used in the future, leaving only the neck for filling the oil.
- Fill the heater with technical oil approximately 85% of the total volume. A margin of 15% is necessary for the free space that the liquid will occupy after heating and thermal expansion. Never fill oil too close. Close the oil filler neck.
Rice. 15: Close the oil filler neck - Ground the heater to a ground loop.
It should be noted that to increase the service life of such a device, the heating element should be selected in accordance with the housing material. Otherwise, due to the large difference in the output voltage of the particles of these metals, destruction of the elements will occur. Also note that the heater will have a decent weight, so it is advisable to ensure it is securely fixed in space or make a structure for ease of movement.
Rice. 16: Wheeled design
Cheap and cheerful
Typically, devices that are heated by electricity are used as an emitter - incandescent filaments or lamps. But the simplest version of the emitter is a heating radiator. This is the same physical body as the Sun. And it can also emit heat. Stand by the radiator and feel the emanating heat - this is radiation. It just spreads in all directions. Why heat the walls if you can direct the rays towards the living space?
Take the foil, smooth it well to improve the reflective effect and stick it on the wall behind the radiators and radiators. As a result, the heat that the walls could receive will be directed in the opposite direction - towards you. This method helps to get up to 20% more heat without any tricks. The only drawback is the ugliness of the reflective screen: it spoils the interior.
Attention! Instead of foil, you can use heat insulators with a reflective screen. A striking example is the material penofol, one or both sides of which are foil-coated.
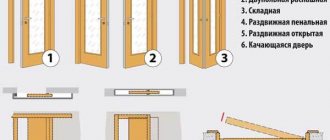
Features of installation of film IR heating
Flexible film heaters can be installed with your own hands without much difficulty. The main thing when transporting and cutting is not to bend the film at an angle of more than 60 degrees. Its cut is made in the places indicated by the manufacturer on the canvas.
As insulation, it is best to place isolon or penofol with an IR-reflecting foil layer under the film. And the thermostat should be installed away from direct sunlight, radiators and drafts.
To achieve maximum effect, the area of the film heater should reach 60–70% of the square footage of the heated room. At the same time, IR film cannot be placed under furniture on the floor and above high cabinets near the ceiling. Such heating will be of no use to people, but local overheating points will appear in the room.
Also, the strips of the infrared flexible electric heater need to be moved 15–20 cm away from the walls. In order to correctly calculate and lay out the film, you need to draw up a room plan in advance with all the required indents and places for placing furniture.
Any finishing material is a screen for infrared radiation. The only question is the degree of its transparency, the weakening of IR rays and the heating of this finish or cladding. Some cladding options allow radiant heat to pass through, while others do not.
Option #1 – on the floor
The infrared IR heater in the floor version is installed on a flat rough base made of concrete, wood boards or plasterboard. It cannot be placed in a concrete screed or a layer of tile adhesive; the polymer film is not designed to withstand the alkaline effects of the cement used.
As a finishing coating, it is permissible to lay on top:
- laminate (without cork backing);
- thin carpet over chipboard or plywood flooring;
- linoleum without a heat-insulating sublayer.
It is not recommended to lay parquet on top of IR film. The wood of the parquet blocks will begin to crack and creak from overheating.
According to SanPiN, the floor in living rooms is allowed to be heated only to +26 0 C. However, if there is severe frost outside the window, the IR floor heating system will have to be turned on at full power in order to achieve comfortable air temperatures in the room.
And in this case, walking on it with bare feet will become uncomfortable. This is the main disadvantage of the floor-mounted version of infrared film heating.
Option #2 – on the ceiling
Infrared film heaters in ceiling design are allowed to be closed:
- eurolining, MDF and gypsum board with a thickness of up to 12 mm;
- stretch ceilings (PVC or fabric);
- suspension systems such as "Armstrong" or "Griglyato".
You can also use plastic panels, but only on the condition that their manufacturer allows their decor to be heated to +50 0 C.
If the IR film heater is mounted together with a suspended ceiling, then the heating film should be laid directly along the frame of the system. It cannot be fixed to the ceiling, as there will be too large an air gap between the PLEN and the final finish.
The old Soviet reflector is in use!
A homemade infrared heater can be made from an old Soviet-made reflector. In addition to this, you will need:
- Nichrome thread;
- Steel rod;
- Fireproof dielectric (ceramic plate is suitable).
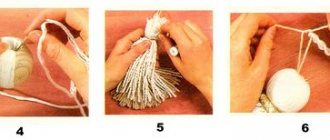
To make an IR fireplace from these things, follow the instructions:
- Remove dirt from the reflector;
- Check the plug, cord and terminals to turn on the coil (they must be intact);
- Measure the length of the spiral that is wound around the reflex cone;
- Cut a steel rod the same length as the spiral;
- Wind a nichrome thread onto the rod so that there are 5 turns for every centimeter;
- Carefully remove the rod from the nichrome winding;
- Place the spiral on a plate (another dielectric) so that the turns do not touch each other;
- Connect the ends of the nichrome spiral to the mains;
- Now the heated spiral will easily fit into the grooves of the cone from the reflector;
- Connect the ends of the spiral to the contacts.
The nichrome filament glows better than the spiral that was in the device before our manipulations. As a result, we get a powerful emitter, the energy of which is reflected from the walls of the reflector and hits opposing bodies, which begin to absorb heat.
Description
Electric infrared heaters become popular when it is already cool outside and central heating has not yet been connected. If you find yourself in a similar situation, you can remove the question using one of two options. The first involves the use of a different type of heating device, while the second takes into account the use of infrared devices.
Similar devices produce heat energy that passes through the air and heats objects. The surfaces themselves begin to warm up, thanks to which the room becomes warm. The heating degree depends on the shape of the surface, the angle of incidence of the rays, and also the materials.
Heat is supplied to the air from the objects themselves, and not from a heating device. Electric infrared heaters work according to a similar rule, which implies the accumulation of heat in the place where it is most needed, namely near furniture, walls and people in the room.
An interesting fact is that the heat that comes from a heating device can be compared with real solar radiation.
Heater glass + aluminum foil
You will need:
- Foil;
- Two glasses of the same size;
- Paraffin candle;
- Sealant;
- A wire with a plug at the end;
- Cotton napkin;
- Boxed;
- Cotton swabs;
- Any device for holding a candle.
Step-by-step instruction:
- Clean the glass with a napkin from paint, dust, grease;
- Light a candle. Place it in a glass, candlestick, or simply drip paraffin onto a flat surface and quickly place the candle on the puddle;
- Smoke the glass on one side by passing it over the fire at the same speed. The soot will lie evenly if the glass is cooled before the procedure. The dark layer will eventually become a conductive element;
- Run cotton swabs around the perimeter of the glass pieces so that you get a frame of clean glass 0.5 centimeters thick;
- Measure the width of the smoked rectangles on the glass with a ruler;
- Cut two rectangles of the same width from foil - these will be electrode strips;
- Take one glass and place it with the smoked side up;
- Apply boxing agent to it and place rectangles of foil on the edges so that they extend beyond the glass;
- Place the second glass on top with the smoked side down and press well so that the structure sticks well;
- Along the perimeter of the “layer cake”, spread sealant at the joints of the glass;
- Check the power of the structure. If it is not higher than 100 W per square meter of room, then the heater can be connected to the network using a wire and plug;
- To connect to the network, use a wooden block with metal plates reinforced at both ends. Solder a plug to one contact. If you install the glass on a block so that the foil coming out from the sides fits tightly to the metal contacts, you get a full-fledged heater.
Attention! To calculate the power of a structure, use a multimeter to measure the resistance of the conductive layer. Since the current strength in the circuit depends on the load, it is better to calculate the power using a more stable parameter - this is the voltage, which in the network is equal to 220 Volts. To do this you will need the formula: N=U*U/R .
N – required power. U – voltage (220V). R – measured resistance. Example: when measuring, we got 24 Ohms. Substitute into the formula: N=220*220/24. We get 2016 watts. This is enough to heat a room with an area of 19-20 square meters.
If your power is more than 100 watts per square meter, then it needs to be reduced by increasing the resistance (we cannot change the network voltage). If the power is very low, then it needs to be increased.
What to do if the power is not suitable?
Now let’s talk about how to make an infrared heater with your own hands of the required power. To do this, you need to know the area of the room you want to heat. For example - 15 meters. Now you need to calculate the maximum permissible power at the rate of 100 watts per meter. Since we have 15 of them, the power will be 15 * 100 = 1500 Watts (it is necessary to count in them, despite the fact that in the passports of electrical appliances it is indicated in kW).
If the voltage is constant (220 Volts), then you can calculate the required resistance. To do this, we derive the resistance from the formula given above: R=U*U/N. Substituting the calculated power and voltage into the formula, we get: R= 220*220/1500=32 Ohms (approximately).
In the example above we had 24 ohms. This means that the resistance needs to be increased. To do this, you need to reduce the width of the smoked strip on the glass. This comes from the formula R=l*p/S . Where l is the length of the conductive layer (a constant value, because we will not cut glass), p is the resistivity (constant), S is the cross-sectional area of the conductive layer, which depends on its width. The wider the layer, the lower the resistance, the narrower it is, the greater it is.
Conclusion! To achieve the required resistance, you need to select it experimentally, making the soot strip narrower or wider, depending on whether you need to increase or decrease the resistance. In this case, each time you will have to disassemble the glass structure.
Option 2 device on candle soot
It should be made by those people who cannot find graphite in their home or do not want to bother with it. The sequence for creating an IR heater with your own hands is as follows:
- Take two pieces of glass. The dimensions of each piece should be the same. These parameters can be as follows: length 5-7 cm, width - 2-3 cm.
- The material is cleaned of any dirt. If necessary, it is washed and then dried. It also needs to be degreased and cooled. You can reduce the temperature of the glass by placing it in the refrigerator.
- A conductive layer is applied to the glass. To do this, light a paraffin candle and place glass over it so that it is covered with a dense layer of soot. It is desirable that this layer be thin. Soot will be a conductive material that contains unburned carbon particles.
- Take a rag and wipe off a few millimeters of soot from all sides of the rectangle.
- Pieces of copper or aluminum foil are placed on the sides of the glass, 3 cm long. One end of the material should be on the soot, the other should protrude a few centimeters beyond the edge of the glass. The pieces of foil will be the terminals to which the ends of the cable will be connected.
- Another glass is placed on top of the smoked glass with pieces of foil. It is treated with steam before installation.
- Each end of the structure is sealed with epoxy resin or covered with a layer of sealant.
- The resistance of the heating element of the future IR heater is measured and its power is calculated. It is the product of resistance and the square of current. The formula is: N = R x I², where R and I are the resistance and current, respectively.
- If the power does not exceed permissible standards (for example, for apartments with old wiring it should not exceed 3 kW), then proceed with installation on a wooden base. If the power is not satisfactory, then the structure is dismantled and recycled. Similar actions must be taken during possible repairs. To change the resistance, you need to change the width of the soot strip. The larger it is, the less resistance. Heating is also reduced.
- A groove must be made in a board longer than the length of the heating element made. Its width should be equal to the width of the glass structure. Depth - 0.5 cm.
- Install the heating element on the base. To do this, it is inserted into the groove.
- A wire with a voltage regulator and a plug is connected to the terminals.
The number of such heating elements can be large. They can be connected either in series or in parallel. The method depends on the person who can also repair his device.
Heater based on laminated plastic
To assemble a homemade infrared fireplace you will need:
- Laminated paper plastic - 2 pieces with an area of 1 square meter;
- Boxed;
- Graphite (you can buy powder or get it from old batteries, from a pencil - but you will have to crush it);
- Copper plates;
- Wood;
- Plug with cord.
If everything is there, start assembling:
- Mix graphite powder with bauxide to form a thick mass with high resistance;
- Place the plastic sheet with the rough surface facing the table;
- Apply bauxide mixed with graphite onto the plastic using zigzag strokes;
- Prepare the second sheet of plastic in the same way;
- Glue both plastic sheets together, pressing them tightly together;
- On opposite sides of the plates, attach copper plates that will act as terminals;
- Build a wooden frame into which you will need to insert the resulting structure;
- Allow the future heater to dry;
- Measure the conductor resistance and calculate the power.
Attention! Here, the calculation of power and resistance is carried out using the same method as in the previous case. Only the resistance will depend not on the width of the conductive layer, but on the graphite content in the box. The more powder, the higher the resistance, and vice versa.
You will have to disassemble and reassemble the structure several times before you experimentally achieve the required power. Only then can you connect the device to the plug and connect it to the network for operation.
Preliminary testing
Nichrome wire (thread) as the main heating element
A preliminary experiment is needed in order to determine the required power of the heater.
Financially, you will not suffer, since the materials are usually used at hand.
Nichrome wire is a semi-finished product made from an alloy of nickel and chromium. It is characterized by high electrical resistance.
The percentage of nickel in this alloy is up to 80%, providing ductility and corrosion resistance.
The presence of chromium in the wire adds increased hardness and resistance to high temperatures.
If the resistance of the nichrome wire is unknown, then it is advisable to install it yourself. To do this, twist a spiral from a piece of wire 1 m long.
Having placed a thermometer inside it, connect the wire to a power source with a transformer.
At the moment when the temperature on the thermometer reaches 40 ° C, it is necessary to record the readings of the ammeter and voltmeter.
They will help determine the conductor resistance.
Also, if the diameter of the wire is known, you can find out its resistance from the calculation table:
Nichrome wire resistance table for heating device
Next, given that a homemade heater will operate from a 220-volt outlet, you need to find out the amount of wire to obtain an alternating current power of 100-120 units. For example, for a 100 Watt heater you will need 24 m of nichrome wire with a diameter of 0.3 mm.
Mini heater made from a shoe polish can
Prepare materials:
- Flat shoe polish box;
- Two conductors;
- Can;
- Graphite powder;
- Sand;
- Plug.
Step-by-step instruction:
- Wash the box;
- Mix sand with graphite powder, taking them in equal quantities;
- Pour the mixture into the box, filling it halfway;
- Cut a circle out of tin;
- Attach a wire to it;
- Place the circle on top of the graphite-sand mixture;
- Add enough sand and graphite until the jar is full;
- Close the jar with a lid to create pressure inside;
- Connect the second wire to the body of the can and connect it to the network using a plug (you can use a car battery).
To regulate the degree of heating, screw the lid of the jar looser or tighter to change the pressure inside. The tighter the jar is twisted, the stronger the heating, and vice versa. But do not allow it to overheat, at which point the jar begins to emit yellow or orange light rays. In this case, the contents inside the can are sintered, causing the efficiency of the heater to decrease significantly. To improve performance after sintering, you need to shake the jar vigorously - then the graphite-sand mixture will again become loose and suitable for work.
Constructions
Amateur craftsmen build heaters that are often very intricate in design, see photo in Fig. Sometimes they are done carefully. But the vast majority of homemade heating devices described in RuNet have one thing in common: the high degree of danger they create, harmoniously combined with a complete discrepancy between the expected technical characteristics and the actual ones. First of all, this relates to reliability, durability and transportability.
homemade heaters
Make a heater for your home. premises or a camping autonomous one for summer cottages, tourism and fishing, the following systems are possible (from left to right in the figure):
- With direct air heating using natural convection - an electric fireplace.
- With forced blowing of the heater - fan heater.
- With indirect air heating, natural convection or forced air flow - oil or water-air heater.
- In the form of a surface emitting thermal (infrared, IR) rays - a thermal panel.
- Fiery autonomous.
The latter differs from a stove, stove or hot water boiler in that most often it does not have a built-in burner/furnace, but uses waste heat from heating and cooking appliances. However, the line here is very blurred: gas heaters with a built-in burner are commercially available and can be made independently. Many of them can be used to cook or reheat food. Here, at the end, a flame heater will also be described, which is not wood-based, not liquid fuel, not gas-based, and certainly not a stove. And the others are considered in descending order of their degree of safety and reliability. Which, nevertheless, with proper execution and in the “worst” samples, fully comply with the requirements for household autonomous heating devices.
Fireplace
Diagram of an electric fireplace with an air heating element and a double convection circuit
You can improve an ordinary electric fireplace, or make your own efficient one based on a purchased heating element, using an additional casing that creates a secondary convection circuit. From a conventional electric fireplace, firstly, the air flows upward in a rather hot but weak stream. It quickly reaches the ceiling and through it warms more of the neighbors' floors, attic or roof than the owner's room. Secondly, the IR coming down from the heating element in the same way warms the neighbors below, the subfloor or basement.
In the design shown in Fig. on the right, downward IR is reflected into the outer casing and heats the air in it. The thrust is further enhanced by the suction of hot air from the inner casing, which is less heated from the outer casing at the narrowing of the latter. As a result, the air from an electric fireplace with a double convection circuit comes out in a wide, moderately heated stream, spreads to the sides without reaching the ceiling, and effectively heats the room.