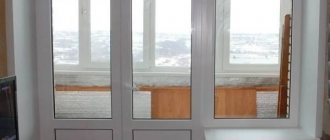
If the old structure wears out or if you want to install a new window with a door, you will need to install a balcony block. This is a simple operation that is accessible to almost anyone with a little experience working with tools. But installing a balcony block with your own hands has specific features that need to be taken into account during work, otherwise you can get an extremely bad result.
If necessary, a person without special training can install a balcony block. To do this, you will need instructions on how to install a balcony block, a set of tools, a physically strong assistant, patience, time and the desire to do everything efficiently.
Preparatory work
Preparing a wall opening for installation of a balcony block begins with dismantling the old structure.
Note! Before removing the old block, it is necessary to clear the window sill and remove the curtain rod and curtains. Furniture located close to the window should be moved away or covered with film to protect it from dust.
Dismantling the old block
Dismantling of a wooden window and door unit is carried out as follows:
- Remove the opening doors and balcony doors from their hinges. The glass is removed from the blind sashes, after removing the glazing beads.
- The window sill is dismantled. The concrete is broken with a hammer, cutting the reinforcing elements with a grinder. A wooden, aluminum or plastic window sill is simply removed from the opening.
- Remove the tides.
- Remove the old frames from the opening. To do this, they can be cut, starting from the bottom, or pryed with a construction cutter.
- The slopes are dismantled and the insulation is removed.
Dismantling an old wooden structure
If you are dismantling old PVC windows and doors, first remove all fasteners and then remove the frames.
Try to perform the work as carefully as possible to maintain the integrity of the opening.
Preparation of window and door openings
According to the current GOST, which regulates the connection of PVC windows to openings, the latter must have a flat surface. The presence of chips, potholes, and other irregularities, the depth of which exceeds 10 mm, is not allowed.
If the walls crumble, they are strengthened with binders. Oily surfaces are degreased. Irregularities are eliminated with the help of plaster, and cracks in brick and block masonry are eliminated with the help of high-rigidity foam insulation or the same plaster.
You can clean the opening from dust and debris using a stiff brush or vacuum cleaner. If installation work is carried out in winter, then snow, frost, and ice are also removed from the working surface.
The walls of the opening must be aligned horizontally and vertically. Their deviation from the axes is acceptable, but not more than 4 mm per 1 m. Accurate measurements can be made with a building level or a laser plane builder. You can also control the equality of the diagonals in the opening.
The process of installing the frame in a clean and leveled opening
Connection of door and window frame
To connect the window and door parts, you must first remove the movable sashes from their hinges.
To do this you should:
- knock out the top hinge rod;
- open the locking mechanism by turning the handle;
- remove the sash from the bottom hinge.
Metal rod under the decorative hinge plug
Then prepare a connecting strip, self-tapping screws and an electric drill with a set of drills.
- Place the tie strip between the door and window frame.
- Place the entire structure “upside down” on a flat surface, making sure that there are no distortions in it.
- From the door side, drill tunnels in the end part of the frame in increments of 30-40 cm.
- Insert the fasteners and tighten them.
- Cover the visible parts of the fasteners with decorative caps.
- Apply sealing tape around the perimeter of the structure.
Profile for connecting balcony door and window
Fixing the sealing tape
If you want to make fastening units from the side of the window, you will have to remove the blind part of the window. To do this, you need to pry the glazing beads with a spatula, remove them, and then expose the glass.
Note! Choose self-tapping screws with a length of 80-90 mm so that when screwed to the end they do not violate the tightness of the window in the balcony block.
Connection diagram of individual parts of the block
Selecting fasteners for a balcony block
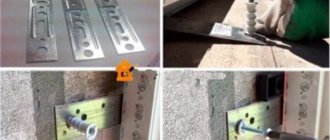
Before installing the balcony block, you need to make markings for the fasteners that will hold it in place. For these purposes, anchor plates or spacer frame dowels are used. What is the difference, what are the advantages of each option?
Anchor metal plates are attached at one end to the outer end of the window and door frame, and at the other to the wall of the opening.
Plate bent to the wall
Some of them (“with ears”) are first inserted into special grooves on the frame and only then screwed with self-tapping screws. Others (without “ears”) are fixed immediately, simply by attaching them to the box.
Fastening anchor plates “with ears”
The main advantage of anchor plates is that to install them you do not need to remove double-glazed windows from the blind parts of the window. This reduces the risk of damage to the PVC structure significantly, which is especially important for inexperienced craftsmen.
But anchor plates cannot always be used. They are unreliable fasteners for large (more than 4 m2) and structures with actively used sashes. They are also not suitable for installing a balcony door. However, many experienced craftsmen skillfully combine plates with spacer dowels, using the former in the upper part of the window-door unit, and the latter in the bottom and sides.
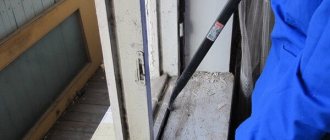
Fastening the balcony block to anchor dowels is the most reliable option. These elements are a set of a bushing and a durable metal bolt. When the bolt is screwed into the bushing, it expands, due to which the frame structure is reliably attracted to the walls of the opening.
However, the use of dowels requires the preliminary removal of even blind sashes, which may lead to a violation of the integrity of the double-glazed windows. If you are not a professional, then you cannot do without an assistant, or even two.
Removing the bead using a spatula
Note! To install the box using dowels, you will need a powerful hammer drill.
Replacement of double-glazed windows in PVC doors
If the windows are damaged or you want to install a more modern and efficient double-glazed window, you should dismantle the old one, which consists of a number of simple manipulations. First, you need to remove the plastic beads that hold the glass in the frame along the entire contact perimeter, for which you use a metal spatula, the edges of which are rounded and cannot harm the glass or plastic frame. With sharp movements, the glazing beads are pryed up and removed from their installation location. The last thing to do is dismantle the top glazing bead of plastic windows. After this, you must carefully remove the glass unit itself, preventing the glass from deforming.
Installation of a new double-glazed window is carried out in the reverse order, however, you should pay attention to the correct placement of the plastic spacers that separate the double-glazed window. They must be positioned to ensure the same distance between the panes. This will eliminate unscheduled structural repairs due to ineffective service, which may be due to improper installation. The plastic beads are fixed using a small rubber hammer.
Fact! Repair or replacement of double-glazed windows must be carried out as cleanly as possible to prevent grains of sand or other construction debris from getting between the window seals and the double-glazed window. After dismantling is completed, the working surface of the door should be cleaned with a vacuum cleaner.
Installation of a balcony block
After you have chosen the method of attaching the PVC structure and made the appropriate markings, you can install the block in the opening. The complexity of this stage lies in aligning the frame box vertically and horizontally, securing it securely, and making an assembly seam.
Aligning and fixing the window-door unit in the opening
The window-door unit is not installed with direct support on the walls of the opening. To form an installation gap and transfer the weight of the PVC structure to the base, it is necessary to use support blocks (wedges). They can be plastic or wooden. The latter are easy to do with your own hands, but they require mandatory impregnation with antiseptics. The optimal length of the block is 110-120 mm.
Wooden mounting wedges
Two plastic mounting wedges form a rectangle, which allows you to securely install the balcony block in the existing opening. If necessary, the elements are shifted relative to each other. Due to the existing projections, they will not move apart. This allows you to orient the frame box in space.
Placing mounting wedges under the frame
Note! Mounting blocks must be placed under each vertical element of the balcony block, including under the impost.
Fastening the frame structure to the wall
According to the current GOST, after fixing the balcony block with temporary wedges, you can begin fastening it using anchor plates or dowels.
Fastening the block using plates
Installation of the frame box on the plates is carried out as follows:
- Mark the places where the plates are attached to the frame. They should deviate from its internal corners by 150-180 mm. The installation step is 600-700 mm. The distance from the impost to the nearest fastener should not be more than 180 mm.
- Mark the places for fixing the plates on the walls of the opening.
- Using a chisel, make recesses in the wall for fasteners. This “recessing” will help subsequently hide the plates under the final finishing of the slopes.
- Fix the fasteners on the frame so that they look towards the room. First, screw the plates in the lower left and right corners, then on the sides of the box, and lastly, in its upper part.
- Place the box in the opening, bend the plates slightly and secure them to the wall with dowels.
Screwing the plate to the PVC frame
Note! While working, check the evenness of the balcony block. During the process of tightening the fasteners, a noticeable distortion may occur.
Dowels are used as follows:
- Marking the balcony block. It is similar to the arrangement of anchor plates.
- The frames are drilled through from the ends at the designated points.
- Install the PVC structure in the opening, align it horizontally and vertically, and mark the walls along the holes already made.
- Fix the balcony block box with dowels.
Fastener seating depth
Diagram of fastening units
Note! After attaching the window and door unit to the wall, the side mounting wedges are usually removed. But the lower ones must be left as a support for the entire structure.
The difference between fastening with dowels and plates
Making an assembly seam
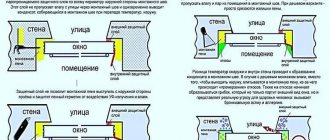
After installing the balcony block in the existing opening, you can proceed to making installation seams. The current GOST 30971-2012 assumes the presence of three main layers:
- central - responsible for heat and sound insulation of windows and balcony doors;
- internal - preventing the penetration of steam to the insulation;
- external - removing steam from the central layer, preventing moisture from penetrating into it from the street.
The general requirements for the installation seam are high quality insulation and the use of environmentally friendly and safe materials. Moreover, all of them must withstand operating temperatures in the range of -10..+40°C.
Central layer of assembly seam:
- Material – polyurethane foam or well-known polyurethane foam. An alternative is polyethylene foam tapes, thermolen, which are not so convenient to use and are used quite rarely.
- Laying - continuous filling of all seams and joints. The presence of delaminations and cracks is acceptable, but within 6 mm. The width of the foam layer is from 15 to 60 mm, the depth is not less than the thickness of the PVC box.
- Do not use polyurethane foam at air temperatures below -10°C.
Foaming the assembly seam
Use a special gun to apply polyurethane foam
Note! While the polyurethane foam is drying (at least 24 hours), the pre-hung window sashes and the balcony door must be closed.
Outer layer of assembly seam:
- Material – sealing tape, sealants.
- The water resistance limit is at least 300 Pa.
- Must be resistant to temperatures ranging from +70°C to -30°C and lower if we are talking about a frost-resistant seam.
Additionally, the outer layer of the assembly seam is protected with special overlays and strips.
The inner layer is an elastic sealant that is laid continuously. It should have greater resistance to vapor permeation than the central layer of the seam.
Can't do it without an assistant
The first thing you need is an assistant, as some jobs simply cannot be done on your own. Balcony blocks consist of fairly heavy glazing and an even heavier frame. An assistant will be needed not only for direct installation, but also for delivering the unit to the apartment.
It is impossible to bring the structure into the apartment in one go, so it must be delivered in parts. You can resort to the help of riggers, but their services today are quite expensive. As a rule, it is 150 rubles for one floor, so to save money you will have to turn to a friend for help.
But as for the installation itself, you simply cannot do without help, since the structure may simply collapse. Moreover, adjusting the balcony block and leveling it also requires outside help.
Window sill installation rules
After installing the main part of the balcony block, you can begin installing additional elements. One of them is the window sill. It protects the assembly seam from external influences and increases the thermal insulation of the room.
Preparing the window sill and opening
You can install a plastic window sill or cover the ledge with ceramic tiles. However, the first option looks more organic in combination with a PVC balcony block.
Installing a plastic window sill will not take much time, but requires some preparatory work. You need:
- Remove all debris remaining after installing the window and door.
- Dust the work surface.
- Level it with cement mortar, if necessary.
- Make a drawing of the future window sill, taking into account the size of the opening and the angle of the slopes.
- Prepare the window sill itself. It needs to be cut according to the drawing. To do this, you can use a jigsaw, wood saw and other cutting tools.
Basic values for cutting a window sill
After completing the preparatory work, you can proceed directly to installation work.
Fastening the window sill in the opening
The window sill must fit tightly to the frame and be aligned along the main axes. To do this, he needs support points. Typically, their function is performed by plastic or dry, antiseptic-treated wooden blocks (blocks).
The supports are laid in increments of 50-60 cm in two rows: the first along the frame, the second along the inner wall.
Plastic supports for window sill
As soon as the first row of supports is installed, you need to take a piece of window sill and attach it to the frame. It should be aligned similarly to a full-fledged product.
Install the second row of supports and again use the building level. The angle between the window sill and the frame can be strictly 90° or be 2-3° greater (to remove moisture).
The final stage of work is foaming the space between the opening wall and the window sill. The first layer of foam is applied along the frame, the PVC product is installed, and the remaining space is filled with polyurethane foam. After a day, it will be possible to cut off the protruding excess.
Installation diagram of a plastic window sill
Air exchange
Since there are no heating devices on the balcony, sufficient heat exchange between the balcony and the adjacent room is required to maintain the temperature within the required limits during the cold season. The solution to this problem depends on the area of the balcony. A built-in exhaust fan with a cover will handle it best. It is easy to install in a wooden window pane. You can also drill holes in several rows in the door, masking them with mesh.
Air valve
It is still not worth drilling a plastic profile. The PVC balcony block has earned popularity due to its tightness, but it is precisely this property that creates problems with air exchange in the room. If you ventilate by opening windows and doors, such an important characteristic as sound insulation is lost. Today, window system manufacturers have completely solved this problem by using air valves. They come in supply and ventilation types. Such a valve, while maintaining all the best properties of PVC products, creates a controlled air flow without creating drafts. Windows get rid of fogging and condensation without losing their visual appeal.
How to make a threshold for a balcony block
When installing a balcony block, you need to take care of adding a threshold. It is needed for a smooth transition between the living room and the balcony.
You can make a threshold with your own hands from plastic or tiles. However, before starting work, it is important to pay attention to the installation height of the door frame. If it is small, then you can install the plastic threshold according to the following scheme:
- Cleaning and leveling the concrete base.
- Installation of support bars (their thickness is chosen based on the desired threshold height).
- Aligning supports horizontally.
- Laying the threshold.
- Foaming the space underneath.
- Waterproof all joints using sealant.
Flat base for the threshold
Installing a plastic threshold on wooden supports
Plastic threshold for the balcony
To cover a concrete base with tiles, you only need to complete the first step. Then you can begin priming the working surface and applying the adhesive.
If the height from the floor to the edge of the door frame is significant, then you can raise the threshold using clinker bricks. In this case you will have to:
- Cleaning, leveling and priming the concrete base.
- Dilution of cement mortar.
- Laying bricks on mortar. Please note: they should not reach the angle of slope with the internal wall of the room 3-4 cm.
- Installation of wooden formwork around the perimeter of the threshold.
- Final filling with mortar.
- Removing formwork.
Laying clinker bricks
The ledge can be tiled or decorated with plastic.
Common Mistakes
- When pre-positioning a new door, immediately begin attaching the side post. Remember to check the other posts on the fastener and the door. First, check the gap size everywhere to a quarter, holding it in a vertical position and level. Between the profile and the quarter, the gap at the top should be uniform and not less than 1 cm. The gaps at the bottom do not need to be equalized, the main thing is that they should be at least 1 cm.
- Completely fasten the door first, and then fasten it, or vice versa. Because of this, the corner of the frame may rest on the quarter. Another unpleasant consequence: the anchors on top, which are already installed, will not allow the structure to be moved if necessary.
- When installing anchors, immediately recess them into the profile up to the head and tighten. Because of this, you will also not be able to move the structure if necessary. And there will be problems with setting the diagonal. This can be solved, but not easily: the anchor is loosened and pulled out using pliers grabbed by the sleeve. But it’s better not to complicate things like that.
Avoid making these mistakes during the following steps.
Finishing window and door slopes
Window and door slopes can be finished with plasterboard, plaster and plastic (sheet material, sandwich panels). Work technologies also vary.
Decorating slopes with plaster
Plastering is one of the most affordable and simplest options for finishing slopes. The plaster has a low price, is easy to apply, forming a smooth coating ready for final painting. However, this material has a low heat saving rate, can crack under the influence of external factors and is susceptible to mold formation. In addition, the process of working with plaster itself is quite dirty.
But if you decide to save your budget, then plaster the slopes as follows:
- Prepare your work surface thoroughly. Eliminate unevenness, degrease and remove dust.
- Check the evenness of the slopes using a building level. The permissible deviation along the axes is 2 mm per 1 m of the finished surface.
- Apply a layer of deep penetration primer.
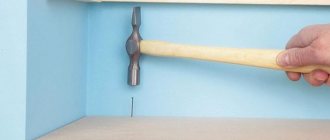
- Attach a reinforcing corner along the edges of the slopes to “stumps” made of mortar or along the edge of the inner wall - a wooden rule (slat).
- Using a spatula, apply the solution to the work surface. This should be done as if throwing it.
- Distribute the solution along the slopes, making movements from bottom to top.
- Make a temperature gap between the frame and the slope in the form of a furrow 3-5 mm wide. Fill it with silicone sealant.
- After the plaster has dried, finish it with grout. To do this, use fine-grained sandpaper.
Distributing the mortar along the wall
When plastering, it is important not only to obtain a smooth surface of the walls, but also to evenly distribute the solution and maintain the slopes. It is for this purpose that a special tool is used - a malka. You can make it yourself from plywood, boards, timber or even leftover PVC panels.
The optimal width of the fry is 130-150 mm, and the length is 80-100 mm greater than the width of the slope. On one side of the tool you need to make a notch that should correspond to the thickness of the window frame. The mortar is pressed against the wall, one end resting it against the frame, and the mortar is leveled. It must be laid 5-6 mm thick.
Notch at the end of the fry
Perforated corner and window frame - beacons for distributing putty using a hammer
Installation of plastic slopes
Plastic slopes are resistant to moisture and mold, easy to maintain, aesthetically pleasing, and affordable. Their main disadvantage is fragility under directed mechanical influence.
The material for covering the opening can be a sandwich panel with insulation or a simple PVC panel. You can install them in two different ways - with or without a starting profile.
In the first case, the work is performed as follows:
- The starting U-profile is screwed along the entire length of the frame with self-tapping screws.
- A wooden batten is installed along the edges of the slopes. At the junction of the top and side elements, a gap of 10 mm should be left. The protruding parts (“spikes”) of the panels will go into it.
- A plastic slope pre-cut to the required size is installed with the end into the starting profile.
- Insulate the slope with mineral wool or polyurethane foam.
- The second end is fixed to the sheathing using “bug” self-tapping screws.
- An F-profile is installed along the edge of the inner wall, fixing it with glue or liquid nails. It is overlapped in the corners and then cut off.
- The junction of the slope and the window structure is insulated with liquid plastic or silicone sealant.
Fastening the starting profile around the perimeter of the frame
The space between the panel and the wall is filled with polyurethane foam
The second option - installing a plastic slope without a starting profile - involves performing similar actions, but with one exception. The PVC panel is inserted with a “spike” directly into the mounting foam, which was used to install the balcony block. To do this, it is cut to a depth of 10 mm. The width of the cut should not exceed 1 mm.
Note! If you use a sandwich panel, you can make the “spike” yourself. To do this, the product is first cut along the edge to ½ thickness. Then an incision is made across. The result is an L-shaped edge of the panel.
Features of working with drywall
The opening for a balcony block is rarely lined with plasterboard.
- Firstly, this is a labor-intensive process that involves working not only with this material, but also with plaster, primer, and glue.
- Secondly, you need to use only moisture-resistant drywall. But even with this, the entire skin will need additional protection from moisture.
- Thirdly, under the influence of external factors, drywall can swell and delaminate.
It is convenient to use gypsum board when you are sheathing internal walls. In this case, working with slopes will look like this:
- A metal UD profile is fastened along the window frame with self-tapping screws.
- A plasterboard blank is inserted into it, starting from the top of the opening.
- The formed cavity is filled with insulation, leaving 10 cm free from the edge.
- An adhesive composition is applied to the edge of the slope and the drywall is pressed against it.
- All joints are additionally coated with glue.
- After it dries, the slopes are puttied.
Adhesive method of fastening plasterboard slopes
Note! To obtain a smooth and durable base for subsequent finishing, you need to apply at least two layers of plaster to the drywall.
Materials
There are no special features here. Wooden balcony blocks are almost never used today, but plastic or aluminum windows are just the thing today. The choice should be made based on the weather conditions in your region. Accordingly, if the weather is cold for a long time, then you should choose an insulated balcony.
Today, modern wood is gaining popularity. The price for such a design is quite high, but if the room is decorated with wood, then such a block will fit perfectly into the overall interior. Therefore, you need to think, maybe just restore the old wood?
Video master classes on the topic
Detailed videos that will help even a beginner install a balcony block with a window sill and slopes on their own:
Tuning the opening and installing the BB:
Independent installation of a window and door unit on a balcony is a labor-intensive process that requires a lot of time and financial costs. Directly installation is preceded by a large amount of preparatory work. Both are based on certain theoretical knowledge and practical experience. If you are not willing to risk a PVC structure by installing it yourself, consider hiring a professional.
YOU MAY ALSO BE INTERESTED
Preparation for installation
The preparatory stage before replacing the loggia box includes clearing the space. It is necessary to get rid of old things, pieces of furniture, accessories that interfere with repair work. The floor covering and fixed pieces of furniture are covered with a protective film to prevent the ingress of debris and contamination.
The installation of a loggia box cannot be carried out by one person. An assistant will be needed for this. In addition to preparing working tools, the new unit is inspected for scratches and deformations that occurred during transportation. Visible defects in the purchased unit will need to be repaired.
Ventilation diagram
In order to maintain a constant temperature on the balcony during the winter months, the block design must have good heat exchange with the main room.
In some cases, a special exhaust fan is used to simplify this task. The diameter of this mechanism should be from 10 to 15 centimeters. And its power should average 90 l/hour.
If you decide to keep the old wooden block, then the glazing will need to be taken to a glazier so that he can make round holes of the required size. You can independently drill several holes 2-3 centimeters in size from the bottom of the doors.
About 10 such holes are needed. You can cover them with decorative wooden mesh. It is also recommended to make such holes in plastic doors, but the holes in this case do not look very attractive.
Therefore, it is recommended to make a groove of an average of 50 centimeters and install a special damper that can be easily adjusted.
Methods for securing the frame
Before installing a plastic window with your own hands, an important point is the choice of the fastening method that will be used in the future. The window profile can be fixed using anchors or mounting plates. Both options have their own strengths and weaknesses, which is why before making a final preference you need to not only familiarize yourself with them in more detail, but also take into account some of the features of the room.
Initially, you need to pay attention to the material the wall is made of. If you have to install a window in a brick or panel house, then there are almost no cardinal advantages or disadvantages of using one or another type of fastening
When there is a need to install in a building made of foam blocks or aerated concrete, the more preferable option is to secure it using mounting plates.
Features of installation using anchor bolts
Anchors as fasteners are mainly used when installing large-sized window structures, as well as those that have enormous weight. With this method of fixation, the window stably resists many shock loads, which arise, for example, during the operation of windows with sashes that can be opened in two different positions.
In addition, anchor bolts passing through the frame provide the opportunity to perform more precise adjustment of the verticals and horizontals of the installed window structure. If all rules are followed, such a mount is more durable, ensuring the absence of vibrations that can occur during strong gusts of wind. Another positive side is the minimal risk of sagging of the installed window structure during further operation.
A significant drawback when using them is that due to through drilling, there is a huge probability of depressurization of the chambers of the new window. Given this, an imbalance in the temperature inside them may occur. The second disadvantage of fixing the frame with anchors is the need to maintain extreme accuracy and avoid even minor defects when making holes in the profile, since otherwise, as a result of incorrect drilling, gaps may form, incomplete closure of window sashes and other negative consequences.
Features of fixing plastic windows using mounting plates
This method is simpler, thanks to which even a person who is faced with such a task for the first time can use it without difficulty. When fixing a plastic window using mounting plates, you can certainly avoid depressurization of double-glazed windows, and also save a significant amount of your time.
Mounting plates are a suitable option for window structures with fixed double-glazed windows and small dimensions. Ultimately, the appearance of the window will not deteriorate, since in the future the slopes will be finished, which will completely disguise their presence.
There is also a drawback and lies in the possibility of some trembling, which can arise due to an insufficiently tight fit of the fastened components to each other, since the mounting plates are fixed to the profile, and not as when using anchors, when through holes are made in it.
Note! To attach mounting plates in an opening made of concrete or brick, it is recommended to make small recesses, thereby avoiding the need to apply an extra leveling layer before creating internal slopes.
Very often, during installation, specialists combine both types of fasteners. Fixation using anchors is carried out into the walls through the side elements of the frame and the window profile, and from above, only mounting plates are used for fastening. If the installation of a plastic window is carried out in a wooden bathhouse, then the second type of fastenings is used in rare cases, since they may become loose. In some situations, galvanized screws are used instead of anchors.
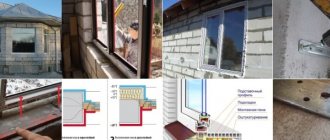
Stage 1. Measurements
In most apartments there are openings without a quarter.
If there is no quarter, then the frame will be installed on anchors, and the foam will be covered with special covers. Determining the presence of a quarter is quite simple: if the internal and external widths of the frame are different, then there is still a quarter.
How to measure windows correctly
- First, the width of the opening is determined (the distance between the slopes). It is recommended to remove the plaster for a more accurate result.
- Next, the height is measured (the distance between the slope above and the window sill).
To determine the width of the window, two installation gaps are subtracted from the width of the opening. To determine the height, the same two gaps plus the height of the profile for the stand are subtracted from the height of the opening.
Accurate measurements of the opening guarantee the ideal combination of aesthetic perception and ease of use of a plastic window
The symmetry and straightness of the opening are checked, for which a mounting level and plumb line are used. All defects and irregularities must be indicated in the drawing.
To determine the width of the drainage, add 5 cm to the existing drainage for bending. Also, the width of the insulation and cladding is taken into account (subject to subsequent finishing of the facade).
Window measurements
The dimensions of the window sill are determined as follows: the width of the opening is added to the size of the overhang, and the width of the frame is subtracted from the resulting figure. Regarding the offset, it should cover the heating radiator by a third.
Vapor permeable sealing tape
PSUL provides self-ventilation of the seam between the frame and the opening.
Due to its porous structure, polyurethane foam allows not only air to pass through, but also moisture, which can lead to the accumulation of moisture on the surface of the slopes and their dampening. The use of PSUL allows you to avoid these troubles. Ventilation of the gap between the opening and the frame is ensured by PSUL
The tape for installing windows is porous polyurethane foam treated with a special compound. One side of the PSUL has an adhesive layer. Delivery to the installation site is carried out in rolled form. The material must be unrolled immediately before installation, otherwise it will lose its properties.
PSUL is glued to the window structure, having previously removed the protective coating from the adhesive layer. This tape is sealing and self-expanding, that is, after the tape is impregnated with oxygen, its linear dimensions increase. As a result, the expanding tape completely covers the seam.
It is important to take into account that for high-quality overlap of the assembly seam it is necessary to use a PSUL of the appropriate width. Increasing in size, the tape acquires its vapor barrier properties and ensures the removal of moisture from the installation seam, and also protects it from precipitation
Installing a vapor barrier tape is a prerequisite when installing windows
Self-expanding tape is produced in a compressed state. It seals the inner seam against moisture penetration. This protects the slopes and the installation seam from mold. Vapor barrier for PVC windows is a mandatory type of work.
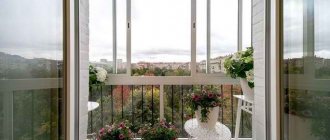
Frameless glazing
With frameless glazing, there are no vertical elements in the design
Such frames allow the sun's rays to freely enter the balcony, which is important for the shadow side. Features of frameless glazing:
- special tempered glass (5-10 mm thick) is used;
- profiles are made of aluminum;
- the glass moves thanks to bearings with wheels;
- there are overlays;
- it is necessary to install the casing and ebb;
- it is necessary to install clamps;
- there must be locks on the handles;
- it is necessary to use acrylic or rubber seals;
- the sashes are fixed with tape.
Installation of the frameless structure is carried out in strict sequence:
- firmly fix the upper ebb;
- an aluminum profile with bearings is attached to it;
- install the upper silicone seal;
- glass is installed, they are connected in parallel using a seal;
- fix the lower part of the ebb;
- The gaps formed during the work (between the glass and the wall) are sealed with sealant.
During work, materials such as nails and screws are not used. A special glue is used as a connector for glass sheets.