Plastic windows have long been part of the life of an ordinary person. They have replaced wooden windows everywhere because they have high strength properties, are durable, do not lose their appearance, and are easy to use. Plastic windows are warmer, which is due to the use of modern configurations with energy-saving properties.
Despite all the advantages of translucent products, few people know about their features. We are talking about the ability to adjust plastic windows for winter and summer periods of operation. In fact, this is an important factor, since proper adjustment for winter can improve energy-saving properties. Adjustment for summer time determines the possibility of ventilation, which increases the level of quality of living in a house, apartment or country house.
To carry out adjustment work, it is not at all necessary to contact specialists. It is enough to know the modes of installed plastic windows, have a small amount of tools, and the work can be done with your own hands. The transition to winter and summer mode will not take much time.
Seasonal Maintenance
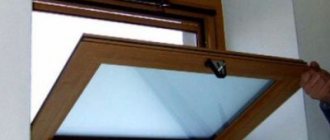
A plastic window is, first of all, a mechanism that can open the sash in different positions. In this regard, due to frequent use, due to the large weight of the sash, as well as depending on other factors, the mechanisms may become loose, resulting in drafts and discomfort. But even the appearance of strong drafts is not a reason to buy new windows, dismantle them and pay for installation.
The first thing to do is to pay attention to the translation of the locking mechanisms. This will allow you to achieve a greater density of pressing the sash to the frame, which will eliminate drafts, make your home warmer, and ultimately save on utilities.
Leak test
Before adjusting the mechanisms for the winter, it is necessary to determine the place where we feel the highest level of draft. To do this, it is necessary to determine the pressing density, which can be done using an A4 sheet.
Let's do this. You need to open the window, then place a sheet under the sash, close the sash and try to pull the sheet towards you. If the sheet simply pulls out, it means that the sash is not pressed tightly. This mode of plastic windows is suitable for the summer period of operation, but for the winter it is not enough.
Normal pressing is considered to be when the sheet is pulled out with difficulty. If the sash closes with difficulty, the handle turns with great effort, then the mechanisms are overtightened, as evidenced by a torn sheet. It is necessary to loosen the pressure.
If you don’t have an A4 sheet of paper at hand, you can check for a draft with a lighter or use a match. It is necessary to light it and hold an open flame around the sash. The draft can be felt to the touch. In this place there will be a cold window sill, cold slopes, and you will also feel general discomfort when standing at the window. During severe frost, if the window sill covers the radiator by more than half, both condensation and ice may form on the window sill itself and on the glass.
Instructions for setting up PVC
A video will serve as a supplement to the instructions on how to independently adjust the mode of plastic windows in this article.
An important rule for long-term operation of windows is preventive maintenance and correct periodic adjustment of the mechanisms. Once or twice a year it is necessary to clean and lubricate the hinges, clamping and locking mechanisms and the handle. To do this, you can use special or machine oil, which is applied using an oil can or brush.
Having lubricated all the rubbing and moving parts, open/close the sash several times and turn it on its hinges.
If the windows face the roadway, where there is a very active flow of dust and fumes, the mechanisms require more careful maintenance. As the rubbing mechanisms wear out and begin to creak, the seals age, and the tightness deteriorates accordingly.
Special products are produced for lubricating rubber seals; they are produced in bottles with convenient nozzles. Products in cans with a spray function will help lubricants penetrate into the most inaccessible places of window mechanisms.
The best option is machine oil, you can use any analogue or modern product from a spray can.
Following certain rules and regular proper care will help to avoid problems and keep your home warm and cozy.
Adjusting plastic windows winter-summer
If you just had plastic windows installed yesterday, then there is a high probability that the installers left the locking mechanisms in the neutral position. Therefore, in winter a draft will be inevitable, which will require us to additionally prepare plastic windows for winter. Let's further clarify the main aspects that need to be taken into account before starting the work.
What is it for
The transition to summer is mandatory for the following reasons:
- It is necessary to release the pressure on the sealing rubber. If the sash is constantly pressed to the maximum, the elastic will be compressed more strongly. Over time, the elasticity of the material will weaken, requiring replacement. The rubber seal costs little, but it is problematic to select it for a certain window configuration. If it is not replaced, a draft is inevitable even when the mechanisms are adjusted for winter operation.
- Ventilation is necessary. The formation of microscopic cracks will have a beneficial effect on the level of comfort in a house or apartment in the summer. That is why the sash is weakened in the summer, creating microscopic ventilation to improve the microclimate. Daily winter ventilation of plastic windows indoors is also mandatory, but this must be done under the control of the owners.
Adjustment depending on brand
Manufacturers of double-glazed windows complete their products with different types of fittings from different brands, the adjustment of which may have some distinctive features:
- "Maso." The trunnions of this brand are quite large and oval-shaped, which allows adjustment with ordinary pliers or a wrench.
- "Torx". Produces the most reliable and durable locking fittings. Adjustment is carried out using a hex wrench or slotted screwdriver.
- "Roto". The locking mechanisms of this company have round heads. To turn them you need a special key of the appropriate shape.
How to translate?
So, we know that the trunnion is responsible for adjusting the winter position and the summer position. To move the glass unit to the desired position, you need to open the sash and pay attention to the end part. The trunnions are located along the entire perimeter of the sash. It is necessary to pay attention to the notch that is located on the eccentric. If the notch is located up or down, then the weld is in a neutral position. That is, it is proportionally placed relative to the street and the house. This is an installation position that should be changed depending on the season.
Why regulate?
Different modes are needed for one simple reason - the change of seasons. Accordingly, there is a periodic drop or rise in temperature. The ability to close windows more tightly (or, conversely, less tightly) increases the access of fresh air into the room in the summer and reduces the outflow of heat outside in the winter.
If the window is constantly used in “winter” mode, this will lead to rapid wear of the seal due to the constantly high clamping pressure on it. If you leave the summer mode for the cold period, then there will be drafts and significant heat loss in the room. As a rule, during installation, windows are set in a neutral mode (spring/autumn), and when the season changes (that is, 2 times a year), it is recommended to make the appropriate adjustments.
Self-adjustment of plastic windows winter-summer
If transfer to summer is intended, then it is necessary to turn the eccentric so that the notch “looks” towards the street. In this case, the pressure will be minimal.
Let's check it out. You can easily verify this by closing the sash together with the A4 sheet. If we pull it, we will see how easily it will pull out from under the pressure point. This option is suitable for summer mode, as it will provide the necessary microclimate.
In the case when it is necessary to switch the window sashes to winter mode, it is necessary to turn the eccentric using a hex key so that the notch is located towards the house. This way we can ensure maximum compression, which can be verified using an A4 sheet. You should place it under the sash and pull it out in the closed position of the window. If the force is significant and the sheet comes out with deformation, it means the sash is tightly closed.
Winter and summer mode
Most often, plastic windows need to be adjusted for the new season: in winter, complete tightness is desirable, and in summer, you can let in a little fresh air. This is achieved by adjusting the sash pressure density. It's easy to do it yourself. Once you figure it out, you’ll be surprised how simple everything is...
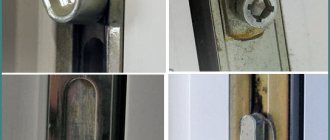
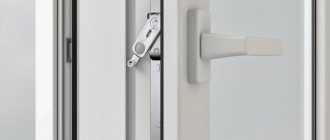
The window sash is pressed to the frame using pins. These are movable metal protrusions on the side surface of the sash. When the handle is turned, they move behind the mating metal plates mounted on the frame. In order to be able to adjust the tightness of the fit of the sash and frame, they have an eccentric - either they themselves are made of an oval shape, or in the center of the round protrusion there is an adjustment with an offset center. By changing the position of the trunnions (see photo), you change the degree of pressure, that is, eliminate the draft from under the sash.
Adjusting the pressure of the plastic window sash to the frame
As you can see, the shapes of the locking protrusions can be different. Various tools can be used to adjust them. If your window has eccentrics like those in the picture on the left - oval-shaped protrusions - change their position using pliers: clamp it and turn it in the desired direction.
If the locking tab is round, as in the picture on the left, it can be slotted for a screwdriver or hex key. After examining them, you will easily understand which tool you need: a regular screwdriver or a No. 4 hexagon. Insert a key or screwdriver into the slot and also turn it to the desired position.
Place all the protrusions in the same position. Please note that they are not only on one side of the sash - the outer one, but also on the inner side (at least one, but there is one), and can also be at the top and bottom. Set all the existing locking lugs in the same position, otherwise the frame will warp and there will be blowing from under it.
Turn the eccentric using pliers or a hex wrench.
When adjusting the fittings of plastic windows, remember that weak pressure corresponds to the summer mode of closing plastic windows, standard or strong - to the winter mode. If you carry out maintenance work in winter, first set it to the standard position and check if there is airflow. It is not recommended to immediately pinch the rubber bands on new PVC windows. In this position, the rubber seal installed around the perimeter is strongly pressed. Because of this, over time it loses elasticity. A normal seal has a 15-year warranty, but still... If the pressure is immediately set to maximum, the rubber will deteriorate faster. As a result, once again setting the winter position on the plastic windows, you will find that it is still blowing from under the sash, and the rubber is all cracked. This means it's time to change the seal. This is also not very difficult, but it takes more time, and you still need to buy tires.
So: the winter and summer positions of plastic windows are set by changing the position of the locking lugs - trunnions. Everything is explained in detail in the video below. After viewing, adjusting plastic windows yourself will finally cease to be a problem.
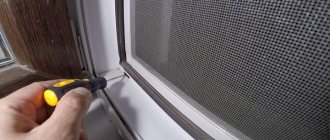
Read how to install a mosquito net on a window here.
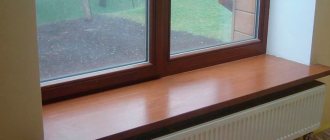
Setting the vertical position of the sash
A situation arises when the sash sags. This is inevitable over time, which can result in spontaneous closure of the sash, as well as a violation of the tightness of the press.
To avoid this and adjust the position vertically, you need to remove the decorative trim on the bottom right, on the bottom hinge. Here the trim consists of two parts, but we are only removing the top part. It is necessary to switch the sash to ventilation mode, opening it completely from above. Preparing installed plastic windows for winter is done only in this position, since in a fully closed state we can damage the mechanisms and the seal itself.
Let's do this. Smoothly turn the main screw of the lower hinge to the left or right (depending on the situation). If you have somewhere the sash “rubs” against the strike plate or the body of the plastic frame, then when turning it one turn, check whether this is enough. Smooth adjustment will allow you to tighten the plastic window in the desired direction.
What window problems can you fix yourself?
Most often you may encounter the following types of malfunctions, which you can easily eliminate on your own:
- When closing, the sash touches the frame from the side or bottom
- The sash does not fit tightly enough to the frame
- Wear of striker plates
- The handle is blocked when the sash is open in the “closed” mode, the window does not close
- The sash is closed, but the window does not close, the handle does not turn
- The handle is broken
- The handle is very difficult to turn
For repairs we may need the following tool:
- Pliers
- Hexagon (4 mm)
- Screwdrivers (phillips and flathead)
- Set of "stars"
Horizontal adjustment
The reasons for horizontal adjustments are still the same. This is a violation of the tightness of the press, as well as sagging of the sash after a while, which leads to spontaneous opening or closing during use.
The sash can be adjusted horizontally in two positions. This is above and below. To adjust from below, you need to remove the second pad. It should be noted that with plastered slopes it is quite difficult to adjust the screw on the right, so you can adjust plastic windows for the winter with your own hands with the sash open at 90 degrees relative to the frame. This will also be problematic, but you can always turn it a couple of turns, which will pull the bottom of the frame towards the right or left slope, respectively. When working, you should use a level to establish the normal position of the sash relative to the plane.
We regulate correctly. As for the upper adjustment, it is often in this junction area that a draft occurs. You can adjust the sash from above by opening it 90 degrees relative to the frame and adjusting the screw to the left or right, depending on the situation. You should also use a level to find the normal position. There is no need to tighten it, because otherwise the ventilation mode will not work.
What tools are needed to tighten the sashes?
To adjust the hinge mechanism of a window structure, you need a set of simple tools that every home craftsman should have:
Chisels with a sharp edge or a construction knife for convenient dismantling of the plastic cover without damaging it.- Pliers, if necessary, to grip decorative trims in case of problems with their removal.
- A screwdriver with a set of bits, if complex adjustments are impossible without dismantling the sash, or minor repairs to the fittings are required.
- A slotted or Phillips-head screwdriver for turning the adjustment screws.
- An L-shaped internal hex key, or an asterisk, if there is a corresponding head on the adjusting screw.
- Oil can for lubricating all fittings after adjustment is completed.
- When straightening skew or sagging, you may need a laser or bubble level.
Advice. When choosing a tool, you should make sure that the tips of the keys, screwdrivers and adjusting screw heads are compatible. Otherwise, there is a risk of damage to both metal and adjacent PVC parts.
Changing the degree of sash pressure
We found out that in order to adjust the degree of pressing of the sash, it is necessary to correctly position the eccentric relative to the house. That is, if it is directed towards the street, it means that we have switched to the summer mode of plastic windows; if inside the house, then to the winter mode. But there are situations when adjusting the eccentric is no longer possible. In this case, you will have to replace the rubber itself. The sealing rubber has a seating configuration that determines the depth of the seat, its shape, and other criteria. This should be taken into account and the rubber band should be selected individually for each window. In addition, in order not to change the rubber bands often, you need to take care of them by lubricating them with a special compound, which you can buy at a window factory.
You can also adjust the degree of pressure by replacing the strike plate. The strike plate is fixed, and it is selected individually for the window project, in increments of up to 0.5 mm. In order to replace it, you need to unscrew 1 self-tapping screw that presses the “retainer” to the frame, come to the factory with the product and buy several strikers with different pitches for testing. These are inexpensive design elements that you can always return if they are not needed.
Setting the winter/summer mode in eraser windows can be done using an eccentric. That is, even if you take the striker a little more, you can always loosen the eccentric, which will make the sash turning handle soft, and the ventilation or pressing mode necessary for operation. This will help adjust the ventilation of plastic windows for summer and winter.
The plastic window does not close
Sometimes the geometry of the window opening changes so much that even moving the sash to the maximum, we do not get the desired result: the plastic window does not close. What to do in this case? If there is an adjustment on the mating part, as in options a and b in the photo, try to get by with a little damage - tighten it further here. The principle is the same: insert the hex key and rotate it clockwise, pushing it to the maximum.
If a few millimeters are missing not in depth, but sideways, then you will have to install a lining under the mating part. They are cut from a piece of white plastic. The maximum thickness is 3-4 mm. First, unscrew the screws and remove the stops. Two gaskets are cut out: one is installed from below, the second from the side. As a result, the stop moves 3 mm deeper into the sash.
Types of mating parts on the frame
They are first installed on the desired place of the lining, on them there is a stop, which is screwed with a self-tapping screw. Protruding pieces of plastic are cut off with a sharp knife. Check whether the window closes or not.
If this does not help, there is another way: move the sash frame. It is quite flexible and can be moved about 5mm. The procedure is as follows:
- On the side that needs to be moved, the glazing bead (only one) is removed.
- Between the double-glazed window and the frame, just below the place where we will move it away, a plastic or wooden (not metal) smooth and narrow object is inserted. A flat spatula or ruler works best.
What to do if the plastic window does not close? How to adjust - Press the frame, insert a plastic strip that will bend it.
- Take out the ruler or spatula.
- Reinstall the glazing bead.
If you look closely, you can see that the frame is slightly curved. The main thing is that the window now closes. In 99% of cases this is enough. If you are unlucky and all these tricks do not produce results, you need to remove the slopes and also bend the frame.
You can watch all the steps described above in the video.
Read how to make slopes on plastic windows with your own hands here.
Adjusting the top corner fit
As we said earlier, the upper part of the corner is most susceptible to drafts. This is what installers usually do not regulate due to negligence, since it takes more time.
To get to the adjusting screw, you need to open the sash so that it opens in two positions at the same time. That is, the sash should open at an angle of 90 degrees and unlock the ventilation mode. It is best to perform these steps with a helper to support the frame while you adjust the eccentric.
To open the sash in two positions at once, you need to press a special lock on the end of the sash, then turn the handle up and pull the plastic sash towards you. In this position, access to the mechanism will be open. Here you should also use the hex key that was previously used to adjust the eccentrics. Accordingly, by turning the eccentric to the left or right, you can achieve a level of increasing the pressure of the upper corner.
Over time, adjustment of the fittings, including the upper pressure angle eccentric, will be necessary. This is due to the fact that the mechanisms become loose and need to be restored to their original condition. Let us remind you that immediately after installation, installers are required to adjust the windows to their normal position. That is why, after installation, they seem ideal to us, but after a while, the opinion about plastic windows may change, since a draft and other nuances will appear. All this is not a problem, because you can adjust the mechanisms of plastic windows for the winter without involving specialists.
You can also contact the company that installed your windows. For example, rehau windows always have a warranty, so within the prescribed period you can even perform the adjustment for free if you can justify sagging or other defects with reason.
Setting up loops
Adjusting the hinges, as well as cleaning and lubricating the mechanism, will help eliminate drafts and disengagement of the upper hinge. This procedure will require basic knowledge and a set of tools: 4 hex wrench, wide chisel.
The winter and summer positions of plastic windows are set by changing the position of the locking lugs - trunnions.
Horizontally
If the window sash in the lower or middle part touches the frame, it means that the sash has sagged. You can tighten it by lifting the vertical or one of the horizontal adjusters.
At the bottom of the sang there is an adjustment hole for a hex key (sometimes for an asterisk).
Horizontal adjustment is carried out due to the upper and lower hinges, the design of which has special hexagonal holes. The setting is made with the window open. When the hexagon is rotated clockwise, the sash is attracted to the hinge, and the opposite lower corner rises. When adjusted counterclockwise, the sash moves away from the hinge, the opposite upper corner lowers. The adjustment of the lower hinge occurs both when the window is open and closed from the outside. It is similar to the top setting.
Adjusting the bottom hinge of a plastic window or door.
These methods will help eliminate bevels and shifts. The adjustment step corresponds to 2 mm.
Vertically
Vertical adjustment can be done using the bottom hinge. To do this, you must use the adjusting hexagon located under the lower hinge cap. When the key is rotated clockwise, the sash will be raised, and counterclockwise, the sash will be lowered. The adjustment step is 2 mm.
Once the result is achieved, stop.
What to do if the adjustments don't work
Let's assume that you have completed all the necessary steps, adjusted the eccentrics, replaced the strikers, adjusted the angles, and so on. But this did not lead to positive actions and a draft still occurs, the windows freeze, condensation forms, which “flows” along the window sill onto the non-moisture resistant laminate. This may be due to the following problems:
- Poor quality windows. This happens when the assembly is carried out in violation of technology. Defective windows can be affected by poor-quality installation. It is necessary to check that the windows are level, and if this is not the case, you must contact the manufacturer for warranty. In the case of rehau, the percentage of low-quality assemblies is minimal.
- The joints between the window sill and the window are not airtight. If there are any gaps near the window sill and frame, it is necessary to use a sealant that will close the cold bridges and after sealing the house will become much warmer. Manufacturers of plastic windows recommend insulating slopes using plastic panels. The space “behind the panels” also needs to be foamed, which makes the space in the house much warmer.
- Polyurethane foam is not protected from the outside. If windows are installed without PSU tape, the polyurethane foam may collapse after a while. It can be pecked out by birds or destroyed by insects, which will lead to the formation of drafts in the house. Therefore, it is necessary to protect the foam, for example by painting it, so that it does not deteriorate under the influence of the sun.
- The rubber seal is worn out. This can happen due to poor quality material or improper use. Firstly, at least once a quarter you need to wipe off dust from the rubber band. Secondly, it is necessary to lubricate the sealing rubber with a special compound. Thirdly, it should be changed after 5 years of operation. If the windows were installed in a house without heating, and you moved in several years after installation, the rubber may have dried out, which will lead to a leak.
- External and internal waterproofing of windows is not provided. As for internal waterproofing, it is only suitable for plastic slopes. It is not used for plaster. External waterproofing is glued to the clover. In the future, the external waterproofing is covered with low tide. It is recommended to additionally waterproof the junction of the frame to the top of the opening, since liquid can accumulate here if there is no facing material for the facade of the house.
Adjusting and replacing handles
During the operation of PVC windows, users encounter problems when turning the handles. If the defect is not corrected in time, the structure will fail.
To prevent such problems, moving mechanisms should be regularly lubricated and cleaned of dirt. It is important to remove any dust and dirt, wipe off moisture and treat moving parts with clean oils that do not contain alkalis or acids. The best option is machine oil or a special product for window fittings.
After completing this treatment, you need to try again to open and close the sash or turn its hinges. All elements must move quickly and steadily.
If the situation does not improve, the blocker may have shifted due to shrinkage of the building and disruption of the window geometry. Such a mechanism must fit freely into the mating part and press against the frame. Otherwise, the handle will not turn normally.
To change the element, you need to get to the fasteners that are hidden under the decorative trim. There is a thin lid that needs to be pulled up with your nails and turned in the desired direction. Having gained access to two bolts, all that remains is to unscrew them and remove the handle. New fittings are installed in its place.
Mode Density Adjustment
To regulate the pressure of the sash to the base of the window, find the eccentrics that are located in different parts of the sash. Then insert the key into the socket and twist it either to the right to tighten the pressure, or to the left to loosen it.
To understand how tightly the mechanism is pressed, use the above figure. The shift during adjustment will be less than with other types of adjustments - from 1 to 2 mm.
Attention! The easiest, and actually free way to check whether the seal clamp is working correctly. To do this, you only need one match or candle - light it and bring it to the window - see if the flame deviates. If nothing happens, it means the wind is not passing.
Errors during adjustment
You should not put a newly installed double-glazed window into the “winter” position. Sudden pressure on a new rubber seal can cause it to become irreversibly deformed; once the load is released, it will not return to its original shape.
Uneven pressure. After all the work has been completed, you need to check the degree of fit of the window around the entire perimeter using the same sheet of paper or visually. Uneven load in different areas will also lead to deformation of the gasket and the appearance of drafts.
With the onset of summer, it is necessary to loosen the seal, since all materials expand at higher temperatures, and, accordingly, the pressure between the parts of the glass unit increases.
As you can see, adjusting the seasonal position of the window does not present any difficulties. Any person without preparation can cope with the task. You will need the simplest tools that are found in any home. Changing modes allows you to provide the most comfortable microclimate in the room and reduce the degree of wear of the seal and fasteners, thus significantly extending the service life of window structures.
In addition to the described adjustments to the position of the window, do not forget about the basic rules of care and operation: lubricate the hinges with machine oil, the seal with special silicone grease, do not load the open sashes, and turn the handle all the way when opening. This will help prevent major damage to the fittings and the entire structure.
Useful video on caring for fittings:
Is there a difference with adjusting PVC balcony doors?
The principle of operation of the fittings for a metal-plastic door leading to the balcony is the same as for a PVC window. Therefore, the adjustments are almost identical:
- Horizontal movement of the door to the right or left is carried out by tightening the adjusting screw located in each hinge under the decorative trim. If the door leaf clings to the doorway along its entire length from the handle side, you need to tighten the screw 1-2 turns clockwise in each hinge (top, middle, bottom). If the door at the corner farthest from the hinges catches the threshold, the screws are adjusted at the top and in the middle;
- Vertical adjustment changes the position of the door in relation to the opening in height. To do this, tighten the vertical adjusting screw in the lower loop. Turning the furniture key counterclockwise moves the door down, clockwise moves it up. Unlike the window, you need a “furniture key” with a diameter of 5 mm. After lifting the door two full turns, it is necessary to lift all the strikers on the sides of the door frame (you need a “furniture key” with a diameter of 2.5 mm). After this, you will have to lift the main and additional locking bars;
- Front adjustment is responsible for the force of pressing the door against the door frame. For these purposes, the trunnions are rotated, as in a plastic window. However, there are also differences. In some types of fittings, the clamping force is changed by the strike plate - for this, an adjustable screw with a hexagon head is placed under it (option “A” in the photo “Types of strike plates”).
Types of strikers.
Lubrication of PVC window mechanisms
Every self-respecting manufacturer of plastic windows offers its own lubricants. At the same time, there are separate lubricants for the mechanical part, and different ones for the rubber seals. They are not always available, so any silicone-based lubricants will do. Do not use water-based lubricants or those containing aggressive substances.
The best option for the physical state of the lubricant is a spray. It easily penetrates into any place under pressure.
Lubrication points:
- loops;
- pen;
- trunnions and strikers;
- scissors.
Lubricating the fittings is easy. There are technological holes in the end sides of the sash element, where the window closing mechanism is located. Lubricant is added to them. Moving and rotating elements located on top are lubricated in the usual way - on top of the contact planes.