Often, some time after installing windows, customers realize that a blind sash interferes with the full operation of the structure, and to correct the situation, it is necessary to install an active one in its place. However, so far only a small percentage of window owners in need of such replacement are carrying out modernization activities. This is due to lack of awareness - many consider such a procedure impossible, and dreams of comfort remain dreams. Meanwhile, there are technologies that make it possible to adapt windows to current needs and improve their performance characteristics at a reasonable cost.
Frame making
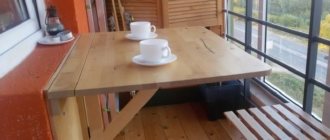
To create the frame you will need blanks for door frames. You can find veneered boxes coated with varnish or made of solid wood on sale. It is better to choose a box made from solid wood, because the veneer is vulnerable to temperature changes and can peel off over time. The color can be matched to the facade, or you can buy unpainted parts and give them any color. And if you look for stale goods at a discount, you can save a lot of money.
You can saw and trim the box using a wood saw or jigsaw. The sawn corners should be straight, 90 degrees.
The length of the horizontal parts is easily determined: take the width of the glass unit, add to it two thicknesses of the jamb at the narrowest point and add a gap of 5 millimeters. The vertical parts will be equal to the height of the glass unit, plus 5 millimeters.
To connect the parts into a frame, the easiest way is to cut off part of the quarter at the junction. This will need to be done for two of the four frame pieces. In order not to damage the veneer, first the cut is made with a hacksaw for metal, then continue with a regular hacksaw for wood. When we saw off a quarter vertically, it can be removed with a chisel. To firmly connect the parts, you can use furniture confirmations. There are special drills for drilling holes for them, but if they are not available, you can get by with two ordinary drills for wood or metal: 5 mm and 7 mm for deepening under the cap. It is advisable to glue all joints with PVA.
How to remove and change double glazed windows
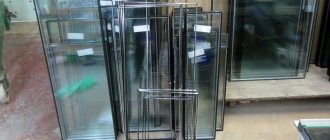
Sometimes it is necessary to disassemble a plastic window to replace the glass unit - the glass has cracked or broken, or has become leaky (condensation settles between the glasses). Sometimes it is necessary to change the rubber seal that is located around the perimeter of the glass on the indoor and outdoor side. Over time, it loses elasticity and begins to blow from under the glass. For all this work, the glass unit must be removed.
The glass unit is held in the frame by glazing beads - thin plastic strips. To remove the glass unit, they must be removed. There are four beads on each double-glazed window - two long vertical, two short horizontal. We start shooting from the long ones.
To work, you will need a spatula with rounded corners or an old knife with a thick blade, or some other similar tool. This tool is inserted at an angle into the gap between the bead and the frame.
There is a small gap between the bead and the frame. We insert the edge of the tool into it
By slightly turning the blade to the right or left, we disconnect the glazing bead from the frame. It is fixed in a groove, and when pressed, it comes off quite easily. By moving the tool up and down, we separate it at a greater length. Now, holding the glazing bead with your hand, you can easily remove it. We carry out the same operation with the second vertical and horizontal slats.
To prevent the glass unit from falling out, it is better to remove the top bead last. In this case, you need to lightly hold the glass with your hand (just keep in mind that they have a significant weight). By slightly pulling the glass towards you at the top, we remove it from the frame.
A new or repaired double-glazed window is installed in the reverse order. First, pads are placed - rubber plates that soften contact with the frame. The glass is aligned, aligned with the center - the gaps on the right and left should be equal.
Place the glazing beads in place. But this time they put the top one first, then the bottom one, then the side ones. The procedure for installing the glazing bead is as follows: insert one edge into the groove, insert the second edge. Press the middle with your palm until it clicks.
Stages of such installation: recommendations
Scheme of complete window dismantling.
The old window frame is removed and the inside of the opening is cleaned. More thorough cleaning is done using a vacuum cleaner. Then all surfaces need to be primed. This is done for further better adhesion to the solution.
In order to install a small window in height, they use a hammer drill to punch out places for the corners, they are pre-drilled and mounted on dowels or bolts. Lay out the first row of bricks or insert a foam block already adjusted to size. This is easy to do with one saw - its structure is such that the foam block can be brought into any shape if desired. If the width of the window is reduced, then the matter is simplified with one masonry, and only the outer side needs to be leveled - this is not important on the inside, since the small window will have to be finished. If there are gaps between the corners and the walls, they need to be foamed and the frozen foam carefully cut off with a knife.
The cement mortar for bricks and foam blocks is made thick; during laying, the elements are hammered for better adhesion to each other. In addition, before planting the next brick, it is first dipped in a bucket of water - the porous structure will allow it to firmly adhere to the mortar. For the foam block, you can use a spray bottle with water. However, you should not make brick openings in the rain - this risks washing out the mortar from the masonry and causing the structure to collapse.
Next, the masonry of the small window should be allowed to set within 24 hours. After this, it is wrapped in reinforced mesh and plastered. The mesh is secured with nails by driving them into the hardened cement mortar. It is not too solid yet, so it will easily let nails in.
Types of brickwork to reduce the window opening.
And the point is not even that the surface should be beautiful on the outside, although this is also important, but that when finishing the interior, the wall should still be smooth. For example, a sheet of drywall must lie completely on the wall, without bulges or depressions
After the plaster has completely dried - progressive compositions take no more than a day to do this - the inner surface can be finished with plasterboard or another method of decoration. If it is intended to finish the gypsum board, foam plastic or film is recommended under it to avoid moisture from entering from the outside. If only wallpaper will be glued, the new plastered surface must be carefully coated with a primer to avoid the appearance of dark spots. New double-glazed windows or wooden frames are inserted, and the small window is ready.
Using tinting films for double-glazed windows
Thanks to the use of polymer film, you can quickly solve several problems at once - adjust the light transmittance of double-glazed windows, increase the level of safety of windows and decorate them.
In addition, with the right choice of material, heat loss can be significantly reduced. This will require multifunctional films that work in two directions. They do not allow heat to pass through both from the interior and from the street. Invisible metallized layers are applied to the surface of this polymer coating, which are capable of reflecting waves of a certain length. Multifunctional films are sold in transparent and color versions. They are quite easy to stick on double-glazed windows according to the instructions on OknaTrade. When choosing color films, you need to take into account that there are different types of coatings with different light transmittance. The degree of darkening of the interior spaces depends on this indicator, so it is recommended to consult with a manager on this issue before purchasing. You should also take into account the antistatic properties of the film so that dust does not accumulate on its surface during operation.
Price
Installing new windows is not a cheap pleasure. You can, of course, save on the quality of fittings, the thickness of the profile or glass unit. But is there any point in this saving if in winter you have to walk around the house in sweaters and woolen socks, if on a frosty day the glass will freeze up and a puddle of condensation will accumulate on the windowsill? You can save on frame material. Wooden windows are more expensive than plastic ones. The difference in their cost is approximately 50%.
A simple price comparison, however, is not entirely correct. The service life of a wooden window, as we have already said, is longer than a plastic one, so it would be more correct to compare not the price of products, but the cost of their use per year. Taking the conditional cost of a plastic window to be 10 thousand rubles, and estimating its service life at 50 years, we find that the cost of annual use will be 10,000/50 = 200 rubles.
For wooden windows, both the cost of the finished product and its service life depend on the type of wood. For example, windows made of pine will last 60 years, while windows made of oak will last about 90. Moreover, the former are on average one and a half times more expensive, and the latter are twice as expensive as plastic ones. This means that the cost of annual operation of a pine window is 15,000/60=250 rubles, and an oak window is 20,000/90=222 rubles. As you can see, plastic windows also benefit from this method of evaluation, but now the difference no longer looks so significant.
Our comparison of plastic and wooden windows did not allow us to identify a clear leader: in some parameters wood is superior to plastic, in others - vice versa
Any final verdict in this case will be exclusively subjective, because for each person the compared characteristics have different degrees of importance
For some, the main thing is that the house is warm, for others good sound insulation is important, and for others they are ready to sacrifice everything so that new windows fit harmoniously into the interior of their house or apartment.
It is possible that many were unhappy that they did not find a ready-made solution in our article. Alas, they will have to find the answer to the question of which is better – wooden or plastic windows – on their own.
Replacing a conventional double-glazed window with a double-glazed window with heat-saving glass.
At the beginning of the development of the window market in Russia, many, out of ignorance or because of cost savings, preferred a single-chamber (two-glazed) double-glazed window to a double-chambered one, or installed windows with a double-chamber (three-glazed) double-glazed window, but with a thickness insufficient for our climate zone. Now people have become convinced of the shortcomings of this preference and are striving to correct the mistake. There are two ways to solve this problem: The first is to replace the old double-glazed window with a new one of the same thickness, but with heat-saving (low-emissivity) glass. The second is to replace the old double-glazed window with a new one with a greater thickness (possibly with heat-saving (low-emissivity) glass). In this case, you will have to change the glazing beads to beads of smaller thickness, but problems may arise with this: 1. The profile from which your windows are made may no longer be produced, which means there are no glazing beads, so before deciding to replace the double-glazed window with new one with more thickness, make sure that the contractor has the required glazing bead in stock. 2. It is important that the new beads are no longer than required, otherwise, during installation, they may split the sash at the welded corners.
Is it possible to make a blind plastic window openable? When does the question arise?
Metal-plastic windows are installed during the construction process of buildings or during their further repair. In both cases, windows with a minimal functional set are often purchased. Their pros and cons are clarified during operation, and the owner of the premises is sometimes faced with the acute question of improving metal-plastic structures.
The most common reasons for requests:
There is no ventilation and the premises do not pass fire safety inspections. This applies to windows in boiler rooms and other rooms with gas equipment. . Insufficient air exchange. . When purchasing housing in a new building. It's no secret that developers strive to reduce costs and this is often reflected in the windows. In such cases, new residents have to independently replace fixed double-glazed windows with pivoting sashes. . When purchasing a secondary home. Windows that suit some owners are often unacceptable to others. . Improving your financial situation. It happens that when ordering, customers are forced to save money by purchasing a blind window for a room where opening is not particularly necessary, and after a while it becomes possible to make changes to it. Plastic structures can be remade and modernized by experienced craftsmen. For a reasonable fee and quite quickly, they will manufacture and replace the blind part with an opening sash.
For what reasons may it be necessary to replace a blind sash with an active one?
The performance capabilities of new windows may not meet the owners' expectations for various reasons. The main ones are the desire of the customers themselves to save on fittings and a poorly thought-out design. As a result, difficulties most often arise:
- when ventilating interior spaces;
- in the process of washing windows;
- due to violation of fire safety requirements, which provide for the possibility of leaving the premises through the windows.
Claims regarding the performance characteristics of windows are often made in new buildings or apartments purchased on the secondary market. Developers often try to minimize costs and save on almost everything, and in the second case, the desire of the new property owners may simply not coincide with the opinion of the previous homeowners who installed the windows. In all of the above cases, replacing a blind sash with an active one is completely justified and is considered the best way to correct your own or someone else’s mistake.
In some situations, if there are problems with ventilation, serious measures associated with the installation of an active sash can be avoided. To do this, you will need to integrate a special supply valve into the frame. This device provides a constant flow of fresh air into the interior even when the window is closed.
Selection of frame and profile
The frame of a plastic window is a structure consisting of several chambers. All these sections have their own purpose: for collecting condensate, for fastening fittings.
The main task when evaluating a frame is to study the quality of the profile. Profile assessment requirements:
- Structural strength.
- Safety for humans. The material should not emit toxic compounds, toxic fumes and impurities.
- The profile structure must be resistant to chemicals.
- Resistant to deformation due to impact and axial load.
Note!
- How to choose a washing machine: TOP-130 photos and video reviews of washing machine options. Types of washing machines, choice of manufacturers
- How to choose a vacuum cleaner - TOP 140 photos and video reviews of characteristics. Types of vacuum cleaners by power, filtration systems, cleaning methods
- How to choose a refrigerator: TOP-180 photos and video reviews of refrigerator models. Selecting the size, capacity, functions and materials of internal shelves
All of the above requirements are fully met by plastic. Therefore, window manufacturers chose this material.
To further strengthen the frame structure, steel profile reinforcement is used.
Replacing the slope system
The easiest and most popular way to update the design of an opening is to replace the slopes on plastic windows. Recently, many PVC systems have appeared on sale, which are designed for finishing walls around windows. These designs have many advantages:
- affordable price;
- simple installation;
- high energy efficiency;
- hygiene;
- versatility.
Sloping systems are designed for both indoor and outdoor use. Thanks to complex application, you can not only “refresh” the interior design of rooms, but also update the facade of a private house. This method of improving windows does not require the involvement of specialists, since the systems are extremely simple and can be installed on their own. They consist of just a few elements:
- sandwich panels;
- starting and corner profiles;
- platbands;
- plastic latches.
The Qünell and Exter systems are recommended for cladding slopes. Thanks to a large selection of decors, they are suitable for windows made of white, colored and wood-like PVC profiles. The systems do not place significant load on the walls and allow additional insulation of openings along their perimeter. Plastic systems are not afraid of exposure to moisture and UV rays. They can be reused elsewhere if the need arises.
Replacing window slopes increases the energy efficiency of profile structures, reduces the risk of mold and mildew, and also improves sound insulation.
What is considered fittings?
All mechanisms for opening plastic windows belong to the concept of “accessories”. With these devices, the window can be opened in different positions and in different ways. For this purpose, rods, brackets, hinges, and various elements connecting parts can be used.
Most often you can find windows with a tilt-and-turn mechanism. This is the most popular design that can be considered classic. To open the sash, only one handle is used, and the window can open in at least two positions: wide open and in ventilation mode, when only the upper part is slightly opened, while the sash is tilted.
Plastic windows need to be adjusted periodically. How can you adjust plastic windows? Read “How can you adjust plastic windows?”
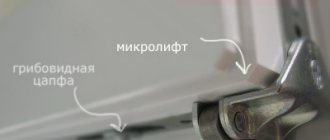
The window mechanism is located inside the structure and is invisible to the eye. On the market you can find a large number of different fitting designs that can provide convenient opening and ventilation modes. For example, recently you can come across such an idea as micro-ventilation. This method of refreshing the air in a room is especially relevant in winter, when oxygen is required, but an open window will make the room cold.
In addition, manufacturers produce a variety of accessories aimed at protecting the home from burglary and accidental opening of windows, for example, by children. Window opening mechanisms can be equipped with locks that allow the sash to open in steps, that is, you can choose the width from which the sash can open for ventilation. In addition to fittings for windows, many companies produce fittings for plastic and wooden doors. The mechanisms can be installed on both interior and entrance structures, and can be used for doors of balconies and loggias.
Types of windows by opening type
Deaf - the cheapest option. The glass unit is installed in the frame and cannot be opened. Is the base window available for modification.
A pivot window is a “classic” window that opens to the side. Hinged - opens only in one plane; as a rule, the upper part of the window is movable relative to the frame. Tilt-and-turn is the most universal solution that allows you to open the window entirely or tilt it only for ventilation.
In addition, there are sliding windows, which are widely used when installed on balconies or in country houses.
video instructions for manufacturing, installation, repairs, drawings, arched extensions, photos and prices
All photos from the article
The plastic double-glazed windows that are popular today have many advantages, but it does not always make sense to install them. For example, if you need to glaze a wooden house in the country, then having at least a little experience working with wood, it will be much cheaper and more practical to make homemade frames or update existing ones. Below we will get acquainted with window manufacturing technology, and also consider how to update old wooden windows with your own hands.
Wooden double-hung window
Window production
To make a wooden window with your own hands from start to finish, you need to do the following:
- Drafting the project;
- Manufacturing and installation of the box;
- Manufacturing of window frames;
- Installation and glazing of the frame.
Below we will take a closer look at all these stages of work.
Example of a wooden window diagram
Drafting
First of all, you need to complete drawings on how to make a wooden window with your own hands. To do this, you need to decide on the dimensions of the future product and its design. Accordingly, you should first measure the window opening.
To correctly draw up drawings of wooden windows with your own hands, you can familiarize yourself with existing projects and select the most optimal one. In this case, all that remains is to adjust the dimensions of the structure to the window openings of the building.
As a result, do-it-yourself drawings of wooden windows should show all the details of the product, as well as their dimensions, which must be indicated in millimeters. Having such a project will greatly simplify the work process, since all the nuances of the design will be before your eyes. Accordingly, the likelihood of making mistakes is reduced.
Below, as an example, we will consider how to make the simplest design - a blind wooden window with your own hands.
Window box diagram
Making a box
Although the frame is the simplest element of a window, its manufacture must be approached very responsibly, since it is the one that takes on the entire load from the window. To make a box, you can use only well-dried boards, without any defects. Pine boards are an excellent option, as they are quite resistant to moisture.
Instructions for making a box look like this:
- The work begins with completing the blanks. To do this, four parts must be sawn off from a 5 cm thick board - two equal to the width of the opening, and two equal to its height.
- Then, at the ends of the boards that will fit along the width of the opening, you need to cut out a tenon with a jigsaw. For vertical workpieces, corresponding grooves are made at the ends.
- Next, on each board, using a plane, a groove is selected with a depth of 4 mm and a width of 50 mm.
- After this, the box is assembled. The joints must be glued with wood glue. Additionally, the structure can be strengthened with metal corners.
- At the end of the work, the box is inserted into the wall. It can be fixed in the opening in different ways, depending on the material of the walls. Usually dowels or dowel-nails are used.
What to do if the sash is sagging?
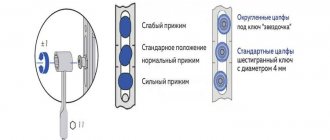
The easiest and fastest option is to contact a specialist. But, if you wish, you can try to save the window yourself. To do this, you need to find the adjusting screw located at the bottom of the hinge, use a hex key to secure it (while carrying out this procedure, you need to slightly lift the sash and hold it in this position until you complete all the manipulations).
If the sash has moved not only downwards, but also to the side, use the same hex key to adjust the screws of the lower and upper hinges. In this case, the sash must not only be lifted, but also slightly pressed against the location of the control hinges.
When fastening the screws, do not overdo it - if you tighten them too much, the sash will either rise too high or be pressed too tightly against the hinge group.
Window opening options
Mount an impost (partition between the sashes), dividing the window opening into several sashes, install a transom, sliding or folding mechanism - nothing is impossible for our craftsmen!
The image shows the most commonly used options for PVC window sashes. Therefore, you can carefully study the diagram and call us for advice.
Is it possible to convert a blind window into an opening one in the Dnieper?
The window factory Open Windows produces windows for residents of Dnepropetrovsk and the region. We provide a full range of services for the production, modernization and maintenance of metal-plastic structures. Many years of experience in the window industry allows us to provide our services to all customers with high quality and on time. Contact us and your windows will get a new life.
It sometimes happens that people order windows with tilt-and-turn sashes to reduce the overall cost of the order, but after some time, after thinking about and using such windows, they realize that they need tilt-and-turn sashes. If you decide to replace the rotary fittings with tilt-and-turn fittings yourself, then you need to know:
name of the window hardware manufacturer in order to purchase only the missing components (turn-and-tilt lock, corner switch, turn-and-tilt scissors, middle locks, latch, etc.), while the lower hinge group and the upper hinge on the frame will remain the same and there will be no need install new hinges using special templates;
name of the profile and dimensions of the sash along the sash rebate - width and height, because a number of elements of window fittings depend on these values;
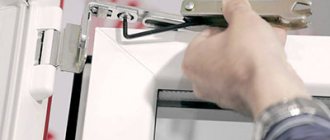
After you purchase the components for remodeling the window yourself, you will need to remove the decorative trim of the top hinge on the frame in the closed position of the swing window, remove the pin from the top hinge group by pressing on it from above and pulling out the pin from below, for example, with pliers. If your sash is equipped with an overhead middle clamp, you will also need to remove the decorative trim from it and unscrew the fasteners from the frame part. After this, you need to move the handle to the open position, holding the sash with your hand to avoid falling out from a gust of wind or under its own weight.
After removing the sash, you need to unscrew the window handle, place the sash on the table with the outer side up and unscrew all the elements on the sash with the exception of the lower hinge on the sash. Next, according to the installation instructions (available from the hardware store), screw on the fittings in a certain sequence. When installing the fittings, you will need to cut the tilt-and-turn lock and the tilt-and-turn scissors to the size of the window; this can be done by cutting with a hacksaw or an angle grinder. When screwing self-tapping screws into a PVC profile, it is advisable to set the minimum tightening force on the screwdriver to avoid turning the self-tapping screw in the profile. Self-tapping screws must be used in sizes 3.9x25 or 4x25. When installing fittings on the sash, make sure that all fitting elements are in their middle (central) position, because The performance of the fittings will depend on this.
After hanging the sash on the frame, you need to screw the mating parts onto the frame. When the handle is turned from the middle position to the closed position, the trunnions on the fittings move: for the right sash - clockwise (view from the inside), for the left sash - counterclockwise (also viewed from the inside). We mark on the sash with a pencil the position of the trunnion in the closed position (all trunnions), then close the sash and transfer the marks to the frame, now it will be clear where to screw the strikers.
Changing a pivot window to a tilt-and-turn window.
When performing the work, the entire “piping” of the fittings (all the metal) is replaced with a new one, only the bottom loop remains. It is better to install the fittings of the same brand as the old one, then you will not have to change to a new one and reinstall the top hinge. This is important, since it is not easy to install the top hinge correctly and efficiently without a template, and even in “field” conditions. An incorrectly installed top hinge can become loose over time, especially on large sashes. Which threatens their downfall. It is advisable to find an agreement to determine the brand of the profile system. This is necessary to select “standard” strikers. Cost (including Roto NT fittings) (only plastic windows) – 5000 rubles/sash.
There is only a little left - we insert the glass
Making wooden windows with your own hands
The most important thing in this process is the accurate selection of glass sizes. Thanks to this, cold bridges are not created, and the glass adheres well to the wooden window frame. Deviations of 1 mm can already have negative consequences - but we don’t need that.
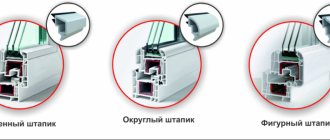
You need to cut the glass with a diamond glass cutter, and fine-grained sandpaper is suitable for polishing the edge. The cutting technique is very simple. It is enough to stock up on a ruler that will be longer than the glass and guide it along it with a glass cutter. Before coating the edges with sealant, you need to attach the glass for fitting. If everything is successful, then sealant is applied to the grooves, after which the glass is finally inserted into the frame. After this, we use a glazing bead - it should hook both the frame and the glass, and then fix it with thin nails. If the ties are wider, then fix them with self-tapping screws - choose thin fasteners.
At this point, making wooden windows with your own hands is completely completed and only one thing remains: placing wooden windows in prepared boxes. I didn’t need this action, but if you still decide to install, then:
- We insert the structure into the block and fix it in the grooves
- We fix the frame using self-tapping screws - the elements should pass through it directly into the wall
- All cracks are blown in using foam and wait for it to dry completely.
- In the future, you can design the slopes with your own hands in the most convenient way for you. But for wooden structures everyone is accustomed to using plaster, since plastic slopes will not look harmonious
How to install metal-plastic windows with your own hands
Before starting installation, prepare everything you need for work:
- Window frame with fasteners;
- Building level;
- Polyurethane foam;
- Mount;
- Bulgarian;
- Windowsill.
The process of preparing a window block
Window preparation is an important stage of installation work that you carry out yourself. If necessary, the double-glazed windows and hinged sashes themselves are dismantled from the window structure.
To release the double-glazed window, a chisel is used; very carefully, you need to use it to pick out the glazing bead (fastening) and after a light blow on the tool it will come out of the grooves. Then the vertical fasteners are removed, top and bottom
The released glazing beads will need to be marked; sometimes their sizes can differ significantly, which will lead to the formation of gaps of several millimeters. The glass unit will come out of the grooves on its own if you tilt the frame a little. Gently lean it against the wall, creating a slight angle.
Decorative plugs must also be removed from the swing doors, then unscrew the clamping bolts. If there is a transom opening system, release the top of the sash by turning the handle to the center and remove the hook from below.
Ultimately, you should end up with a free frame, on which there are only lintels separating and reinforcing the sashes. On the inner surface of the plastic frame, holes are cut along the contour for mounting anchors. The minimum number of such holes should be three for the sides, two for the lower and upper ends. For drilling, use metal drills, because the window is made of metal and plastic, and inside it has a metal inclusion for strength characteristics.
To fix the frame, it is preferable to take anchors with a diameter of 0.8-1 cm and metal drills of the same size.
Benefits of replacing a single window section
Of course, a radical option is possible - replacing the entire window system. However, replacing the valves has a number of advantages over this method.
- the second option is significantly cheaper;
- more quickly: making and installing a sash into a finished frame is much faster than making and installing the entire window unit;
- almost complete absence of construction waste when replacing the sash;
- the design of the room is not disturbed when the renovation of the room is ready. There is no need to even dismantle the window sill.
By replacing the sash, you get the opportunity to improve its consumer qualities: install a more energy-efficient, impact-resistant or tinted double-glazed window, a handle with a security lock and other useful accessories.
Description of some work options
Before we examine in detail all the features of the adjustment, I would like to cover in detail one more question, namely, how to make a plastic window folding if it simply opened. The work is not easy, but anyone can do it if they want.
How to convert a pivot window into a tilt-and-turn window
Instructions for doing the work yourself look like this:
| Illustration | Description |
| A new set of fittings for a plastic window is purchased. To carry out the alteration, we need to change the entire locking mechanism. |
They will sell you everything you need from a company that supplies fittings; the main thing is to know the exact dimensions of the sash and the manufacturer of your window. It is best to purchase components from the same place where you purchased the windows.
- The plastic plug is removed from the bottom loop;
- The plastic frame lifts up, it just slides off the bottom support and you can remove it;
- The sash is placed on the floor so that it does not fall and it is convenient for you to work with it.
When should a window be replaced?
After long-term use, there are situations when upgrading windows is pointless and requires their complete replacement. The following signs indicate the need to install new structures:
- Adjusting the sashes, aligning their diagonals, and even replacing the hinges do not help eliminate opening problems. This means that the frame has deformed to such an extent that it interferes with the normal functioning of the window. Usually in such cases only replacement is required, since dismantling the structure and reinstalling it is useless.
- The profile began to quickly and evenly turn yellow over its entire surface area. Such changes are a clear sign that a low-quality PVC mixture was used during extrusion. The appearance of yellowness indicates the active destruction of plastic. It is impossible to stop this process, so it is most rational to order new windows.
- The constant appearance of mold and mildew - if all methods of combating unwanted microflora have been tried, but it forms again and again, then the problem is in the windows. Most likely, the tightness of the structures is broken, but problem areas cannot be detected. Also, mold and mildew form when windows constantly fog up, which may indicate their extremely low energy efficiency.
- Cracks and chips are noticeable on the profile - such signs indicate a high degree of wear and tear on PVC windows. The defects mentioned cannot be eliminated. In addition, this event is useless, since cracks will appear in new places.
- An unpleasant “poisonous” smell emanates from the windows. This means that the plastic has begun to actively decompose. Since decay products are hazardous to health, windows must be replaced in any case. In addition, the appearance of an odor is the primary sign that the profile will soon begin to turn yellow or grey, crumble and become covered with cracks.
Also, a replacement option should be considered if the irregularities in the connecting seams are systemic in nature. Although theoretically such a defect can be eliminated, gaps indicate a violation of production technology. It is unlikely that it will be possible to update old windows with similar problems. In addition, such an event is too labor-intensive and unprofitable. It requires dismantling, transporting damaged structures to the workshop and replacing profile elements. In such a situation, it is much easier and more logical to order new plastic windows.
PVC window lubrication
A significant part of the violations that require adjustment of the mechanism of plastic windows occurs due to its poor lubrication. In new windows, the fittings are coated with a sufficient amount of lubricant for effective operation. However, over time, these compounds degrade and lose their properties. These processes occur especially intensively in houses that are located near busy highways, industrial enterprises, and other sources of air pollution. Dust settles on the moving elements of window fittings and penetrates the lubricant, which significantly deteriorates its quality. This leads to jamming of the mechanisms and their accelerated wear. Therefore, adjusting old plastic windows always involves lubricating them.
To prevent accelerated wear of fittings and complex repairs, you need to lubricate them at least once a year. It is best to lubricate windows twice a year - before the onset of the winter and summer seasons. In addition, it is recommended to lubricate after carrying out any maintenance work on any hardware elements, for example, after adjusting the scissors of a plastic window, hinges or pins.
What to lubricate with?
Special compounds are used as lubricants for servicing plastic windows, which are sold in specialized stores or can be ordered from window suppliers. They are supplied in bottles with convenient attachments designed to work with certain elements of fittings. If such special lubricants are not at hand, you can use technical petroleum jelly and any technical oils, for example, sewing machine oil. Silicone grease or aerosol lubricants such as WD-40 can also be used. The use of edible, cosmetic and other types of oils that are not intended for use with mechanisms is not allowed.
To achieve maximum beneficial effect, the lubricant should be applied to clean and dry metal surfaces. Therefore, after adjusting the window fittings, it must be thoroughly cleaned of any dirt and wiped with a soft cloth. Dirt from hard-to-reach places is removed with a brush or sponge. Before applying the lubricant, it is recommended to further inspect the window fittings to ensure they are clean.
What to lubricate?
Lubricant is applied to all moving elements. Lubricated including:
- Trunnions;
- “Scissors” of a plastic window;
- Hinge adjustment mechanisms;
- Fastenings;
- Latches, etc.
A few drops of lubricant are applied to each of the moving parts. After this, I let the mechanism work in normal mode to distribute the lubricant evenly.
In addition to the mechanisms, rubber seals must be lubricated. For this, a special composition is used. The lubricant maintains the elasticity of the rubber and prevents it from drying out. It is better to treat seals twice a year. Be sure to lubricate them in the fall when adjusting the pressure of a plastic window with your own hands in winter mode.
Regular lubrication of window fittings will extend its service life and eliminate unnecessary repairs and adjustments. In some cases, it serves as an alternative to adjustment work. For example, before adjusting plastic windows that do not close well, it is recommended to lubricate the fittings. In many cases, this is enough to solve the problem.
Window handle repair
It often happens that adjustment is not required, you need to pay attention to the window handle. They are the most susceptible to wear and tear. If the handle is loose, you need to tighten it in a timely manner.
There is a plastic cover around the handle that covers the bolts. You need to turn it to the side.
Use a Phillips screwdriver to tighten the bolts.
If the handle jams or is difficult to turn, dip a cotton swab in machine oil and lubricate the fasteners. Or use silicone lubricant.
A broken handle can be easily replaced. Buy exactly the same one at a window hardware store. Turn the cover from the old handle 90 degrees and unscrew the screws. Place the new handle and screw it on. Return the pad to its original position.
How to make a window with your own hands. Assembly of the box and frame.
If we talk about the most popular methods of connecting parts, then the dovetail takes precedence.
Adhesive can also be used for such structures, but as an optional material.
Even if you correctly assemble the frame with glass, it simply will not fit into this frame.
Next you need to make a frame for the glass. Remember that you must have a gap of at least 2 millimeters between the frame and the box, since wood tends to swell. Please also note that this design uses glass no more than 4 mm wide.
The frame itself is assembled in the same way as the box, but here it is much more difficult to maintain the required dimensions. So you need to allocate 1 cm to the glazing bead, the lower groove will be 2 cm wide and one and a half cm high, respectively. The top one is 1.4 cm wide and 1 cm high, respectively.
The technology for assembling parts also remains the same; it is very important to maintain the accuracy of the grooves, which, given these parameters, requires special care from the master
The resulting structural elements must be painted and then varnished. It is better to do all this before the glass is already installed, so as not to spoil them. As soon as the structure dries, you can move on to the next stage of work with your own hands.
After the frame and box are ready, the fittings are mounted on them. This includes hinges and handles. It is worth noting that today there are a lot of different devices on the market, including moving mechanisms.
Modernization procedure
So, now we know for sure whether it is possible to make an opening window from a blind window. It's possible. Transform the window opening in stages:
- Measure the blind sash.
- A new part is made for the old frame.
- Ready-to-install materials are delivered to the customer.
- Remove the old glass unit from the profile system.
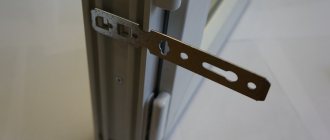
- Outside the opening, fasteners for the mosquito net are fixed.
- Install window hinges and hang a new profile on them.
- The sash is adjusted and the fittings are checked.
- Check the tightness of the window system and the tightness of its fit to the base.
Summarizing
Redesigning windows can significantly improve the appearance of a home, but it can also worsen it. Therefore, before redoing anything, you should calculate everything, preferably on paper. For example, a small window can visually lower the ceilings, and this is not always good - you will have to select the appropriate wall decor. Narrow windows are good only in long rooms. You must first find an acceptable option, take into account all the nuances, and then proceed with installation.
Independent work does not require academic knowledge in the technical part of installing window openings. Everything is learned through experience. If you have little time and bad weather conditions, you can outsource the work to the craftsmen, but you can also do it yourself. The overall work will take no more than 3 days, provided that the metal-plastic frame structures are already in place, and there is also permitting paper from the BTI. However, you usually have to order new double-glazed windows, the production time of which varies from a week to a month, so it is advisable to carry out the work in dry, warm weather, namely in the summer.
Prices for converting fixed windows to opening ones
Prices for this service are set after measurements; the cost depends on the configuration of the window, the type of double-glazed window and the window profile system. From 7,110 rub.
Often, some time after installing windows, customers realize that a blind sash interferes with the full operation of the structure, and to correct the situation, it is necessary to install an active one in its place. However, so far only a small percentage of window owners in need of such replacement are carrying out modernization activities. This is due to lack of awareness - many consider such a procedure impossible, and dreams of comfort remain dreams. Meanwhile, there are technologies that make it possible to adapt windows to current needs and improve their performance characteristics at a reasonable cost.