First, decide what kind of pattern you want: white against a background of clear glass, translucent or transparent in a matte halo. Maybe you need a color picture? Or just lines, contours? Or do you want the pattern to cover the entire window with lace? Any of the options is available - it depends on the drawing method and the type of stencil.
A direct stencil (1) is a sheet (of paper or film) with a silhouette or pattern cut out in it, which is filled with paint. Reverse stencil (2) - a figure cut out of a sheet. The image appears when you paint the space around it. In the contour stencil (3, 4), only the edge of the drawing is cut and painted: what comes out is a picture full of air, similar to a sketch with a pencil (or marker). To cut such a stencil, use a stationery knife or scalpel - scissors are not suitable for this.
Holding a stencil and drawing is uncomfortable, don’t even try. Dense material should be secured to the window with tape, preferably masking tape: it does not leave marks and can be quickly removed. A lightweight paper cutout can be glued onto the soap. The thin film will stick to the glass on its own.
In addition, by attaching stencils, you will be able to evaluate the entire composition. And if necessary, correct it before you have applied the drawing - it’s quite a shame to erase and redo something that’s already ready. So, look at the photos of New Year's windows and choose the decoration method that suits you best.
Powdered sugar, flour and semolina
This is one of the simplest and most delicious techniques for painting window glass. Small children can participate in the process - for them this activity will become real magic.
Using a direct stencil, we apply an adhesive base to clean glass - honey or sugar syrup diluted in water. Then we spray powdered sugar on it, using a soft sponge or microfiber sponge. Let the patterns dry, then remove the stencil and brush off excess powder with a brush.
To create a transparent design against the background of a sweet “snow fog”, we take a reverse stencil from thin paper. Apply syrup to it so that a wide outline is formed along the outer edge. Next, dust the picture and the area around it with a dry soft brush, barely touching the glass.
To create New Year's patterns on syrup, you can use flour instead of powdered sugar - the pattern turns out almost the same: maybe a little less airy and more contrasting.
And if you take syrup and semolina, the coarse grain and slightly yellowish color of the picture will resemble an old photo from a family archive. Apply the cereal onto the syrup in a thin layer using a slightly damp sponge or hard brush.
Note: this interesting effect occurs only in silhouette drawings—semolina is not suitable for working with reverse stencils.
Christmas theme
If there is no desire to change the Christmas decor in two weeks, then you need to immediately take care of the appropriate paraphernalia when decorating the windows. These include:
- Christmas wreaths with traditional green and red ribbons;
- gingerbread and colorful caramel;
- boots for Santa Claus;
- carved figures of angels;
- coniferous compositions with candles on the windowsills.
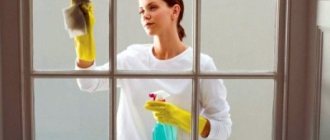
Soap drawings
Everyone has almost forgotten about this method, but in vain! With its help, translucent velvety pictures are obtained, similar to ice covered with frost.
You can make them the old fashioned way: grate a piece of soap on a fine grater, add warm water and beat (preferably with a mixer) until a thick, stable foam is obtained. Dip a sponge into it and apply a design using a stencil. If smudges form, wipe them off with a wet cloth.
It’s even easier to use white liquid soap or a creamy soap base: you don’t need to whisk or dilute anything - just pour it into a saucer and draw! Just one piece of advice: it’s better to cut the stencil out of thick paper or cardboard - it will make the edges of the image clearer.
Or you can draw lace patterns with a thin soap on dry glass. In any case, soap patterns are not only beautiful, but also wash off well from the window, allowing you to save on cleaning products.
Vytynanki in the form of a snowflake
It seems like this can be done? After all, in order to cut out a snowflake, you need to fold a sheet of paper completely, so how can you add the Snow Maiden there?
A rather clever cutting method will help with this.
- Initially, you need to take a sheet of paper and cut it to a square shape.
- Fold the paper in half to form a triangle.
- Place the resulting triangle with the straight side down.
- Fold both edges up so that there are 3 sharp edges at the top, just like when cutting out a regular snowflake.
- Fold the resulting “trident” in half. You should get a small acute triangle.
- Excess elements that stick out need to be cut off. As a result, there should be an even triangle without sharp edges at the bottom.
- Draw a small pattern in the wide part of the triangle. So that there is free space in the acute angled part.
- Then carefully cut out this pattern and unfold the workpiece halfway.
- On half of the snowflake, draw half of the Snow Maiden’s silhouette. In order for the silhouette to be even, it is better to print it and trace it.
- Next, cut out the silhouette of the Snow Maiden and unfold the snowflake.
- The result is a very beautiful image, in which the Snow Maiden will be in the center, and there will be a beautiful pattern around the circle.
Toothpaste
A very popular technique. Who didn’t draw with paste on the bathroom mirror as a child! But not everyone knows what potential it holds: you can make seven(!) different types of images with it. Just never rush to remove the stencil when working with toothpaste - the picture must dry completely.
To get a dense white pattern on glass, take a straight stencil, a piece of foam rubber (or a sponge) and a non-colored paste. Squeeze it onto a saucer (a little bit so it doesn’t dry out), grab it a little with a sponge and thickly stamp the cut out silhouette.
We perform a transparent drawing on a matte background in the same way. Just take the reverse stencils and cover all the free space between them with paste “stamps”.
Don't want to make the entire window matte? Then depict a snowflake, a month with stars, a Christmas tree or any other object in a halo. At the same time, achieving a shining effect is not difficult: apply the paste tightly along the edge of the tenderloin, and the farther from the edge, the thinner the paste should be, the thinner the layer and the less frequent the stamps.
The frost effect can be achieved by spraying the glass with a paste diluted with water. If you use a spray bottle, the droplets will be smaller, and if you spray with a toothbrush, the droplets will be larger.
Note: You can make toothpaste multi-colored by mixing food coloring or a few drops of diluted watercolor into it. You can add details to the stamped silhouette by drawing them over the wet image with a toothpick or a manicure stick.
It’s also easy to make a contour drawing with paste using a stencil - just fill the slots using the same stamping technique. The splashes applied on top of them give a special charm to the delicate linear outlines.
There is another option - drawing contours without a stencil. In this way, you can easily and quickly turn a window overlooking a neighboring house into a window overlooking Paris.
But this technique is suitable for those who have a confident hand and no fear of a “blank slate”. Ready? Then we attach a conical nozzle to the tube (the same as on ointments and creams) and draw, squeezing the paste onto the glass directly from the tube - just like Van Gogh!
By the way, we always say “paste,” but there is also tooth powder that can perfectly replace it when painting a window. If you dilute it with water to a thick sour cream, you can paint on glass with a hard brush.
And dry tooth powder applied to wet glass with a soft brush looks like real snow.
Vytynanka to school or kindergarten
If your child at school or kindergarten was given the task of making crafts for the New Year with his own hands, then here too you can use the ability to make vytynanki. Doing such creative work with a child is much more interesting, but you need to be careful with sharp objects.
It is best to let the child draw the silhouette and cut out the general outline, and cut out the small details themselves so that the child does not get hurt.
By making beautiful silhouettes of animals, Santa Claus, Christmas trees, houses and attaching threads or ribbons to the blanks, you will delight any teacher and most likely your product will be useful for decorating a class or group.
If this is your first time trying to make stencils, you need to start with simpler images. Then choose something more complicated with a lot of small details.
Professionals create entire paintings with the smallest details and volume effect. You can also come to this, but in the beginning it is better to take simpler sketches.
Regular paints and markers
By “regular” we mean gouache. Of course, you can use any other water-soluble paints, even water-based ones for the interior. The gouache just adheres more tightly to the glass, the picture turns out brighter and also washes off perfectly.
Watercolor is another matter. It leaves colored shadows on the window long after the New Year: it will take more than one wash for them to disappear.
And painting with watercolors is more difficult - you need a very soft brush, the humidity of which has to be constantly controlled. Otherwise, due to excess water, the paint on smooth glass will “shrink” and the design will not work.
Note: to add shine to a gouache painting, you can apply glitter and sequins to the wet paint. And to make the picture more contrast, just outline it with a black outline - also with gouache or a washable marker. The latter will also help if you feel like an insecure artist: attach the stencil to the window, outline the silhouette with a marker, and then paint over it.
By the way, washable markers themselves are a great way to paint on glass. They can be used to draw white and colored pictures instead of paints and brushes, or to make outline drawings using a stencil and by hand instead of toothpaste.
How to draw a gouache fairy tale on a window, step by step with photos
It will not be difficult for real specialists to draw a real fairy tale, a full-fledged composition with many active characters, in gouache on a window. Such an image must be holistic, plot-driven, and interesting.
How to draw a fairy tale in gouache step by step on a window? The algorithm of actions is described below.
You can use this drawing as a basis:
First, you should depict the main characters - cats. They are drawn from the back, as if looking out the window.
The image diagram will be like this:
It is important to maintain proportions: one cat should be larger and the other smaller. Seals can be either snow-white or colored.
Now you should start drawing snowflakes. There will be a lot of them, they should form unique curtains that are tied with bows.
How to draw snowflakes correctly was described a little higher.
Paper decorations
Another greeting from childhood. True, before you had to improvise, but now there are ready-made templates - there are a lot of them on the Internet. Just print, cut and paste.
The New Year theme offers snowmen, Christmas tree balls, symbols of the year, Santa Clauses and Snow Maidens, angels and bells, Christmas trees, deer, houses in snowdrifts... In general, there is so much to choose from!
From this set you can easily create your own unique composition. But you don’t have to be original - traditional snowflakes made of matte paper look wonderful on the window.
Note: the glass should be wiped dry, otherwise the pasted paper will not stick. And don’t use glue, it’s better to use a thick soap solution or sugar syrup, they wash off the windows faster!
Useful tips
- When cutting out blanks, do not forget to use tweezers or eyebrow tweezers in order not to damage small parts or tear the blank.
- Very small elements that cannot be cut out can be painted over with a black marker or pencil.
- It is best to glue protrusions to glass with a soap solution; this is the safest and most convenient method.
PVA and hot glue
This is a way to create amazing “ice” pictures that during the day do not interfere with seeing what is happening outside the window, and in the evening they flicker beautifully, illuminated by street lights.
To make snowflakes you need PVA glue in a soft plastic bottle with a dispenser, transparent files and stencil drawings on A4 paper.
For silhouette pictures, you will also need a brush - it will help to evenly distribute the glue over the stencil. Then everything is simple: insert the sheet with the template into a file, place it on a flat surface and apply glue on it, following the outline of the drawing.
When the glue becomes completely transparent, it is dry. Then we separate our sticker from the file (it can be removed very easily), apply it to the window and press it a little. The adhesive patterns are embossed, elastic, adhere to the glass by themselves, and are easily removed and glued back. Essentially, they are reusable.
Note: if you have a glue gun, snowflakes and silhouette drawings can be made with hot glue. By the way, it comes in transparent, milky matte, gold, silver, solid colored and colored with glitter - all types of glue sticks are easy to find, they are on sale.
And to make a colored or sparkling picture from PVA, you need to mix a little water-soluble paint or, accordingly, small glitter into the glue before drawing. You can do both together. But don't overdo it, or your sticker will lose its elasticity and transparency.
Cotton balls
For this decoration you need:
- roll cotton balls;
- string them on a thread or fishing line.
Balls of different diameters will look original. Alternation with other decorative elements will add zest.
Ready-made stickers
You can decorate glass not only with stained glass pictures, figures made of paper and glue, or drawings with toothpaste.
If you don’t have time, and the New Year’s window as a result is more important to you than the process of creating it, ready-made self-adhesive stickers are at your service.
Their variety will not let you get bored: white, colored, plain transparent, matte with glitter and mirror, paper and vinyl.
Simply remove the sticker from the mounting backing, place it on the glass and smooth it out. That's it - the drawing is ready!
Lights around: decorate the windows with shining garlands
The light of New Year's lights turns everything around into a wonderful fairy tale. If you decide to decorate your room for the holidays, you cannot do without festive illumination. LED or electric garlands are hung on curtains, mounted on cornices, on window sills and on the windows themselves. In the evening, these colorful lanterns look amazing - both outside and inside your apartment or house.
Beer and magnesia
An exotic, but very effective way to decorate windows for the holiday. It is for those who, when hearing the words “New Year,” see a winter forest, snowdrifts and a house with windows in frosty patterns.
Such patterns, very similar to natural ones, are obtained from a mixture of beer and magnesia. The solution is easy to prepare: for 100 grams of light beer you need 50 g of powder. You can apply it in one to three layers in two ways: using a spray or a sponge, brush, cotton swab - whichever is more convenient for you.
To ensure a reliable ice pattern, it is better to select the “fine fog” mode on the spray bottle. And using the second option, improvise - depict curls, lines, feathers, snowflakes. As the liquid evaporates, a crystalline pattern gradually appears on the glass. You can speed up the process by drying the window with a hair dryer.
Note: the smell of beer in the apartment, of course, remains for some time, although it quickly dissipates. For those who cannot tolerate it at all, we offer another solution: 100 g of boiled water, a tablespoon of diluted gelatin and 50 g of magnesia.
To create ice patterns, you can also use a photo fixative solution: 40 g of fixative per 100 g of water. The process is similar. The only difference is that the fallen crystals quickly turn white and become opaque. As a result, the window ends up with a pattern that is silky to the touch, similar to dense frost.
Frosty designs adhere well to glass, do not crumble when touched and are easily washed off with water.
Where can you use vytynanki?
Templates cut out of paper can be used in various variations. There is a stereotype that they can only be glued to windows, but in fact they are convenient for decorating the entire home or office.
Moreover, the location is not limited in any way. Very often, windows and offices in schools and universities are decorated with such patterns. In new modern coffee shops that use black or dark brown chalk boards, white silhouettes will look very nice and contrast.
In offices, you can decorate work computers and tables with such patterns.
You can cut out entire scenes. Secure each element with long threads and hang it on the ceiling or wall. This will create volume and decorate most of the interior space.
Very often, paper blanks are used to decorate kindergartens, as this is the most budget-friendly and safe option for children. Funny fairy-tale animals will add a festive feel to the interior of the kindergarten; children will be interested in watching and studying the pictures.
Necessary materials
Most often, experienced artists are itching to paint everything, but it happens that you want to do something beautiful with glass, but you don’t have the artistic skills to draw.
What you need to know about the characteristics of the paints that are needed for stained glass painting is that they are available for sale to any average person. These paints are very liquid in structure, which is why they create the effect of transparent colored glass. They also dry quickly and many have a strong odor.
They can be sold in tubes with nozzles that make it easy to distribute paint over glass without drips.
If you use brushes, then only synthetic ones, and you need to stock up on paint thinner - nail polish remover or white spirit will do.
The most important point in stained glass painting is that we will need special contours for stained glass, namely thick paint in conical tubes with a thin spout, thanks to which the outlines of the sketch are applied, creating limited parts. They are filled with paint, which does not spread if the contour is applied correctly without breaks.