Installation of roller blinds on plastic windows
How to correctly measure and then install roller blinds on plastic windows? First you need to measure the window itself - this is done in the closed position of the window frame and it is important to avoid errors (measure everything to the nearest millimeter).
With the right approach, they can help create the necessary comfort.
If the curtain must tightly cover the entire sash, you need to correlate the height of the opening part of the window with the length of the curtain. It is also important to clarify that the lower edges of the blade guides should be at the same level.
Installation of roller blinds is quite simple, and operation is not particularly difficult, so this type of window design option is one of the most popular today.
Before taking measurements, it is necessary to determine the mounting location:
- Outside at the doorway.
- Inside the window opening.
- Separately for each side (transom).
In design projects they are skillfully combined with additions, so their application goes beyond strict styles - only high-tech or minimalism.
It is necessary to measure the width and height of the window. How to do it?
- This will take about an hour and a half, and the tools you should take are a tape measure, a sheet of paper, and a pencil.
- The width of roller blinds should be equal to the width of the glass + 1 millimeter on each edge.
- When taking measurements, you need to make sure that fastening the curtains will not interfere with opening the windows.
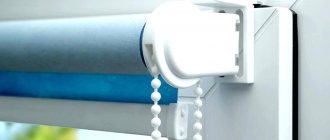
The specific mechanism of action of a roller curtain is that the fabric is wound onto a drum using gears, chains or an electric drive.
The height of the curtain is equal to the height of the sash; the canvas can cover the window frame by no more than 5 millimeters.
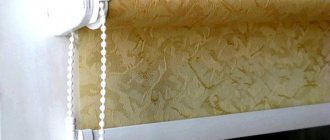
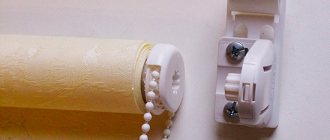
The curtain consists of a roller, gear, brackets and fabric. Brackets can be static or spring-loaded, which can be snapped into place and secured to the carrier.
Installation methods
What types of fastenings are there for roller blinds?
There are 3 most common types of means by which the curtain is attached to the window:
- Open roller blinds. They are mounted in the window opening itself or above it. To control the curtains, a special chain and spring mechanism are used.
- Closed roller blinds. They have a decorative “cover”-box to hide the roller of folded curtains when the window is open. Usually installed on the ceiling.
- Mini system. In general, they are the same as closed roller blinds, the only difference is in size. There is no need to drill the frames.
Installation methods
Installation of roller blinds is carried out in accordance with their design. There are open and closed models.
The open ones are wound on a horizontal shaft so that the roll remains in the field of view of the observer. The fabric hangs freely from the shaft, there are no additional elements.
Closed curtains are equipped with a special casing into which the fabric goes inside when wound up. In addition, closed models have guides on the sides of the fabric. This increases the closing density - the guides are adjacent to the window sashes and do not allow light to pass through from the sides.
Installation of all structures can be done in several ways:
Fixation using special brackets included in the delivery kit
Fastening with self-tapping screws to the sash or other surfaces (side slopes, sometimes the ceiling)
Fastening with double-sided tape
However, not all options can be used - for example, heavier closed models cannot be installed with tape; such curtains need reliable fasteners. Open structures are lighter and can be installed in simpler ways.
When choosing a method for attaching curtains, you must first decide on the supporting surface.
There are three main options:
Sash installation
Ceiling mount
Installation to window slopes
The best option is to install the curtains to the sashes. Other methods, as a rule, are used forcedly - if during the purchase there was an error in choosing the sizes, or there are no special fasteners.
Installation of curtains on a movable sash can be done in two ways:
Fastening the brackets to the sash with self-tapping screws
Attaching the brackets to special clamps installed on the upper edge of the sash
Expert opinion
Mezentsev Sergey Petrovich
Residential renovation and finishing specialist
The first option is simpler and more reliable. However, the use of self-tapping screws automatically voids the warranty - the window manufacturer will regard the installation of curtains as unauthorized interference with the window design.
The second option does not violate the warranty agreement, but the strength and reliability of such fastening is much lower. According to GOST, the warranty period for sashes is 3 years (for double-glazed windows - 5 years). If the window has already served for several years and the warranty is no longer valid, the best option would be to install curtains with self-tapping screws.
How to hang roller blinds on a wall or ceiling
How to hang roller blinds on the wall. Instructions.
- Attach the cornice to the surface of the ceiling and mark the points where the screws will go in (it is better to choose screws longer than 4 centimeters, this will make it easier to work with).
- Drill holes for self-tapping screws according to the holes on the cornice.
- If the ceiling is concrete or brick, you need to drill with a 6 mm Pobedit drill - the holes should be 4-5 centimeters deep, there is no need to do more. If the drill rests on gravel (while working on a brick ceiling), you can break through the obstacle using a steel punch or dowel. It is more convenient to drill concrete with a wet tool.
- Insert plastic dowels into the holes.
- Screw the screws into the dowels.
The structure can be mounted on the window sash, wall or ceiling, depending on the ease of control and interior design.
Self-tapping screws
How to hang roller blinds on plastic windows using self-tapping screws. Instructions.
Tools you will need for work:
- Drill.
- Screwdriver.
- Screwdriver.
- Building level.
Typically, the purchased product comes with instructions that explain step by step how to install the curtain.
What to do:
- Choose a place for fasteners (you can use tape for this or simply attach it to the window.
- Install the guide line. Thread the end of the fishing line into the hole and tie a knot there, thereby securing the fishing line.
- Secure the fasteners with self-tapping screws: make holes in the base using a pre-prepared drill, insert self-tapping screws and self-tapping screws.
- Insert the roller - the main part of the curtains (roll of fabric) - into the grooves and press down; a click should be heard.
- Install tensioners - fastenings at the bottom of the window. Measure everything with a building level.
- Secure the lower ends of the fishing line, drill holes and then insert self-tapping screws.
Installation of roller blinds depends on the type of window and the location where they are mounted.
Double-sided tape
The process of attaching roller blinds to plastic windows using double-sided tape is quite simple. Instructions:
- Mark the locations for fasteners at the top and bottom using a building level.
- Securely attach the fasteners to the frame of the plastic window using double-sided tape. It is better to secure several points at once with tape.
- Attach the fishing line.
- “Place” the roll roller in the grooves of the fastenings until it clicks and check the reliability - the roll with the web should not fall out of the fastenings or look unstable or wobble.
- Secure the structure and test it in action.
If this is a sash frame, then you can use construction Velcro. When replacing windows, you will not need to seal the holes later.
On brackets
To attach roller blinds to brackets, you first need to determine the places where these same brackets will be located. Using a building level and a pencil, you need to mark the places for the brackets and secure them (with self-tapping screws or tape). After this, you can “plant” the cornice with roller blinds on the brackets.
Having inserted the structure into the grooves of the brackets, you need to make sure that everything is securely fastened and check the finished curtains in action.
Options for the location of roller blinds
Depending on the type, size of the window, as well as the design solution for the interior of the room, roller blinds are attached:
- to the wall above the window;
- to the ceiling;
- to the window opening;
- to the frame;
- to the doors.
The first mounting method is suitable for a small window without a window sill. It will allow you to choose a long cornice that will visually expand the opening. Installing curtains above the window is also good for a small room, especially if you choose roller blinds of the same color as the walls. In this case, the space will visually increase.
For a wide and deep window opening, mounting to the frame is more suitable. Due to this, the window sill remains freely accessible, and a large curtain will not focus attention on itself.
Installation of guides
How to install guides. Instructions.
- Attach the guide to the base to which the curtains are attached.
- Mark the top and bottom of the guide.
- If necessary, cut off the excess part with a special construction knife.
- Prepare the second guide in the same way.
- Take the decorative box and compare it with the marks made earlier.
- Mark the locations for the screws.
- Drill holes.
- Start attaching the roller blinds with 1 screw.
- Check the functionality of the structure.
- Glue the guides with tape or glue to the roller blind.
- Secure the entire structure.
The adjustment and installation of the roller mechanism must be done carefully so as not to damage the frames or interfere with their opening.
Methods of fastening Roman blinds
Roman models can be attached to the surface in several ways. Typically this is:
- Without drilling holes in the surface - in this case, installation is carried out on the window frame or directly on the window sash. If the second method is chosen, then the canvas will be located as close as possible to the glass, as a result of which it will be possible to use the window sill and the space that remains around the frame for personal purposes.
- With drilling a hole - in such cases it is necessary to attach it to the wall or ceiling surface. It is important to take into account that the canvas will cover the entire window opening and part of the wall.
Models that are installed on walls and ceilings may differ in width and length, which is limited solely by the size of the room.
Attaching Roman blinds to the wall
If you plan to mount the canvas on the wall, you can choose the following options:
- use Velcro tape - it is recommended to purchase sewing Velcro, secure its reverse side to the fabric, and securely glue the other side to the ceiling surface; if necessary, the fastening points can be disguised using decorative elements;
- furniture staples - here you will need to use a furniture stapler, with which Roman canvases are shot to the surface of the ceiling - this method is the simplest, but there is a high probability that the canvas will be damaged.
The most popular mounting method is to use double-sided adhesive tape.
Attaching Roman blinds to the ceiling
To attach the structure to the ceiling, use a rail. The work algorithm looks like this:
- Markings are made on the surface of the ceiling - there should be 2 holes on each side.
- Fix the brackets securely to the wall surface.
- Install the railing using brackets for this purpose.
Fastening can be done using hooks.
Installing Roman blinds on windows
If you plan to install the canvas on a window using the drilling method, then the work should be performed according to the following algorithm:
- The first step is to decide on the location where the installation is planned. After this, appropriate marks are made to indicate the drilling locations. It is important to ensure that the marks placed are at the same level.
- Using a drill, holes are made, after which the brackets are secured using self-tapping screws. If necessary, the use of gypsum is allowed, which will significantly strengthen the structure.
- After this, the cornice is installed on the brackets and the Roman blinds are secured.
After all work is completed, it is recommended to check the functionality of the structure.
What are the errors during installation?
The most common installation errors:
- The window was measured incorrectly. In this case, the curtain does not cover the entire gap or, on the contrary, covers too much space and gets in the way.
- Start drilling holes without additional measurements and fittings. This can ruin the window finish.
- The markings are not applied correctly. In this case, the curtain will not be available for use.
- Inappropriate fasteners selected. The result is that the structure is not securely fastened and can fall to the floor or window sill at any moment.
- Incorrect installation method selected. Then the view of the window and the entire room will be ruined.
How to install roller blinds on wooden and plastic windows is assessed based on the interior design.
This way you can quickly hang roller blinds on any mount with your own hands without the help of specialists.
Features of attaching curtains to the ceiling
The basic difference between this path is the different arrangement of fasteners. In this situation, they must be placed with the holes towards the top of the window opening or towards the ceiling. That is, when purchasing you need to purchase special ceiling fasteners.
Attaching roller blinds to the ceiling using metal brackets
Note! For curtains of large weight and size - and these are the ones that are usually preferred to be hung from the ceiling - it is better to give preference to metal rather than plastic fastenings. They are stronger and more reliable.
Types of fastening roller blinds at the BOTTOM of the window.
At the bottom, fastening is needed for guides - such ropes (fishing line) that do not allow the unwound curtain to develop freely during a draft or when the window is opened completely or for ventilation. There are also differences here for opening doors and blind doors.
For an opening sash.
Everything here is the same as for the top part:
Same mounting method. The same advantages and disadvantages.
I’ll just add that you can do without these guides, but it’s not very convenient. That's why I attached them to all the windows. And even on blind doors (I’ll explain why below).
For a blind sash at the bottom of a plastic window.
You can attach it to a blind sash either using the above method or using self-tapping screws, but it’s even better (as it seemed to me) to do this using magnets with glue:
It’s a pity that such magnets are not included with all roller blinds. Moreover, nowhere on the curtain is it written which mount for the guides is included. Purely logically, I later figured out that if the curtain is very wide, then there will be magnetic fastenings inside (the manufacturer thought that wide curtains are hung on solid sashes, and opening sashes should always be narrow).
As you already understood, the magnets are attached very simply: tear off the protective film and press firmly to the desired location. True, in one room, these magnets came unglued after six months, so I forced my husband to put them on Moment glue - now they sit as if nailed down.
An iron plate is inserted into the lower part of the unwinding fabric, which sticks to these magnets.
The advantages of such a magnetic mount: it is very easy to attach, there are no fishing lines along the glass, it looks unnoticeable, it holds very tightly (even during a strong draft the fabric does not fly away).
There are also disadvantages There is no such drawback for guides using fishing line. After all, there the fishing line goes from the very top to the very bottom and therefore the curtain is fixed in any position. Well, the last drawback is that you rarely see these magnets complete with roller blinds.
How do roller blinds work day and night?
The curtain canvas consists of alternating stripes - thick fabric (“night”) and transparent mesh (“day”). In length, it is twice the height of a regular roller blind, since it is thrown over the shaft and wound onto it. As it moves, the dense fabric either covers the mesh, completely darkening the room, or opens it.
Interesting materials:
How to remove ink from a leather bag? How to remove blackness from an aluminum pan? How to remove double-sided tape from the refrigerator? How to remove the on-screen keyboard without a mouse? How to remove glitter from clothes? How to remove deep scratches on a plastic bumper? How to remove bitterness from Gruzdyanka? How to remove bitterness from salted milk mushrooms? How to remove bitterness from salty Volnushki? How to remove bitterness from Volnushki?
In which room is it better to hang roller blinds?
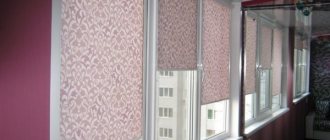
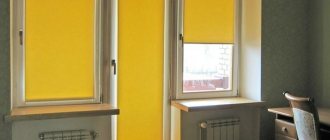
Roller blinds can be hung in absolutely any room, if this is the design idea and the desire of the owners. They look great in the living room, bedroom, and kitchen. Often, such curtains are used on sunny sides, because... They are able to provide reliable protection from bright rays due to the density of the fabric.
It would seem that the spirit of office style accompanies roller curtains, but, lo and behold, here you have an excellent harmony of roller curtains in a bedroom made according to a classic design. You don’t even need additional bulky curtains or curtains here.
Recommendations for choosing fastenings depending on the size and weight of curtains
To summarize what was written above, we can formulate a basic rule for choosing an installation method.
The larger the curtains, the more reasons there are to prefer mounting to the ceiling or walls. They can easily take on the additional load. If the size and weight of the curtains is small, then it is better to attach them to window sashes - this option is the most convenient for use.
Mini roller blinds with side rails are very popular, allowing you to completely block sunlight
Large size models are available for panoramic windows
By following the instructions on how to hang roller blinds on plastic windows, you can handle this process on your own without any problems, without any special training.
Installation of roller blinds with side rails
Some roller blind systems have additional elements - side guides in the form of thin strings. Their installation is carried out after attaching the curtains. Curtains with guides always come complete with special string clamps; you should pay attention to this in the store.
The string is cut to the required length. For guides on both sides of the frame, clamps are attached to the bottom. They can be glued or screwed with self-tapping screws. The string is attached to the edges of the shaft, the places are marked, you can find out about this in the instructions. The distance between them is measured, the same length of string is fixed on the bottom of the frame, and the attachment points of the lower clamps are marked.
Next, the string is passed through the holes on the curtain fabric in the lower zone. The string is tensioned and attached to the lower clamps. It should form a guide for the curtain fabric. It is best to install roller blinds with guides after studying the instructions. It is important to position the clamps correctly and tension the string well.
installation of roller blinds with guides