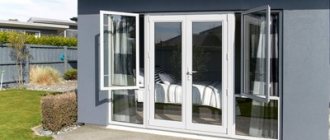
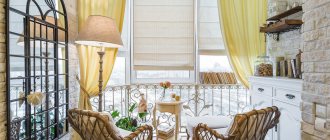
Balcony glazing is a way not only to visually expand a living space, but also an additional opportunity to create coziness and comfort in the home.
After installation, the protective functions of the frames are improved: when it rains, water does not seep inside, the wind does not blow through the loggia, and extraneous noise from the street does not penetrate.
Balcony glazing with aluminum profiles is suitable for budget-conscious owners. The structures are easy to care for; they simultaneously ventilate the room and retain heat. Profiles can be ordered to suit your taste - with sliding or fixed sashes. If desired, you can assemble the frames at your discretion using corner adapters and connectors.
The leaves in the design are distinguished by width and number - the larger, the narrower they are. The width and height are selected depending on weather conditions - the stronger the wind, the wider the sheet.
To glaze balconies with aluminum profiles, use primary material (obtained by reducing alumina, secondary material is obtained from recovered scrap, slag or waste).
Alumina is aluminum oxide found in soil. The structures are coated with polyester, a protective powder that increases resistance to weather conditions and the service life of the balcony.
Types of aluminum structures
By opening method:
- Doors that slide apart in parallel.
- Vertical.
- Slant (sliding window).
- Deaf.
- Multi-leaf (for large loggias with a large number of windows).
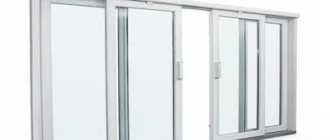
The method of parallel opening of the sashes is the most popular: the frame moves to the side on wheels and is fixed on a blind sash, which does not have an opening mechanism and does not allow the frame to move outside the balcony.
The vertical method, when the frame rises up and is fixed in the desired position, is not often installed.
The inclined method is the most labor-intensive - you need to pull the sash towards you, and it will slide out to the side like a shelf in a cabinet. Pros - it is convenient to ventilate the room.
Materials for sliding windows
Installation of aluminum windows can be carried out using a cold or warm method.
Cold glazing of a balcony with an aluminum profile is done if you do not intend to go out to the balcony often in winter. Aluminum has always been in demand, but only ordinary glass can be inserted into it.
Warm method: a heat-splitting insert is inserted inside the slats, as a result, cold bridges are not formed. For better sound insulation, the inserts are filled with polyurethane fillers.
You can choose wood as a material, but over time it dries out and rots. Even special solutions do not guarantee protection against mold.
You can install sliding plastic double-glazed windows. When installing yourself, it is important that the material is of high quality.
Installing sliding sashes differs from conventional window installation, but the advantage is not only convenience and freeing up space: mosquito nets on the windows are adjustable, and there is no need to move them from side to side.
Sliding window care
Aluminum sliding windows on the balcony are cleaned like regular ones, but there is one inconvenience - you can’t remove the sashes from the rollers - you won’t be able to put them back in place.
To clean glass from dust and dirt, alcohol solutions are used. It is best to wipe off stains with microfiber or a sponge.
Squidges (glass scrapers) are suitable for cleaning the exterior. A clamp attachment is attached to the long handle.
Rollers and other accessories need to be cleaned and washed periodically. Then the service life of the mechanisms will increase.
Don’t forget to check the operation of the locks and lubricate the seals and stops with protective solutions.
It is better to vacuum the guide grooves.
What is the difference between plastic and aluminum balconies
Aluminum glazing is not only a more economical option - the profiles are visually difficult to distinguish from plastic.
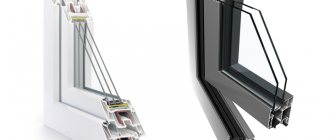
What is an aluminum profile: it is a rectangular strip or bar of metal, divided inside into insulated chambers (usually made of extruded aluminum alloy).
The thicker the internal partitions and the more hollow chambers, the stronger the balcony structure.
Although a plastic profile is characterized by increased resistance to solvents, acids, alkaline and mineral oils, people continue to buy aluminum profiles, because the cost of the material is several times lower, and the quality remains at a high level.
Metal structures can be hinged, framed, frameless, or sliding. The framed aluminum frame holds the multi-chamber glass.
The basis for the sashes and frames are metal profiles for balconies, made with alloys of zinc, manganese or magnesium (not in pure form). The surface is coated with a water-repellent composition, which guarantees protection against rust.
An aluminum profile for a balcony is inexpensive, unlike plastic (a thermoplastic transparent polymer of vinyl chloride).
To enhance the thermal properties, the profiles are installed with special thermal inserts inside the slats, which improve the thermal insulation inside the loggia.
Another advantage of the metal profile is its lightness and ease of installation. The metal sheathing creates less pressure on the window glass and parapet. Aluminum balcony glazing is recommended for buildings with a high accident rate.
Aluminum alloys retain heat well. Thermal breaks are installed inside the slats - inserts made of polyamide and aluminum that protect the frame from freezing.
Advantages of aluminum profiles:
- Lightweight design, thin sashes can be made - they do not sag and have a low load.
- They are not susceptible to oxidative processes (containing silicon and magnesium, the substances prevent the formation of a rusty coating).
- Resistance to temperature changes (from -82 to +190-200° C).
- Long service life (up to 80 years).
- Non-toxic.
- Easy to repair without the help of a specialist.
- Affordable price.
- Compatible with any design.
- Protects from street noise.
Minuses:
- “Warm aluminum windows” are more expensive (with the installation of thermal inserts).
- They can freeze at sub-zero temperatures.
- Unlike plastic profiles, they retain heat worse (they freeze completely in winter).
Plastic frames are a more modern and more expensive option. Pros: retain heat well, easy to install, withstand high temperatures.
The disadvantages are a high fire hazard and poor quality of the material. There is no point in installing plastic if the balcony is not insulated. If you want to drink coffee on the loggia in winter, insulate the floor, walls and ceiling.
The best manufacturers
Many manufacturers offer their aluminum products for glazing balconies.
The three most popular brands look like this:
- SCHUCO. This is a German brand whose products are of high quality. The products are durable and reliable.
- New Tex Group. This brand belongs to a concern from Italy. The products also boast of their quality and long service life.
- Provedal. This is a popular Spanish brand that is used for glazing of residential and industrial enterprises. The structures are lightweight and reliable.
Before purchasing products, you should read reviews about a specific brand, study all the technical characteristics and proposed profile modifications.
Aluminum sliding windows for a loggia: what are the pros and cons?
There are two types of windows - with sliding and hinged sashes.
Hinged sashes are convenient and more familiar in everyday life; they are covered with insulation and additional details that enhance the sealing of the windows.
The disadvantage of swing doors is that they take up a lot of space when opened.
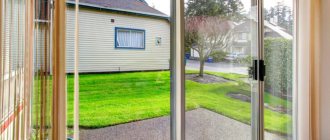
Sliding aluminum windows for balconies are increasingly in demand. When opened, there is a lot of space left, a free window sill. The sash can be easily removed and put back in place. Removable structures make windows easier to clean.
Disadvantages of sliding sashes:
- Icing and accumulation of ice and snow crusts.
- In winter, thermal conductivity is worse.
- Possible manufacturing defects include an uneven frame, due to which the sashes may move incorrectly or jam. You can only notice it over time.
- If the frames have not been treated with a protective solution, sooner or later the sashes will begin to become moldy.
The main reason for ice on frames is lack of heat in the house. While warm air circulates on the balcony, the window does not freeze, but as soon as the heat disappears, a crust of ice forms on the sashes. Therefore, before installing sliding windows, it is important to insulate the balcony itself.
Advantages of sliding sashes:
- Adjustable mosquito nets.
- Good sound insulation.
It is not advisable to install sliding structures above the 7th-8th floor. If the sash is more than 1.7 m high and more than 0.8 m wide, there is a high probability that under wind pressure it will not withstand the load and will fall out.
What does a sliding aluminum window consist of:
- Parts for opening or closing sashes.
- Double-glazed windows.
- Slats for fixing the glass unit in the sash (glazing bead).
- Fixed side frame (impost) - installed if there are two or more sashes.
- The sashes are frames for glass.
- The base of the frame on which the sashes are attached.
- Brush seal is a nylon tape with bristles that is glued along the frame. Does not allow moisture or dirt to seep in from the street.
- Fixed lower frame - divides the window lumen and fixes the sashes.
- Adjustable wheels (rollers) - located in the lower horizontal sash, fixed with a set screw. Improves frame movement to the side.
- Mortise or overhead latch - secures the doors in the closed position. Can be ordered with or without a key.
- Glass seal – closes the joint between the sash and the profile.
- Slopes and platbands on the outside and inside of the window.
- A wide strip at the bottom of the window opening for water drainage (low tide).
The warm aluminum profile has two pieces of glass with an air gap and a heat-insulating gasket.
The cold profile does not have built-in gaskets; in the cold season, the structure can withstand temperatures of -6°C.
Average prices in the Russian Federation
The average cost of aluminum balcony window structures depends on the manufacturer, the number of chambers, and the presence of thermal pads. Another factor is the type of mechanism: sliding windows will be slightly more expensive than fixed and casement windows.
For example , for 1 square of aluminum window you will have to pay from 2,600 rubles if you use the Provedal C-640 profile.
Installation prices also vary. They differ by region and by the companies that do the installation. The average cost of installing an aluminum profile is from 16,000 rubles for the complete package: visor, ebb, adjustment.
The difference between a plastic profile and an aluminum profile
Metallic profile
Installed on hanging balconies with slabs up to 6 m long. Most often, the slab extends beyond the outer wall (the protrusion can be up to 80-90 cm) and is not able to withstand a load of more than 450 kg. It is dangerous to place any pieces of furniture on such a balcony, not to mention massive double-glazed windows with additional cameras.
For this reason, on most balconies in older buildings, aluminum profiles are installed (cold glazing method, there are no thermal breaks inside).
Ordinary glass is installed in metal profiles, and there is more space left on the balcony, because there is no need to attach additional structures (a plate to support the frames). If desired, the profile can be placed deep into the balcony, thereby expanding the area.
The service life of such a balcony is longer, because the structure is lighter and is practically not subject to loads.
Frame dimensions:
- Minimum – 40 mm, sash – 47 mm (for cornice and other structural parts).
Aluminum structures can be not only cold, but also warm.
Warm option: double-glazed windows, thermal inserts, glass with thermoregulation are installed. This increases the weight of the structure.
Unlike plastic, which often has one standard size, aluminum is more flexible and easier to install - if desired, the doors can be given any shape, such as round or triangular.
The dimensions of the aluminum structure should not be more than 2 m - otherwise the upper profile will sag and the doors will not open normally. If the window is too wide, the sash may unscrew and fall out.
If the dimensions still exceed the permissible norm, then the frame must be reinforced with bars, and the upper metal profile with plates. For additional support, a special holding visor is installed.
How to evaluate the skill of installers if you don’t want to install windows yourself
Contact several companies and ask them to take window measurements. They usually do not charge money for this work. In addition, you can find out the total cost of installation and compare the difference between the two companies.
Before purchasing, check the documents for the materials (certificates indicate quality).
Keep in mind that the cost of services will be higher if glazing is carried out on the upper floors - additional installation and covering of the canopy is required.
Plastic profile
A plastic profile is half as heavy as a metal profile. Before installation, it is necessary to take into account the condition of the building - the walls and parapet may not withstand the pressure.
For weak walls of a house, single-chamber double-glazed windows with a thickness of no more than 60 mm are suitable. Single-chamber packages differ in the number of glasses inside the frame.
The plastic in the section is empty and separated by partitions. The quality and thermal conductivity directly depend on the number of these voids - if there are few of them, it means more heat is retained. The voids perform certain functions: one ensures heat conduction, the second – water drainage, the third is responsible for the strength of the structure.
The number of cavities can reach up to 8.
In many frames, one of the compartments inside is reinforced with a metal frame. The frame can be closed, U-shaped or L-shaped.
The main function of the frame is to provide additional rigidity, protect the frame from subsidence, which can occur due to frequent opening of the sashes, and reduce the deformation of parts.
The metal frame regulates air flow and enhances resistance to sudden temperature changes.
In order not to make a mistake with your choice, look at the markings before purchasing - they are usually indicated on the inside of the frame. The manufacturer's brand is also indicated there.
The plastic should be smooth to the touch. The first sign of low-grade material is a rough, slightly grainy surface. Over time, such a window may turn yellow or become askew due to strong pressure.
Pay attention to the color of the frame - at first glance, the plastic is all white, but if you look closely, you will notice differences in shades. A high-quality plastic profile will have a uniform color.
Types of metal reinforcement for plastic windows
An L-shaped frame is suitable for small windows; usually a long strip is laid between two walls.
In U shape, suitable for windows with a height of up to 190 cm, it reinforces the profile of three internal walls.
A closed (closed) frame closes four voids at once and greatly enhances rigidity. It is recommended to install if the loggia is very large; it is popular for installing panoramic balconies.
Double-glazed windows: number of chambers
If a two-chamber package has three glass compartments, then a single-chamber package has two, and between these compartments there is an air partition - air that retains cold and at the same time allows heat to pass through.
In a two-chamber package there are three air chambers, which means more heat is retained, but the load also increases.
The overall weight of the structure is affected by the thickness of the partitions. The larger it is, the heavier the plastic window. The minimum width starts from 60 mm and ends at 120 mm (usually for residents of the north).
Plastic is divided into classes A, B and C.
Class A includes frames with an external wall thickness of 2.8 mm and an internal wall thickness of 2.4 mm.
In class B, only the inner wall differs in thickness - from 2.0 mm (the frame retains heat less and can be damaged during transportation or installation. Installed in stores).
Class C includes frames with thinner walls. But such windows are also in demand - double-glazed windows are installed in utility buildings, warehouses and other industrial premises.
What is required for setup?
Most poor sash function can be corrected by adjusting the sash movement . To do this, you will need to purchase a set of hex adjustment wrenches, which are sold at any hardware store or construction market.
How to adjust correctly?
To adjust the rollers on the aluminum sash, lift the sash using a No. 4 hex key. In the frame at both ends at the bottom there are technological holes with a black cover; if you bend it, the adjustment screw required by the user will open.
If it is necessary to lift the sash, the key is rotated counterclockwise. Similar actions are performed from the other end.
Important. The height of the rollers is set very carefully, making sure that the sash is not skewed diagonally. In this case, it will not be able to close with a latch. The work is carried out according to the level, or, in extreme cases, plumb.
Algorithm for adjusting the latch of an aluminum frame:
If the mating part was incorrectly fastened during installation of the block, it should be twisted.
To do this, use a hex wrench No. 2.5, insert it into the hole in the center and unscrew it until the answer can move freely along the frame.Next, it is twisted so that the latch fits completely into the answer.
- If the tongue does not latch, you need to remove it.
It is held in place by a fixing screw. Pull the sash handle down, after which the hole for the hexagon No. 3 opens, it is rotated in the opposite direction to the fittings, for example, if the latch is on the left end of the sash, then the key is turned to the right and vice versa. Once the locking screw is loosened, the tongue becomes movable, it is pulled out and installed “flush” with the edge of the aluminum frame. - The fixing screw is tightened, the sash will close tightly with the latch.
Possible mistakes
Any window design has its own characteristics, therefore, before adjusting the operability of the sashes, you need to familiarize yourself with the product data sheet and the procedure for installing and operating the unit .
Failure to follow these simple rules leads to big problems in the operation of an expensive structure; it becomes a source of noise, moisture and cold. And this cannot always be eliminated using simple configuration methods.
If, after completing the adjustment, the situation with restoring the operability of the sash has not improved, you will most likely have to perform more complex repairs and, possibly, invite representatives of the block manufacturer to do this, especially if the warranty period for the kit has not expired.
An approximate list of restoration work on an aluminum sliding balcony frame:
- Replacing seals or damaged rubber products can cause misalignment of the sashes.
- Tightening of all fittings, followed by partial replacement of faulty components.
- Adjusting the operation of the valves.
Important! During practical developments in the operation of such aluminum structures, a direct relationship was established between the functionality of the sashes and the annual maintenance of the balcony frame.
Many owners do not even realize that such systems need to be serviced annually, which leads to premature failure of fittings and seals, which cause the shutters to fail.
What types of glass are there?
It is recommended to install single-chamber packages with multifunctional glass, which is coated with multilayer coating with the addition of silver oxide. Spraying not only improves thermal insulation, but also reflects sunlight. Such windows differ in their functions and have several names:
- i-glass: helps retain heat in the room. The main thing is not to confuse the sides during installation. If the spraying is located outside, then you won’t get any heat, it will go outside.
- im-glass: spraying has a slightly different composition; the main function of windows is to reflect the sun's rays, which heat objects in the house. By reflecting the solar factor, im-glass does not block the light source itself, which means the room will be just as bright.
What types of windows are there?
Arched
For arched windows, profiles are installed, made by a rolling machine, which gives the sheet metal a curved shape. This type of window can be seen in winter gardens or greenhouses.
Trapezoid
Trapezoidal windows can be isosceles (for a gable roof), rectangular (for a gable roof).
They are classified as non-standard designs, which are manufactured strictly to order. Feature: you need to accurately calculate the size and shape before installation; tilt and turn mechanisms must be installed (then you will get one right angle).
You cannot make an angle less than 30° - the tightness will be broken, the profiles will not fit together.
The shape of the windows may vary depending on the location. They are usually installed in attics, attics, or built into roofs at a certain angle.
There are different types of trapezoidal windows:
- Fixed windows are small windows that will not open.
- Rotary - opening with a handle. Provide good ventilation.
- Folding (fanlight) – tilt to the side at a certain angle (can be adjusted, difficult to clean).
- Trapezoid with a tilt-and-turn system (you can tilt the sash or open it with a handle).
Combination of aluminum, wood and plastic
Aluminum performs a barrier function, regulates the weight of glass and frames, and wood inserts serve as decor and are often installed on the outside of the street. Aluminum can be combined not only with wood, but also with plastic and copper.
More often they choose a combination of plastic and wood (the combination is classified as a warm profile). But if you choose by cost, then wood and aluminum are much cheaper.
Single-frame and double-frame windows are installed using thermostatic bridges (profiles are built inside). Aluminum and wood are connected to each other with special plastic clips.
The resulting chambers prevent the flow of cold air from entering the room and do not allow liquids to accumulate on glass and between materials with different thermal conductivities.
If the material is plastic, then it also protects the window from the accumulation of condensation.
Among the combined windows there are: Finnish, Swedish, German.
Fireproof windows
Profiles and double-glazed windows are made from a special fire-resistant material that holds the flame and increases the time to extinguish the fire (the glass does not crack, the frame does not burn). You almost never see such windows in ordinary houses.
The glass has markings that indicate the degree of fire resistance:
- At EL60 the glass will not crack within an hour.
- EL30 – 30 minutes.
- EL15 – will last no more than 15 minutes.
PVC marked “fireproof” does not withstand the onslaught of flames for long, since plastic is a flammable material in itself, no matter what the manufacturers say.
Metal structures hold back fire well (melting point 660°). It will take a long time to reach the critical incandescent point.
Aluminum frames can be installed in both cold and warm versions.
Wood treated with a special solution holds back fire quite well.
The disadvantages of wooden and plastic windows are the release of toxic substances during combustion.
Further care
Installing windows with aluminum profiles on the balcony is only half the battle. In order for them to work well and for a long time, it is necessary to properly care for them. To avoid scratching the surface of the glass, do not use cleaning products with abrasive particles. In winter, the structure must be used carefully. If ice appears on the window, you should not try to open the sash with force.
Aluminum itself is not a capricious material. If small defects and scratches appear on the profile, they can be easily masked using acrylic paint of a suitable color. It is important to periodically clean moving elements from accumulated dirt and lubricate them with machine oil.
Before you start glazing your balcony, you need to choose which option you need - cold or warm. If all work is carried out according to the instructions, then the aluminum profile balcony will be a cozy and warm area of the apartment.
Lamination and coloring of structures or glass
Using lamination, you can update aluminum frames and change their color. The profile is covered with heated glue, then with acrylic film (it must be pressed into the surface with a special roller).
The doors can be laminated on the outside, inside, or on both sides at once. But this must be done before installing the windows. If the windows are already installed, you can put a self-adhesive film, but this method will not be considered complete.
A protective film is glued to the glass to reduce light entering the room (from the street it is mirrored) and to retain more heat (energy saving).
There is a special film that protects the outer glass of the balcony from damage.
Metal profiles can be painted without lamination in any color (400 shades). For convenience, it is better to use a spray gun.
Installation
To install windows on the balcony, it is better to invite professionals, but you can do it yourself :
- a canopy is attached to the balcony slab;
- install an aluminum frame;
- attach a metal casting;
- install window sashes into the frame;
- seal the joints.
At the final stage, all window fittings are adjusted.
Learn more about installing the system here.
Aluminum windows to the balcony: step-by-step installation instructions
Tools you will need for the job
If you want to repair old window frames, then you cannot do without a scrap.
A hammer will be needed to hammer in fasteners and restore old sashes, and a chisel will be needed to repair the ebb and window sill.
You will also need: a building level, a tape measure, a screwdriver, a screwdriver, a concrete drill, hex keys, a mounting gun (to close any gaps that may appear after dismantling).
Removing old glazing: preparation for work
Clear out the balcony area: bring all bulky things into the room. You shouldn’t immediately break the frames - if you decide to glaze the balcony yourself, take measurements based on the old structures.
Using old frames, it is much easier to calculate the length and width. Don't forget to measure the width of the ebb, future window sill and sashes.
Make sure the top of the balcony is level. If the house is old, there may be distortions or unnoticeable roughness in the concrete.
Once all the dimensions are written down, start removing the frames (sometimes they come off the hinges easily, other times they require some work). Remove the slats and carefully remove the double-glazed windows.
Then remove the frames. In difficult cases, you cannot do without a crowbar, hammer or chisel - old, especially wooden structures can become stuck tightly, they need to be carefully pryed off with a tool. It's better if someone helps.
After removing the sashes, clean the concrete from any debris or glass. Measure the window openings with a building level - they must be level (otherwise the frame will skewer). Small unevenness is allowed, but if the potholes or depressions are larger than 10 mm, they must be filled with soil mortar.
The same goes for damaged, crumbling walls. Before you start glazing the balcony with an aluminum profile, restore all internal surfaces and put the room in order.
How to glaze a balcony: options
Without removal: the frames are installed on the balcony parapet or a support board fixed with fasteners. Even an inexperienced technician can handle such an installation.
With extension: the extension structure (up to 40 cm long) is attached to the balcony railing and fixed with brackets that press the frame to the wall.
Support bars are attached to the brackets (at the top and bottom); the frame itself should also rest on inclined bars. The resulting gap between the window is covered with a window sill. Installation cannot be carried out without support wedges.
1. Leveling the parapet
Most often, simple wooden blocks are used for support, but you can make supports with plastic (relevant for plastic windows).
Wood blocks must be treated with protective solutions (maximum length of blocks - 120 mm).
The blocks are placed under the vertical elements of the frame, including the impost.
Do not install double-glazed windows unless you have completed all the work on the outside of the balcony - make sure that you do not need to extend the roof canopy.
Step-by-step instructions for installing balcony windows
The installation of aluminum and plastic windows is practically no different. The only thing is that the plastic frame, unlike the aluminum one, cannot be extended beyond the parapet due to its heavy weight.
2. Attaching wooden planks
3. Drilling holes in the planks
Before you start glazing the balcony with an aluminum profile with your own hands, you need to prepare the place and clean the surface of the slabs.
Secure the external ebbs in advance (apply with a slight overlap).
4. Screwing in dowels
5. Level control
The next step is to assemble the aluminum frame. Before connecting profiles, check the material for defects.
Connect the frame structure, secure the profiles with self-tapping screws. Manual assembly is applicable only to metal beams (plastic is delivered already assembled).
6. Assembling the window frame
7. Attaching the gasket to the guide
You cannot make a mistake when assembling a metal box; the exact sequence of actions is indicated on the material.
After the structure is assembled, place rubber gaskets inside the slats, which will strengthen the seal.
8. Assembling elements
9. Fixation with self-tapping screws
The sashes must be installed at the end, with the glass already inserted and secured.
If you plan to install sliding doors, then the frame must first be fixed to a board or concrete surface with perforated tape.
10. Assembling the second frame
11. Attaching mounting plates
Mark the areas where the window fasteners will be located; during installation, they should be directed towards the room. Choose fastening materials to your taste. Use a chisel to make indentations in the places where the dowels are fixed (this way they will hide deeper and be completely covered by the slopes).
First of all, install the anchor plates on the lower corners of the frames (in this case, you must maintain a distance between the fasteners of no more than 39-40 cm). Then on the side profiles, and only then on the upper corners.
If the windows are very high, then fastening units are added to the plates.
12. Window sill installation
13. Attaching the window sill with self-tapping screws
The advantages of anchor plates are that they can be installed without removing double-glazed windows from “solid” structures. The plate is attached on one side to the window and door frame (to the outer end part), and on the other to the wall opening and ceiling.
If the plate has an “eye,” it is inserted into the frame groove and secured with self-tapping screws.
Fasteners without “ears” are pressed against the wall and immediately secured.
Anchor plates cannot be installed if the windows are large (more than 3.5-4 m) or if you plan to open the doors often. The fixing plates are not suitable for balcony doors.
14. Installation of the second part of the window sill
15. Attaching the second part of the window sill
16. Attaching a metal cast
Instead, you can install spacer dowels that will unite the structures, attracting them to each other.
Frame anchors (dowels) are often installed when there is no need to make a through hole. This method of fastening is more reliable, because after driving the dowel into a special sleeve, the anchor expands, it will no longer be possible to pull it out, and the frame is pressed tightly against the wall.
The downside is that you will have to remove the blind sash, and this can lead to damage to the glass if you are not experienced.
After installing the fasteners, install the structure in the opening, bend the plates and secure them to the wall.
The next step is installing the window unit. To do this, you need to install the frame box vertically and fix it.
17. Installing a window frame
Installation of a window unit
Mark the balcony blocks (done in the same way as for fasteners).
Insert the first part of the balcony frame into the opening from one edge, fix it, support it with blocks, check whether it is level (while tightening the dowels, the structure may “move”).
18. Attaching the window frame with screws
20. Installing a second window frame
If everything is in order, attach the lower part of the frame to the parapet (parapet). Screw the screws into the holes that were made when marking the balcony blocks.
After installing the first frame, install the second.
Using a hammer drill, make holes in the concrete on the ceiling for the frame anchors. Secure them with self-tapping screws.
21. Fastening frames to each other
22. Installation of the following window frames
24. Fixing the frame with a screwdriver
Once you have installed the window-door unit, remove the retaining pads from the sides, leaving the bottom ones in place.
Then you need to make an assembly seam (the composition is applied at a temperature not lower than 10°). All windows must be kept closed until the foam dries.
25. Attaching to the top slab
26. Installation of dowels
27. Level control
28. Installing the visor
Instead of polyurethane foam, you can put foamed polyethylene or a layer of thermolin - insulation, which consists of flax fibers.
Then, on a cleaned slab covered with a board, place a window sill (pre-align it horizontally), secure it with self-tapping screws, and tuck it in with wooden blocks in several rows.
29. Fixing the visor with self-tapping screws
30. Applying sealant to the visor
31. Fixing the visor
The final stage is applying polyurethane foam into the gaps between the window sill and the wall of the opening.
32. Sealing the canopy inside the balcony
33. Sealing ebb tides outside the balcony
34. Installing a window sash
36. Installation of limiters
Loading and weathering on the structure
The maximum width for a balcony box placed outside the structure is 1.5 m.
It should be understood that aluminum glazing of loggias and glazing of balconies have significant differences.
The loggia is enclosed by the walls of the building and stands on a solid floor slab. It will not be able to collapse, since it is an integral part of the entire house and therefore can withstand a large load. Despite this, you cannot exceed the total weight limit.
The aluminum balcony is enclosed by a parapet and is taken outside the house separately, that is, it is not an integral part of the building and can collapse due to the load. If the stove is connected to a living space, the pressure increases.
37. Finished balcony
There are attached and suspended balconies (they do not stand on the ground, but hang on brackets). Attached balconies stand on a separately built foundation.
Installing a balcony on the ground floor requires written consent not only from the residents of the house, but also from employees of the Bureau of Technical Inventory (BTI).
Employees of the organization calculate the load on concrete based on the following data:
- Condition of concrete slabs and age of the house.
- The number of people living in the apartment.
- Location and layout of the balcony (corner or central part).
- Influence of weather conditions (applies to balconies on the upper floors).
According to SNIP, the maximum load of concrete slabs of a new residential building should not exceed 200 kg sq. m. m. (at the loggia 400 kg sq. m.).
The total weight of the balcony along with household items, double-glazed windows, and decoration is 700-720 kg (the weight of a person is also taken into account).
For old houses, the load rate is 110-112 kg per square meter. m.. The older the building, the less the load.
As for metal profiles, the maximum weight of the structure should not exceed 16 kg m2. m. (without removal, and with removal +4 kg).
To increase the load, the concrete slab on the ground floor can be strengthened with supports and the foundation is poured.
Aluminum glazing of balconies at height includes additional reinforcement and strapping.
To determine the strength of the impact of weather conditions on metal or plastic balcony structures, you need to determine the number of the wind region. To do this, you need a geographic map of your region of residence.
Periodically you need to clean metal profiles from debris.
All standards are indicated similarly on the map.
Installing aluminum windows on a balcony is a rather complicated matter. Very often during work something goes wrong. If you are not confident in your abilities, it is better to use the services of professional craftsmen.
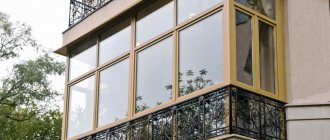
Stained glass glazing of a facade in a private house
With the modern development of construction technologies, not only profiled glazing of the facades of business centers, large shopping malls or public buildings has become possible. Spectacular aluminum stained glass glazing is increasingly being offered by architects for private construction - country houses, dachas, cottages. They are effective in the rapid construction of frame-type houses, which, with an established foundation, can be completed in one season.
There is no need to worry about the fragility of the structure, since special thick, specially tempered glass is usually used for these purposes - they are 5 times stronger than ordinary glass. If you wish, you can even put:
- armored glass;
- bulletproof glass;
- transparent plastic that bends;
- special mirror glass (when everything is visible from the inside and nothing from the outside);
- plexiglass or plexiglass (does not break, can be drilled and cut).
This is convenient for forming a special architectural design.
You can order aluminum glazing for a balcony or loggia in Moscow or the Moscow region by calling +7 (499) 370-35-51 or leaving a request by email. You can also leave a request through an online consultant on the website.