Floor repairs can include a whole range of work, including leveling and exterior finishing. Sometimes the question arises about raising the floor level in an apartment. This article will tell you how to do all the work correctly and not make mistakes.
How to raise floors in an apartment
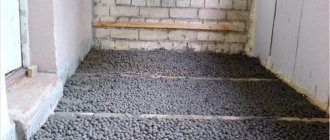
Screed with expanded clay on the balcony
The main reasons for raising the floor level
Usually, during renovations in an apartment or house - especially an old one, where the ceilings are quite low - they try to make sure that the floors rise slightly during leveling. But in certain situations, the floor level may still need to be raised somewhat.
The main reasons for raising the floor level
Quite often, the procedure for raising the floor is associated with the redevelopment of the room. For example, the floor can be raised onto a loggia in order to then remove part of the wall and increase the space of the room. Also, sometimes it is necessary to level the floors in the entire apartment and make them at the same level, and here, too, most likely, you will have to raise the base a little in some room.
In neighboring rooms, the floors can have different heights, and they can differ either significantly or by just a few millimeters. It depends on the house itself and the type of room layout.
Raising the floor with a dry screed
In a private house, raising the floor level may be necessary to lay an additional layer of thermal insulation if the previously laid one is not enough. To do this, you need to raise the base a few cm (about 10) in order to lay insulating material into the void.
Communications under the joist floor, installation
How to level a concrete floor and improve sound insulation and/or thermal insulation
If your apartment is not on the ground floor, there is a heated room below you, you should not be concerned about thermal insulation. Your floor will be at “room” temperature. If you want to make a warm floor, that's a different story and you will need electric or water heating. The base will also have to be leveled under it, and it is also advisable to insulate it so as not to heat up the neighbor’s ceiling. So, how can you level a concrete floor while improving heat and sound insulation?
How to level a cement floor and improve sound insulation
- Floating screed, under which insulation mats and polystyrene foam are laid. The thickness of the layer in this case depends on how much you want to improve the performance, but definitely not less than 6 cm.
- Lay plywood, gypsum fiber board, OSB along the joists, filling the gaps between the joists with materials with the required properties.
If at the same time you also need waterproofing, it can be implemented in both cases, and it can be either. This can be PVC film spread on concrete, built-up or coating waterproofing.
How to raise the floor
In general, the procedure for raising the floor requires certain knowledge and considerable financial and labor costs. At the same time, work is not carried out in all rooms at once if the scope of work is expected to cover the entire living space. Raising the floor level is carried out in each room separately according to individual calculations.
Important! Before deciding how the floor will be raised, you should make calculations and find out what load the floors can withstand without damage and without damage.
Wooden floor on the balcony with joists
All calculations are made taking into account the choice of finishing coating that has already been made, since the decision on how the floor will be raised will largely depend on its weight. Moreover, if different types of covering are installed in different rooms, then calculations are made individually for each of them.
On a note! The load on the floors may not be calculated if the apartment is on the ground floor and there is no basement underneath. If there is a basement, then you will have to calculate the load.
How to raise the floor
When calculating materials and permissible load, we can assume that the floor slab in a concrete house can withstand a load of about 400 kg/m2. And the density of reinforced concrete averages about 2700 kg/m3.
The main reasons for the procedure
Owners of apartments with standard ceiling heights do not face this problem. If it is necessary to install heating pipes in a room, they try to slightly lower the floor base so that after installing the system, the ceiling height in the room does not change. When the house was built on stilts, and the heating procedure from the lower part of the living space did not show a positive effect, it will be necessary to increase the height of the ceiling partitions and carry out thermal insulation work in parallel.
Another reason that led to the need to raise the floor is the leveling of the base of the slab. In this situation, the choice of building finishing material (finishing material) is made quickly, since many products in this category meet the requirements of a rough coating.
Raising the floor structure is most often necessary in different rooms: kitchen, bathroom, bedroom, corridor, hall. But sometimes, for safety reasons, you need to increase its height on a balcony or loggia. In this case, questions arise when choosing and purchasing building materials. This is due to the fact that in all residential premises the base of the floor is represented by a concrete slab, so the way out of this situation is to raise it in the most convenient way with minimal expenditure of money, effort and time.
Ways to raise the floor
There are 4 main methods of raising the floor. In general, they are all called screeds. Let's look at them in the table below.
Table. Methods for raising floors.
| Way | Short description |
| Screed made of cement-sand mixture | This is the most popular and familiar method to many. And the most durable even with intensive use. However, many builders do not like to use this method due to the long drying time. The cement-sand screed itself can be laid quickly, but after that it dries for about a month. And other work cannot be carried out during this period under any circumstances, otherwise all the work will go down the drain. It will be very difficult to correct the mistakes made. Also, a cement-sand screed is a rather difficult way to level the floor, and it puts a colossal load on the floors, which requires careful calculation and consideration of the amount of materials and the permissible height of the screed. |
| Self-leveling floors | This is a special type of screed, which is made using special self-flowing building mixtures. It is usually used for additional leveling of the floor and if the level needs to be increased slightly. The type of mixture for pouring floors is selected depending on the conditions in which the floor will be used - a wet or dry room, in a heated or unheated room, etc. One of the main advantages of this method of raising the floor level is the high drying rate of the poured layer. However, it is important to remember that self-leveling floors are very demanding on the condition of the base - it must be well cleared of debris and leveled. Yes, and such mixtures are not cheap, but they require a lot of attention during the pouring process. |
| Dry screed | To raise the floor level, you can make floors from gypsum fiber - this is the so-called dry screed. GVL slabs are laid on a leveled expanded clay bedding. In this case, installation occurs quickly, the process does not generate a large amount of dirt, floor design work can be continued almost immediately after laying the slabs, and this method of raising the floor significantly increases the thermal and sound insulation of the base. But GVL floors also have disadvantages - it is waterproof, and if the floor level rises significantly, you will have to use a lot of expanded clay bedding and over time, because of this, the floors may sag. |
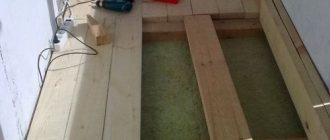
| Floors on joists | This method, like cement-sand screed, is considered one of the most popular and is considered traditional. It has become especially often used recently both for arranging floors in private houses and apartments. It makes it possible to raise the floor by a certain amount with particular precision and is ideal for laying laminate and parquet. The work is completed quite quickly; after completion, you can begin laying the topcoat immediately. Using this method, the floor level can be raised to 15 cm or more, while the ceiling will not experience significant load. In the voids remaining between the joists, various communications can be placed or additional floor insulation can be done. But the lag system also has its drawbacks - if the work is done incorrectly, the floors may begin to creak or sag. |
Deciding on the method of leveling the concrete floor
Once you have decided on the maximum difference in floor heights, you need to analyze what can be improved with little effort. Take a close look at your floor. It often happens that there is some kind of hump that creates a large difference. cutting down concrete is still a pleasure, but if it helps reduce costs or reduce repair time, then you can do it. When everything that could be corrected has already been corrected, the height difference will again have to be determined. Next, you can choose how and with what to level the concrete floor.
Leveling a concrete floor in this condition is not at all easy.
For small differences up to 5 mm
If you have differences of 1-1.5 mm per two meters of length, this is generally an almost ideal floor and there is no need to level it. You can put any covering. If the situation is slightly worse, but the differences in height of the concrete floor are up to 5 mm, such deviations are considered small. Leveling a concrete floor can be done in several ways:
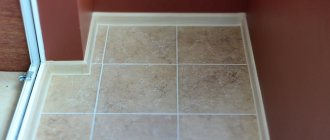
- There is no need to level it under tiles or porcelain stoneware. This difference will be covered by the thickness of the adhesive composition. But glue consumption will be higher.
- Concrete floors with differences of up to 5 mm can be leveled with a leveler. These are self-leveling compounds, which are specifically designed to level differences of up to 5 mm. For this case, finishing or medium levelers are suitable. Finishing ones are more expensive, but have greater fluidity, due to which differences after their use are minimal. But if the flooring does not require an ideal base, it is quite possible to get by with an average leveling compound - the costs will be lower.
Self-leveling floors can be made in layers from 1 mm to 15 mm - Use tile adhesive for leveling. But, firstly, the floor needs to be primed, and secondly, it is more difficult to work with than with self-leveling floors. The glue is diluted according to the instructions. You can just slightly increase the amount of water. But just “a little.” The main difficulty is that the composition is sticky, sticks to the rule and the spatula, and is difficult to level. The price is not much cheaper than with levelers, and it is easier to work with them.
Can also be leveled with tile adhesive
When choosing a composition for leveling a concrete floor, pay attention to strength. The strength of the leveling layer should be the same as the base. A difference of 50 units is acceptable, no more. For example, if your screed is M150, then the leveling layer cannot have a strength higher than M200. Why? Because if tensions arise in it (and they will arise), it will simply tear the bottom layer. And cracks in the floor are not good at all.
Differences up to 3 cm
Leveling a concrete floor with height differences of up to 3 cm is the most inconvenient task to implement. Laying a concrete screed less than 3 cm thick is problematic, since to guarantee long-term operation the layer must be 3 cm or more. If you can raise the floor level a little, you can use:
- Concrete screed made of DSP or expanded clay concrete.
- Dry screed on expanded clay chips with special GVL slabs (Ceresit technology).
How to level the floor without screed. The fastest way - Dry screed the floor with joists, but you will have to raise the floor by at least 6 cm. But you can improve the sound and heat insulation.
Leveling the floor under laminate, linoleum using a dry screed along the joists
If raising the floor level is not in your plans, you can use levelers. A coarse or medium composition will be needed. Look at the thickness of the layer. Three centimeters - most likely, you will find only in the starting lineups, and smaller ones (up to 15 mm exactly) can be found in the middle ones. Be prepared for the fact that when using a starting leveler, another layer may be required - a finishing layer.
How to level a concrete floor with differences of more than 3 cm
Leveling a concrete floor in an apartment with a height difference of more than 3 cm is traditionally done by laying a DSP screed. If you need to cheaply level the floor, DSP is your budget option. But the cement-sand screed for leveling has a serious drawback - it “matures” for 28 days. Moreover, at least the first week it is necessary to maintain high humidity. Then wait until it dries. In order for the concrete to be strong and not crumble or crack, the drying process cannot be artificially accelerated. And only tiles can be laid on a damp base. Other floor coverings have fairly stringent requirements for substrate moisture.
If you don’t want to deal with “wet” processes or the ceiling does not allow you to add a large load, leveling the concrete floor with a dry screed will help. There are two options - bulk and on logs. The second option is when one of the sheet materials is placed on the logs - plywood, fiberboard, fiberboard, gypsum fiber board. We get a flat surface with minimal differences. But this method will lead to the floor level rising by at least 7-8 cm.
Leveling the floor using beacons is one of the most popular methods
The bulk method of making a dry screed is to pour granules (usually expanded clay) onto the floor, level it and lay the same sheet material on it. It's easier and faster to do, but it has its own peculiarities. If you use the wrong backfill or level it poorly, during operation you may end up with distortions, holes, and dips. But, leveling the concrete floor in this way, following the technology, gives very, very good results. The “load capacity” of such a floor is up to 10 tons per square meter. So more than enough.
What to do if the concrete is covered with bitumen mastic
Sometimes, after removing the old floor covering, it is discovered that it was lying on bitumen. This situation often occurs in old housing stock. If you plan to level the concrete floor with a screed using beacons, all you need to do is inspect it for cracks and peeling. The peelings must be removed and the bald areas covered with a new layer of bitumen. Fill out the cracks as much as possible. Fill with polyurethane glue or epoxy resin, and also fill with bitumen on top.
If the damage is too extensive, remove the old bitumen completely if possible. If you can’t remove it completely, remove only the damaged areas and fill the cracks. Coat everything on top with a new layer - there will be excellent waterproofing.
If a bitumen-impregnated floor looks like this, it's best to remove everything
If you plan to level a concrete floor using “levelers” (levelers), it is advisable to remove the bitumen. It has a too smooth surface, which has a bad effect on the level of grip. A “spatula” attachment is installed on the hammer drill and beaten. Then they remove debris and dust, and prepare the surface for priming.
If bitumen cannot be removed, you can go over the leveling mixture several times with soil for difficult bases. The adhesion will be sufficient, but the cost of such a primer is high. When the soil is dry, you can pour the levelers.
How to raise the floor in a wooden house
In a wooden house, the floors can be raised using any of the above methods - there is no need to worry about the load on the floors, since there are none here. The best options are wooden logs or cement screed. And you should choose depending on which method the home owner likes best.
Important! When installing a floor in a wooden house, do not forget about high-quality insulation, as well as the mandatory waterproofing of the floors. Otherwise, the floors will quickly become unusable.
Waterproofing a wooden floor
If in a private house the floors need to be raised to a considerable height, then you can combine both cement screed and logs. First, a concrete base is made, on which a wooden structure is then installed.
Additional methods for processing wood bases
A small difference in the surface of a wooden floor, within 0.5–2 cm, allows the use of a technique such as scraping. The work is performed manually or mechanically, depending on the area of the premises. The process requires attentiveness and accuracy from the performer - protruding nail heads and other defects that can lead to breakdown of the sanding machine must be eliminated. Therefore, it is worth entrusting the scraping to professionals. Moreover, they may have a tool that an inexperienced specialist does not have - high-performance sanding and parquet sanding machines or hand tools that are indispensable when processing floors in the corner of a room.
If the difference in levels between different sections of the floor is less than 20 mm, the surface is leveled using a self-leveling mixture. The principle of laying the material is practically no different from the work of leveling a concrete base, although some nuances should be taken into account:
- Before carrying out work, you should ensure that all worn and broken boards are replaced, as well as cracks and defects are filled with putty;
- before pouring the solution, the floor is additionally primed and waterproofed;
- A reinforcing polyethylene mesh placed on a layer of cement mixture that is beginning to set helps to further improve the performance characteristics of the treated surface.
One of the cheapest ways to level the floor is to use PVA glue and putty made from sawdust. It involves laying guides and applying a thick mixture of adhesive and base material to the floor. When this mixture dries, plywood sheets are fixed on top of it.
How to raise the floor level in an apartment?
In an apartment, raising the floor is done differently depending on where the work will be done. Kitchen, bedroom, bathroom or loggia - everywhere the floor level will rise in its own way.
You should be guided by the following principles: if the floors rise to a level of up to 8 cm, then the screed is easiest to make using the wet method, that is, using a cement-sand mixture. In some cases, the ceiling can be additionally covered with expanded clay mixture. If the apartment is located above the first floor, then you can do without additional insulation.
Floor installation methods
On a note! A regular screed by itself will raise the height in the room by up to 5 cm, even without laying insulation or joists.
If it is planned to create a multi-level screed in the rooms, that is, a floor of a certain height will be made in each room, then calculations are made for each of them separately. Here it is optimal to use the method with logs, because with such a design it is most convenient to change the height.
Raising the floor in the bathroom or kitchen
The kitchen and bathroom are rooms where air humidity is quite high. Therefore, it is not recommended to use structures made of wood or plasterboard to raise the floor level. The best option is cement-sand screed or self-leveling floors.
How to raise the floor in the bathroom
A layer of waterproofing materials must be laid. This could be roofing material or polyethylene film. It is also worth remembering that the floor level in the bathroom or toilet should not be exactly the same as in other rooms. The fact is that it is in these rooms that floods usually occur due to the presence of water pipes. And if the floor level here is the same as in other rooms, then if the apartment is flooded, water will get into other rooms. A small threshold or drop will allow the water to remain in the bathroom.
Waterproofing the bathroom floor
Important! If pipes are replaced, then all communications are changed before the screed is poured. Otherwise, you will have to carry out a number of additional works to create holes in the floor for laying pipes.
Features of pouring the mixture
In order for the mixture, regardless of whether it is cement mortar or self-leveling floors, to fully retain its functionality and properties, a number of conditions must be met:
- It is recommended to fill the solution at a temperature of 5-25 degrees;
- recommended air humidity – no more than 90%;
- there should be no drafts for at least 24 hours after pouring. To do this, it is recommended to close all windows;
- During the finishing process, it is recommended to make a slight slope of the floor.
By following all these recommendations, you can make a strong and durable bathroom floor with your own hands. The answer to the remaining questions will be provided by the corresponding video.
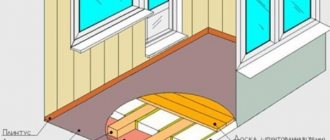
Raising the floor on a loggia or balcony
During construction, the floor level on a loggia or balcony is often lower than in other rooms. However, it is often raised in order to avoid tripping over the resulting threshold. Also, raising the floor level on the balcony and loggia is done if this part of the housing is planned to be combined with the room in which it is located.
When raising the floor level on the balcony, care should be taken to waterproof it. To do this, the base can be treated with bitumen mastic or covered with film.
DIY balcony floor
Removing outdated wood flooring
This process is the most labor-intensive and unpleasant, but it is impossible to do without it.
When the old floor covering is wooden, you will need to prepare the following tools for dismantling:
- hammer with nail puller;
- hatchet;
- mount;
- screwdriver;
- electric saw or jigsaw (they will be needed for cutting old boards);
- shovel;
- garbage bags.
Dismantling begins with removing the baseboards along the perimeter of the room.
If you plan to re-lay floorboards or old boards will be used for the construction of joists, then they should be dismantled very carefully, trying to minimize damage. Use a nail puller to remove previously driven nails, and use a screwdriver to remove self-tapping screws.
When the removed wooden elements are no longer needed, they should be removed from the apartment. After freeing up the space, they begin to dismantle the logs. Very often they are securely attached to the rough base, so they must be removed carefully so as not to damage the base. Otherwise, you will have to waste time sealing the resulting holes.
Raising the floor level in rooms
In rooms, you should choose the method of raising the floors according to your own preferences, the strength of the floors and the properties of the selected finishing coating. Since the area in residential premises is usually larger than in a bathroom or toilet, the mass of the cement screed here will be significant. Thus, in rooms it is easier to use a wooden joist system to raise the floor.
In general, the floor level usually rises to a maximum of 10 cm, and according to average indicators - only 2-3 cm. If the floors need to be raised as much as possible, it is also recommended to use a joist system. The voids between them can be filled with insulation or other materials so as not to “move through the air.” It is optimal to use mineral wool or polystyrene foam as a filler.
Raising the floor in an old apartment
So, the decision on choosing a method to raise the level is influenced by the following aspects.
- Budget for repairs . Some materials are more expensive, others are cheaper, and you need to correctly calculate all possible options and choose the best one.
- Rationality of the work carried out . You don’t always have to choose a complex and time-consuming option; sometimes the simplest is enough - it will be enough to lift the floors without effort and at minimal cost.
- Labor costs . It is always worthwhile to adequately assess your time and effort that will have to be put into performing certain works.
Floor raising technology
Let's get acquainted with the technology of raising the floor using cement-sand screed.
Step 1. The floors in the room where the work will be done are thoroughly cleaned of debris and leveled as much as possible. After this, using a building level, markings are applied to the wall, marking the level of laying the expanded clay mixture. Using a tape measure, measure the height from the rough base to the marked line. This is necessary to calculate the amount of mixture.
Marking walls using a laser level
Step 2. The area of the room is calculated. The required amount of material is purchased - expanded clay and sand concrete mixture M 300, as well as reinforcing mesh with a section of 6x6 cm.
Sand concrete - dry mix
Calculator for calculating the amount of ingredients of a mortar for floor screed
Go to calculations
Step 3. Expanded clay consumption – 1 bag per square meter. It is poured out in an even layer on the floor. In this case, it is recommended to focus on the previously applied markings so as not to overdo it with the amount of expanded clay.
Filling the floor with expanded clay
Step 4. The sand concrete mixture is diluted with water to a liquid state. It is poured onto the surface of expanded clay. Wait until the mixture sets a little.
Pouring sand concrete mixture
Step 5. A reinforcing mesh is laid on the spilled expanded clay mixture. Individual sections of mesh are laid overlapping each other in 1-2 cells.
Laying reinforcing mesh
Step 6. Using a building level, markings are again applied to the walls, this time at the level of the finished floor.
Laser level
Step 7. Beacons are installed. They sit on the solution and are sunk to the desired level. Lighthouses must be located on the same level. The distance between them should not exceed 1.5 m.
Installation of beacons
Step 8. The sand concrete mixture is mixed with water until it reaches the consistency of sour cream. The floor is being poured.
Pouring the floor with sand concrete mixture
Step 9. After this, using the rule, the mixture is carefully leveled. The rule must be of such length that it applies to two beacons at once.
Leveling the mixture using the rule
Step 10. Once the screed has set, check the floor level. This can be done using a rule (see if there are any unevenness) or using a level.
Checking the floor level
Video - Screed with expanded clay
Carrying out work with large differences in the concrete base
Cement screed is the cheapest way to level the floor and is required when there are large differences. And in order to further simplify the process, guide structures - beacons - are used. They are fixed to the floor at a distance of 500–800 mm, aligned in one plane using a level.
The next stage is to prepare a solution of the appropriate consistency, add plasticizers to it and place the resulting material on the concrete. After the screed has set, the guides must be removed by filling the remaining grooves with solution. After 4 weeks, the surface of the screed is rubbed and strengthened by treating it with a primer. A faster way to level a large area is the semi-dry screed technology.
Raising the floor without screed
On a loggia you can raise the floor level without using a screed. Let's look at how this is done.
Table. Raise the floor level.
| Steps, photo | Description of actions |
| Step 1 | The base of the floor is thoroughly cleaned of debris. |
| Step 2 | The adhesive composition is applied to the cleaned base using a notched trowel. |
| Step 3 | Polystyrene slabs are placed on the glue and pressed carefully. |
| Step 4 | The entire base is covered in the same way and dried well. |
| Step 5 | Next, a layer of reinforcing mesh with small cells is laid on top of the polystyrene slabs. It is laid with an overlap in 1-2 cells. |
| Step 6 | A layer of adhesive is applied to the mesh. |
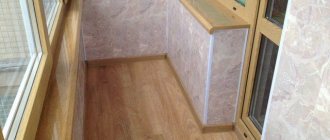
| Step 7 | Next, a layer of finishing coating is laid. |
Prices for Ceresit tile adhesive
Ceresit tile adhesive
Carrying out preparatory activities
Before laying a new floor covering, the base, cleared of old material, must be brought into proper shape:
Dust is removed from the surface to see if there are any defects in the base, such as cracks or crevices, areas with peeled or crumbled pieces
Also pay attention to the presence of traces of mold and dampness. If the above defects are detected, they must be eliminated - otherwise the effect of thermal and sound insulation will be less. To do this, use cement mortar, sealant or foam.
The choice of material depends on the extent of damage to the base. If fungus or mold is detected, the concrete is treated with impregnating antiseptics. After the subfloor has dried, the list of further measures depends on the type of new floor surface.