It is quite difficult to imagine a house, a modern office or an apartment without sun blinds. They are convenient and easy to use, undemanding in maintenance, and ideally protect the room from sunlight.
From the extensive range of products, even the most picky customer can choose a model to suit his taste.
Fabric, plastic, aluminum vertical sun blinds, Japanese curtains, pleated, roller blinds with a chain mechanism - such a variety of products is fertile ground for the most unexpected and original design ideas.
Installing blinds is quite a difficult task. Therefore, the installation process must be taken seriously, because the durability of the product and comfortable operating conditions depend on it. In this case, it is necessary to take into account any nuances of the design, as well as the features of the walls in the room.
Methods for installing blinds
There are several ways to install blinds yourself.
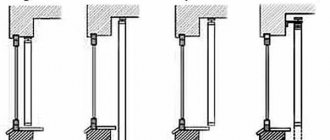
If the window is slightly recessed into the wall, the blinds are installed in the window opening. In this case, the size of the blinds should be a couple of centimeters smaller than the width and height of the window opening.
When the window is recessed into the wall, it is possible to install a curtain above the window opening. In this case, the blinds better cover the window from the sun's rays. The width of the blinds should be 10 centimeters greater than the width and height of the window opening. After installing the product, you should check whether it is possible to open the window with the blinds raised. When blinds are installed in window sashes, the size of the product should be 3 centimeters larger than the width of the glass in the sash.
This design opens simultaneously. If the window and the wall are flush, the blinds are installed on top of the window opening. They are mounted on special brackets located away from the wall. The width and height of the blinds should be 10 centimeters greater than the size of the window.
Ceiling mounting
First, brackets are attached to the ceiling using self-tapping screws or adhesive tape. Despite the apparent fragility, fastening with special tape is very reliable, so it is important to accurately apply the markings and apply the guide rod evenly. Otherwise, the glue will quickly set and it will be impossible to move or correct.
Installation begins with markings, then, if self-tapping screws are used, you need to drill holes for them and drive in dowels.
The next step is fastening the cornice, installing the verticals on a pre-tensioned guide cord using c-clips. All that remains is to fix the blinds and install the side plugs.
Installation process
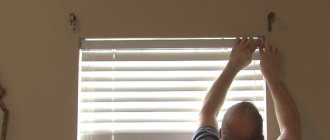
Before installing curtains/blinds, you need to make sure that they will not interfere with the opening of the window when folded. Then you should measure the same distance from the edge of the window on both sides and mark the points - this is where the first fastening will be located.
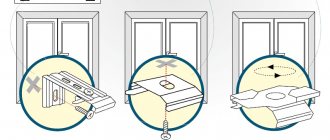
A hole is drilled in the wall and a dowel is inserted that matches the type of wall. The mount is screwed on with screws.
At the next stage, using a level and a ruler, mark the location of the second fastening. According to the principle similar to the first fastening, the second fastening is installed.
When installing large horizontal blinds, additional intermediate fastening should be provided. It is placed at a distance of approximately 10 cm from the adjustment mechanism, since this is where the maximum loads occur during operation of the structure.
If vertical blinds larger than 160 cm are installed, three mounting brackets are installed to the ceiling when fastening them.
At the final stage, the blinds are inserted into the mounts, and the product is ready for use.
Despite the seemingly simple theoretical process of installing blinds, you must understand that this is a labor-intensive and complex process that is influenced by many factors.
Therefore, the best option is to turn to professionals. By dialing the phone number +7 (846) 205-0-200, place an order, and Bihagen specialists are guaranteed to fulfill it in the shortest possible time.
Until recently, blinds were considered an indispensable attribute of public and commercial premises and offices. Their presence on the windows gave formality and detachment, and it was difficult to imagine that they would very quickly conquer home interiors, becoming an integral part of the climate control system. Blinds are one of the simplest and most affordable ways to enclose the rooms of your apartment or house, a glazed balcony or winter garden from excessive insolation, as well as from unwanted attention from passers-by. A variety of constructive and design solutions will allow everyone to choose blinds to their taste.
Based on the design features, there are 4 main types of blinds. Horizontal systems, in which the plates are assembled into a canvas using threads, and their angle of inclination is adjusted using plastic sticks - handles or chains. Such blinds are usually assembled upward. Vertical systems, which are assembled into a canvas on a horizontal carrier and can rotate around its axis, move apart to the sides or assemble at one of the sides. Roller. Designed similarly to roller shutter systems. A one-piece protective fabric, which, if necessary, is easily wound into a roll, can be made of natural or synthetic fabric, or special materials with increased light protection. Pleated.
This type of blinds can be attributed to the latest design developments. They are fabric treated with a special compound and corrugated. They can be either horizontal or vertical, controlled by a cord or chain, and are lightweight and come in a variety of colors. They can be mounted both on the frame and inside the window opening.
Product Features
Vertical curtains close from top to bottom in the classic design or from both ends at once. The pleats can be partially adjusted, covering some parts of the entire structure.
The blinds can be rolled up compactly and then hidden inside the guide cornice.
Scheme
You can install curtains regardless of what material the main structure is made of. There are several ways to attach and adjust.
Fabric items can be washed on a delicate cycle in an automatic washing machine. Blinds are often combined from two types of canvas to regulate the degree of illumination in the room.
A detailed overview of vertical products is shown in the following video:
Self-installation of blinds - is it so difficult?
Installing blinds is usually not particularly difficult, even for those who have little experience in such work.
Each kit, in addition to the canvas itself, control system, box or guides, includes one or even several sets of fasteners, each of which is designed for different installation options. Important: Before purchasing blinds, you must determine exactly what size they should be. And it, in turn, depends on the intended installation method. If you plan to order blinds from a specialized company, it is better to entrust the calculations to specialists. This will reduce the number of errors and rework.
If you plan to do this work yourself, you will need to consider the following points: Inside the opening. If you want to mount blinds inside the opening, then their length and width should be 2 and 4 cm less than the opening, respectively. Outside the opening. In this case, the width of the blinds should be 15 cm greater than the width of the opening. The height should be at least equal to its height. On window sashes.
In this case, the blinds should be several centimeters larger than the glass unit. The main requirements in this case are the absence of interference when opening windows and a free window sill. To install blinds you will need a set of fasteners, a screwdriver or a screwdriver, a drill, a ruler and a pencil (marker), screws or dowels (depending on what surface it will be on). fastening), as well as either special brackets or latches - clips. The choice of fastening method depends on the design decision, the presence of construction flaws and the required width of the window sill. In addition, sometimes there is a need to use fastening methods that do not require drilling holes in walls and windows.
Overview of mounting options
Now let's move directly to the workflow. When installed in different ways, the size of the blinds varies within significant limits. Therefore, I strongly recommend that you first read this section, choose the method that is most suitable, and only then order blinds according to the recommendations that will be given in the corresponding paragraph.
There is no need to rush; in construction and renovation, this always leads to unnecessary costs or problems during the work. Only after understanding all the nuances, proceed to choosing the product and its installation.
Method 1 - fastening inside the opening
A very common solution, which is characterized by a fairly simple workflow and is highly reliable. Installing blinds on a plastic window yourself can be done in several ways:
- On the top of the window frame, this is a very popular solution due to its simplicity;
- On the wall above the window, if the space in the opening allows this;
- On the top of the opening, if it is not possible to use any of the above methods.
Attaching to the top of the opening is the most difficult, so if possible, use another option
If you decide to use this particular option, then here are recommendations on how to choose the optimal size of blinds:
- The width of the system should be 4 cm less than the width of the opening, that is, you should have 2 cm gaps on both sides . This is necessary not only for the free movement of the structure, but also for the normal fastening of the upper box, since it can be wider than the lamellas themselves;
Such gaps will ensure easy installation and operation.
- The height of the system should be 2 cm less than the height of the opening. But there is an important nuance here - if one or two doors open, then the box should be positioned so as not to interfere with the operation of the structure. If this does not work, then it is better to use the option of mounting on the doors, which we will describe below.
To carry out the work we will need the following:
| Equipment | Description |
| Mounting brackets | Most often they come included, but sometimes you need to purchase them separately. For example, if you are mounting the system to the ceiling, then a wall bracket may not be suitable, although many modern manufacturers include universal elements that can be used for any type of work. |
| Blinds | You must purchase a ready-made kit in sizes taking into account the recommendations described above. Usually the structure is assembled and you only need to make sure that the cord is not tangled |
| Mounting brackets | Most often they come included, but sometimes you need to purchase them separately. For example, if you are mounting the system to the ceiling, then a wall bracket may not be suitable, although many modern manufacturers include universal elements that can be used for any type of work. |
| Screwdriver | With its help, self-tapping screws will be tightened; if you fix the blinds on the frame, then no other power tools will be needed |
| Hammer | It is necessary when drilling an opening for installing dowels, with which the mounting brackets will be fixed. Naturally, the kit must include a drill of the appropriate diameter and length |
| Measuring tool | Of course, you can’t do without markings; a level, ruler or tape measure and pencil are used for the work. It is important to place the blinds level, so do not do the work by eye |
The configuration of the brackets depends on the mounting method
Now let's figure out how to install the structure correctly:
- First you need to unpack the blinds, make sure that everything is in order and there is no damage. Then the box is tried on the opening, you must check if everything is in order and if all the dimensions match, it won’t take much time, but everything will definitely be in order. If the shutters at the window open, then be sure to check whether the frame does not interfere with their movement, do not miss other little things like handles on the windows, blinds should not rest against them;
Be sure to try on the design before starting work
- Using a level, you need to mark the horizontal on the surface; just put a couple of dots or strokes so that you can orientate yourself to them while working. Next, attach the brackets and mark the points for drilling the holes; if you are attaching to the wall or the top of the opening, if you are fixing it to the frame, you must also put the points in the right places;
- If you need to drill holes, then this part of the work is done, after which plastic dowels are inserted, creating holes for the screws that will secure the fasteners. In cases where you are attaching to PVC, you can immediately screw special screws into the plastic; they fit well into the material. It is much easier to work with a screwdriver, although a regular screwdriver will do;
Self-tapping screws can be screwed into plastic even without drilling
- If the brackets are installed correctly, then fixing the container with blinds in them will not be difficult; it simply snaps into the fasteners. The structure must be held securely and not move at the attachment points;
- Lastly, the operation of the system is checked; everything should move easily, without any problems or obstacles.
Method 2 – fastening from outside the opening
Now let's figure out how to install the blinds outside the opening yourself. This option is suitable for cases where the window is not recessed deeply into the wall and if you need to darken the room as best as possible, there are two mounting methods:
- If the window is located deep, then the structure is installed on the wall above the opening;
- When the window is flush with the wall or slightly recessed, the installation is carried out on special brackets;
- Sometimes it is attached to the ceiling; this system is more often used in vertical blinds due to their large size.
The external mount looks quite interesting
Now let’s figure out how to determine the optimal size of blinds in this case:
- The width of the product should be 10 cm larger than the width of the opening, so that on each side the system extends onto the walls by at least 5 cm, this will ensure high-quality darkening . The height can be 10 cm greater than the opening if the window sill does not protrude, or the size is calculated individually if there is a protrusion;
When hanging the box, do not forget that it should not interfere with the opening of the doors; the easiest way is to place it along the top line of the opening.
- If the window is located flush with the wall and the blinds are mounted at a distance from the wall, then the width of the structure should be at least 20 cm wider than the opening to ensure high-quality darkening . As for the height, it is determined based on whether the system will go below the opening or lie on the window sill.
It is important to take into account the tilt angle of the sash when ventilating; it should not rest against the blinds
The following list of tools is required for work:
- A hammer drill with a drill of the required size;
- Level and pencil for marking;
- A screwdriver or screwdriver for tightening fasteners.
The work instructions look like this:
The process diagram is quite simple
- First, you need to place the blinds against the opening to make sure that you have not made a mistake with the width. Using a level, marks are made in the right places, after which you need to determine the exact position of the mounting brackets and mark the points at which these elements will be attached to the wall;
Special brackets allow you to adjust the distance of the structure from the wall and set the exact position of the clamps
- Drilling is done at marked points, so as not to constantly check the depth, wrap electrical tape around the drill in the required place and use it as a guide when working, so you won’t make the holes too deep or too shallow;
If your structure is more than one and a half meters wide, then it should be hung not on two, but on three brackets to ensure the necessary rigidity and strength. For large sizes, it is better to use aluminum products; they are less susceptible to deformation and retain clear geometry for many years.
Aluminum blinds are much stronger than plastic ones, but their price is noticeably higher
- Attaching the brackets is quick and easy if you make the holes in the right places. The working process is simple: first, plastic dowels are inserted and pressed until they stop, after which the load-bearing elements are attached and fixed using the screws included in the kit. They can either be screwed in or simply driven in with a hammer, the reliability of the fastening does not suffer from this;
- The last step is this: you need to insert the container into the latches, make sure that it is securely fixed, after which you can begin to check the functionality of the system.
Method 3 - fastening to the sashes using clamps
Now let's figure out how to install plastic blinds on plastic windows, although the process is similar for products made from other materials. This option is perfect for windows in which one or more sashes open; separate elements are attached to each half of the glazing, which allows you to open not the entire opening, but part of it. In addition, such solutions do not interfere with the opening of windows, which is also important.
Fastening is always done on the frame, and you can do it as indicated in the first method - using self-tapping screws. But this solution has one significant drawback: if you decide to remove the blinds, then there will be holes on the surface, which are unlikely to be eliminated. Therefore, it is better to use the technology from this section, then the frames will remain intact.
Separate design is more convenient to use
Let's consider how to determine the optimal sizes of blinds in this case:
- The width of the structure should be 3 cm greater than the width of the glazing, that is, the overlap on the frame is 1.5 cm . It is important that the system does not rest against the handle and does not interfere with opening the window;
- The height should be 3-5 cm greater than the height of the glass unit.
In this case, we will need the following set of materials:
- Finished blinds with a U-shaped top;
- Plastic clips that are specially configured to attach to the frame and snap into the blind frame;
This is what the fastening latch looks like
- Bottom holders that will fix the blinds in a tense position and will not allow them to sag, even if the window is open.
Thanks to the clamps, even when the shutters are tilted, the blinds will fit snugly to the frame
As for the tools, we don’t need anything at all - just our hands and the desire to carry out the installation without outside help.
Installation of blinds on a plastic window is carried out using the following technology:
- First you need to open the sash and wipe it with a cloth, the structure should be clean;
- The latches are placed on the frame on both sides of the sash with a distance of at least a few centimeters from the edges . If the width is large or the blinds are massive, then three fastening elements can be used;
- Lastly, the blind box is inserted under the outer part of the holders until it clicks. The latch protrusion should fit into the groove as shown in the diagram below, everything is quite simple and easy;
This diagram simply and clearly shows how to install blinds using latches
- Lastly, clamps are installed at the bottom of the frame. Here it is important to clearly mark their position so that the open blinds are taut and not dangling. When the marking is completed, you can attach the elements using self-tapping screws or using double-sided tape so as not to damage the window profile.
The lower clamp holds the structure in a taut position
Method 4 – mounting on universal brackets
This option is similar to the one described above, but it also has a number of differences, so it should be considered separately. It also does not require drilling of the shutters, no tools are needed for operation, and the main fastening element is a universal mount, which is suitable for blinds, roller blinds and pleated curtains. That is, you get a platform on which you can attach different systems.
Versatility is the main advantage of this option.
The list of materials and the measurement process are no different from the option described above, so we will start immediately with the installation process. The work is carried out in the following sequence:
- First, you need to clean the surface from dust and degrease it, this will allow us to fix our elements as securely as possible.;
- Then you need to glue double-sided tape to the back of the clamps. There are different options in stores, choose better products that are designed for fastening heavy objects, so as not to worry about the reliability of the structure;
The fixing bracket is removable, which is an additional plus
- The bracket is inserted into the mounting platform if necessary; if you are attaching the structure to a blind sash, then the latch is not needed . This is a very big plus, since in the previous case it was impossible to attach blinds to blind sashes without self-tapping screws;
- Then a bracket of the configuration we need is attached to the base; short self-tapping screws are used for the job so that they do not protrude from the back side;
- Next, the elements are glued to the surface in the required places, and in the case of opening doors, they are also snapped onto the upper end;
- Lastly, the blind box is secured - and the structure is ready for use, everything is simple and quick.
The system looks very neat
If you are thinking about how to install plastic blinds on windows, then this option is perfect, because the design is light in weight and double-sided tape will easily hold it in place.
Installation of blinds outside window openings
This method is most effective in order to level out the broken geometry of openings. And it is mainly used for installing vertical blinds.
Before starting work, you need to measure the window and mark with a pencil or marker where the dowels will be installed.
After this, holes are drilled at these points and dowels are placed on which the brackets are mounted. To prevent vertical blinds from swinging due to drafts, weights are used under each strip, connected to each other by a chain. There are two methods of external installation - inside the opening and outside it (on the ceiling or wall).
Methods of mounting on PVC windows
There are two methods of installation - with or without self-tapping screws.
In the first case, markings are applied under the fasteners, holes are drilled in advance, brackets are driven in and the blinds are attached. Two holes are also made at the bottom, and the ends of the curtains are firmly fixed with plugs.
In the second case, the entire structure is assembled separately and completely, and then fastening points are marked for the finished structure. Next, the brackets are attached to the marked points using adhesive tape from above, as well as a string tensioner from below. Only after installing the guide string are the lamellas installed in the mechanisms.
Window sash installation
Can be used to install both roller and horizontal blinds.
The main advantage of this method is the possibility of selective shading of the sashes and maintaining the accessibility of the window sill space. This type of installation can be done with or without drilling. If you decide to drill the sashes, try not to damage the glass unit by first finding out its dimensions.
At the same time, there is no need to worry about the blinds being level, since the manufacture of windows always takes this important factor into account. It is enough that the top installation line is parallel to the top line of the sash. The tightness of the window will not be affected by the installation of blinds, thanks to modern multi-chamber packages.
If the sash to which the blinds are attached opens, then in this case the frame is not drilled, securing the blinds using a special tape - self-adhesive or clamps. This method is also optimal for new plastic windows, which are still under warranty from the manufacturer.
Drilling installation
In this case, it is better to choose a method for marking the sash by assembling the structure. To do this, put brackets on the cornice. Then they apply it to the surface and mark the points where drilling will be done.
This should be done after preliminary fitting of the entire structure on the window block. It is important to position it correctly and make sure that nothing interferes with the canvas.
For self-tapping screws measuring 3 mm, choose drills of 2-2.5 mm. You can screw in the fasteners without preparation, but in this case there is a risk that the plastic will crack. When drilling, you should try not to touch the glass unit. Do not operate an electric drill close to the glazing beads.
Video: Installation of horizontal blinds
So, if installation with drilling and installation of latches is chosen, the sequence of procedures is as follows.
- The assembled blinds with installed clips are applied to the place of their future installation; The blinds are aligned (to do this, they are completely unfolded); The points at which the dowels will need to be installed are marked with a pencil; The latches are removed from the blinds and mounted to the marked places using self-tapping screws; Installed on the latches the entire structure, after which the control elements are attached - a cane and chains (laces); When the canvas is completely untwisted, the bottom fixation points are determined and the lower clamps are screwed in these places. Bottom fixation is used to ensure that the canvas does not deviate from the sashes during ventilation;
If the blinds are mounted on a cornice, then a different sequence of actions is used.
- When disassembling the set, the control elements (line and chain) are unwound, after which the blinds are applied to the window sash. The blinds are attached to the window with self-tapping screws. Additionally, small holes are made in the lower bead (recommended diameter 3 mm), through which the tensioned control line is passed, and the chain - the latch is installed on a special mount. The correct operation of the control mechanism is checked.
There are ways to attach blinds to sashes without using a drill or screwdriver. These can be special holder-clamps, the fulcrum for which is the upper part of the window profile, between which a control cable is stretched, brackets on self-adhesive pads, as well as magnetic holders. These methods are increasingly used for installing roll-up light protection systems, since they are easy to install and do not damage window frames.
They can be used on any windows, regardless of how the opening system is implemented (pivot or tilt). They are convenient and practical, and do not require the use of special equipment.
Alternative types of installation
It is not necessary to drill into the window to attach the blind base. There are other options for attaching blinds to windows. To install roller blinds you will need the following tools:
- Double-sided tape;
- liquid Nails;
- scissors;
- ruler or level.
Roller blinds are a smooth canvas that can be rolled up, raised or lowered using a special mechanism. Roller blinds do an excellent job of protecting from scorching sun rays, while at the same time decorating the living space. Let's look at how to attach roller blinds to plastic windows. This type of curtains is attached separately to each window sash. Roller blinds come in several types, and the mounting method for each type may vary.
Attaching roller blinds with double-sided tape
The Mini roller system is a classic roller blind on a compact shaft. They can be easily installed on individual plastic window sashes. The fasteners are attached without drilling, and thanks to this the frame remains intact. To prevent the fabric from sagging, the lower metal rail should be fixed using special magnetic holders. The window sash can be opened in any way.
Roller cassette curtains are roller blinds that are assembled into a cornice that looks like a compact cassette. This type of curtain is suitable for flaps, plastic or aluminum. The most popular curtain options are the Rollite and Uni systems. Models of these designs include strips for double-sided tape. Using these strips, the guides are glued to the window sash.
Cassette blinds are controlled by a single chain, with the help of which the height of the curtain is adjusted. A special clamp is installed on the window frame, which keeps the chain from sagging when the window is ventilated.
Isotra blinds
Isotra and Isolite systems are also popular. A plastic window with this type of blinds can be used in any mode without fear of breaking the system. Fastening is carried out using glazing beads, in which small holes will need to be made. If such glazing beads become damaged, they can be easily and quickly replaced at any time.
Important! Interestingly, the method of attaching blinds to the wall is still used. This type of installation does not harm the plastic window; you just need to take the correct measurements.
Video: Installation of roller blinds
Instead of bulky curtains, people are increasingly installing light and elegant blinds on their windows. Their design is very easy to clean from dust, weighs less than any cornice with curtains, and costs much less. How to properly install blinds after purchasing them?
You need to think about this even before going to a specialty store. You first need to think about options for mounting the system, then purchase a kit and install the blinds. Installing blinds yourself largely depends on the method of opening and closing the window.
Blinds not only protect windows from bright sunlight, but also decorate the interior of the room.
Types of blinds by material of manufacture
Slats for blinds are made from different materials. The cost of curtains varies depending on the material.
Plastic blinds
A good economical option, but you will rarely see such designs in apartments because of their appearance. They are more common on office windows.
Fabric blinds
This type is the most common. The slats are usually made of polyester. This durable material has excellent performance characteristics, does not fade in the sun and is easy to clean.
Cotton blinds
Every year eco-style is becoming more and more popular. This type of curtain is a fairly expensive blind model. It is necessary to take into account their features and be extremely careful when using them, as they do not tolerate moisture well and quickly get dirty.
Wooden blinds
Such curtains are not a cheap pleasure, but the price is well worth it. They are made from light and durable wood. They require regular maintenance during use, so it is recommended to vacuum them once a week.
Bamboo blinds
Fashionable type of window decoration. Most often they are produced in a horizontal version. They are painted in various colors - from light wood to deep red. When processing and painting, the natural properties of bamboo are preserved.
Fiberglass blinds
This type is ideal for kitchen windows, as this material meets increased fire safety requirements.
Aluminum blinds
Most often, aluminum slats are coated with multi-colored enamels in order to give them a beautiful appearance.
Basic methods of installing blinds
Installing this product yourself is not a very difficult task. To do this you will need the following tools:
- hammer drill; level; pencil; fastening screws and self-tapping screws; screwdriver.
Installation of blinds can be done in several ways:
Image 1.
Scheme for attaching blinds to a window. In the window opening. Above the opening. In the window sashes. These products can be installed in a window opening only if the window is recessed into the wall. The slats for this installation method are chosen 3-4 cm narrower than the width of the window opening. The product can be installed above the window opening if the window is again slightly recessed into the wall. In this case, you can cover both the window itself and a small part of the wall near it. The width of the blinds in this case can be arbitrary, and the height can exceed the window opening by at least 10 cm.
When the slats are raised, the windows should swing completely open. To install blinds with your own hands on the window sashes (image 1), you will need 2 narrow sets. Each system will be used separately. The length of the lamellas in this option should not exceed the width of the glass. When installing, you need to ensure that the system does not cover the window handle.
Wall mounting
If you decide to mount the curtain on the walls, you first need to make sure that the surface is strong enough to withstand drilling, or covered with a high-quality finish that can support the weight of the structure on the glue.
For successful installation, you will need a plumb line (except for a level) so that the installation is as level as possible.
It is necessary to calculate whether the doors will open freely and how great the risk of damaging the panels is. The more nuances are considered, the more accurately the materials will be selected.
When using adhesive tape, it is necessary to degrease the surface in advance for better adhesion.
Types of blinds
Blinds can be of different types:
- protective; with electric drive; photo blinds; interframe; roller; bay windows; attic; multi-textured; Roman blinds; pleated; horizontal (image 2); vertical (image 3).
According to the materials used for manufacturing, they are:
Image 2. Installation of horizontal blinds.
- fabric; lamella; cotton; wooden (image 4); bamboo; fiberglass; plastic; aluminum.
The most common and high-quality products are produced by Italian companies Casa Valentina, Coulissa and the Polish manufacturer Anwis.
Preparing tools
In order to properly hang and secure the canvas properly, it is worth preparing the necessary equipment.
To install curtains you will need a stepladder. It is necessary to apply the markings correctly in order to attach the vertical slats without displacement. For control, a construction bubble level is used, and the markings are applied using a tape measure, a simple pencil or a construction marker.
The main tools you will need are a screwdriver, an electric drill, a hammer, a screwdriver, and a stationery knife.
You need fasteners, stoppers, monofilament, c-clips, rod rings, chain locks.
How to install horizontal blinds?
How to install horizontal blinds? The work takes place in several stages:
- Marking. Installation of fasteners. Installation of cornice. Assembling the control mechanism.
First you need to check the horizontal and verticality of the wall. This will require a level.
Then the cornice is applied to the wall, marks are made in those places where the fasteners will be located. In this case, the canvas must be completely lowered. It is good if the work is monitored by an assistant who will correct the position of the completely open product.
Image 3. Installation of vertical blinds. After this, the fasteners are mounted on the wall using self-tapping screws. The cornice is inserted into the fasteners. A hook is installed in a special control mechanism, and a cane is installed in it, onto which the tip is placed.
All that remains is to fasten the adjusting cord. There should be no problems with self-assembly of the product, since all stages are described in some detail in the attached instructions. Usually installation takes 1-1.5 hours. The installation of vertical and other types of blinds differs from the previous one only in a larger or smaller number of parts. To install the product on a plastic window, you need to measure each sash separately. In the places where the mounting angles are attached, holes with a diameter of 2.5-3 mm are drilled in the upper part of the frame.
The corners are secured to them using self-tapping screws. No additional fastening with foam or glue is required. The blind strip is placed in its place, and the canvas opens to its full length. The places where the lower corners are attached are marked.
Holes are drilled, corners are attached, and the bottom strip is installed. When installing vertical products, there are some differences from similar work with horizontal systems. When marking on the wall, you need to note the distance from its surface at which the blind guide will be located. It should be 6 cm. At this distance, the material of the blinds slats does not touch the walls.
Advantages and disadvantages
Vertical blinds have the following positive aspects:
- Compact curtains do not take up much space and do not require much space for installation.
- Adjusting the degree of opening and axis rotation is easy thanks to convenient controls.
- A protective layer is applied to the lamellas, protecting the base from impregnation with grease and dirt. This increases service life and reduces the need for periodic cleaning.
- The products do not require special care; it is enough to carry out wet cleaning once every few months, wiping the parts with a damp cloth.
- A variety of choices is provided by a wide range of blinds, a rich range of colors, a variety of patterns, and gradient application.
A wide range of
The curtain fits tightly to the window, equally successfully protecting the house from heating or cooling.
The canvases go well with other types of curtains and blinds made from other materials.
There are few disadvantages, but they exist:
- To fully open the plastic flap for ventilation, it is necessary to move the blinds completely, otherwise the risk of damage to the slats increases.
- The panels rotated around their axis take up a lot of space on the window sill, so it is inconvenient to place any objects on it.
- During washing, the protective film from the manufacturer is removed. After such cleaning, the blinds lose their ability to withstand dirt and grease, so they can no longer be left in the kitchen.
Recommendations for installing and caring for blinds
As you work, keep the following tips in mind:
Image 4. Installation of wooden blinds. Vertical products make the room visually taller. They can cover not only the window, but also the wall along with the balcony. Horizontal ones move the walls apart and make the room wider. You can attach the products to the ceiling or to the upper slope of the window opening. Fully raised horizontal blinds should not interfere with the window opening. The lower part of the blinds should be attached to the opening sash so that the sash does not sag in the micro-ventilation position. From the products horizontal type, it is necessary to periodically remove dust with special brushes. Vertical slats can be washed in accordance with the instructions included with the product.
They need to be removed, rolled up and placed in a container with water and washing powder. The dirt usually comes off on its own. All that remains is to rinse the slats and hang them in place while damp. Wooden slats cannot be washed. They can be cleaned with a vacuum cleaner and wiped with a damp cloth. The need to install any type of blinds is a subjective opinion of the home owners.
It depends on personal aesthetic taste and the urgent need. Blinds can decorate a room: they can replace the curtains that are boring to many, which collect a lot of dust, protect the room from direct rays of the sun, thereby reducing the temperature in the room in the summer. Installing blinds does not take very much time. How to install blinds yourself is now clear to you. Date: 06/01/2015 Comments: Rating: 27 Installing blinds with your own hands is a fairly simple action that even a beginner can figure out if desired. There is nothing complicated here, the main thing is to have competent and clear instructions on how to carry out this kind of installation. Blinds are a substitute for curtains, which are necessary to close the window from the sun and prying eyes.
Which blinds to choose for a balcony?
Thanks to the variety of materials, configurations and color shades of this type of curtains, you can choose modern curtains for any interior. Before buying blinds for a balcony, carefully study how to install blinds on plastic windows.
Balcony blinds must meet the following criteria:
- Be practical, since balcony windows often open.
- Fastenings must be functional and reliable.
- Plastic or fabric models are better suited for balconies, since metal and wooden ones make a lot of noise.
- Remember that not all types of blinds are suitable for balcony windows. This is especially true for aluminum and sliding curtains.
Important! The best option for balconies and loggias is plastic blinds. They are lightweight, easy to use, do not fade in the sun, are easy to clean and retain a beautiful appearance for a long time.
How to hang
The hardest work is behind us. All that remains is to hang the horizontal blinds in place.
- We install universal brackets.
- By turning the latch counterclockwise, we secure the upper cornice to the bracket at a distance of 20 cm from the edge.
- Turn the latch clockwise until it stops.
- We insert the hook of the rotating mechanism located on the upper cornice into the control handle (relevant for models with a cord and a handle).
We check the functionality of the system: raise and lower the slats, rotate them at different angles, changing the lighting, check whether they interfere with the opening of the sashes. If all these manipulations were successful without any extra effort, the blinds are installed correctly. In contrast to thick curtains, a lightweight slatted design made of colored plastic or aluminum painted in different colors ensures good air circulation while guaranteeing uniform lighting. With its help, you can easily protect your home from direct sunlight, and if the color and texture of the slats are correctly chosen to match the design of the apartment, they will highlight its advantages.
How to install horizontal blinds with your own hands in the video:
Scotch tape
How to install horizontal blinds without drilling? For this, double-sided tape intended for construction work is used. You can perform the installation in 2 ways:
- The tape is glued to the cassette, and it is glued to the window.
- The clamp brackets are glued to the tape, and the cassettes are fixed to them.
In both cases, you must follow the instructions:
- This method should be used during warm periods.
- You should wash the frame or glass, dry the place of fixation and treat it with acetone or solvent.
- Make markings with a pencil, cassette tape, or level. The line should be parallel to the window sill so that a skewed gap does not appear at the bottom.
- Remove the protective film of the tape and stick along the marked line.
- Fix the canvas.
Useful tips when choosing and using blinds
If you want the installed curtains to please you for a long time, and their fastening and mechanism do not fail, listen to the following tips:
- When choosing blinds, make sure that all their components are of high quality.
- The adjustment mechanism must be selected taking into account the convenient side during operation.
- Make sure that the blinds fold completely when the window is fully open.
- Turning the window handle should not have a mechanical effect on the curtain elements and limit their movement.
- Blinds should be cleaned regularly.