Cassette roller blinds - These are roller blind systems that can only be installed on a plastic window sash. In normal situations, this type of curtains is not installed on other surfaces. After reading my article to the end, you will know all the necessary information about cassette roller blinds and will be able to choose the best option for yourself.
- Description
- Systems
- Uni-1 (Uni-1)
- Uni-2 (Uni-2)
- Uni 1 and Uni 2 - differences
- Control
- Chain
- Spring (PIM)
- Electric drive
- Kinds
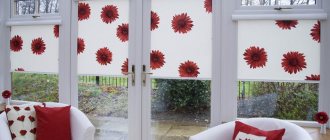
- Zebra
- Day Night
- Accessories
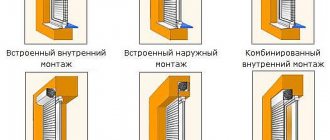
- Installation
- For self-tapping screws
- On tape
- Photo
- Video
- Reviews
Description of cassette roller blinds of the uni system
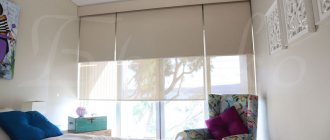
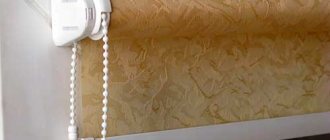
Cassette roller blinds for plastic windows, unlike free-hanging roller blinds, fix the fabric (material) with guides. The lower plumb line of the fabric is also fixed. This type of product is installed only on PVC windows, directly on the frame itself. The roll with wound fabric is covered with a decorative box. Be sure to look at the photos of cassette curtains. Roller blinds with guides securely fix the fabric. While in the cassette, the material is always parallel to the window sash and flows along the glass unit. There are several systems of cassette roller blinds uni , which can be with different types of control.
Cassette roller blind systems
Uni cassette roller blinds come in two main systems, with flat and “U” shaped guides, each of them has its own advantages and disadvantages. Let's look at them.
Cassette roller blinds Uni-1 (Uni 1)
Roller blinds with Uni-1 guides are curtains that have flat decorative guides that are glued vertically to the glazing bead of the window frame. The fabric sheet and the lower plumb line are located between the double-glazed glass bead. To install it on a window sash, it must have a certain design. The depth of the glazing bead should not be less than 10 mm. Otherwise, the lower plumb line will not fit between the guide and the glass unit and the curtain will not work. Also, if the window has a narrow glazing bead, there is a possibility that the roll of fabric that is in the decorative box will also rest against the glass unit and will not rotate freely. If the glazing bead has a small depth, and cassette roller blinds need to be installed on the windows, then it is recommended to use Uni-2 cassette roller blinds.
The uni 1 roller blind systems can be installed either with self-tapping screws or with double-sided tape. Can only be controlled by a chain or by an electric drive. PIM - a spring-inertial mechanism is not available for this system due to design features. PIM is installed only on the Uni-2 cassette system (Uni-2).
.
Cassette roller blinds Uni-2 (Uni 2)
Cassette roller blinds Uni-2 are a system with “U” shaped guides. Unlike the Uni-1 system, it is not demanding on the depth of the glazing bead. Since the curtain fabric and the lower plumb line are located entirely between the walls of the guide. Roller blinds uni 2 for plastic windows are installed separately on each piece of glazing, including the swing sash.
This is a more universal system, and in the vast majority of cases, manufacturers decide to install it.
One of the advantages of this system is that a spring-inertial mechanism (PIM) can be installed on it.
Installation can be carried out either with screws or tape using a special adapter.
It can be controlled by a control circuit, PIM and an electric drive powered by a built-in battery.
.
Video review of cassette roller blinds with “U” shaped guides Uni-2 (Uni-2)
A detailed video review of the cassette system. Video includes:
- review
- froze
- installation on tape
- self-tapping installation
- dismantling
Video from the advertiser - a full review of Uni-2 cassette roller blinds
Roller blinds uni 1 and uni 2 differences
- Uni-1 - flat guides, Uni-2 “U” shaped guides. Uni-1 - cornice closer to the window sash (the lining is narrow).
- Uni-2 sticks out 10 mm more, since the lining is high (this feature affects the opening width of the window sash, especially if the slope is close to the sash hinges).
- On Uni-2 you can install a PIM (a spring inertial mechanism, but on Uni-1 it is not possible, since the flat guides do not have a braking mechanism for the lower plumb line and the fabric will simply curl into a roll.
- Uni-1 eats up the window clearance a little due to wider guides, while Uni-2 has the same clearance.
- For uni 1, place the box just below the top horizontal bead so that the roll of fabric falls between the side beads. Because of this, the clearance also decreases.
Marble window sills - product characteristics
This material has earned respect for a number of advantages, which we will hasten to talk about. In addition to its obviously attractive appearance, it is characterized by excellent practical qualities, for example, it is not afraid of temperature changes, which means that annoying cracks will not bother you. This will also allow you to safely install climate control equipment nearby. During the entire period of operation, marble will not change its shade, even if it is on the sunny side! Agree, this is a consumer's dream.
This material itself is porous, so it is treated with special wax compounds, and in the event of any mechanical damage, this layer can be easily restored; the impregnations also make the window sill resistant to moisture. However, this property is also a weak point; if you do not monitor the condition of the coating, or it is completely absent, then every drop will willingly penetrate into the structure, be it spilled wine or flower water. That is why it is best to install marble as a window sill in a house, and not in an office, where no one will pay due attention to its condition.
If you don’t have the opportunity to spend money on natural material, don’t worry, marble window sills look equally nice in the interior. Artificial stone or marble chips are used for this. The first option will be the cheapest, but not all the advantages of natural material will be available to you, however, this alternative is considered “warmer” and noticeably lighter in weight. This option consists of resins that are used to fill special molds. This also gives more opportunities to create custom window sills from cast marble.
Managing cassette roller blinds
Cassette roller blinds for plastic windows can be controlled in three main ways. Control circuit, PIM (PIM) spring-inertia mechanism, or electric drive. Let's take a closer look at them.
Chain control
Cassette roller blinds
— can be controlled by a chain. This is the most common and cheapest control. The curtain fabric is lifted by tensioning the chain. The circuit is closed in a ring, the ends of which are connected by a control circuit lock. If you pull one end of the chain, the curtain will rise, and the other will lower it. Roller blind travel limiters must be installed on the chain. And they are adjusted to the final upper position and the final lower position - these are “buttons with a slot in the middle”, into this slot the control chain braid is inserted between the plastic balls.
If the final upper and lower positions of the uni roller blind are not set, the fabric sheet may come unstuck from the pipe shaft or fall. Also, with strong movement, by inertia, the lower plumb of the fabric can fly into the box, and then in order to pull it out of there, you will need to dismantle the curtain.
Chain control can be installed both on the Uni-1 (Uni-1) and on the Uni-2 (Uni-2) systems.
.
Spring-inertial control
Spring-inertial control of roller blinds can be installed on cassette roller blinds only of the Uni-2 system. In this case, control is carried out using the control handle, which is located on the lower plumb line of the roller blind fabric. In this case, there is no control circuit and, as a result, it cannot be damaged. Cassette roller blinds with a spring mechanism also have a significant negative feature. To close the window you have to reach to the very top point of the window, which can be inconvenient for people with limited mobility.
The advantage of roller blinds uni 2 with a spring is that in this case the curtain can be placed upside down and the window can be closed from the bottom up. Moreover, if the curtain rod is positioned vertically, then control can be carried out from right to left or vice versa. This may be relevant in cases where the windows are located in the basement or on the first floors of buildings.
The nuances of controlling this system are described in the video, be sure to watch it.
.
Video review of cassette curtains with PIM (spring-inertial mechanism)
The video includes the following sections:
- Review of roller blinds with PIM
- How to order cassette roller blinds with springs in an online store (website functionality shown)
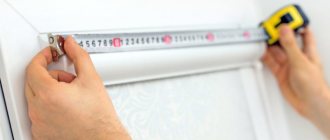
- How to take width and height measurements for ordering in an online store
- Curtain options - top-down (box on top) or bottom-up (box on bottom)
- Unpacking blinds purchased in the video online store ZHALYUZNIK
- Installation with double-sided tape
- Self-tapping installation
- Dismantling (Video for information)
Video: Roller blinds Uni-2 (Uni-2) with a spring mechanism.
Automatic control
Cassette-type roller blinds can also be controlled by an electric drive. Automatic control of roller blinds is the most expensive, but also the most convenient control. The price for one product with such a drive starts on average from 10,000 rubles at the time of writing. It may depend on many factors: on the fabric, on the drive manufacturer, on the size of the product, etc.).
The automation can be installed on both the Uni-1 and Uni-2 systems. The battery pack and the radio signal receiver are located inside the curtain shaft. Externally, the roller blind does not indicate the presence of an electric drive. The connector for connecting the charger is located under the cover of the decorative box.
The product can be controlled from a remote control, smartphone or from a key on the wall. Everything will depend on your desire and wallet.
.
Wall models
The most famous model is a wall-mounted clothes dryer for a balcony with twine attached to opposite walls. In homemade versions, hooks are driven into the wall or a strip is attached to which the same hooks are attached (these can be nails bent upwards). There are strings/thin ropes stretched between these hooks. This is a long-known option. Far from the most aesthetic, but the cheapest and very common.
An improved and refined option is a clothes dryer for the balcony with twisting ropes. It consists of two parts: a stationary one, which is attached to one of the walls, and a mobile one, which we attach to the opposite wall before hanging the laundry, and remove it when it is dry and removed.
Compact balcony clothes dryer mounted on the wall
Yandex.RTB RA-1479455-8
There are several more designs of wall-mounted clothes dryers for balconies and loggias. They have one thing in common - they are mounted on corner or T-shaped brackets. And in structure they can be very different. For small amounts of laundry, folding wall-mounted dryers on the balcony are convenient. When folded, they do not clutter up the space, unfold and fold easily - you just need to pull the outer bar and you can hang your laundry. The model is also easy to fold - just press the outermost bar towards the wall. Everything folds into a compact rectangle.
Folding wall-mounted clothes dryer for the balcony
These dryers have one drawback: when closed, you can’t hang anything on them. And you can only unfold them entirely - you can’t pull out one or two slats.
Also, folding wall-mounted dryers do not clutter up the space. They are a frame with tensioned ropes or installed rods. The frame is movably mounted directly on the wall or in the housing. It can be fixed with stops, strips, chains. If you want to make a clothes dryer for your balcony with your own hands, these are the simplest, most reliable and compact models.
The designs are very simple, easy to do with your own hands
If necessary, it is tilted back, the angle of inclination is determined by the side holders - thrust bars, but there are models with thick tapes.
There is also a wall-mounted version of the “Liana” described above. In this case, the bracket to which the strips are attached is fixed on the wall higher, the strip with the adjustment threads is on the same wall, but lower.
Drying "Liana" in a wall-mounted version
When installing wall-mounted models of clothes dryers, it is advisable to mount them using all the holes that are in the brackets. Then we can hope that even when loaded to the maximum, they will not fall.
Types of cassette roller blinds
Much has already been said above about ordinary cassette roller blinds with one sheet of fabric, so I do not include them in this section. But there are other roller blinds in a box with guides. And articles have already been written about these systems, so here I will only briefly show them, but if you need more in-depth information, then follow the link and study.
Cassette blinds Zebra Uni
Roller blinds with guides can also be made with double fabric, which is made in stripes; the name Zebra comes from these stripes. Systems, just like conventional roller blinds with one sheet, can be Uni-1 and Uni-2. The types of controls are still the same. If the system interests you, click on the button for more details and get acquainted.
.
Twin day night
Cassette roller blinds on the Uni sash can also be doubled; this system is also called day and night. A lot has been said about her too, click the button for more details...
.
How thick can stone window sills be made?
Stone products - window sill made of Carrara marble
Another factor in favor of the triple is the overhang, which is usually present at the window sills, and the ears, which in the double can be broken off quite easily. Selecting an initially high-quality stone, correct installation (grinding, using normal glue), a manufacturer’s guarantee after installation is the key to the safety and beauty of your stone window sills for many years.
If you want to install window sills of greater thickness, this is also quite possible. To do this, use adhesive, a version of which you see in the picture. In this case, a high-quality material was chosen - real classic Italian Bianca Carrara marble 30mm, and the profile gluing option was very well chosen - (30+30 OV). It is practical, monumental and undeniably very beautiful.
Accessories for cassette roller blinds
Roller blinds in a cassette can be made from various components, different manufacturers, colors, etc. The most common manufacturers of components for roller blinds are China and Poland. The highest quality and most widespread are Polish. In my opinion this is the best choice. If we consider electric drives for automatic cassette curtains and other components used in automation, then Somfy is the leader here - the quality is super, the price is also super (very super, if anyone doesn’t understand). Zomfi is France, a recognized leader in the production of automation for blinds, roller shutters, gates, awnings and much more. All other manufacturers will be cheaper, there are quite a lot of them, including China among them. On my own behalf, using my experience, I can recommend the Amigo drive for roller blinds - not expensive and high quality. These drives are manufactured in China under the brand of blinds manufacturer Amigo.
What stone is suitable for making stone window sills?
Example of granite for stone window sills
Ideal for making window sills are any granites and rocks with similar strength characteristics, as well as labradorites and quartzites. Products made from granites are the most practical, and the choice of granites is so diverse that it is possible to choose a stone for almost every design. Granites are granular in nature. But the variety of textures is so great and the colors are so diverse that a person who has little knowledge of the “stone business” after visiting a warehouse radically changes his idea of granites. To give you an understanding, you will be given a choice of a huge assortment of granite names brought from different countries - mainly India, Brazil and China.
Stone products - marble window sill
Marbles and marbled limestones are also suitable for making window sills, only in a more gentle manner - when they are not walked on or used as countertops.
Marble is a rock that has average strength (relative to granites), and the likelihood of scratches is quite high. For example, if it is almost impossible to accidentally scratch granite with a knife or a frying pan, then on a marble window sill it is undesirable to cut food with a knife and use iron objects (even ceramic pots).
If it is quite easy to protect marble from stains using protective products for natural stone, then the protection of stone from scratches is the strength characteristics of the material. It all depends on how you are going to use the window sills.
You should not make window sills from slates and onyxes; we do not recommend choosing travertines, the latter absorb everything very well. Most stone window sills are made from marble or granite.
Installation of cassette roller blinds
Installation of cassette roller blinds can be done in two ways, using self-tapping screws or self-tapping screws, and if you don’t have the desire or ability to drill a window, you can install it using double-sided tape. Read the information below.
Self-tapping screws
Closed roller blinds
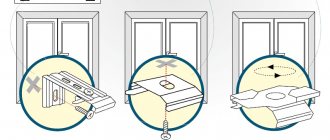
- installation on self-tapping screws or self-tapping screws. Before starting installation, remove the cover from the decorative box. Here is an important point for those who cannot do this, it is not filmed, you see. I explain how to remove the side cover from the decorative box of cassette roller blinds of Uni systems.
Let's say we need to remove the right cover. There is no need to lift anything, bend or bend something, snap it off or anything else; if you use the above, it will not come off. So, if we remove the right cover, then with your right hand, open palm, place your fingers on the right side from the end of the box onto the cover. Apply just a little force so that your hand presses against the side of the lid, I repeat, not much, the force should be enough so that your hand does not slide on the lid. And now simply pull the applied and pressed hand towards you. Now I see how the lid fell on your floor. Whoever this happened to, write in the comments, we’ll laugh together :-). That's all. Screw in two screws on the left, two on the right, put on the covers, and glue the guides.
.
On tape without drilling
Cassette roller blinds can be installed on windows without drilling the window using double-sided tape, click for more details, a whole article has been written on this topic.
.
Correct installation of windows without a quarter. What does this mean and how to make such an installation?
Installation of windows without a quarter occurs as follows. If your house is new, then the windows are installed in an empty window opening. And in order to order a window, you need to subtract 5 cm from the vertical size of the opening - this will be the height of your window. And subtract 3 cm from the horizontal size of the opening - this will be the width of your window.
Installation of windows without a quarter occurs as follows.
If your house is new, then the windows are installed in an empty window opening.
And in order to order a window, you need to subtract 5 cm from the vertical size of the opening - this will be the height of your window.
And subtract 3 cm from the horizontal size of the opening - this will be the width of your window.
Subsequently, when installing the window yourself, these 3 cm will be filled with polyurethane foam (1.5 cm on each side of the window). And 5 cm is 1.5 cm from the top of the window to fill with polyurethane foam and 3.5 cm to the window sill under the window. You also need to take measurements of the length and width of the window sill and the external ebb and add at least 5 cm to these dimensions so that the window sill “crashes” a little on the right and left into the wall.
For an inexperienced installer, you can take 20-30 cm as a reserve; the excess is cut off during installation. In general, window sills and ebbs come in a standardized width (10, 20, 30, 40, 50, 60 cm) and length (up to 6 m), but you, in any case, must provide the minimum dimensions so that they bring you the most suitable window sill and ebb from available.
goodlinez.ru