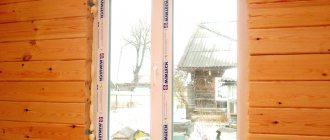
Relatively recently, all residential buildings had ordinary wooden windows, which had to be sealed for the winter. Today it is almost a relic of the past. And most people strive to replace such windows with modern plastic window structures, and they are especially interested in installing plastic windows with their own hands.
This desire of the consumer is quite understandable - plastic windows not only have an aesthetic appearance, but also serve as interior decoration. They are also much easier to use, last an order of magnitude longer, and are significantly cheaper than their wooden counterparts.
If you have a desire to replace the old windows in your apartment with modern double-glazed windows, then you will certainly ask yourself whether it is possible to install a plastic window yourself. How difficult is it to install plastic windows, and can you do it yourself without the help of specialists?
Yes, it's quite possible. In order to install a plastic window with your own hands, it is not necessary to have a construction specialty. With certain skills and good tools, anyone can install a plastic window with their own hands.
Let's figure out how to do it right.
What does a plastic window consist of?
First, let's look at the design of a plastic window. Without this, you will not understand the installation process itself.
Plastic windows are made from a special material called PolyVinyl Chloride. That’s why plastic windows are called PVC windows in short. Like any window, the main element of a PVC window is a frame made of a profile consisting of cells. The more such cells in the frame (also called chambers), the warmer the window will be.
Typically the frame color is white. Although plastic can be black, brown, and even colored. The most common and most budget option is white plastic windows.
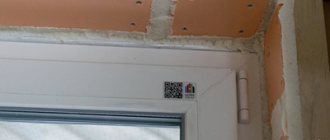
In addition, the window consists of an opening part (sash) and a stationary part, which is called a “capercaillie”. The glass unit is directly inserted into these parts of the window, which is pressed against the frame with a special plastic strip. For tightness, a black rubber seal is placed.
Special mechanisms are installed on the window sashes, with the help of which the window opens and closes.
In addition, on the outside the window has a so-called ebb - a small board with the help of which precipitation is removed, and slopes - plates that seal the side and top parts from the street side.
The structure of a plastic window
Methods for installing PVC windows: to unpack or not to unpack – that is the question!
When installing windows, you need to choose the type of installation - with unpacking (unpacking) or without unpacking. Want to understand how these two methods differ from each other? Take a look at the diagram of a plastic window.
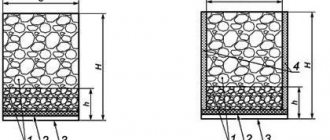
- The frame is one of the main elements of a window. The frame is formed from a reinforced PVC profile and several sealed chambers. The number of cameras can vary from two or more.
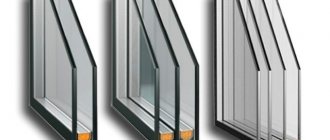
- A double-glazed window is the largest element of a window, occupying about 80% of its area. It is a sealed structure consisting of glass. Depending on the number of glasses and air gaps between them, it can be single-chamber, double-chamber, etc. The double-glazed window fits tightly to the frame due to the seal.
- Glazing beads are parts that allow you to mechanically secure a glass unit to the frame.
- An impost is a separator through which a window is divided into several sashes. There are single-leaf, double-leaf, three-leaf, etc. designs.
- A blind sash is a sash without an opening mechanism.
- A transom is an opening sash.
- Sill (other names: bottom, mounting, stand) profile is a load-bearing element of a window structure. It is necessary for the correct installation and fastening of a plastic window sill and external drain indoors.
- Fittings are all moving parts of the structure designed to open, close, and secure the transom when ventilating the room.
Window installation method with unpacking
(in some regions the term “unpacking” is used, the essence is the same). This method is based on preliminary disassembly of the structure: glazing beads and double-glazed windows. After fixing the frame to the wall throughly, all removed elements are installed again.
To quickly and correctly unpack the structure, you need a strong knife or chisel. We insert a knife blade or chisel between the glazing bead and the frame, and with gentle blows on the handle, knock the glazing bead out of the groove until a gap appears. Then we bend the knife (chisel) and push the elements apart with the wide side. We consistently do this with all the glazing beads that hold the glass unit in the sash. It is not recommended to do this procedure with the sharp end of a knife, since it increases the risk of damaging the window or glazing bead. To remove the glass unit, be sure to wear gloves, otherwise you will injure your hands on the sharp corners of the structure. If the window is not solid and there are sashes, remove them. If there is a transom in one of the sashes, it is easier to remove the entire assembly without removing the glass unit. That's it, the structure is ready for installation.
Disadvantages of the method
: more labor-intensive, takes longer than installation without unpacking (on average, 30-60 minutes are added for each window). Often, fogging of the glass unit occurs in a window installed using this method. In addition, the appearance of the glazing beads may be damaged (scratches, chips) if they are removed/installed carelessly. It is important to perform all actions clearly and carefully. After removing the packages, you need to put them in a safe place where there is no chance of accidentally touching them and breaking them.
Advantages and scope of application of the method
: installation of windows with unpacking is more reliable and provides a strong fixation of the frame to the wall. This method should be chosen in the following cases:
— it is planned to fasten windows in multi-story buildings (from the 15th floor). When installing windows on the lower floors, where there is no wind and gusts of wind, they do not need to be unpacked;
— installation of structures of considerable size is to be done. However, in this case, combined installation is allowed (the balcony block is attached without unpacking).
Window installation method without unpacking
This method does not require disassembling the structure. That is, there is no need to remove double-glazed windows and glazing beads. The frame is secured to the wall not with dowels, but with fasteners pre-installed on the outside of the wall.
Advantages and scope of application of the method:
Installing windows without unpacking saves time, shortening the process as much as possible. This method is recommended for use where there is no need for increased fastening strength: when replacing standard windows in private houses, and also, as mentioned earlier, in multi-storey buildings below the 15th floor.
Taking measurements
Before ordering and, accordingly, installing a plastic window, you need to make several measurements. Moreover, how carefully they are done will determine how your structure will fit into the window opening. Remember that accurate measurements are almost half the success. If you take the measurements incorrectly, when installing plastic windows yourself, the structure simply will not fit into the opening. In addition, the windows may begin to freeze.
First you need to carefully examine the opening. If the part of the window that is smaller on the outside, then measurements are taken at the narrowest point. Moreover, it is highly advisable to make several of them, because window openings are rarely perfectly smooth. Find the smallest measurement value and add 3 to it. Measure the height, leave its value as it is.
If the window is the same size both inside and outside, measurements are taken slightly differently. You need to measure the width and height. Then you need to subtract 5 cm from the height, and 3 from the width. This will be the full size of your window, with width and height. We subtract the values in order to leave gaps for installing the window sill and special mounting foam.
Each owner chooses the window sill according to the size he wants. Some like wide window sills, some like narrow ones, and some make them at wall level. This is individual, and there are no rules here. This applies to width.
Attention! The length of both the window sill and ebb should be taken with a margin - about 10 cm wider than the window opening.
Thermal conductivity and sound insulation of the window: so that noise and cold do not sneak into the house
Thermal conductivity of plastic windows
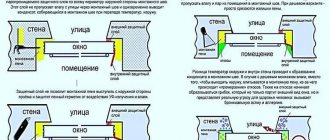
In addition to the manufacturer, when choosing a window, it is also necessary to take into account such quality as the thermal conductivity of the structure. According to SNiPs and territorial building codes, the heat transfer resistance coefficient of a window varies depending on the climatic conditions of the region of residence. Structures that are installed in residential premises should not have a heat transfer resistance lower than that specified for the specific region of residence.
Thermal conductivity directly depends on the design and type of glass used in the double-glazed window. If you order windows with energy-saving glass, the thermal insulation of structures increases by 10-15%. The cost of energy-saving glass is about 250 rubles. for 1 sq. m.
The thermal conductivity of a window may decrease due to poor-quality installation, or less often due to manufacturing defects. Very often, in the process of improper installation, a chip or crack appears on a double-glazed window, and the structure loses one of its main qualities - tightness. Visually, this manifests itself as fogging of the inner surface of the glass. As a result, in winter the room will become colder, and the house will have to be heated more.
To improve the thermal conductivity parameters of the window, you can prepare a support profile. From the point of view of thermal conductivity, the stand profile is the weakest point in the window structure. To attach the drain, you will have to drill it, which will further worsen the thermal conductivity parameters. To normalize the thermal insulation properties of the window, the internal volume of the stand profile can be filled with polyurethane foam. This should be done the day before installing the window so that the foam completely hardens. Foaming of the stand profile is not provided for by GOST; window companies also do not practice this operation.
Soundproofing properties of plastic windows
This parameter is essential if there is a busy highway or railway near the house. However, it is always more pleasant if external noise from the street does not penetrate inside the house. And this cannot be achieved without high-quality window sound insulation.
Getting ready for installation
Do-it-yourself installation of plastic windows always begins with dismantling the old window. As a rule, even novice builders find dismantling particularly easy.
After you have broken out the old window, you need to carefully inspect the opening and remove anything that may fall off later. If some parts of the opening protrude from the walls after dismantling, they must also be removed and the surfaces smoothed. Potholes, if any. It should be sealed with cement mortar.
When installing PVC windows with your own hands, you must take into account the following circumstances:
- the plastic window structure should be carefully secured;
- the window structure must be leveled both horizontally and vertically, otherwise in the future it may simply warp;
- It is necessary to plaster the mounting foam on all sides, with which the structure is attached, also in order to avoid future problems such as deformation.
Stage 4. Dismantling work
This procedure is recommended to be carried out immediately before installing a new window. In most cases, the old ones are thrown away, so the structure can be torn out along with the fastening, and if necessary, the frame can be sawed.
Removing an old window
Window dismantling
Step 1. First, the seal and thermal insulation are removed.
Step 2. Next, the plaster is removed from the slopes. To do this, it is better to use a hammer drill with an appropriate attachment (it is called a “shovel”).
Step 3. The window sill is removed and the cement layer underneath is cleaned off.
Step 4. Adjacent surfaces are treated with a primer material (by the way, many installers forget about this). In the case of a wooden opening, a layer of waterproofing material is laid around the perimeter.
The window has been dismantled
Old window
Note! Installation can be carried out at a temperature not lower than -15ᵒC. Polyurethane foam must be frost-resistant.
Plastic window installation technology
Install a plastic window with your own hands as follows:
- The structure should be fixed on four sides using wedges, and it should be determined how accurately the frame is positioned relative to the opening;
- secure the frame with special bolts;
- attach the structure with screws to the wooden part;
- seal the plastic structure using polyurethane foam, spreading it over a surface slightly moistened with water.
However, these are very general recommendations, and it is necessary to dwell on how to correctly insert a plastic window with your own hands in more detail.
You need to start with the fact that there are two different ways to install plastic windows with your own hands.
The first method is to drill holes in the window frame for special anchors, which are driven into the wall. This is a rather complicated method, but a more reliable fastening.
Fastening a plastic window with anchors
The second method is that metal plates are first attached to the frame from the outside, and only then these plates are attached to the walls. This is a much simpler and faster method, but such fastening is not reliable. The frame can simply warp even in strong winds. Therefore, if you still decide to make your life easier and install a plastic window with your own hands using the second method, use thick and wide metal plates. In this case, you can give your plastic structure greater reliability. However, if your city is very windy, this method is definitely not suitable for you.
Direct installation
Installing a plastic window with your own hands using the first method with reliable fastening is carried out as follows.
First, you should check whether the structure and the window opening are compatible. If everything is in order, we proceed directly to installation.
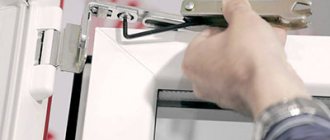
First you need to remove the window sash. For this:
- turn the window handle down, placing the window in the “closed” position, and use a screwdriver to remove the trim from the hinges;
- pull out the pin, which is located on the top hinge;
- open the shutter by turning the window handle to a horizontal position, after which, by lifting the window sash, you can easily remove it from the lower pin.
After you have removed the sash, you need to remove the double-glazed window on the capecaillie. For this:
- insert a small spatula or something similar, strong enough, thin and not wide, into the gap between the frame and the bead;
- move the glazing bead with a spatula, going along the entire length, and remove it from the frame.
After this, you can easily remove the glass unit itself. The main thing is that it does not fall out of the frame after the glazing beads you removed are no longer holding it. To avoid this, the window should be tilted.
The frame is freed from the glass unit, and now it should be covered around the perimeter with special tape. This tape is needed to keep the window warm.
As a rule, white self-adhesive protective tapes are glued to the frames. It is also advisable to remove them, because later, when they heat up in the sun and stick to the frame, fused with it, this will be difficult to do. In the meantime, the tapes are very easy to remove.
Now the frame needs to be inserted into the window opening. To do this, you will need mounting wedges, which are placed in the corners (this is a mandatory requirement), as well as in other places where you deem it necessary.
Using a drill and a drill bit, special holes are made into which the fasteners are inserted. The first hole is drilled at a distance of 1.5 - 2 cm from the top edge. The bottom hole should be approximately the same distance from the bottom corner. The gap between the two fasteners should not be more than 5-7 cm. The anchor is hammered into the hole and then tightened. At the same time, you must tighten the anchor carefully, trying not to overtighten, otherwise the profile will bend, and this cannot be allowed. This operation - tightening the anchors - is continued as many times as necessary.
After this, ebb tides should be installed outside. Before installation, self-adhesive waterproofing should be applied to the part of the frame that is located outside. Grooves are made in the side openings (the edges of these ebbs will need to be inserted there later).
On that part of the opening where the ebb will rest on the wall, a special profile is installed, to which the ebb will then be attached. If the height difference is small, you don’t have to install the profile, but simply apply a layer of polyurethane foam. Then the ebb should be placed under the ledge of the frame and attached to it with self-tapping screws. Along the lower edge of the ebb, you also need to fill it with polyurethane foam.
Next, you should fill the opening itself with foam so that there are no cracks or gaps left between the frame and the opening.
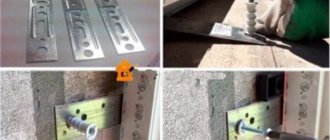
Now let's take a closer look at the second method of installing plastic windows with your own hands - using plates.
This method is much simpler, although, as we have already said, it is less reliable. Installation using this method involves installing thick metal plates.
They should be installed at the same distance as the anchors in the first installation method - approximately 2 cm from the edge, and no more than 7 cm between those in the middle. The metal plates are simply screwed to the profile using self-tapping screws.
In all other respects, do-it-yourself installation of plastic windows is completely identical to the first installation method. In the same way, the window is leveled in three planes, after which all actions are identical. Simply, unlike the first method, they attach not the frame itself, but metal plates, and attach them to the so-called dowel-nails. The peculiarity of the fastening is that they first drill a hole, then bend the metal plate, insert a dowel into the hole, put the plate in place and tighten the dowel.
Our promotions
Additional options
- Roto NT fittings
- Double-glazed windows
- Self-cleaning glass
- Mosquito net
- Anti-burglary fittings
- Window sills
- Winter window ventilation
- Window profile lamination
Our advantages
| Own production | exact order fulfillment time | 100% Quality Guarantee | we employ professionals | 10 years of successful work |
The main mistakes when installing plastic windows with your own hands
If you install plastic windows incorrectly, this can lead to the fact that the house will be cold; water will flow into the room through improperly installed ebbs. And the expensive structures themselves will quickly become unusable. And if professional installers sometimes make mistakes when installing PVC windows, then, of course, an amateur who installs plastic windows with his own hands is not immune from them.
Let's look at the 10 most common mistakes made when installing plastic windows.
The window size is incorrect
This is usually a consequence of incorrect, careless measurement of the window opening, and, accordingly, the manufacture of an unsuitable window structure. And in case the window is too large in size. And if the size is very small, it is simply impossible to install such structures.
Poor preparation of the window opening
If the surfaces are poorly cleaned, there is construction debris, dust, potholes left on them, or, on the contrary, parts of the wall protrude on the surface of the opening, the polyurethane foam will not fit as tightly and evenly as is necessary for high-quality installation of plastic windows with your own hands. In addition, this kind of pollution absorbs moisture very well, and it will soon end up inside your apartment.
Ignoring wall insulation
If a plastic window is installed without taking into account the thermal insulation of the wall, then cold air will penetrate into the apartment at the joints. Therefore, it is imperative to take into account the layers of walls when installing plastic windows. If the wall consists of one layer, the window should be placed exactly in the middle of the wall. If the wall is double-layered, the window should be installed at the very edge, as close to the insulation as possible. And if the wall is three-layer, then it is necessary to install a PVC window directly in the plane of the wall insulation, in order to avoid heat loss.
Incorrect distance between the window frame and the slope
If the window frame is located too close to the slope, the seal in this place will be of poor quality, and moisture will begin to appear and accumulate in these places. If, on the contrary, the frame is located too far from the slope, then there is a risk of deformation, since the load on the anchors or metal plates is too great.
Incorrect size of window sill
The window sill should be slightly narrower than the window frame itself. If it is a different size, or they decide not to install it at all, then water will penetrate under the window frame due to the lack of a normal seal in this place, and as a result, the wall will constantly be wet. Metal parts can simply corrode after a certain time.
Poor quality fastening of PVC window to the wall
If you skimp on dowels or anchors and there are too few of them to attach the window structure to the wall properly, over time the position of the window will change, the frame will become deformed, and it will be difficult for you to tear off and close the window.
Not enough polyurethane foam
Polyurethane foam is practically the only material for insulating a window structure and the wall itself to which it is attached. If there is not enough foam, the heat will escape. Therefore, the gap between the slope and the window frame must be filled properly, not sparing the mounting foam.
No insulation tape
If you decide not to use the insulating tape required by GOST on the inside and outside of the window structure, be prepared for the fact that the thermal insulation will gradually become worse and worse. Accordingly, the windows will deteriorate much faster than you would like.
Therefore, if you decide to install a plastic window with your own hands, try to go through all the necessary steps and perform all the necessary actions efficiently, carefully and slowly. Then your beautiful plastic windows, installed by yourself, will delight you and your household for many years.
Security measures.
Installation work may only be carried out in special clothing that does not restrict movement, as well as a protective helmet and gloves. When drilling into materials that produce flying chips, you should wear safety glasses. To protect the respiratory system from construction dust, use a respirator. Extension ladders and stepladders must be equipped with a device that prevents the possibility of shifting and tipping during operation. The lower ends of ladders and stepladders must have fittings with sharp tips for installation on the ground, and when using ladders on smooth surfaces (metal, tile, concrete), shoes made of rubber or other non-slip material are put on them.