When a thorough renovation has long been completed and the created interior with new pieces of furniture has already become boring, you want to refresh it again. Spending money on new renovations is impractical, but investing a little in giving the old interior a new lease of life would be a great idea. A material such as self-adhesive film can come to the rescue, which allows you to very quickly, conveniently and efficiently update both walls and furniture. If you know how to glue self-adhesive film correctly, you can even use it to mask any defects on surfaces, cracks and other imperfections.
Coating features
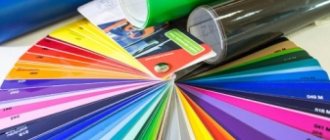
Material such as self-adhesive film has appeared on the building materials market for a long time. But over the years it has managed to improve and transform, and is now regaining its lost popularity. Self-adhesive film, which can be glued to various surfaces, has a low cost, a huge range of colors and textures, and is also very easy to use. Therefore, it can be used for decoration everywhere. It is worth understanding the main characteristics and features of such a material in order to know how to properly glue self-adhesive film to furniture, walls, even cars.
Among the huge range there are varieties for any surface and purpose. Adhesive coating manufacturing technologies are similar to the production of adhesive tape. At the same time, the finished material combines the properties of wallpaper and adhesive tape.
It is worth noting several advantages of self-adhesive tape:
- Resistant to moisture.
- Inert to high ambient temperatures up to 80 degrees.
- A huge number of different patterns, textures and colors.
- Acceptable affordable price.
- Easy to use and stick.
- Makes it easier to care for pasted objects or surfaces.
Self-adhesive film also has another characteristic feature - it can cover absolutely any surface made of metal, wood, glass, plastic, drywall, plywood, cork.
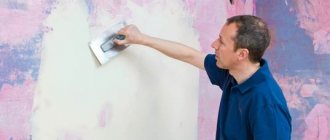
Note! The main difficulty that may arise when working with this material is a perfectly leveled base for gluing. How to glue self-adhesive wallpaper correctly onto a platform without defects, irregularities, cracks, bulges, or dents. In the future, they will all serve as the main prerequisite for the formation of bubbles on the surface of the film. Because of this, it may deteriorate or begin to come off.
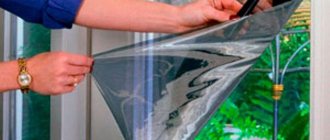
Gluing self-adhesive wallpaper to the wall is not difficult. In order to glue them, you do not need to have any special skills or abilities. To apply the film, you just need patience, a little free time and an assistant, especially when working with large surfaces.
Also, to glue such material, you need to prepare the appropriate tools:
- Ruler.
- Scissors.
- Construction knife.
- Pencil.
- Industrial dryer.
- Felt spatula.
Note! Using a hair dryer, you need to heat not only the joints or corners of the wallpapered surface, but also the entire perimeter of the sheet as a whole.
What will you need?
First of all, you will need your creativity and a suitable idea.
Decide which surface is right for you. Experts advise using matte furniture for rooms, and glossy furniture for bathrooms and toilets. But you shouldn’t take this as a rule - show your imagination and look for unusual solutions. The following tools are worth stocking up on:
- Scissors or stationery knife,
- Pencil,
- Roulette,
- Soft fabric,
- Spray,
- Sandpaper,
- Primer.
First, calculate how much film you will need. Using a tape measure, measure the surface area that will soon begin to transform. Do not forget to buy film with a small supply, because no one guarantees error-free and meticulous work (especially if you are doing pasting for the first time).
Under what conditions can it be used?
Since the finished coating is not affected by moisture and high temperatures, self-adhesive wallpaper can be glued to walls under any conditions convenient for the master.
The material does not require anything unusual in maintenance, so it can be used to cover any premises:
- You can apply self-adhesive wallpaper in the kitchen, as such wallpaper is very easy to clean. Another plus for the kitchen is that in this room, wall decoration, in particular wallpaper, is updated more often than in other rooms. Since self-adhesive has a low price, it can be changed more often, also stick it on furniture and keep it clean.
- Feel free to stick self-adhesive materials on the walls in the bathroom, toilet, toilet. For these rooms, the choice will be optimal; it will reliably protect the walls, and can serve for a long time even under regular exposure to moisture, splashes of various soap products, which can easily be washed off the coating.
- In any other room where the child lives. You can place self-adhesive wallpaper at the bottom of the room, creating an original decor. A child who likes to draw on wallpaper will not damage the expensive material. At the same time, the self-adhesive can be easily washed or cleaned, unlike a textile covering, or, if necessary, simply replaced with a new one.
- Self-adhesive film will be an excellent protective coating for any home furniture, be it cabinets, furniture, tables, chairs, chests of drawers, cabinets, bedside tables and much more. A protective smooth layer will allow the material to last longer and update the interior of the home, and may even radically change its style.
Advice! You need to select the type of film depending on the base on which it will be glued. To restore antique pieces of furniture, you need to choose a transparent coating; it will help disguise minor scratches and abrasions and at the same time accurately convey the texture and shade of the material. For glass, you can choose a film with mosaic patterns, which will look very original.
To clean self-adhesive film, as a rule, use ordinary warm water and any detergent. You should not select abrasive and powder-based cleaning compounds, as well as solvents, so as not to damage the structure and color of the material. Ethyl alcohol is suitable for removing stubborn stains.
General conclusions
Using the materials in the article, it is not difficult to choose suitable products. Self-adhesive film for furniture is used during restoration and decorative work. The installation algorithm described above should be adjusted taking into account the characteristics of a particular project and the restrictions set by the manufacturer. For example, to ensure reliable fixation, the recommended temperature range is set. The comprehensive application of the recommendations will help to obtain excellent surface characteristics and extend the service life of the updated product.
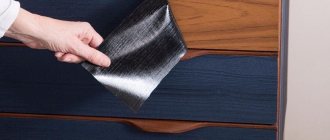
Pasting
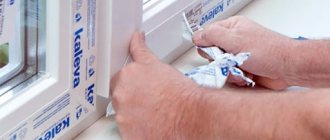
Before gluing self-adhesive film to furniture, walls or other surfaces, you need to carefully prepare them for work, and also become familiar with the basic gluing technology.
Surface and material preparation
Many people are interested in whether it is possible to glue the film to a wall, cleared of old coating, ceiling or other material.
Adhesive wallpaper products and sticky photo wallpapers can only be pasted on a well-prepared surface. It is first cleaned of residues of other materials, dust, dirt, degreased with alcohol or gasoline, and dried thoroughly.
This is interesting! This film adheres ideally to a varnished surface and looks good on it. If the substrate is rough or matte, a layer of primer or polyester varnish must be applied to it.
Wooden, plastered, fabric surfaces, as well as chipboard and plywood, must first be wiped down, then the remaining dust and small abrasive particles must be removed. For this, putty and acrylic primer are used; they will allow the film to remain on the base for a long period.
In order for the film to adhere better to metal or glass, these materials must first be slightly moistened.
Gluing technology
Typically, manufacturers include a detailed description of operation with each roll. Therefore, every master can learn how to glue self-adhesive wallpaper from this instruction. In fact, this process is as simple as possible, but requires a little practice. At first, you need to be careful and careful to avoid mistakes.
Main stages of work:
- Take the prepared piece of wallpaper.
2. Separate the protective film by approximately 5 cm.
3. Then apply the adhesive layer to the top of the part to be glued, accurately check the coincidence of measurements, shapes and evenness of the lines.
4. Then gradually, slowly moving downwards, simultaneously attach the sticky layer of film to the surface and peel off the paper layer.
5. Immediately you need to expel all bubbles and distribute the film evenly over the surface. You can use a dry cloth to smooth it.
Advice! When working with self-adhesive, you need to use the same smoothing tactics as with regular paper wallpaper. That is, from the middle to the sides, to the edge of the segment, in order to completely eliminate the appearance of air and bubbles.
If errors are made in the work, they need to be corrected immediately. That is, the film is immediately separated from the base and leveled until the material has completely set.
On video: How to glue self-adhesive film? New life for old furniture.
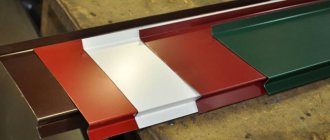
Kinds
Self-adhesive film is just a general name for a whole group of outwardly similar products, which may differ in material and performance characteristics. For example, such a finish is considered the cheapest of all possible, but the cheapest options are usually made of simple polyethylene, and this option is only suitable for those who like to change their interior design with a high frequency. PVC film is already considered to be of much higher quality and will last much longer, the same goes for vinyl.
Since film is most often purchased for the aesthetic appeal of the finished surface, it is desirable that it at least does not fade in the sun. If bright light is not typical for your kitchen, this can be ignored, but ideally it’s worth paying a little extra for material that has ultraviolet stabilization - then the finish will last longer without replacement.
Many modern types of self-adhesive film are loudly called universal, that is, suitable for any conditions of use, but in practice this is more of a marketing ploy, especially if we are talking about an inexpensive product. For the kitchen, you should choose especially sustainable solutions, because the film must be both moisture-resistant and heat-resistant. Special thermal film can even be located quite close to the stove, however, then you should not think that it will cost at the same level as the most budget options.
Finally, film can also be classified by image. Most popular types are decorated with a specific pattern, but there are also transparent options - they are used to provide additional protection for furniture that still looks beautiful and should remain so for as long as possible. “Modern” solutions like mirror or holographic films are becoming increasingly popular, but you need to understand that an attempt to create excessive glamor with budget materials can look downright cheap.
Common mistakes
Often, when working with large areas, craftsmen do not take into account the ability of the base material to absorb moisture. First you need to thoroughly clean it and wait until it dries completely.
Mismatch or difficulty in adjusting sizes - this problem arises when working with quick-setting surfaces. In this case, powder or talc will help, which will slow down adhesion.
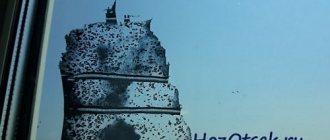
If air bubbles appear on the surface of the pasted film and it is impossible to get them out, you should pierce them with a needle and carefully smooth them out.
Decorative qualities of PVC film facades for kitchen units
Kitchen PVC facades can have a variety of colors and textures. Film manufacturers take into account fashion trends: as soon as a certain material becomes popular, they produce a PVC coating that imitates its shade and texture. Thanks to this technique, you can purchase facades “metal-like,” “wood-like,” or “glass-like.”
The film can be:
- glossy;
- matte;
- mirror
Thanks to modern technologies, various images and patterns can be applied to PVC coatings. 3D drawings that imitate three-dimensional details - stucco molding, milling or decorative carvings - have become widely popular.
How to remove self-adhesive film
When the old material has already worn out or is simply tired, boring, and you want something new, you can afford to change the self-adhesive. But to do this, you need to know how to remove it correctly so as not to damage the base or the material to which it was glued.
To remove the film, you can use the following methods:
- Exposure to hot water. Wet the surface generously, leave for 5-10 minutes and gradually slowly peel off the film. If it is a wall, you can use a knife or a sharp spatula, but you need to act carefully so as not to damage it.
- Another option is a hair dryer. Heat the film thoroughly with a hairdryer, wait until the adhesive layer begins to gradually move away from the surface. You can even use a hair dryer to dry your hair. But more powerful is a professional construction device.
- An alternative to a hairdryer is a fan heater operating at maximum power. It makes the material soft and allows it to peel off easily.
If there are traces of glue left on the base, you can use a solvent to remove them. You can use alcohol or gasoline.
How to glue self-adhesive film? (2 videos)
Types of self-adhesive film (15 photos)
Questions and answers
How to remove old film?
Usually the old film is easily removed from the surface. If the glue sticks very tightly, you can remove it with a scraper; if necessary, the surface can be polished.
What can be used to degrease surfaces other than alcohol?
Any organic or non-organic solvent can be used, but care must be taken that the solvent does not affect the top layer of the furniture.
How long can such a film last?
On average, film can last for 2-3 years without loss of external qualities.
Is it safe to use baby film?
The film should only be of high quality. Poor quality materials may release unsafe compounds.
How to wash film to remove dirt?
Only with a damp cloth using regular detergents. Aggressive agents can damage its surface.
Car surface preparation
In order for the film to stick firmly and last a long time, it is necessary to carefully prepare the surface. To do this, carry out the preparatory work:
- Inspect the car for any major stains or damage.
- Wash the car with detergent. You can use regular car shampoo for this.
- Remove traces of insects and bitumen stains by treating the stained areas with a rag soaked in alcohol. Then polish, because the protective coating fits much easier on a smooth car body.
- Degrease difficult elements. When the work is completed, wipe the surface to be glued dry.
Sticking a film on a car and doing tuning is not as difficult as many people think. To do this, you need to prepare the necessary tools and follow the work algorithm.