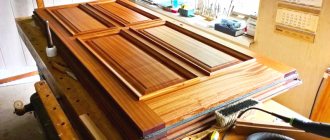
A window sill is often perceived not only as an element of the overall window design, but as an independent multifunctional piece of furniture. It can be used as a table, shelf, step or seating area. Increased use of the window slab, especially for other purposes, leads to loss of aesthetic appearance and mechanical damage.
Over time, the desire to update the appearance of the window sill may be associated not only with the need for restoration, but also with decorative elements. You can not only strengthen the window sill slab and renew the surface with wear defects, but also choose a more suitable color, texture, and shape. The new technology for replacing an old window sill involves selecting and installing a special lining.
Restoration using an overlay allows you to restore the freshness and attractiveness of a window at minimal cost and adjust its shape taking into account its functional features.
The installation will not take much time, will not affect the walls, wallpaper, or the main structure of the window, and will allow you to do without inviting installation specialists to do everything yourself. It should be noted that such a restoration is possible provided the window sill thickness is no more than 6 cm.
The gloss also fades
In addition to its direct purpose, the window sill is used by households for many other purposes:
- as a desk or kitchen table;
- bench;
- additional shelf;
- greenhouse.
The white decorative surface attracts children as an object for creativity.
There are often cases of a window sill being close to a central heating radiator, as a result of which the plastic can become deformed or even catch fire. It does not tolerate too aggressive household chemicals and turns yellow if the window faces the sunny side. All this turns a beautiful piece of furniture into something that causes pity and irritation.
There are two ways to solve the problem: complete replacement and update.
In what cases are they necessary?
Whatever the reason, the new surface will add freshness and attractiveness to such an interior element as the window sill.
There can be many reasons for installation:
- Concrete or granite window slabs sometimes crack or chip at the corners.
- Plastic window sills, especially white ones, fade and turn yellow over time.
- Often, damage occurs from hot objects that accidentally fall on the surface, including unextinguished cigarettes.
- Traces from flower pots and water dried on the surface.
- Stains from aggressive cleaning products.
- Accidental mechanical damage.
- Scratches and marks of claws and teeth of pets.
- The desire to simply update the surface by changing the shape or color shade.
Replacement or restoration?
Radical actions, namely dismantling the old window sill and installing a new one, are impractical in many situations. Especially if the old one has lost only its external attractiveness, but is still fundamentally strong. This applies, first of all, to stone, wooden, and concrete foundations. Although plastic options are no exception. In these cases, it is enough to update the coating.
Installing overlays on window sills eliminates many problems at once:
- the process does not require much time;
- eliminates the hassle of disposing of waste left after dismantling;
- money is saved.
The construction market offers a repair lining for the window sill that is specially designed for this purpose. Samples of different colors and sizes are available, so choosing a new coating to match the wallpaper or any other will not be difficult.
Kinds
There are two types of overlays:
- PVC;
- MDF panels.
Each of them is considered in detail. Plastic products come in different colors. For example, white or displaying a pattern of wood or marble. The following materials are used for installation:
- wooden;
- concrete;
- stone;
- tiled.
Products are selected 2 cm wider than the base. This is necessary to prevent cracks. Additionally, plugs are selected. The material is the same, it should be suitable in width and shape. Standard sizes:
- width – 15-52 cm;
- length – 3 m;
- thickness – 3.5 mm.
MDF overlays with a dropper are used to restore the old plate. They have a limited selection of colors. There are no end caps.
They are less common in sales than plastic products. They need to be chosen wider by 6-8 cm. The drip tray performs the main function and covers the old window sill. The size is selected according to the type and dimensions of the slab.
Before restoring a plastic window sill, the following criteria should be taken into account:
- the color must match the shade of the window structure;
- pay attention to qualities and properties;
- rules of care, the ability to use detergents;
- calculate the dimensions correctly;
- the presence of plugs that correspond to the dimensions of the slab.
Window sill trim: what is it?
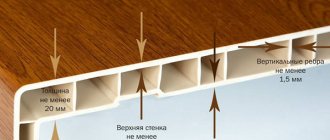
Plastic covers for window sills are sheets with a profile edge of different sizes. During the installation process, they are cut to fit the dimensions of a specific window. The installation process involves fastening the lining over the old base, without dismantling the structure.
The linings have a sufficient margin of strength and rigidity, so they serve as good protection for the base of the window sill. However, they cannot replace it: they are too thin, therefore they are not used as an independent element, only as decorative ones.
The set is completed with an end trim for the window sill. It is made of a similar material, which helps hide flaws in the base.
The decorative repair trim is available in two versions: PVC or fiberboard. It can be used if the thickness of the window sill does not exceed 6 cm.
Description and functions
The main functions are to carry out restoration, protect the structural surface and give the window an overall aesthetic appearance.
The linings are made of thin profiled sheets, which are used for finishing work and cosmetic repairs.
It is impossible to make an independent window sill out of them, but they are universal as a finishing coating for restoration purposes. Suitable for wooden, plastic or concrete window sills, as they are compatible with all building materials.
Like many window structures, the trims are made from polyvinyl chloride, so they form a single unit. A wide range of colors, patterns, shades, dimensions allows the user to choose the best option. The maximum length can reach 3 meters, and the depth is 1.5 m.
The end caps are made of the same material. The use of a metal-plastic base preserves the strength of the products and makes them quite cheap and accessible.
Thanks to the thin, but tough and durable material, after restoration the window sill becomes resistant to fire, ultraviolet radiation, humidity, and temperature changes.
Advantages of the covering-overlay
Plastic covers for window sills have a whole list of advantages that make their installation profitable:
- Versatility. Installation of the lining is possible on any window sill: old or new; wooden, plastic, stone, brick, concrete.
- Variety of assortment. You can easily choose a sample that matches the color of your home decor. It can be plain or imitate wood, stone, or other materials.
- Quick and easy installation. There is no need to remove the old window sill - just glue the trim to it. You can do this yourself.
- Interchangeability. An overlay that has lost its presentation or has become boring can easily be replaced with another one if desired.
- Aesthetics. The decorative trim is made from the same material as the window frame, so together they look cohesive.
- Price. The material is inexpensive, the next purchase cannot undermine the family budget.
Installing covers on the window sills returns its attractive gloss, radically changing for the better the overall appearance of the window as part of the interior.
Advantages and disadvantages
If we compare the advantages of plastic linings, it is worth highlighting:
- affordable price;
- installation can be done without professional skills;
- large selection of colors to suit the design of the room;
- you can change the shape and size of the main plate;
- long period of service.
Among the disadvantages are:
- fragile coating;
- unstable to mechanical influence.
What to consider when choosing?
The market is overflowing with different offers from domestic and foreign manufacturers. With such an abundance of plastic covers for the window sill, it’s easy to get confused, so when planning to update the window sill, you need to choose the cover consciously. Several main criteria are taken into account.
Color
Plastic covers for window sills are available in a variety of colors, including plain or colorful designs. Imitation of natural materials is popular:
- wood;
- marble;
- stone
Choosing any option for plastic window sill covers, except white, requires some effort, because you need to analyze the compatibility with the interior. Not everyone is ready for this, so neutral white overlays remain the most common and in demand. They coincide in this with the plastic frame and do not in any way affect the overall color scheme of the room.
Dimensions
A standard repair trim for a window sill measures three meters long and one and a half meters wide. However, you can purchase a product with other parameters that are closer to what you need, so before placing an order online or in a store, you need to measure your window sill as accurately as possible. It is advisable to add a couple of centimeters to the obtained values for the allowance necessary for correction during the installation process.
The length is measured over the entire surface of the window sill plus the areas that cover the wall. Along with the main one, an end trim for the window sill is immediately purchased, with which both sides are decorated. Its dimensions are also carefully measured and taken into account when purchasing.
Price
The final option is able to determine the financial factor. Foreign plastic covers for window sills are undoubtedly beautiful and of high quality, but domestic manufacturers have learned to work just as well. Their products are not inferior either in aesthetics or in consumer properties, but are several times cheaper. It should also be preferred by lovers of novelty, for whom even a very beautifully decorated old window sill quickly gets bored. It is simply unreasonable to shell out significant amounts of money each time with such an attitude.
However, you shouldn’t save too much; after all, the product is not purchased for one day or a year.
It is desirable that the decorative overlay be resistant to external aggressive influences such as moisture, ultraviolet radiation, temperature changes, fungus, and household cleaning chemicals.
Spectacular solutions for window decoration
Matte and glossy window sills with fashionable, eye-catching textures from the best manufacturers are available for sale at anti-crisis prices:
- Möller (Meller) - standard laminated panels, tall, imitating the noble rich shades of expensive types of wood. Wood surface textures - dark, light, golden oak, exquisite marble;
- Stained glass (Russia) – a stylish panel with the texture of expensive red wine, mahogany wood, classic matte dark oak;
- Werzalit (Verzalit) - decorative surfaces with textures of honey sun walnut, delicate, pastel maple;
- Danke (Danke) - laminated beautiful profile (window sill board) texture - modern metallic, wood, classic black wenge, stone;
- Crystalit (Crystalit) - laminated PVC sheets with wood textures - universal ash, beech with a beautiful natural cut pattern of natural wood.
Any required width is always available - from 100 to 1000 mm, cutting (window sill 10, 15, 20 cm) to the required size. Large selection of fittings and components in the desired colors. One of the advantages of buying a colored window sill board is that you only pay for the size you need (a pre-cut profile is laminated or painted).
Materials required for work
Installation of overlays on window sills can be done by yourself, without contacting a specialist, since special construction skills are not required. The tool is also a common one, available to every handy owner:
- roulette;
- fine-tooth saw;
- jigsaw;
- assembly adhesive;
- putty or its equivalent;
- silicone
You may need special compounds to bring the surface of the old window sill into proper shape (degreasing, wiping).
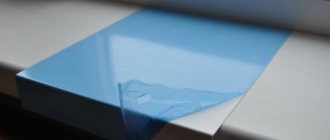
Covering the window sill with self-adhesive film
When the preparation is complete, proceed to the process itself.
Prepare for work:
- Selected self-adhesive;
- Knife, scissors;
- Long ruler, tape measure, pencil;
- Rags, sponge, rubber spatula.
The crucial moment is to cut out the film correctly. Ideally, this should be one piece with correctly cut corners and smooth edges. If you are in doubt about the calculations, then first make a pattern on paper and try it on the windowsill.
When cutting, take into account the height of the ends and the slight bend under the window sill board. If everything is perfectly marked, you can transfer the drawing to self-adhesive film. Lay it face down; on the wrong side there is a lined grid with a pitch of 10mm for ease of cutting.
Transfer your pattern to self-adhesive paper, lightly tracing the contours of the pattern on it. If you have a film with an imitation or pattern, then try to orient it so that the pattern is equally symmetrical on opposite slopes.
If there are several windows in the room, it would be correct to cut out canvases that are identical in symmetry. The self-adhesive film for window sills has been cut, the preparation has been completed, and you can begin the main process.
If this is your first time encountering this task, then before laminating the window sills, slightly moisten the base with water or a slightly soapy solution. I'll explain why. Then the film will not stick “tightly” to the surface, and it can be corrected, slightly shifted, eliminating the distortion.
Separate a piece of protective paper from the self-adhesive film by 5-10 centimeters to fix its initial location on the base. Place it on the window sill at its base and begin smoothing from the center to the edges, pressing the film well.
Peel the backing off the film in small sections and stick these sections onto the surface. And so the entire workpiece, the ends and folding under the window sill base. If there is a displacement, correct it, since you glued the film to a damp surface.
Smooth with cloths and a rubber spatula. Inspect the finished product for bubbles. They can be easily eliminated by piercing them with a needle and pressing to release the air. Usually the difficulty arises when you laminate the corners, but since you have everything cut out in advance and cuts are made at the folding points, there should be no problems.
Removing the film
When replacing the film, the question arises of how to quickly remove the self-adhesive film. The simplest method is to wet it several times with hot water, then the adhesive component will soften and easily come away from the base. Using a spatula, start removing the film.
An ordinary hairdryer can come to the rescue, as it heats the surface in a dry way and helps remove the self-adhesive. Warm up the area, and, lifting the film, pull it towards you, then the next area. Remove any remaining adhesive with alcohol or solvent.
This is how simple a self-adhesive film for window sills can transform its design. The main thing is accuracy when working, accuracy in measurements and adherence to sticker technology, then the quality will be at its best.
Installation in stages
Installing a repair trim on a window sill is simple, without surprises, but, as in any matter, care and accuracy are required.
Preparing the base
Includes treatment of an existing window sill. Whatever material it is made from, it is thoroughly cleaned and degreased. Otherwise, the surfaces run the risk of not sticking together.
After this, the plastic base is considered ready. On a concrete window sill, minor defects need to be repaired with gypsum putty. An old wooden window sill is cleaned of the paint layer, and cracks and other recesses are covered with wood putty. When it dries, sand it with fine-grained sandpaper. Next, the base of any window sill is treated with an antiseptic.
Uncover
The repair trim for the window sill is cut according to the existing dimensions of the opening. It is necessary to reproduce the contours of the window sill as accurately as possible. Use a mounting knife or jigsaw.
The configuration of the areas along the window slopes can be difficult. They are cut out using paper patterns.
You should not try to increase the size of the window sill by using an overlay that is too wide. If it extends significantly beyond the edge of the base, any unintentional pressure will easily damage it.
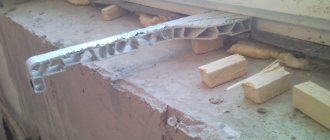
Fixing the pad
The plastic linings are secured to the window sill on the base base and done as follows:
- The backing of the cover is thoroughly cleaned from dust and debris;
- assembly glue is generously applied to the base, that is, the window sill: in a continuous line around the perimeter and randomly along the rest of the surface;
- the decorative overlay is pressed against the window sill, after which heavy objects (books, dishes with water) are placed on it; it is advisable to place them thicker so that the surfaces stick together evenly and reliably; be sure to place the weight in the corners;
- After the glue dries, the weight is removed.
To ensure that the protective film of the lining does not interfere with the final stage of installation, it is lifted from the edges along the entire perimeter.
Installation of ends
After installing the cover, side or end caps are installed on the remaining unclosed ends. The end trim for the window sill is made from the same material as the main trim, purchased along with it and cut to the required dimensions.
Window
0 votes
+
Vote for!
—
Vote against!
The window sill is as practical and an integral part of the window structure as the window itself. You can often notice that the functionality of this item in everyday life is much wider than one might think. It is widely used as a convenient place for various, sometimes completely inappropriate, items. And increased use of this area leads to rapid loss of appearance, wear, and, ultimately, final damage. This article will focus on repair linings for window sills.
Replacing an old window sill is not always the only right solution. If we take into account the laboriousness and high cost of the process, then any other option may be more acceptable. Therefore, instead of replacing the old window sill, you can try to restore it. Restoration is convenient, first of all, because it does not take much time, you will not need to free up a lot of space near the window and bother with removing construction waste that will remain after dismantling the window sill. And the cost of restoration is still less than a complete reinstallation of the product.
A simple, easy-to-implement method of updating a window sill can be considered the use of plastic linings specially manufactured for these purposes. They can be purchased at specialized construction stores or even ordered online. A large selection of colors and patterns of decorative surfaces allows you to choose a product in accordance with the color of the window, wallpaper, general interior style, or simply guided by your taste and preferences.
What are window sill covers?
- Overlays are thin profiled sheets, the dimensions of which are adjusted individually to the parameters of the window. They are used for repair and restoration work in residential premises of various types, as well as in offices, institutions, etc. They are not used as an independent element, that is, an alternative to replacing the window sill.
- They, like windows, are made of polyvinyl chloride and, together with the window, look like a single whole. This material allows the thin trim to be strong and rigid enough to provide protection for the surface of the window sill. Moreover, it doesn’t matter what the window sill itself is made of - plastic, wood or concrete - plastic linings go well with any of them. They are all equipped with a profiled edge and plugs made of the same material, which will help hide imperfections and unevenness of the base.
- In all cases, installation is carried out in a very short period of time. A simple installation technology involves fastening a new part over the old one without first dismantling the structure. A window sill repaired in this way, according to manufacturers, can last for many years.
- The use of overlays can be considered not only as a wonderful option for updating the window sill, but also as a new full-fledged element of the interior.
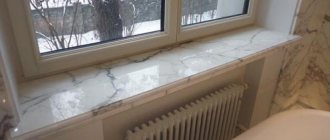
Restoration of window sills
The reasons for installing overlays may vary. You can often notice that over time, a concrete or granite window sill develops small cracks and chips in the corners and edges. It is very difficult or even impossible to restore an even, smooth surface, and therefore there is practically no point in restoring it. If you are not satisfied with the appearance of the window sill and want to update it, it is better to use a plastic cover, which will not only hide the defects that have formed, but will also give the old coating a fresher look.
A window sill made of plastic is more likely to be damaged due to the fragility of the material and its instability to the adverse effects of environmental factors:
- It can be damaged by an accidental strong blow. Children often do this while carelessly playing near the window;
- Often adults also take part in the process of turning a plastic surface into disrepair, accidentally leaving hot objects on it, for example, a mug with a hot drink or even an unnoticed cigarette ashes or cigarette butt;
- in rare cases, the cause of damage to a plastic product (due to non-compliance with installation requirements) is too close proximity to a hot central heating battery - the plastic may become deformed or even catch fire;
- Housewives who love flowers may accidentally pour water over the edge of the pots when caring for them. Such diligence results in stagnation of water on the surface, as a result of which stains appear, and it will not be easy to get rid of them;
- at the same time, the use of too aggressive chemicals when cleaning will also not increase its service life;
- Pets also keep up with their owners. The marks and abrasions left by their paws, scratches from claws will definitely not decorate the appearance of the coating;
- direct sunlight on the surface causes them to yellow.
Overlays for window sill repair are also useful in cases where you simply want to increase or decrease its size, refresh the appearance of the window, do not have the time or funds for more thorough repairs, or want to replace it without unnecessary dust and dirt in the room.
Advantages of a decorative window sill trim
What are the positive properties of plastic linings that make their purchase and installation profitable?
- First of all, it is quick and easy to install. There is no need to spend a long time dismantling the old window sill or removing construction debris. Simply attach the trim over the old part using construction adhesive. You can do this yourself, while a complete change of the window sill will require professional knowledge, since window slopes will also be involved in the process.
- Another advantage is interchangeability - periodically change the pads from one to another as needed or desired.
- In terms of price, repairing plastic window sills using an overlay is significantly higher than replacing a slab and will not greatly affect the family budget.
- Even if there is no particular need for replacement, you are tired of the color and shape of the window sill and there is a desire to match it, for example, to the color of new wallpaper, or you just want to diversify the interior - there is nothing simpler - just install an overlay and an attractive glossy surface will immediately give the window a completely different, new look .
How to choose plastic linings for repairing window sills
Before you begin installation, you must first select the right finished product.
- The main selection criterion will be correctly selected sizes, since all linings produced by manufacturers differ in size. The choice here is quite varied. Despite the fact that the standard dimensions of the overlays are basically 3 m by 1.5 m, you can also purchase a product that will be as close as possible to the given dimensions. Therefore, before going to the store, you need to first measure the dimensions of the window sill and add a few centimeters for the allowance that will be needed for correction during installation. You should measure not along the window opening, but along the entire length of the window sill, taking into account the fragments extending onto the wall. The width is measured from the edge of the frame to the edge of the slab.
- Not only are the sizes of the plates available in a wide range, but also the colors and patterns on the decorative layer. The overlays can be plain or be a high-quality imitation of natural materials - stone, marble, rare wood species. The most typical and widespread are white products.
- At the same time, you should not forget about purchasing the end trims for the window sill, which are used to decorate the sides.
- It’s worth saying a little about the price. Products of domestic companies are always cheaper than foreign ones, but, nevertheless, comply with the European quality system.
How to install plastic covers on window sills
Installing the cover is not difficult, but requires care and attention. In addition, you can do this yourself, saving on the cost of a specialist. Any complex construction skills and the use of special tools are not required here. But you still can’t do it without tools. To work, you will need a fine-toothed saw, a tabletop or hand jigsaw and a regular tape measure. And in addition to the overlays and plugs, you will also need assembly adhesive for gluing two surfaces and silicone for sealing the joints between the overlay, the wall and the frame. When everything you need is available, you can start working directly.
Stages of work
- First, prepare a plastic plate and cut it according to the parameters of the window recess.
- Some difficulty here will be presented by the figured fragments near the window slopes. You can carefully cut them along the edges of the workpiece with a jigsaw using a paper template.
- The width of the workpiece should not extend too far beyond the edge of the window sill, otherwise any careless pressing may lead to breakage of the plate.
- Before starting the installation of the lining, preliminary preparation is carried out on the lower part, that is, the surface of the window sill, which must be smooth and clean.
- It is advisable to smooth out all deep unevenness on the concrete slab using gypsum putty. On plastic and wooden window sills, no special preparation is required.
- In order for the construction adhesive to connect both parts being glued together, the surface of the slab must be degreased.
- To fix two elements - the old and new window sills - use mounting adhesive. Distribute it over the surface of the window sill, first with a solid line around the entire perimeter and in a zigzag pattern, rings or any other patterns inside, the main thing is to fill the space.
- Particular attention should be paid to the edges, since the overall strength of the structure depends on how firmly they are secured.
- A pre-prepared overlay is placed on a base coated with glue and pressed in several places with something heavy. This could be a stack of books or a bowl of water. It is mandatory to install such a load at the corners of the window. When the glue has dried and the weight has been removed, you can move on to the next step.
- Now you need to lift the edges of the protective film around the perimeter. Just a little, just to free the edges of the lining from it.
- After installation, there are open spaces on the sides of the plate that should be filled with side plugs. The end cap is a decorative plastic element made of the same material and color as the trim. The required length should be measured from the wall to the edge of the window sill.
- Then, if required, the finished plug is cut according to the dimensions obtained and installed in place.
- Now it's time for silicone. All joints near the slopes and window frames must be treated with sealant. Apply a thin layer of silicone evenly to the seams, so as to only hide the treated areas and carefully level it. You must work with the sealant very carefully so as not to spoil the appearance of the finish. Leave until completely dry.
- Finally, the protective film should be completely removed.
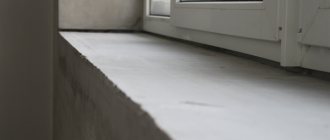
This completes the work. If everything is done correctly, the updated window sill will look neat, and certainly without the previous flaws.
A new beautiful trim is, of course, great, but you need to remember that the rules for using plastic trims are no different from those intended for plastic window sills. And all those factors that led to the damage of the previous coating, if they are not taken into account, will be dangerous for the new one. In order for the coating to last as long as possible after repair, you should treat it as carefully as possible.
Plastic covers can be considered as an easy way to give old, worn-out window sills a new look if they are no longer happy with their appearance, or as a quick method of eliminating defects that have formed under long-term use. If there is no time for major repairs or there is no desire to live in construction dirt and dust during repairs, this option is also acceptable. Or if you want to simply update and refresh the design of the room, give it newness and color, window sill covers can also play a role. They are inexpensive, easy to install and maintain, and the resulting effect is ultimately most positive.