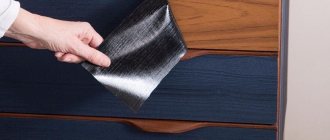
How to remove protective film from a stove?
Film
I scrape it off with a knife (the surface
of the plate
is not enamel, but “stainless steel sheet”), the remaining glue is easily removed with white spirit solvent.
PS True, scraping the film
requires a lot of labor.
Interesting materials:
What environment do cancer cells not like? Which video card should I get for Full HD? What is drops? What is a capital? Hamachi lights up blue how to fix? What is chord? ICloud storage is almost full, how to clear it? Kia optima what class of car? Keyboard, which keys do what? Fiber benefits and harms: how to take?
How to install a sill on a brick window with your own hands
Published: 2018-10-02 | Viewed: 1805 times
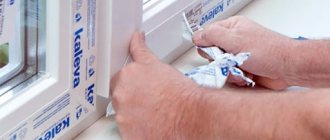
An important stage in window installation is the installation of an external window sill or ebb. Practical metal and plastic in the manufacture of the latter make it possible to protect the structure from precipitation, which often penetrates the technological gap.
Photo #1. Metal window tint
What should you consider when selecting materials for window sills?
The first thing that the craftsman pays attention to is the material of the frame itself; the window sill must be combined with it. For plastic windows there is usually only one answer: appropriate tides. And for structures, for example, made of wood, there are different options.
There is a wide variety of types: for the manufacture of external window sills, in addition to those mentioned, metal, concrete, brick, natural stone or clinker tiles are used. The easiest way is to purchase or make your own water drains from tin, which can be easily painted in the color you want.
But, regardless of the material chosen, it is important to consider some parameters:
- — the width of the ebb should exceed the distance from the frame to the wall surface by approximately 3 cm;
- — the length is calculated based on the parameters of the window and decorative elements;
- — the plane needs to be positioned at a slight slope, about 5% is still drainage, and it is assumed that the liquid does not accumulate, but drains;
- - use of special plugs for safety or aesthetic purposes.
Tools
For self-installation you may need:
- drill or screwdriver, or possibly both;
- when installing tin plates, metal scissors;
- self-tapping screws (different types for different materials);
- marker, measuring tape or other devices;
- side plugs if necessary.
Photo No. 2. Decorative brick casting
Brick ebbs
To create the effect of maximum naturalness (however, this will be the case in reality), clinker drainage systems can be installed along with wooden windows. Shaped products are ideal here, but ordinary clinker bricks or similar tiles would also be a good option.
Having chosen shaped products, you no longer have to worry about the formation of a slope; it is laid directly into the profile.
And the color range of clinker elements is generally very wide, from the expected red or brown to white or black.
Photo #3. Preparing the frame for installing the drip lining
Preliminary preparation
To avoid possible problems, knowledgeable people strongly advise purchasing factory-made solutions; sometimes, as a result of using homemade solutions, the masonry turns out to be uneven and there is a risk of efflorescence. However, everyone is free to choose, and when preparing it yourself, the solution should be made moderately liquid, and the cement should be taken that does not have any additives, for example, slaked or hydrated lime.
Next, you should select the grout. Its color will look great if it contrasts with the shade of the clinker brick.
Photo No. 4. Hood grouting
Preliminary work, as well as further work, must be carried out at an ambient temperature of at least 10 C.
Stages of work
The decision to install clinker drainage should be made before installing the window itself, since for this type of window sills it is necessary to leave a distance under the window frame that exceeds the thickness of the clinker by 2.5 cm.
Before starting masonry, the base is carefully leveled, cleaned of dirt and dust, and then moistened with water.
One of the important rules: accuracy and lack of haste. Not a drop of mortar should get on the front side of the brick; it hardens quite quickly, and removing the contamination will be problematic.
And the crucial moment comes: the main stage of manufacturing an external window sill:
- a board is attached to the wall, leveled; it is both a support and a measuring tool;
- then a solution is applied to the base, which is leveled to the surface of the board;
- the solution is applied to the side parts of the clinker elements, but the seams remain incomplete;
- all bricks are pressed tightly against vertical and horizontal surfaces;
- Between the clinker and the window, for control purposes, plastic wedges are placed, which are removed when the work is completed;
- so that the seams are equal, two plastic crosses are inserted into them at some distance from each other;
- It is advisable to place solid bricks along the edges of the masonry, and use hollow ones in the center;
- grouting is carried out (and it is better to do this the next day, when the solution binds), the material must be carefully pressed into the seams;
- excess grout can be easily removed with a damp sponge;
- When the process is completed, the seam under the window itself is sealed using a silicone or acrylic composition for exterior use, and the ebb is covered with a special film, which should be removed only after the final finishing of the facade.
The finished casting should be protected from rain and other moisture for about a day so that it will last for many years.
Removing the glass
So, also if damaged, you may need to pull the glass out of the double-glazed unit, which is also not a particularly difficult task. In a little more detail, to do this you need to do the following:
- First, you should slightly trim the layer of sealant on the double-glazed window. For this it is best to use a construction knife.
- Then we completely remove the sealant located along the contour in order to get to the aluminum frame.
- After which you can easily remove the glass and replace it.
- Next, you need to provide a new layer of sealant.
This is how the glass is replaced. The process is even somewhat simpler than removing the double-glazed window itself, but it must be performed with even greater caution, since in this case the risk of damaging the structure is much greater.
Required Tools
Before cleaning, it is recommended to prepare the necessary tools . Ideally, they should be grouped close to the work area so that they are easy to reach. Here is a list of tools needed to properly clean plexiglass:
- Sponge or soft cloth;
- From warm water ;
- Suede so as not to scratch the surface;
- Spray ;
- Rotating brush or scraper for large areas.
Available commercially, much of this material is relatively affordable.
Tips for removing grease splashes
If oil or tar stains appear on plexiglass, it loses its aesthetics and becomes unpleasant to the touch. In addition, the material becomes less durable. A deep scrub thus turns out to be essential. To do this, you can use three methods:
- There is nothing better than a natural and eco-friendly solution for removing grease stains from plexiglass: lemon . This citrus fruit is prized for its many benefits, starting with its degreasing effect. You need to cut the lemon in half, squeeze two quarters to collect the juice. The next step is to pour two tablespoons of lemon juice and water . Close the lid and shake in a slow circular motion for a few seconds. Then spray the surface with the mixture from top to bottom. Then the plexiglass must be wiped with a microfiber cloth , making S- shaped gesture. , always from top to bottom. Repeat the motion to remove any remaining product.
- The effect of alcohol on grease stains is no longer discussed. To do this, lightly dampen microfiber cloth in alcohol . The surface should then be rubbed and then scrubbed in the usual manner.
Removing scratches
Having analyzed the size of the damage, we select the abrasive material for work - sandpaper. The choice of the number of such material must be determined wisely, because larger particles of material can damage the surface of your product.
Sandpaper grit is measured by the number of abrasive particles per square inch of surface; the higher the number, the finer the sandpaper.
If the scratches on the plexiglass are not very deep, then sandpaper will cope with them. Before sanding, moisten the surface with a little water. The surface is sanded until it becomes uniformly matte. It is better to carry out the operation in two stages - first, rough sanding with sandpaper with a grain size of 600-800, then the second, “finishing” stage, for which sandpaper with a grain size of 1500 or more is suitable.
Then they select a special paste and begin polishing the surface. The polished surface is cleaned with a cloth, and your product looks almost like new.
A completely different method will need to be sought in the case when the surface of the product is severely damaged by scratches, and even the cracks turn out to be deep. Let's try to restore the surface using a special scraper. We select the material from the scratch according to its direction. Then select an abrasive layer and level the entire surface evenly. For cleaning, it is more effective to choose sandpaper of about 800. You need to sand in such a way that there are no rolls, otherwise glare and optical distortions will certainly form on the restored surface.
Installation of accessories and trims
Low tide
We recommend starting with low tide , which is responsible for draining water from the facade of the house. It is installed level and secured with self-tapping screws. It is important to check the tightness of fastening of the ebb elements by moving left and right along its axis. The head of the screws should be at a distance of 1 mm from the siding, which will prevent deformation during installation of vinyl siding panels. It happens that the nail hole of the ebb does not fall into the center of the sheathing, then it can be made using a hammer drill. Fastening of all parts of siding accessories must be done with an overlap of 25 mm wide.
How do you know where the top is on polycarbonate?
Thus, any sheet of cellular polycarbonate
has a protective film on both sides and the front side (with applied protection from UV rays) is the one on the protective film that has markings, logos or the protective film is not transparent.
Interesting materials:
How to log out of your Netflix account on your phone? How to sign out of your Gmail account on your phone? How to log out of your play store account on your phone? How to log out of YouTube account on Android phone 2022? How to log out of YouTube account on Android phone? How to exit safe mode on a Sony phone? How to exit safe mode on Huawei phone? How to unblock your phone? How to leave discord on your phone? How to exit power saving mode on your phone?
Steps to Clean Plexiglas
Once the equipment and the right products are available, it's time to clean the plexiglass. To remove dust and dirt, follow these steps:
- Mix water and dishwashing liquid ;
- Pour the mixture into a spray bottle;
- Spray the plexiglass;
- Wipe with a damp sponge or soft cloth ;
- Rinse equipment when cleaning;
- Rinse the surface with clean water;
- Wipe the plexiglass with chamois leather .
For the ecological method, proceed as follows:
- Mix 1 cup vinegar and 3 cups water in a spray bottle;
- Shake gently;
- Spray onto the surface of the plexiglass;
- To complete cleaning, wipe gently with a lint-free cloth.
You can also use eco - labeled glass cleaners . It is important to note this mention on the product packaging. Indeed, the presence of solvents can damage plexiglass during cleaning. To clean with window , it is recommended to carefully read the instructions for use .
Mechanical methods
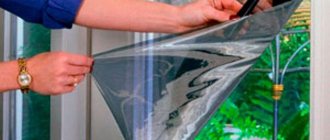
The main principle of removing film from a window is not to disturb the gloss of metal-plastic surfaces. Therefore, cleaning using mechanical methods is carried out very carefully, slowly.
Scraper
A plastic scraper with a very thin and sharp blade and a comfortable rubber handle will help remove the protective layer from the frame of a metal-plastic window.
This little tool is easy to find on hardware store shelves . Working with it is simple and convenient.
Using a scraper, pry up the edge of the protective layer, and then, carefully pulling it, remove the film from the window.
Hard brush
Active friction with a hard, non-metallic brush will help to quickly remove the protection from a metal-plastic window. Alternatively, instead of a brush, you can use a dish sponge (its rough side).
What do you need for work?
Even before starting work, you should prepare the place. Avoid rooms with a lot of dust or carry out wet cleaning. Choose a table or other level and stable place that is well lit and allows you to perform the procedure with maximum comfort.
There are several more factors that will allow you to remove old film from the screen at home:
- Tools. Choose a few different items that have sharp edges and are made from soft materials. A toothpick, a plastic card, a pick - this is not a complete set. Do not use metal tools such as needles or a knife, as this may damage the touchscreen or cause scratches on the display.
- No dust or debris. Use all options to get rid of dust. Take monitor wipes, alcohol or similar solutions with a high content of alcohol, and a can of air - this will help clean the surface of the screen after removing the old protective film.
- Fast and neat. After removing the film, you need to carry out the procedure for installing a new one very carefully and quickly. Each action must be precisely verified, and the surface of the display must be prepared in advance and not only cleaned, but also degreased.
- Use tape. If you remove the protective film to install a new one, use the tape for two actions at once: removing and getting rid of dust that has fallen on the display. Do not use tape, which may leave traces of glue or debris on the display or film.