Window aviary // Walking for cats on the window
Alex - Maine Coon and K:
How can a cat walk in an urban environment?
How to protect a cat from the dangers of a big city? We made an AVIARY ON THE WINDOW
. Now, at any time, our cats can go out into the fresh air, bask in the sun, and watch the birds. And we don’t have to fear for their lives and health.
Another simpler option:
Aviary for a cat
kitanova:
I installed an enclosure for my cat. Everyone is happy.
The cat hung out there all day long in the summer and fall. Stared wide open)), played and slept there sometimes. I feel good too, even though he doesn’t poke his curious nose everywhere, he usually takes part in all my affairs. For example, it takes two of us to wash the floor: I wash it, but he gets in the way. He hunts for a rag and runs around like crazy, slipping on the wet one, falling and running again. )) Does he like it when it’s slippery, or what?
I share my experience, I hope it will be useful to someone.
I wanted to order it, but it turned out that no one makes enclosures in our city. I knew that there were offices in St. Petersburg and Moscow that specialized in the manufacture of window enclosures and window nets for large animals. However, delivering a structure of this size to the other end of the country, and in lathing, is an expensive proposition!
It was decided to do it myself. Moreover, after the construction of the complex, I have nothing to fear anymore. ))
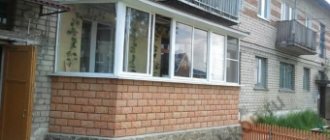
After some thought, I decided not to make an aviary outside the kitchen window, but to install it on the side of the balcony. There is a hinged door. Pros: Smaller, easier to make, cheaper and easier to install.
What is called “find the cat in the picture”
. )))
The enclosure turned out to be not bulky and light in appearance, although it is not small, the base is 45*70, but light, probably because of the transparent roof. This is what I think, but it may seem different to you. ))
Yes, I made the same nets for the windows from the same material as the enclosure (I took a photo like this on my phone, in fact they are practically invisible from the street), because the windows are always open in the summer. Conventional Anti-Cat nets, designed for 6 kg of animal weight, are useless for us. In fact, it is not uncommon for cats that have a highly developed hunting instinct, young and active ones, to break up. When they hunt for some butterfly, bird, fly, they stop thinking about anything at all and fly out of the windows. In our case, this grid has repeatedly justified itself. But not about that now. Therefore, protection is needed. They put the same thing on the first floors so that the cat doesn’t escape. Actually, it all started with the grids. In my opinion, this is a necessity, and an aviary is already my wish list)).
But I don’t regret it at all. Cool stuff.
I’ll write about the grids in another post; there’s probably not enough space here. I'll name it:
“Anti-cat window mesh for a heavyweight”
I drew an enclosure on paper, took measurements, and calculated everything.
I bought a stainless welded mesh with a cell of 25*25 (some use 25*50 or 50*50), perforated steel tape (2mm thickness, 20mm width), metal screws, metal drills, plexiglass for the roof 5mm thick. I bought it from an office that deals with outdoor advertising.
Cut to size.
I don’t remember how much everything cost me (I bought the materials for the enclosure and the nets right away), but I can definitely say that it’s more than 2 times cheaper than ordering, even without delivery, and glass is the largest part of the cost. That is, you can still save money if you make a different roof. I also bought an aluminum corner profile and 4 long steel (12cm on one side) corners for the roof, 4 bolts and nuts with rubber bands (I forgot what they are called) so they wouldn’t come loose, for fastening the glass.
I made a pattern taking into account that the bend would take 2.5 cm around the perimeter of the enclosure (except for the top) for attaching to the frame of the balcony window. Bend inside the structure. My roof angle is 45. The snow does not stay.
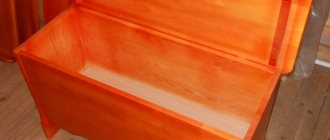
I left the ends of the twigs free at the bottom to secure the side walls to the bottom. I bent the mesh into a box and secured it. This is how it will look. I just bent the tails with pliers.
You can bend the stainless mesh only once, otherwise it will break. It's hard to bend. A man, of course, can handle this easily. And in order to bend it evenly, I took a sheet of thick plywood, laid it where needed, stood on it to press it with my weight and bent this mesh with all my might. ))
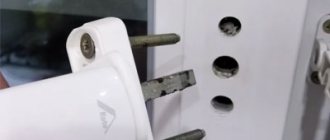
Then I used a jigsaw to saw the aluminum profile for the glass frame. The frame was not assembled separately, but was attached directly to the enclosure with corners using a riveter (the rivets ran out, I had to screw in several bolts, as you can see in the photo). Of course, you can tighten everything with bolts, it’s just more accurate with a riveter. The photo shows that there is still a bar between the corners. It is also made of aluminum. Pieces remained from something, I used them to secure the mesh additionally. Of course, all the holes were already drilled.
To ensure that all parts of the frame were clearly in the same plane (otherwise the glass would not lie flat), I first laid out the profile on the glass, marked where to drill the holes so that they coincided with the holes in the corners. I drilled, then laid everything out again to check. Of course, the one who will do it will come to all this himself)), but I’ll still write in detail, since I’ve already gone through it.
I drilled 4 holes in the profile and glass for bolts. I drilled holes in the glass slightly larger than the diameter of the bolts, so that they would dangle freely, so that when I fasten and tighten the nuts, I would not create tension in the glass. I placed round washers of larger diameter under the caps. The aviary is ready.
I installed it together with my daughter. We had to come up with something to make our task easier. With glass, the enclosure became noticeably heavier, and even a man would not have been able to hold it up for a long time while I was securing it. Moreover, I would not have held it straight. And you can’t lean out the window together.
Therefore, I took two pieces of aluminum profile that were left from the frame (approximately 30 cm each) and secured them with self-tapping screws at the bottom of the window frame. Exactly. Thus, we put an enclosure on these corners, one might say, when we pulled it out the window. In advance, a clothesline was tied to the top of the enclosure and my daughter, standing behind me, pulled the rope towards herself, pulling the enclosure to the window frame while I was fastening it. In any case, the rope must be tied, I think, because there is a risk of falling. We almost dropped it.
The balcony is narrow, and the two of us are tramping around here, and the enclosure with us is 45 cm deep, and even larger with glass. In general, we puffed up and puffed up, we puffed up and puffed up, we almost stuck it out, and then uncontrollable laughter attacked us, and there was no way to stop))))), but we stuck it sideways and the roof forward, all the weight there, at the end , and he began to list with us))))). In general, we somehow controlled ourselves and held on.
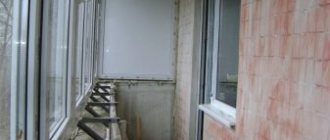
I fastened it as in the photo in 5cm increments, in fact it could have been done less often, I think. Reinsurance. I drilled several holes in the aluminum frame of the balcony, then screwed in the screws with a screwdriver, and so on. She grabbed it from one side and the other, and it was possible to let go of the rope. In general, it was firmly installed.
We put 20kg in the enclosure, everything was ok. This is how the enclosure turned out without any welding. And it looks good, it doesn’t spoil the aesthetic appearance of my balcony, in my opinion. ))
The cat now has his own TV, some kind of entertainment. ))) In general, he watches my TV too, he watches the screen so closely)) he can freeze for 5 minutes.
I wanted to put a piece of plastic window sill on the base, people said that you can buy it at the markets. Cut off. But I didn’t find peace in our ass. For now, a piece of plywood covered with rain film.
All this is not expensive and not difficult. Why don't you do it? ))
If you want a window enclosure for the kitchen or another room, and not for the balcony, like mine, then ask questions. I'm on it. I'll tell you the pros/cons, nuances.
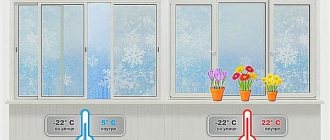
Removable cat balcony
- Will protect the cat from falling from an open window and from escaping. Safety is the main thing!
- The cat will get a great overview view - he will be able to watch what is happening on the street on the left, right, above, below, in front! Open up a new world for your pet, full of smells, sounds, birds, trees - this is the best gift for an apartment cat!
- Ventilate your apartment with peace of mind for the health and life of your pet. Fresh air is necessary for both people and animals at any time of the year!
- Suitable only for PVC windows (plastic tilt-and-turn windows with warm glazing);
- Only one sash of window wide;
- No installation is needed, you don’t need to drill anything, you can fix the balcony on the window yourself - it is secured with special steel clamps (see video);
- Calling a measurer is not necessary; the measurement can be easily done independently;
- If necessary, the balcony can be removed and reinstalled outside the window.
In order to calculate the cost of a removable cat balcony, you need:
- Measure the height and width of the window. You can read the measuring instructions below;
- Enter the dimensions in millimeters into the calculator;
- After this the cost will appear.
| Width in millimeters: | |
| Height in millimeters: | |
| Calculate Product Area: | m 2 |
| Calculate the cost of the product: | rub. |
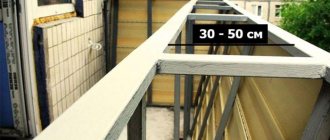
The price is calculated based on the area of the light opening. Standard depth is 35 cm.
- Up to 0.5 sq.m – 5100 rub.
- From 0.51 to 0.8 sq.m – 8300 rub.
- From 0.81 to 1.2 sq.m – 8600 rub.
- Over 1.21 sq.m – on request.
If necessary, you can order a shelf (removable or welded) for the balcony, a side door with wing nuts (for washing the adjacent blind sash of the window), a mosquito net on rods with Anti-Cat cloth (“Pet Screen” for plastic windows)
- Shelf up to 80 cm - 1000 rub. per piece
- Side door – 1000 rub. per piece
- Mosquito net on Pet Screen rods – RUB 3,500. per piece
You can do the measurement yourself or call our specialist. To measure it yourself, we recommend that you first look at:
- Open the flap where you plan to install the cat balcony.
- Measure the width and height of the light opening in millimeters with a construction tape (not sewing tape).
A removable balcony is not suitable for wooden or aluminum windows.
You must have outside (from the street side) a free distance from the light opening to the slopes of the house along the entire perimeter of the light opening - at least 25 mm.
- No drilling of the window frame is required (especially important for those who have windows under warranty or rented housing);
- There is no need to pay for a specialist to come for measurements and professional installation - and this is a significant saving of your money and time;
- To make a removable cat balcony, you only need the dimensions of the window light opening.
- Installing a removable balcony will take you no more than 10 minutes! It does not require professional skills or any tools.
- Delivery to your home throughout Russia to any locality!
- The height of the balcony is only the full height of the light opening for the safety of the cats. Width - the width of the light opening of 1 window sash. Depth (removal) - 35 cm (can be reduced or increased if desired).
- The window-mounted cat cage is a reliable steel structure;
- Reliable fastening to the window frame with special steel clamps.
- The large mesh size - 2.5*5 cm (or 5*5 cm) - allows the cat to get a good view, does not obscure the light, and does not interfere with the full flow of fresh air.
- A transparent sloping roof made of cellular polycarbonate protects your pet from drizzling rain.
- Durable polymer coating. Powder painting is the most effective and modern way to combat corrosion.
- Color - white/light gray/brown/green/black and other colors.
- An aviary on the window with an additional shelf if you have several cats - so that there is enough space for everyone!
Maximum load tests were carried out with a load mass of 60 kg. At the moment, no tests have been carried out with larger weights. The balcony is intended for use by his pets. It is assumed that pets with a total weight of up to 20-25 kg will be on the cat’s balcony at the same time. The size of the window opening is also taken into account.
If you need a mosquito net for your cat's balcony, we will offer a Petscreen frame mesh (petscreen, anti-cat) on metal rods. It is made of especially durable fabric that cannot be torn by claws. And for your pet we will make a special “door” in the mesh. More details - catsafety.ru/catalog/zashchita/moskitnaya-setka-dlya-koshachego-balkonchika/
The cute domestic kitty is, first of all, a predator whose need for observation is embedded in its hunting instincts. Cats love to view their surroundings from above. That’s why windows and balconies are so tempting for them - an overview of the area, fresh air, new smells, street sounds, birds!
The working conditions and prices for services can be found in the corresponding paragraph of the “How to order” section:
DIY balcony for a cat in the window
We continue to disfigure and optimize the apartment for the sake of the cat population. Previous posts on this subject:
Envy, cat people, and tremble! We did what we had planned six months ago - a cat balcony. The materials were prepared ahead of time, but the time and opportunity appeared only today. So, I tell you what, why and for what.
Agree, cats are curious animals, they love to stare at the street and walk. But when you live in an apartment and are a domestic cat, you live to an old age (15-20 years), and when you go outside - okay, if until six or seven. What could be the solution? Create a platform that would be located outside the apartment and would provide a 180-degree view, allowing you to breathe fresh air and view the surroundings, or even take a nap in the sun.
We thought for a long time and chose what to make the frame and mesh from. The most suitable option seemed to be trading nets, on which clothes are usually hung on hangers in clothing markets, but the figure-of-eight wire running along the perimeter clearly would not have allowed for bends. Doubts disappeared when in Chelyabinsk, at one of the construction markets, we saw the so-called universal fine-mesh galvanized mesh. A wire with a diameter of a couple of millimeters, bends and bites well, costs a penny. The width of the mesh is 1 meter, so I had to make a screed from two strips located horizontally.
They also needed anchors, something to stitch the meshes together, and material to make the flooring. We bought M6x50 anchors for the occasion, used nylon clamps for stitching (sold in any electrical goods store), and used a door from a disassembled cabinet from my workshop for the flooring. True, the length was a little short, I had to increase it, but there were no other options.
Here is the window that was subsequently executed. There was always a jar of cat food on it, to which all representatives of the feline population of the area drank all year round. And now there is a Turtle on it:
My wife and I got down to business not very quickly. Understand - we have no experience in this matter, we have never seen such cat balconies either (if anyone has ever done such a thing), we are afraid of making a mistake and messing up somewhere, everyone has polar opinions on any subject. They even tried to argue, but it didn’t work out...
At first there was also no time and nothing to take pictures. Mesh and anchors? Screw them... There were no spectators from the neighbors' windows and no related questions, only the neighbors above hung out their dripping laundry to dry, and we had to move a couple of meters to the side.
First, we measured everything again, somehow agreed on the design, and got started. We cut the mesh to length for the lower part and bent the box. We figured it out, saw a small mistake and slightly bent both sides. Yes, I forgot to say - first they folded the bottom, so that the remaining “ears” along the length could then be folded and sewn to the box to strengthen the structure.
After precise fitting, we began to install the lower box. Everything is simple here - one presses, the other drills, then drives in the anchors and tightens the mesh with a nut. When the lower part was installed, the cats came and asked if there were any seeds? what are you doing here?
Dad, what the hell, isn’t everything done yet?
I just liked this photo - a drill on a windowsill behind bars against the backdrop of autumn trees. The combination, you know, is unusual...
Koshkostado checks the quality of the first stage of construction. The smallest Katerina, who is absolutely black, as always, is practically invisible even in the sun. This is the peculiarity - no matter how you photograph, you only get a black spot.
And this is with the top, which, as a result of the experience gained, became almost at airplane speed. I tell you, sewing halves of the mesh with nylon presses is a pleasure! Very fast and easy, I recommend it. After trimming the “tails” the presses themselves are almost invisible.
While I'm sewing, the cat-faces go out to smoke and explore...
Almost everything is installed:
But the sawdust has not yet been swept away:
Little bits of macro photography. This is a twisted anchor with a washer from old stock:
And also macro. Wood (more precisely, chipboard) canvas and mesh are fastened with a construction stapler (14 brackets):
Lucy, don’t go there, it hasn’t been cleaned yet:
Lucy is the cat in chief, her opinion is decisive in any matter. I seemed to like the balcony:
Ask - what about a plate of crackers and street cats? Who and where will feed them? Don't worry, the dining room just moved to another window, this is also part of the plan.
The turtle is an infinitely affectionate cat. We even considered the option of taking her in, but... where in the one-room apartment is the seventh koshamba... In general, I appeal to the readers living within my reach - please find her good owners, otherwise it will soon be frosty, I feel sorry for the animal, especially such a cool one . If anything happens, I’ll bring it myself, I’ll even operate (sterilize) with my own money, just don’t let the child die in the cold.
And this is the view from the inside, the wife has already put some kind of blanket on the flooring. At this moment, the one-eared cat Vaska is passing under the window. Also unhappy in his own way. The owner died, her son left, and when the cat became very ill with something in the summer and could barely walk, the daughter and granddaughter, who lived nearby, did not want to take them in - like we have a kitten and a dog. Well, yes, you can take a healthy kitten, but a sick cat - die... They took him out together with other neighbors - the cat recovered, but was in such a state that it was scary to look at.
Well, the construction of the cat balcony is completed, it was installed by me and my wife in 6 hours without any interruptions, not a single cat face was harmed during installation.