Hello! This page will allow you to get acquainted with the latest and most popular information about countertops on balconies and loggias.
You will see real examples of arranging countertops on balconies and loggias, bar counters made from high-quality and inexpensive materials.
- On the page you will find information:
- Table top for balcony
- Materials for countertops on the balcony
- Tabletop instead of a balcony block
- Tabletop on the loggia
Fashionable and simple: table on the balcony
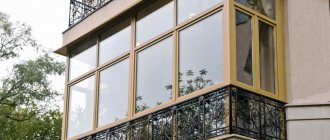
If you have a glazed and insulated balcony, then the choice of material for the table is practically unlimited. On an open balcony or loggia, you can, of course, only place a table made of durable, wear-resistant material. Forged metal structures are often chosen.
One of the simplest and very popular ideas is a table made of pallets. Often they are used to make a coffee table for the living room, but you can also make a beautiful table for the balcony with your own hands. It is suitable as a place for tea drinking, as a book table, and as a table for family board games.
You will also have to buy:
- Wood tinting;
- Spray paint of the desired color;
- Primer;
- Carved wooden legs.
The pallet will be the basis of our table. The table is so simple that drawings will most likely not be needed. So, take a pallet, it has both an upper and a lower plane, one of which needs to be made flat. That is, there should be no gaps between the boards. There should be an upper plane left of the pallet with six intermediate bars attached to it.
Pallet table: next steps
Every three intermediate bars must be connected to each other with a board. At this stage, the resulting tabletop can be set aside. Start preparing the carved legs. The legs need to be coated with a primer and then painted with spray paint. Any color you think is suitable.
Then you tint the tabletop, that is, the upper plane, and its side elements. And the installation of the legs completes the job. This is the simplest version, because the tabletop can be decorated as you like. For example, decorate it using decoupage or paint it with acrylic paints. The final decor is sometimes thought of by one person, but as a result, new ideas come to mind in the process of work.
Kitchen with a balcony door and window: design options
If the redevelopment was not possible, then this is not a reason to be upset. You can make an interesting design for the border of the kitchen.
You can decorate a wall adjacent to a balcony or loggia using beautiful curtains .
In a room facing the south, where there is a lot of sunlight during the day, you can hang thick curtains with or without tulle.
For a small kitchen, it makes sense to think about its non-standard wall design with a balcony door. For example, install a double-leaf option. The white color scheme helps to compensate for the illumination.
Useful tips for choosing and installing countertops
1. For a simple set, you should choose a simple tabletop. That is, you should not install a marble window-sill table with a kitchen set made of chipboard. It would also not be appropriate to install a laminated chipboard countertop to an expensive wooden set. 2. Any matte countertops are more practical than glossy ones. 3. Slabs made from natural stone are quite hard, so the owner of such a kitchen will have to learn how to place dishes very carefully. 4. Installation of the countertop must be carried out in the presence of the apartment owner. 5. Natural stone slabs look more impressive in spacious kitchens due to their massiveness. 6. When choosing a material for a tabletop, it is worth seeing and touching the exhibition model you like. No piece of canvas will allow you to imagine it in finished form. 7. When ordering a tabletop made of MDF and chipboard, it is better to give preference to light colors. During use in frequently washed places, the plastic loses color and becomes lighter. On a darkened countertop, light spots will be especially noticeable.
Table top instead of a window on the loggia
Photo No. 2 —> Photo No. 3 —> Photo No. 4 —> Photo No. 5 —> Photo No. 7 —> —>
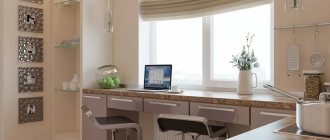
What did the apartment owners want?
Compact office, equipped with modern furniture. To preserve free space, it was connected to the adjacent room by dismantling the balcony block.
The remaining wall served as the basis for the tabletop, which was complemented by a shelving superstructure. The tabletop is smoothly combined with a computer desk and shelves.
Practical white plastic panels were chosen for the interior decoration. You can see the results of the work performed in the photos and videos in the gallery.
Tabletop under the window: an excellent modern solution
Today, redesigning apartment kitchens to maximize functionality is a popular trend. Often, owners are looking for the most interesting options, modern ideas, opportunities that allow them to use the maximum number of square meters in order to optimally place furniture, interior elements and equipment.
A window sill-countertop is a good solution for maximizing the use of square meters in a small kitchen
This is especially true for small apartments, in which every centimeter is worth its weight in gold. However, for spacious rooms the idea of rationalization is no less relevant.
One of the most successful solutions in the kitchen is a window sill-countertop. In this case, you can make the most efficient use of the free space both under the windows and at the window level.
Often in apartments, window sills have an auxiliary function. A radiator is most often placed in this area. It is this that is the stumbling block for most rationalizers.
To bring the idea of a window sill-countertop to life, you will need excellent planning skills.
How to make a window sill on a balcony or kitchen a functional area depends on the flight of thought of the performer, on the needs of the owners, as well as on the geometry, area and a number of other features of the room.
Fastening methods
Installation of a window sill on a balcony should provide for its most accurate location along the horizontal axis.
This part complements the window system, is its integral part, and its installation must be carried out after the mounting foam used to install the window unit has completely dried. Plastic and wooden window sills are installed using mechanical clinching into a U-shaped profile. To install and fasten stone countertops or ceramic tile structures, the preliminary construction of a reliable monolithic podium that can withstand heavy loads is required. A similar base can be made from aerated concrete blocks or other material, organically fitting it into the overall interior of the loggia. Instead of stone elements, you can use a wooden or metal frame, however, such structures require more time and money.
Also, in some cases, metal brackets can be used when installing a window sill. These elements act as supports for the structure and significantly increase their reliability and strength.
Window sills on the balcony can be fixed using special metal brackets, which are installed below the window on the installation profile.
What other nuances need to be taken into account?
Once you have figured out the main points, you need to take care of the nuances. The quality of the installation may depend on them:
- A serious difference between the furniture tabletop and the window sill can be hidden using the same material with which the apron is lined.
- When the window sill is lower than the level of the furniture countertop in the kitchen, then its height is increased and the window frame is reduced. This option is only available for private homes.
- You can install a deep sink in the windowsill. This method of organization is considered more expensive. With this approach, make sure that at least one window sash will open unhindered. The mixer should not interfere with it.
- If you are setting up a work area in the kitchen, then the window sill from the countertop can be expanded behind the slopes. To do this, you can use homemade supports made of foam blocks. You just need to lay out masonry from them along the edges of the tabletop. There will be a deep niche inside. There will be enough space for one or two chairs.
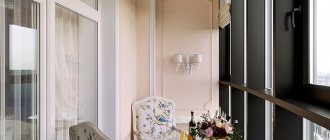
Cabinet
The optimal solution for using a window-sill table in the office is, again, to create a workplace. You will feel light and comfortable here. You can decorate an impromptu table with flowers in pots - the location of the window contributes to this. By the way, don’t forget about window curtains, because on bright days the sun can bother you.
Photo: homedesignersuite.co
Style
The stylistic direction of the room leaves its mark on the choice of tabletop shapes and materials:
- Classic style cannot do without natural wood in varnish treatment. Simple shapes in the form of a rectangle or plate with rounded edges will complement the chosen style.
- Interesting options for models in high-tech style. Glossy surfaces are complemented by fancy shapes in the form of waves or smoothly rounded edges. The main shades are black and white tones.
- When choosing a tabletop in a minimalist theme, the best solution may be calm tones such as brown, beige, khaki and olive. They transfer well on any materials, for example, natural stone. The minimalist style can be complemented by bright shades, embodied in a simple form. Red and deep blue colors can find their place here.
- Mint, lavender, white and light green shades are well suited for the romantic Provence and shabby chic styles. They will look decent if made from natural wood with its unique pattern.
Library
The library should have a lot of light and a comfortable place for reading. The best solution is a place near the window. To create a laconic interior that suits the calm atmosphere of the library, you need to get rid of unnecessary elements. By combining a window sill with a table, you can do this. Wooden surfaces will positively affect the atmosphere in the room.
Photo: futuristarchitecture.com
Answers on questions
Before installation, anyone who does it themselves may have questions. Below are the answers to them.
What size are the projections on the sides of the tabletop from the slopes?
According to the standard - 3 - 7 cm. The gap is usually adjusted to the size of the walls from the window. The longer the surface, the shorter the projections should be.
How much should the countertop-window sill protrude?
There are no strict requirements for this. It all depends on the preferences of the owner of the house. Usually, for personal comfort, a protrusion of 40-60 cm is sufficient. If the protrusion is too large, then additional supports are installed. But the countertop must cover the radiator. This is the main rule.
What should be the length and width of the tabletop?
By standard standards, the length is 3 m and the width is at least 600 mm. If the window is not standard, then the furniture production can order a product for individual parameters.
Tabletop window sill below the height of the kitchen furnitureSource roomester.ru
Tabletop-window sill for the kitchen with an area for storing small itemsSource roomester.ru
Additional accessories
The stand can also become functional. Containers for cereals or fruits are placed on it. Manufacturers also offer a range of pull-out shelves and rails. Accessories add color accents. Practical materials for tabletops are glass or wood.
Accessories are used to place glasses, mugs or kitchen utensils. Napkin hangers are used. They store dishes or other necessary items. The main thing is to choose jewelry that will match the chosen style.
Installation options
Before installation work, you must choose one of the mounting options: using brackets, using foam or glue, or using retaining brackets.
Most often, window sills on balconies are installed using brackets. This ensures that the entire structure remains in place despite external influences. But in some new houses today, installation on brackets is not possible due to the fact that the balcony frame may not withstand the load. In such cases, repairmen attach window sills to polyurethane foam.
Installation on brackets
For every meter of window sill length there are 4-5 brackets. They can be installed on a concrete or brick wall or on a special aluminum profile. The brackets are mounted on concrete screws. The canvas is laid after installing the brackets. Then the canvas is installed to the window using screws.
Installation on polyurethane foam
- At the first stage, you install linings under the canvas. This could be a wooden beam.
- Then lay the canvas, securing it with foam. Don't forget to use a building level when working.
- Next, you install the brackets that will hold the rest of the canvas.
- Then the window sill is pressed against the base thanks to the weight.
- The cracks are filled with foam, and the structure itself remains in this position for 2-3 days.
Bracket mounting
This type of installation is only possible with a large base space - a concrete or brick wall. Special staples are purchased at hardware stores. When installing, the canvas is laid evenly on the base and secured to the brackets.
The following video will tell you more about how to install a window sill on a balcony.
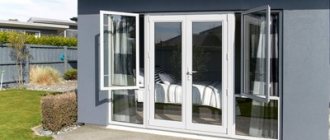
Bar counter along the facade wall
This option can be implemented without dismantling any structures. All you need for this is free space and a glazed balcony. The bar counter on the loggia is located along the wall near the balcony window in a straight line. If the length allows, you can make angular turns at the end sections. The width of the tabletop should be no more than 1/3 of the width of the balcony, otherwise the space will be very cramped.
A bar counter of different configurations, with rounded corners, located in only one part of the loggia, looks compact and stylish. This allows you to save space and equip cabinets for storing things or just put a sofa. Irregularly shaped countertops are suitable for balconies with non-standard layouts, turning their significant disadvantages into advantages.
Principle of operation
For repairs you will need a tabletop, brackets, dowels, a hammer drill and a screwdriver. Please note that the bracket should be only 5 cm less than the width of the tabletop. If its length is short, then there is a possibility of the entire structure collapsing. First, you need to mark the drilling locations (one bracket is used for every 50 cm), then use a hammer drill to make deep holes, insert dowels and secure the brackets using a screwdriver. The table top is secured with self-tapping screws, the length of which should be 3 mm less than the thickness of the table, otherwise lumps may form on the surface. Such a fastening is quite strong, so if the correct ratios are observed, the structure will last forever.
Bar counter along the outer wall of the insulated loggia
Design
The tabletop by the window changes its dimensions and shape depending on the room in which it is located. For example, a wall-length table with smooth rounded lines is perfect for a child’s room. Shelves can be located under the furniture for convenient placement of albums and pencils. The tabletop must be solid, because the sliding or folding mechanism can cause injury to the baby if handled incorrectly.
For a teenager, an option with pencil cases is acceptable. Tall cabinets on both sides of the window-sill table will be the optimal place to store textbooks and other school supplies. The design of the living room table can be solid or folding. The one-piece model can be complemented with cozy decor. Folding products are selected when the living room has to be divided with a study. The countertop in the kitchen can be a workspace or a small table for two, as well as the beginning of a bar counter or a single unit with a kitchen unit.
Design methods
The simplest way to design a tabletop is a straight design, which will be located near a wall with a window. But you can make the finished product even more practical and functional. The following design ideas can be used:
- A tabletop instead of a window block , smoothly turning into a bar counter. This design method is suitable for large and spacious kitchens. The result is a U-shaped set that conveniently divides the kitchen into work areas. The advantage of this solution is that a surface with natural light is placed opposite the window.
- Option with a folding table - ideal for a small kitchen. When unfolded, the table will become a place for family and friendly gatherings at the table. If you fold it, the housewife will have free space in the kitchen.
General rules for remodeling a window sill-table top and practical tips
- The main condition for arranging a window sill-tabletop of any configuration is that air must circulate freely around the radiator.
The heat from the battery should freely rise up to the window, and the cold air from the window should fall down. Otherwise, the kitchen will become cold and damp and, what is even more dangerous, the kitchen windows will begin to constantly fog up. If the latter happens, then the window slopes, and then the kitchen walls, will become covered with mold.
What to do? If you plan to use the tabletop-window sill as a table or cabinet with open shelves, then for normal air exchange it is enough to make several holes in it or build in a ventilation grille as shown in these photo examples.
Ventilation holes in the table top-window sill
If you plan to equip the underframe of the window sill-countertop with cabinets, then their doors should have perforations or lattice inserts, as, for example, in this photo.
An example of arranging a cabinet with lattice doors under a window sill-countertop
- Keep in mind that a window sill-countertop and, especially, a cabinet built above the radiator (even with lattice doors) will worsen the heating of the kitchen (by 2-3 degrees). You can compensate for heat loss by installing an additional radiator or underfloor heating system. In addition, the battery from under the window sill can be moved to another location along the same wall or to an adjacent wall. Relocating a radiator ideally requires an agreed design and thermal calculation, but in practice the consent of the building management company is often sufficient. And one more nuance - since moving/replacing the battery requires turning off the riser and draining the water, this should be done during the non-heating season.
- The window must be at least 1.5 cm higher than the window sill-tabletop.
- To avoid the formation of mold on window slopes, do not forget to treat them with an antiseptic primer. And so that the slopes can be frequently cleaned from accidental stains and splashes, they should be painted with moisture-resistant paint.
- Under no circumstances should you install a stove on a windowsill-tabletop. Firstly, this is prohibited by sanitary and building codes, and secondly, it is simply impractical, because oil splashes during cooking will certainly end up on the windows.
- When planning to leave the battery under the windowsill-countertop in plain sight, it is highly advisable to cover it with a decorative screen and paint it in a bright color or to match the wall. However, sometimes it is enough to replace a large and outdated radiator with a more compact and modern one.
Radiator with perforated screen under the window sill-tabletop
- Due to the proximity of the window and the connection to the external wall, the window sill-tabletop must be made of super-wear-resistant material. The ideal option is artificial stone, which is not afraid of moisture or cooking and, moreover, allows you to create a seamless surface. If the outer wall of the kitchen freezes and leaks, the windows are prone to fogging, and mold once “bloomed” in the room, then you should play it safe and choose artificial stone for arranging the window sill-countertop.
- No matter how you arrange the space under the window, it should be well lit. For this you can use wall sconces or pendant lamps. If the window sill-tabletop serves as a bar counter, then the pendant lamp can be hung at a height of 70 cm from its surface. Lamps above the work area can hang higher, the main thing is to place them directly above or in front of the work place, and not behind it (otherwise the person standing behind the tabletop will simply block the light from the lamp with his back).
- The most practical way to decorate a window above a tabletop window sill is with cassette roller blinds attached directly to the sash. Also, all types of short curtains are suitable for window decoration: Roman blinds, standard roller blinds, horizontal blinds, cafe curtains or classic curtains.
- Sometimes, to get the most out of a kitchenette, you need a window sill-countertop with an irregularly shaped canopy. So, for example, it can narrow in an area of high traffic (say, near the refrigerator) and expand where there is more space.
It is also very good when the corners of the window sill tabletop are not sharp, but rounded.
- When arranging a working window sill-countertop, it may become a problem to find a built-in dishwasher of a suitable height, because... Most PMM models are designed for a height of the lower tier of the kitchen of 82 cm.
- If the window sill has very wide slopes, then it is advisable to make its new countertop (and the cabinets and possibly the sink that go with it) narrower. After all, if you add up the depth of a wide window sill with the depth of a standard 60-centimeter tabletop, the distance from the window to the edge of the table is too large.
DIY making
In order to save money, many people make furniture on their own. A homemade design must be of high quality and meet all the requirements for it. To do this, before starting work, you should think through all the nuances related to color, configuration and material.
The creation of such models requires preliminary preparation of drawings, which reflect the nuances associated with the specifics of the interior. There are various options for implementing folding systems, each of which has a specific technology.
Required tools and materials
The procedure for manufacturing a folding system will consist of several types of work, each of which will require certain tools.
For carpentry work you should prepare:
- hacksaw for sawing wood;
- a file with a large notch;
- cycle;
- sanding paper;
- hammer;
- carpenter's hammer made of wood (mall);
- a device for drilling holes in wood (brace);
- countersink drills;
- awl;
- Screwdriver Set;
- chisel;
- blunt knife;
- miter box.
The structure can be made of wood and can withstand significant loads. For this design, massive material covered with iron is used. Building such a model is not at all difficult.
In this case, along with carpentry tools, you should also have plumbing types on hand:
- hacksaw for working with metal;
- types of files;
- chisel;
- metal scissors.
Do not forget about the measuring tool in the form of a square and a building level. Reclining systems at home are usually constructed from fragments of old furniture or purchased the necessary material in hardware stores.
Its main types are as follows:
Sheets of plywood with a thickness of more than 10 mm, easily withstanding mechanical shocks and not subject to delamination. Chipboard
To make a folding structure out of them, you will need certain skills and the ability to use a plane. Glued slabs that provide the ability to cut the table top to any configuration and size.
Screws and self-tapping screws, dowels or metal corners are usually used as connecting elements.
Step-by-step assembly instructions
The process of constructing a folding model attached to the wall does not require special knowledge.
To create it you will need:
- table top;
- fastening materials;
- loops;
- supporting element.
It is advisable to make a preliminary calculation of the parameters of the system being manufactured. The recommended thickness of the tabletop should vary from two to three centimeters. This size will provide strength without making it heavy.
Any width is allowed, but it should not exceed the distance from the floor to the object to which the structure is attached. The length of the tabletop will depend on the functional features of the model and its location.
To make the structure reliable and safe, fixing supports are constructed, which can be in the form of a triangular scarf or the letter “P”.
If the product is not very long, a triangle-shaped stand is suitable for it. The part is made of bars, fastened together and attached to the table top using hinges. For greater stability, you can make two such scarves and secure them on both sides of the tabletop.
Racks in the shape of the letter “P” are also made from beams and are attached to the surface using hinges. This makes it possible to fold the support. In the folding model, the racks can be attached not only to the tabletop, but also to any vertical surface.
The entire DIY assembly of a folding wall mount table consists of several stages. First, the fastening parameters are specified by applying the workpiece to the intended place for fastening.
Then the support posts are secured to the work surface using hinges or other types of fasteners.
At the end of the work, the structure is checked for strength.
Options for arranging a window sill-countertop
A window sill countertop in the kitchen complements the room with at least one functional area.
A window sill in a kitchen can be used in different ways.
Let's take a closer look at the most popular options.
As a work surface (without sink)
Turning a window sill into a work surface is quite an attractive idea. An additional advantage of this option is good natural lighting in the area located directly next to the window. Bend your elbow and measure 15 centimeters down. From an ergonomic point of view, the work area should be located approximately at this level.
Placing a work surface on a windowsill has many advantages.
If the distance from the elbow to the window sill-table is less, your hands will quickly get tired. More - you will have to work with your back slightly bent. The height of the window sill at the top is limited by the window. If you cannot raise the table to the desired level, it may be better to find another use for the window sill.
For convenience, the window sill should be located at a certain height.
The decision to cover the lower part of the window with brick or other material is costly and not always feasible. And in apartment buildings it is also illegal.
It is not recommended to brick the lower part of the window.
With sink
You can place either the entire working area or part of it on the windowsill. If you decide to place a sink on the window table, you may have to move communications.
You can place the sink on the windowsill.
Like a dining area
The height of the dining area should approximately correspond to the typical heights of kitchen tables. This is approximately 0.8 m for regular counters and up to 1-1.2 m for bar counters. The minimum width is at least 0.4 m. The heights are determined by ergonomics... and the size of the chairs. If the level of the window opening allows, you can even “stick” a “full-size” dining table to the window sill.
You can even make a dining area from the window sill.
Window sill-tabletop with small storage system
If the height of the window does not allow you to use the window sill as a dining or work area, there remains another option - a table with a small-sized storage system. Implementation options: cabinets on a window sill extended beyond the window opening, drawers or niches directly under the tabletop.
Some equip a storage system under the windowsill.
It may be inconvenient to use the window surface as a dining or work area, but nothing will prevent you from placing household kitchen appliances on it.
You can place household appliances on top.
Table top decor
Implement any decor options you like, but taking into account the specifics of the kitchen space in general and the window opening in particular. Namely – high humidity, high concentrations of soot, fat, and aggressive household chemicals.
You need to decorate the tabletop taking into account the characteristics of the room.
Disadvantages of a table top-window sill
The biggest disadvantage of a tabletop-window sill is the proximity of the heating radiator, which is usually located in close proximity to the window opening (either directly below it, or with a slight offset). Perforation and additional ventilation grilles solve the problem of ensuring normal air exchange only partially.
The main disadvantage of a window sill-tabletop is the proximity of the heating radiator.
But even these half measures do not completely solve the problem. The kitchen temperature will drop by a couple of degrees. Options for eliminating the shortcoming: additional heating or moving the heating battery to another location. Both require time and money. The last thing is also coordination with the management company if you live in an apartment building.
In some cases, the problem is solved by moving the battery to another location.
There are a couple more disadvantages:
- The height of the structure is determined by the height of the window opening above the floor level. To raise or lower the window sill, you will have to move the window. And this is either very problematic or completely impossible. The ability to adjust the height of the thickness of the tabletop is minimal.
- Condensation from the window. The end of the structure must be protected from moisture.
- No matter how good the hood is, the room needs to be ventilated from time to time. An open window can greatly limit the functionality of a window sill table.
Whatever version of the countertop-window sill you choose, you will definitely encounter difficulties not listed in the article when implementing it.
With any option, difficulties are possible, so it is worth considering the entire process in detail.
The topic is too broad for a short article, so some issues will have to be resolved on your own. But the goal is worth it, everything is in your hands.
How to decorate a windowsill
A window sill is an ideal place to place decor in an apartment, especially in the era of plastic windows, which have a ventilation mode and do not require them to be thrown wide open. In our article we will tell you how to decorate a window sill so that the decor looks stylish and does not feel cluttered. At the end of the article there are more than 20 photos of the best decor options in different styles!
Window sill decor with indoor plants
The chaos of pots on the window is a familiar picture: in many apartments, only here there is enough light for finicky plants to grow well. To turn them into interior decoration, you need to think through the composition. We recommend starting to decorate your window sill with live plants, following a few simple rules:
- Less is better than more . If you don't know how to decorate a windowsill with flowers, choose a few of the most beautiful plants and leave only them. They will definitely look good, because the fewer objects, the more attention they attract.
- Beauty is in the details . It is ideal if all the flowerpots on the windowsill are made in the same color and have the same design. You can choose even the simplest models: together they will look elegant. An alternative to pots can be plant boxes - an excellent solution for decorating window sills in an apartment in Provence or ethnic style.
- Size matters . If the window is small, it would be wrong to fill it with tall plants. But a few succulents, especially in stylish florariums, will come in handy. On the contrary, if you have a large multi-hung window, tall and spreading plants with dense foliage will do.
- On high . Plants can not only stand on the windowsill, but also hang above it in a pot. By the way, this solution will help save space if you still have to use the window sill for storing things.
- Edible - not edible. A good option for decorating a kitchen window sill is to plant edible greens in boxes, pots, or even old dishes. For example, it could be lettuce, arugula, mint, lemongrass. They require a small amount of soil, water and sun to grow. The bright leaves will delight the eye all year round, and you can enjoy plants from your home garden.
Decorating a window sill with decor
Not every housewife is ready to grow indoor plants - they still require regular care and attention. How to decorate a window sill in a room so you don’t have to worry about decoration? Here are some ideas for different rooms in the house.
Window sill in the kitchen
The kitchen is not always the right place for decoration: first of all, it is important to take care of practicality, so that the housewife can cook and do household chores comfortably. How to decorate a window sill in the kitchen to make the interior cozy?
- Use the windowsill as a storage place. Look how interesting the shelves on the kitchen window look in the photo. You can place dishes on them and on the windowsill - of course, not modest plates, but original sugar bowls, elegant bread bins, beautiful jugs.
- Make compositions from fruits and vegetables. Seasonal “gifts of nature” are the perfect decoration for the kitchen. Place them on a platter or in a fruit bowl, complement the composition with candles, pine cones, nuts, acorns, dried twigs - and your unique decor is ready.
Window sill in the bedroom
Filled with homely warmth and bliss, the bedroom interior is an excellent place to realize your ideas. The most obvious solution to decorating a window with a wide sill is to turn it into another seating area. Place a lot of different-sized pillows with unusual decorative pillowcases, place a cozy floor lamp nearby - and the perfect reading corner is ready. To make sitting soft, use small mattresses-pillows. If you can't find the right size, you can simply lay down a thick blanket.
Another option for decorating a window sill in the bedroom is an additional workplace. Not every home can boast of having an office. It will be convenient to work in the peace and quiet of the bedroom. You can decorate your “desktop” with an unusual lamp, photo frames, or an antique table clock.
Window sill in the living room
How to decorate a window sill in a room where loved ones gather to spend time together and relax? Of course, decorate with your favorite things! The window sill in the living room is ideal for experimenting with decor. Here are some ideas:
- Candles and candlesticks of different sizes . This option is good if there are no curtains or other textiles around the window. By the way, today in stores it is easy to find LED lamps that imitate candles: these are safe to use even in a child’s room.
- Photo frames. When arranging them, it is important to follow the rules of composition: for example, you can take 3-4 identical frames and put them in a row, or order frames of different shapes and sizes, but in the same color, and arrange them in a chaotic order.
- Books. They always add coziness to the interior without taking up much space. It is enough to place several volumes on the sides of the window sill, securing them with ribbon or a special book holder, and the room will seem more lived-in and stylish.
How can you design a window sill to support your chosen interior style? Here is a selection of photos with the best ideas from designers:
We hope our article helped you decide on the window sill design option. Let us remind you that you will find any decor - from dishes to photo frames and figurines - in the catalog of our online store. We will deliver the parcel to any city in Russia and offer a profitable bonus system. Let's make your home more comfortable together!
Lighting issue
During the daytime there is enough light in the kitchen, but in the evening it is difficult to do without artificial lighting. You can fix one central chandelier and leave it at that. When installing, you need to take into account the distance to which the window sash opens, so as not to hit the chandelier (if the kitchen is small).
Lamps with flexible legs are also popular today: you can direct the light in the desired direction, and the position of the lamps itself can also be changed. Finally, you can install spotlights in the window opening itself (if you place spotlights in the window frame). It is aesthetically pleasing and convenient.
There are also small lamps on suction cups, mini-spotlights, which are also attached near the window if additional evening lighting is needed.
Kitchen - work area
A fairly popular solution is to place the sink in the kitchen under the window. Instead of a window sill, you will get a countertop that will accommodate the sink. This solution will allow you to save on lighting in this area. And washing dishes will become a little more interesting.
Photo: nvbas.com
Materials for making a table
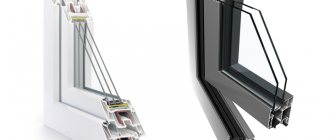
For the manufacture of countertops, as a rule, chipboard or MDF is chosen. Both materials are made from wood waste, are light in weight, low in cost, but have fairly high strength. The difference between chipboard and MDF lies only in production technology. Particle boards are made from waste materials that are first crushed into small fragments and then bonded with hot resin. MDF or fibreboards are made from the same sawdust, but “grinded” literally into wood fibers. They are thoroughly dried and only then secured with special adhesives. If we compare both materials, then MDF definitely wins, thanks to the smaller fraction of fragments:
- The boards are stronger than chipboard due to the denser structure of the material.
- If you drill a chipboard board, large chips will fall out of the hole, and small cracks will appear around, which will give the product a sloppy and unattractive look.
- The MDF surface is smoother, which makes tactile contact much more pleasant.
- Chipboard boards initially emit a strong smell of synthetic glue. If the products are of high quality, then such amber will not cause harm to health. Over time, the smell will disappear, but it may cause inconvenience.
It is quite easy to work with MDF and chipboard yourself. Both materials can be easily cut, but it is unlikely that it will be possible to give a fancy shape to the tabletop. You can use solid wood for the table top, but with such material it will not be possible to fit into a modest budget. Over time, the main disadvantage of wood may appear - the ability to deform in the immediate vicinity of powerful heat sources. For this reason, the tabletop must have an impressive thickness. Stone as a material for wide window sills is used very rarely and only in expensive apartments. As a rule, the material is chosen for the manufacture of a countertop, which will become an extension of the kitchen unit. A marble or granite window sill will perfectly match both the classic style and the line of modern trends. Natural material always looks expensive and beautiful. The PVC tabletop is lightweight, but cannot boast of strength. This material is easy to maintain, easy to install, but with regular use it will require replacement. A new word on the furniture market is metal countertops. The material is usually used in the kitchen in the work area, where the surface experiences heavy loads.
Potential Rack Materials
A bar counter on a balcony from a window sill, or near a window, requires careful selection of the appropriate material. The reason for such a serious approach is the special load that falls on the difficult “share” of such a tabletop.
Positioning in the sun is synonymous with constant exposure to ultraviolet radiation, which is detrimental to many materials. The proximity of radiators is a threat of high temperatures. Poor or absent heating, as well as insufficient insulation, require moisture resistance. Mechanical damage to tables is also common. Therefore, we need to consider what options for bar structures exist.
- Wood - birch, beech, oak, walnut, pine, teak or ash. This is a universal material that looks great in almost any interior, is environmentally friendly, flexible, but the latter quality requires protection of the wood and proper care of the surface of the bar counter.
- Chipboard, MDF. This option is a practical solution, since the material has a low price. Wood boards are usually used to produce various types of furniture; they are also suitable for bar countertops; laminated products are especially good.
- Stone: natural, artificial. Natural material looks solid and luxurious, but the price to pay for naturalness is very depressing. An alternative often used to create countertops is artificial acrylic stone - Corian.
- Ceramics. This option is also attractive due to the ease of making a high-quality countertop yourself. The basis for ceramic tiles is gypsum fiber or gypsum particle boards - GVL, GSP.
- Glass. This material is practical because it requires minimal maintenance. It always looks stylish and impressive as it reflects light. It has a disadvantage: it is fragility. However, you can pay attention to impact-resistant glass.
There are two more candidates for the role of a bar counter - plastic and metal, but the first is not very popular due to its not very attractive appearance, the second is practical, but is rarely used, unless we are talking about a working kitchen surface, where its main qualities - durability - are more valued , invulnerability in a “clash” with cutting and piercing objects.