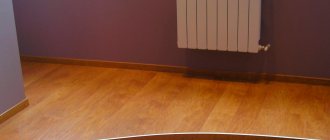
Electric heated floor An important and pressing task in modern apartments is additional heating of the loggia, since this is the event that can turn a previously uncomfortable and cold room into a comfortable and functional room, whose operation is possible at any time of the year.
How to install heating on a loggia and which heating methods are legal and most effective - we will answer in our article.
Installation
It is better to carry out work on installing, moving and replacing batteries in the summer, when there is no water in the system.
During the heating season, before carrying out work, you need to obtain permission to disconnect from the network from the service company (not free), and shut off the riser at strictly permitted times (which the neighbors will clearly not approve of). Carrying out such work requires professional training and the availability of tools.
Particular attention should be paid to sealing all connections - the reliability of the system will depend on this
Basic rules and requirements
For good heat transfer, the following distances and conditions must be observed:
- from the top of the battery to the window sill at least 10 cm;
- from the bottom of the battery to the floor at least 12 cm;
- at least 2 cm from the wall;
- the window sill should not block the radiator;
- the slope of the supply pipes should be 0.5 - 1 cm per linear meter;
- the radiator must be located strictly in the vertical and horizontal planes - this is checked by a level;
- you should try to avoid a large number of kinks in pipes, as this can lead to the formation of air locks and reduce the efficiency of the system;
- It is advisable to install a jumper with a tap - this will allow you to regulate the supply of coolant and the temperature in the room.
Work order
- Remove the old indoor radiator. It is also necessary to cut the pipes at a distance of 10 cm from the connection points - if you decide on such a redevelopment, then it makes sense to replace the liner at the same time.
- Make holes in the wall or balcony partition through which the pipes connecting the radiator and the riser will pass.
- Pass threaded pipes through the holes so that they extend 8–10 cm into the room.
- Sequentially install all connecting elements (fittings, connections) from the side of the room. Parts of the required sizes must have threads.
- Mark the battery mounting location. Install and secure the brackets.
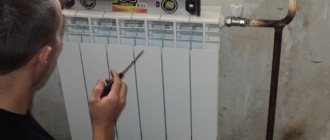
- Mount the battery, adjust the correct mounting using a level.
- Install jumpers, water inlet and outlet channels from the balcony. Install a Mayevsky valve for bleeding air.
- Connect to the general system and check the operation of the radiator.
When it comes to heating an attached loggia in an apartment building, in most cases it makes sense to consider other options: warm floors, ceiling infrared heating. Such systems are no less effective, and installation does not require approvals.
Electric underfloor heating cable system
Basic options using central heating
Once the transfer and connection of the battery on the balcony has been officially agreed upon, you can think about choosing a model. According to their classification, they are divided into the following main types:
- Cast iron heating systems are very heavy and take a long time to heat up and cool down. Moreover, they have the longest service life - up to 35 years. You can still find such heating radiators in Khrushchev and Stalin buildings and they work properly. Cast iron batteries were installed in economy class apartments until 2014.
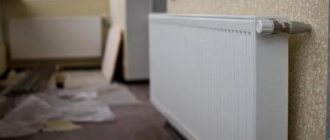
- Panel-type steel heating systems. Their service life is usually up to 15 years. The panel type is more popular due to its affordable price and high heat transfer.
- Tubular steel heating systems are used in interior design options. They come in different colors and sizes. Stainless steel products are the most expensive and best in their consumer qualities.
- One of the popular heating options is aluminum radiators. They are more suitable for the private sector, but can also be used in apartments. Their disadvantage is their sensitivity to the PH level, which will periodically change due to water in the central heating pipes. They are the smallest in size and, due to their high thermal conductivity, are not inferior in heat supply to other radiators. The service life is on average 15-20 years.
- Bimetallic radiators are a combination of an internal steel or copper heating circuit and a shaped ribbed aluminum body. They can be seen in most Russian apartments.
In order for the batteries to create the desired comfortable temperature, there is a certain algorithm for calculating the number of sections. It is believed that one section of an aluminum radiator can heat 2 square meters, and a bimetallic one - 1.5 square meters. In order to find out how many “ribs” you will need, you need to divide the area of the room by 2 or 1.5. If there is no particular heat from the central riser and the water is not very hot, it is worth adding 1-2 more ribs for a better effect.
The installation process also has its own “pitfalls” that must be taken into account regardless of whether the procedure is carried out independently or you simply have to supervise hired workers:
- Sections must be positioned strictly horizontally or vertically. Such work is not carried out “by eye”; all measurements must be made using a level.
- Experienced craftsmen recommend hanging radiators so that there is 10 cm left from the top to the window sill and the window sill does not completely cover the radiator. The distance from the floor will be 12 cm, and from the wall at least 2 cm. These are the minimum possible parameters at which heat transfer will be better.
- The main weight of the radiator will be taken by the upper brackets, so there should be at least two of them at the top. If the battery has more than 12 ribs, then 3 or more are taken. There are fewer brackets at the bottom because their main function is to hold the battery stationary.
- When connecting a radiator, it is important to avoid bending the pipes. Otherwise, air pockets will periodically form in them, which interfere with the free passage of hot water through the sections.
- For large radiators with 12 or more sections, make a diagonal connection. Thanks to such a system, the heat is distributed throughout the battery, otherwise some part of it (usually the top) will remain cold.
What to consider when transferring
The first and main obstacle to such a solution is the Housing Code of the Russian Federation, which categorically prohibits the transfer of utility lines, including heating radiators, to balconies and loggias. In very rare cases, it is possible to obtain official legal permission for such redevelopment in apartment buildings. But owners of private houses can carry out this type of work completely calmly.
The second important factor that must be taken into account is the condition of the external walls. It makes sense to install any heating system in well-insulated areas, otherwise no method will be effective. In addition, if the wall freezes, then there is a high probability of water freezing and a radiator breakthrough. The consequences are not only a fine for illegal redevelopment, but also payment for repairs to the apartments located below.
Balcony heating with electrical appliances
To heat the balcony, you can also use electric convectors, oil radiators and fan heaters.
Advantages of electrical appliances:
- mobility, used for large and small balconies, as well as for any other premises;
- temperature sensors installed on electrical appliances make their operation safe;
- can be turned on only when necessary;
- do not “dry” the air.
Heating a balcony with a convector is one of the simple and effective ways.
The use of such electrical appliances has one important drawback - a fairly large electricity consumption.
You will find more information about installing heated floors on balconies and loggias here.
The use of electrical appliances requires the presence of an outlet. Here you can read how to do it yourself.
If the room is warm even in winter, one of the ideas for arranging it could be creating a winter garden.
Transferring the battery to the loggia
Important: Removal should only be done during the warm season, when the heating is turned off. Work is carried out only after glazing the loggia and carrying out work on its insulation
The location where the battery will be installed is marked. It should be close to the load-bearing wall, but at some distance from the door.
If the loggia area is about 6 sq. m or less, then to heat it you need 3-4 battery sections.
- Grinder, hammer drill and file.
- Steel plates.
- Polyurethane foam and cement mortar (1 part cement to 3 parts sand).
At the location where the battery is installed, a grinder makes small recesses for mounting the entire structure.
Opposite the insertion points of the battery on the main pipe, the wall is punched through with a perforator. The holes made must be expanded to a pipe diameter of +50 mm.
- Battery, pipes and fittings.
- Sealant, die and vice.
- Welding machine and tape measure.
The main pipe is cut with a grinder and has an external thread, onto which fittings with an additional branch are installed.
Pipes with a 9 cm protrusion are led out through the wall. At their ends, threads are similarly made for attaching corner fittings.
After this work, vertical pipes are installed that supply and drain water from the battery - they are screwed into ready-made fittings.
The detailed process of installing the battery on the loggia can be seen in the video:
What to consider when choosing a heater
To choose the right heater for your balcony, you should consider the following technical features:
Device power. The rate of heating of the air in the room depends on it
Homeowners need to remember that powerful appliances require careful handling; they cannot be connected to a network with a TV, washing machine and other similar equipment; they consume a lot of electricity. If you do not have the ability to connect them, take simpler analogues. Device mounting options
Before ordering convectors or a “warm floor” system, think about whether you can install and connect it correctly. If not, it is advisable to choose a simpler option for electric heaters: an infrared lamp, a fan heater. Functional features of the room. If you need to heat your balcony for a couple of days in winter, there is no point in installing expensive heating equipment on it; a regular fan heater will be enough. If the balcony is used as a separate room, it is better to install a “warm floor” system or convectors on it. Work safety. Do not use high-heat appliances if you have inquisitive pets or small children. In such cases, it is better to choose the safest options: infrared heaters or a “warm floor” system.
If you cannot decide which heating equipment to use for your balcony, contact a specialist on this issue. They will take into account all the operating features of this premises and select the most suitable option taking into account your budget.
What needs to be provided?
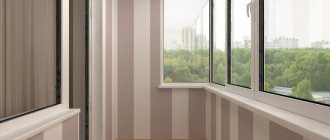
Before you begin installing heating for a balcony or loggia, you need to insulate the room itself. Insulation includes glazing and lining with insulating material all internal and, if possible, external walls. Glazing using double-chamber windows or plastic frames will allow you to reliably retain heat on the balcony; properly installed thermal insulation made of foam plastic or mineral wool will ensure comfortable humidity and air temperature, and thoughtful ventilation will eliminate dampness and condensation.
Photo 3. Insulation of the balcony as the first stage
The most labor-intensive stage is the work of insulating the walls, in particular the floor. But before you insulate the floor, you need to assume which heating option is preferable for your balcony.
We adhere to the letter of the Law
When removing the battery onto the balcony without completing the appropriate documentation, you need to understand that after this event you risk “running into trouble,” the most minimal of which will be the imposition of a fine on you.
But, in this case, the matter will not be limited to paying a fine. You will have to either dismantle the battery installed outside the apartment, or, having received written confirmation from all owners of the living space, prove in court that such a modification is safe for the heating system and does not affect the quality of life in the house of other residents.
Based on your application, the court will make an appropriate decision. He can authorize the changes you have made, after which they will be included in the Technical Plan of the apartment or recognize them as illegal. Then you will have to dismantle the installed equipment within the specified time frame.
If you doubt the need to move the radiator, we recommend that you familiarize yourself with an alternative heating option. Read how to make a warm floor on a balcony with your own hands on our website. The article discusses the features of all variants of this system.
It is also possible to use ceiling infrared heating on the balcony. It has a number of advantages and is much easier to install.
But no matter what option you choose, in any case, heating will only make sense if the room is well insulated. We told you how to do this correctly here.
Insulating materials
The following types of insulation are available on the market:
- expanded clay;
- mineral wool;
- expanded polystyrene;
- polyurethane foam;
- penofol.
Choosing the optimal material is easier than it seems.
Expanded clay
This is the cheapest material. Does not hold its shape, readily absorbs moisture. Durable, resistant to fire, mold, mildew. It is used to insulate the floor on the balcony when they want to save money.
Insulating the floor on the loggia with expanded clay
Mineral wool
Medium price material. Its slabs are very wide, so they are not suitable for small spaces. The ingress of moisture impairs the insulating properties. Mineral wool is environmentally friendly, fire-resistant, and creates additional sound insulation.
Balcony insulation with mineral wool
Expanded polystyrene
Expensive insulation, devoid of any shortcomings. The plates are easily attached to any surface using self-tapping screws. The best option for any room.
Polyurethane foam
Liquid insulation. Easily fills any cracks and cavities. Special equipment is required for installation. Dismantling presents some difficulties.
Why is it difficult to get permission?
Obtaining permission to install a central heating radiator on a balcony or loggia is difficult for a number of reasons.
Firstly, the central water supply system is designed for a strictly defined number of heating devices (radiators), which is indicated in the technical passport of the house. Therefore, a battery on the balcony means the installation of an additional heating device (radiator) entails a decrease in pressure in the coolant system and, as a result, a decrease in its temperature proportionally in all apartments.
Secondly, neither balconies nor loggias belong to residential premises, and heating of a loggia or balcony is not provided for by any technical standards. Even the most thorough insulation of these external structures does not guarantee that heating radiators installed on them with your own hands will not defrost when lowered and the heat supply to the entire house will not stop.
Thirdly, payment for heating utilities is charged based on the technical passport of the apartment, which specifies the number of radiators installed in it. Installing additional radiators is essentially theft of heat energy from the service organization, just like using electricity or water supply by bypassing existing individual meters. Even if you somehow manage to bring them onto the balcony, having received such a “permission,” it will still require changes to all the technical documentation of the apartment building, which you will have to pay at your own expense.
It will also be necessary to make an additional payment for the amount of heat received from the heating radiator placed on the balcony.
conclusions
A balcony with a heater can become a full-fledged room. Heat can be transferred into it in various ways: simple and exotic. When using solar panels for an apartment, all electricity for heating will be free, but installation will be expensive. The innovative warm skirting board is the ideal solution for small balconies. The simplest heating option is a conventional battery, but for its installation you will need to obtain permission from the BTI.
YouTube responded with an error: The request cannot be completed because you have exceeded your quota.
- Related Posts
- Which central heating batteries to choose?
- How can you paint central heating radiators?
- Characteristics of infrared heating radiator
- How to repair a cast iron heating radiator with your own hands?
- How to repair aluminum heating radiators yourself?
- What is the normal temperature of water in central heating radiators?
Heating on the loggia, how to organize it
Installing heating on a loggia is only the first step towards arranging a full-fledged residential area on it. Even the most advanced insulation can only retain heat, but does not produce it itself. This is why the loggia needs heating. There are several ways to organize heating on a loggia, photo below.
Warm floor
- Electric heated floor - contrary to popular belief, it does not consume much energy (180-200 W/sq. m.). Like any electrical appliance, such a warm floor requires wiring on the loggia. The cost of such heating is quite high, but quickly pays off due to the reliability and efficiency of the heated floor. Can be installed under all types of floor coverings, with the exception of floorboards.
- Water heated floor - ease of installation and low cost of materials make this type of heating in demand. A warm water floor on a loggia can be installed under any covering, but its main disadvantage is the need to connect to a heat source, which is usually a central heating battery - and this is rarely legal. In addition, leaks are possible, which are extremely difficult to eliminate.
- Infrared heated floors are a fairly expensive but effective way to heat a loggia. Film heating elements are installed under finishing. The principle of operation is to heat surfaces, not air. Among the disadvantages is fragility, so you should not install infrared heated floors in areas where heavy furniture will be placed. It is best to install such a warm floor under porcelain stoneware, laminate or linoleum.
The advantages of heated floors are:
- Uniform heating of the entire floor surface.
- Visual absence of battery.
- Saving usable space.
- Ensuring a comfortable room temperature.
Electric heating
This group of heating devices includes:
- Oil heaters.
- Electric fireplace.
- Air conditioner.
- Electric convectors.
A convector is the simplest and most common type of heater for a loggia, but it requires the installation of an outlet, that is, you must first provide electricity to the loggia.
For heating loggias up to 5 sq. m. you can install a 1 kW heater, which will ensure uniform and rapid heating of the room. Such heating does not dry out the air, but is expensive if used continuously.
Removing central heating to the loggia
Removing the battery is the most economical, but has its significant disadvantages:
- To move the battery to the loggia you will need permission from the BTI, which is quite difficult to obtain.
- There is a possibility of a pipe burst, which will have serious consequences. This can happen if the heating is temporarily turned off.
Important: The main reason for the ban on removing the battery to the loggia is a decrease in pressure in the heating system, as the number of consumers increases
Getting permission
BTI permission is needed to move a radiator or connect another heating device. Everything said above is absolutely true and, most likely, such permission will not be given for the reasons already mentioned.
But there are several options in which a positive solution to the issue is possible:
- Autonomous heating of the house. If there is a separate boiler house that serves the block or specifically your apartment building, the BTI can issue a permit. Since in this case it is enough to simply perform a recalculation and perhaps such changes will not cause major disturbances in the hydraulic balance of the system.
- Independent connection to centralized heating. With an independent connection to the centralized heating, the in-house heating and heating plant are not hydraulically connected. In this case, heat exchange occurs in a recuperative heat exchanger, which is installed in the basement of an apartment building. Since the hydraulic system in this case is much less branched compared to a dependent connection, deviations in the operation of the system are easy to predict and eliminate.
- Installation of a shut-off and control valve in the basement instead of a throttling washer. A positive decision in this case is much less likely, but still possible. In this case, it is easier to link the new hydraulic system with neighboring houses and thus eliminate any extraneous noise that appears in the neighbors’ heating appliances or risers. The throttling washer will have to be changed, and for this you need to recalculate and drain the heating system. The shut-off valve is easy to move.
Heating on the loggia is possible with a separate boiler room that serves only your home
Problems during transfer
When wondering whether it is possible to move the battery to the loggia, on the one hand it seems that there is nothing special or complicated in moving the heating radiator from the adjacent room to this part of the apartment. After all, the balcony itself will be thoroughly insulated before this procedure is carried out, so you won’t have to worry about possible heat losses associated with increasing the usable area of the room. However, in practice, it is very difficult to implement this idea, if only because such a move is not approved by Housing Legislation without obtaining the appropriate permission.
According to paragraph 1 of Article 25 of the Housing Code of the Russian Federation, the transfer of utility networks is part of the reconstruction of residential premises. But balconies, loggias and some other types of premises do not belong to this category. Therefore, moving radiators there is strictly prohibited. The following arguments can be cited as weighty and adequate arguments in favor of this ban:
Option for placing a radiator on the balcony
Why do you need to insulate a loggia?
In a modern layout, a separate place is given to the balcony. Previously it was used as a storage room or smoking area. Now in new buildings it is initially attached to the general living area, making it part of the space to implement the designer’s ideas (read more in the article “balcony design”). Looking at modern interiors, owners of apartments with an old layout want to add 2-4 square meters to their apartment that are sitting idle.
To do this, you just need to remove the external partition and carry out the procedure of transferring the battery to the loggia.
If the balcony is large, then you can make it into a separate lounge, study or dining area if there is a kitchen nearby. The additional meters are used for a workshop, creating a separate storage space there that no longer looks like a warehouse. You can also place plants on the loggia and create a winter garden, which also needs warmth during the cold season.
How to heat a balcony
Is additional heating of the balcony necessary or will its proper insulation and glazing cope with the cold? Unfortunately, these measures are not enough to maintain a temperature on the balcony above 18 degrees in winter, i.e., comfortable for humans. There are many ways to make heating on a balcony; let’s look at the most common ones.
Electric convectors
An electric heater can easily replace a central heating battery. The advantages of such heating are:
- Compactness.
- High efficiency.
- The surface temperature does not exceed 60 degrees, therefore the air does not dry out.
- Low power consumption – about 200 W/sq.m. m.
Heating a balcony using a convector
There are several options for installing a convector: on the floor or on the wall. But air circulation should be taken into account, so the heater on the balcony should be located under the windows to reduce heat loss.
Important: When wall mounting the heater, you should avoid installing brackets to the wall through the insulation, since operating the device can lead to freezing of the fastening and destruction of the finish.
To connect an electric convector on the balcony, a separate socket is required, so before installing it, you should take care of the wiring.
Infrared heating
This heating is unique because it does not heat the air on the balcony, but the objects on it that accumulate this heat, which makes it possible to reduce the heating temperature. Thanks to this heating, the air on the balcony does not dry out.
The heating element is an infrared film, which can be laid on the floor, photo below, or on the walls and ceiling under plaster.
Infrared heating on the balcony will replace the battery
Most often it is placed on the floor, but you should be careful, since heavy furniture can damage a fairly thin layer. The power consumption of such heating is significantly lower than in traditional heated floors, and accordingly, this is a very economical option.
Warm floor
Do-it-yourself warm floor
Despite the fairly high cost of both materials and installation, heated floors are quite economical - 150-200 W/sq. m., durable and quickly pay for themselves. This type of heating can be installed under almost any floor covering, with the exception of natural wood, which is not designed for temperature changes.
Water heating
The simplest and most common way to heat a balcony is to remove the central heating radiators. But it is worth saying that recently it is prohibited to bring the radiator to the balcony. This happened due to the fact that when installing radiators on the balcony, many residents do not receive additional heat.
Important: Improper installation of the battery can lead to a pipe break and flooding of neighbors, and if such heating is not agreed upon, a fine and legal proceedings.
Despite all the prohibitions, apartment owners still install central heating radiators on the loggias, since this has virtually no costs associated with it, other than the installation itself, and the heating is complete.
How to make a cut-in?
Two options are used: using welding and threaded.
Water floor on the balcony
Perhaps, having read the first part of our article, you have become disillusioned with the idea of moving central heating to the balcony. In this case, we can offer you other options for heating your balcony. Here you can read about how to install a hidden warm water floor on your balcony. To learn how to install electric floor heating on a balcony or loggia, read the article “How to install an electric floor on a balcony yourself?” A comparison of various options for electric and water (steam) heating of a balcony was done in the article on our website “Options for heating a balcony or loggia: which is better?”
Using welding
Pipe insertion using welding
If welding is used on the thermal riser pipe, a site is prepared. As a rule, a flat area (flat area) is made with a grinder and an emery wheel, leaving a minimum thickness of the pipe wall.
A pipe is welded to this site, onto which an additional heating circuit will subsequently be mounted. The return insertion is done in the same way.
After welding the pipes, the outlet and inlet holes in the pipe are made by striking with a chisel inserted into these same pipes. Of course, this must be done in the summer, when the water from the risers has been drained.
Drilling a hole in a pipe through a pipe
But if you use pipes with ball valves, this operation can be done even if water flows through the risers. The sequence is the same, but the hole in the riser is made not with a chisel, but with a drill with a drill attached to it through the hole of an open ball valve.
To prevent the apartment from being flooded with hot water, after drilling the hole, the drill is quickly removed, the ball valve is turned off and installation of the heating circuit begins.
Connection to a pipe using a clamp sleeve
At the same time, do not forget about protection. The screen will protect your face and the electrical system of the drill from the stream of hot water that will flow from the riser in those few moments while you remove the drill from the hole and turn off the tap.
It is better to make the screen out of plexiglass and place it on the front of the drill just behind the rotating head (spindle).
There are options where welding is replaced by installing a female sleeve with a pipe and various kinds of clamp fasteners; but in any case, you must either punch or drill holes in the riser.
Using a threaded connection
Sequence of operations when cutting threads near a wall
Theoretically, a threaded insert looks much simpler: a section of the riser is cut out, a thread is cut at the ends of the riser, onto which a tee is screwed: the balcony branch of the heating circuit will come from it.
But in practice, both cutting a pipe and threading it causes significant difficulties. This has to be done close to the wall, in a confined space, with the risk of causing vibrations in the riser that can lead to destruction of the seals and leakage or breakage of taps and pipe connections in neighbors.
Tee
Therefore, the work requires the efforts of three or four people: two hold the riser tightly with adjustable wrenches, another two cut the thread: this operation itself requires a lot of effort on pipes of this diameter.
Usually, it takes at least an hour and a half to cut 5-6 turns of thread. But in modern high-rise buildings, where booster pumping stations are used to pump water to the upper floors, a more thorough connection is needed, about 10 threads.
When sealing, you should use linen thread as a sealant: nothing better has been invented yet.
Option O, Lucky
If you still decide to seek permission to move the central heating battery to the balcony, then you need to:
- carry out engineering calculations of the thermal conductivity of balcony insulation;
- obtain an opinion from a licensed specialist that it is impossible for the battery to freeze on the balcony;
- perform insulation and glazing of the balcony;
- obtain permission to transfer;
- select and approve a scheme for how to make heating;
- installation of batteries and connection to the heating system.
Tip: If you plan to heat the balcony yourself, then before removing the radiators, it is recommended to cover the wall under the heater with a foil screen, this will eliminate heat loss due to heating the wall.
Calculation of sections
According to SNiP standards, in order to avoid freezing of the heating system, mainly in the corners, the length of the battery must be at least half the length of the window. In addition, each type of battery has its own heat transfer characteristics of 1 section:
- aluminum for 2m2 heated area;
- bimetallic for 1.5 m 2.
Step-by-step instructions on how to install batteries:
- We make markings for radiators. The distance from the window sill to the top is less than 100 mm, from the bottom to the floor - at least 120 mm, from 20 mm or more from the wall.
- Brackets are installed; the main weight must be supported by the upper mounts. Up to 12 sections - 2 on top, 1 on bottom to prevent mobility of the lower part. If the battery is larger, additional top mounts are required.
- We hang the batteries and check the horizontal and vertical levels.
Connection
To prevent the formation of an air lock, make sure that there are no kinks in the lower pipe in the direction from the radiator upwards, and in the lower pipe in the opposite direction.
How to install batteries:
Installing a battery on a balcony
- Lateral.
- Diagonal.
- Lower.
- With bypass for regulating the coolant supply.
If the battery consists of 12 sections and a diagonal heating connection is more appropriate.
Connection diagram of the battery to the central heating system
Connection diagram to the central heating system:
- Two-pipe side connection.
- Two-pipe bottom connection.
- Single-pipe side.
- Monotube bottom.
Video on how to install the battery
But if you decide to connect the heating of a balcony or loggia with your own hands, then first of all turn off the heater supply.
Important: If there is no shut-off valve, then the batteries should be installed outside the heating season
- Cut off the old battery.
- Install the inlet valve.
- Screw the connecting pipe into the battery and into the tap through the fittings.
Tip: To seal and seal connections, use fum tape or tow.
Connecting the battery to the central heating system is the most critical stage in the work; it is better to contact certified specialists, then in case of leaks they will be responsible.
The article was written based on materials from the sites: schoolremont.ru, klivent.biz, balkonsami.ru, oknanagoda.com, house-lab.ru.
Floor covering
After pouring has been done, it is necessary to level the floor surface. If you use a coating such as laminate at the final stage, it is advisable to purchase special construction cement mixtures. If tiles are to be laid on the floor, this procedure is not performed.
When performing any work, try to act in accordance with the instructions, which are necessarily attached to all types of building materials. This is especially true when you heat the loggia with your own hands.
We agree that it is possible to make heated floors yourself, which will significantly reduce financial costs. Although there are certain difficulties in installing them. Electric floors are still considered easier to install.
Water heated floor heating loggia
How to heat a loggia? You can install a modern system with the established name warm floor. The options include both electric heated floors and water heated floors. Very often the choice leans towards the second option.
Water floor installation:
- First, a concrete screed is laid;
- Then the concrete screed is leveled;
- Then the insulating material is laid;
- Then plastic pipes are laid, the basis of the heated floor system, the pipes are laid in a snake pattern, at a relatively short distance from the bends;
- Plastic pipes are connected to the hot water supply system;
- Then the concrete screed is laid again.
Heating is carried out using hot water. The disadvantage of this method is that the process is labor intensive. The same electric heated floor will be easier to install.
Connection to the heating system
The insertion into the central heating riser must be done not only technically competently, but also in such a way that it is unnoticeable to the neighbors. Or, at least, so that their living conditions do not deteriorate so much that they seek legal protection. How to do it?
Battery placed on the balcony
Insertion methods
There are two ways to connect to a hydraulic system: series and parallel. A parallel method is described in the simplest words on one of the construction and repair forums:
With the sequential method, the insertion is carried out at the outlet of the donor battery, and after the additional battery is energized, the pipe extending from it is connected to the “cold” part of the donor battery.
Pros and cons of two types of connections
Connection in parallel with a steam heating radiator behind the wall
With a parallel connection, the cross-section of the water flow into your apartment increases. Exactly the area of the hole through which you supply water to the additional battery. How critical is this?
Let's say you live in a five-story building. The thermal riser lifts hot water from the basement through the radiators of five apartments to the top floor and with its other branch lowers it down through five other radiators.
Thus, there are 10 batteries sitting on one riser, your additional one will be the 11th. The cross-section of the watercourse will increase by 10%, and the pressure will drop accordingly; it will not be difficult to record such a noticeable value by simply observing the pressure gauge. If your neighbors have complaints against you, then legal disputes cannot be avoided.
Then the parallel watercourse must be shut off, the water from the branch must be drained, and the balcony must be used as an unheated room during frosts. This is the lesser of two evils.
Anything more - bursting pipes will cost a pretty penny.
When an additional heating circuit is connected in series, the total cross-section of the water flow does not increase, the pressure in the system does not drop, but this does not mean that the temperature in the neighbors’ apartments will not drop: after all, you are heating your balcony, the coolant loses its calories in this area, and no matter how scanty these losses may seem like they may be the drop that overflows the capacity of your home’s thermal communications to bear the load.
If the facade wall is preserved, hang the battery on it!
It is impossible to turn off the serial connection with one turn of the valve: you will block either the entire riser or a significant part of the circuit connected to it (depending on the overall design of the heating system).
Another useful tip: if your balcony is not combined with a room, then mount the battery on the wall on the outside of the facade wall.
Features and advantages of heated balconies
What is the main advantage of heated balconies?
Relatively inexpensive expansion of the apartment area. Unfortunately, that's where the positives end. Let's talk separately about each of the many disadvantages. First of all, let’s condemn the option of completely combining the balcony with the room. Full combination means moving the radiators to the loggia and demolishing the window sill block. What are the disadvantages? Firstly, it is legally prohibited to bring heating appliances onto the loggia. This is due to a violation of the building’s thermal design.
The fact is that every millimeter of pipe, every radiator is part of a large centralized heating system for the city. They are hydraulically linked together into a system. If you violate this system without permission, the operating mode will be disrupted and, as a result, heating problems may arise anywhere in the house: noise in the pipes, insufficient heating of the radiators, vibrations in the risers, etc.
In addition, the window sill block is often part of the system that secures the balcony slab. Now that we’ve sorted this out, let’s talk about the general dangers of adding a balcony to a living space. Few people think about this, but in each apartment, even at the design stage, the existence of wet and dry zones, as well as certain volumes of ventilated air, is laid down. It is understood that air will penetrate into the apartment through open vents, low density and cracks in the windows, and then, due to the difference in air density in the apartment and outside, will be released into the atmosphere.
Ventilation ducts are provided in the most polluted places in terms of unpleasant odors, i.e. in the kitchen and bathrooms. Thanks to this arrangement, excess odors and moisture are removed.
What is the threat of adding balconies to the living space in this regard? Firstly, the ventilated space will increase, which means the ventilation duct may begin to be unable to cope with the resulting volume of air. After all, an engineer, in order to reduce the cost of communications, can calculate the volume of air “in grinding in”. This situation is possible, although it is one of the least likely.
A much more possible situation is when the air flow pattern is disrupted due to the glazing of the balcony. An unglazed balcony has much more leaks than a loggia. This means it has better air flow. We are used to thinking that the penetration of outside air into an apartment is definitely bad, but this is not always true. If you are concerned about glazing your balcony, you will have to think about organizing an additional inflow. In a good way, it is worth recalculating the ventilation system in the apartment, but all that the designers can advise you in this case is to install a check valve on the ventilation grille and organize an additional inflow: you can do it yourself.
Here is the whole heap of disadvantages that comes with arranging a living space on the balcony. It is also worth adding the cost of insulation here. If you are concerned about heating the loggia, then you need to understand that the balcony building structures were not originally designed to retain heat. To select the correct insulation, it is better to hire a specialist, since the planned thickness of the material depends on a fairly large number of parameters. And insulation, moreover, has the concept of a critical thickness, after which the thermal parameters of the material begin to deteriorate.
A small recalculation will not cost fabulous money, but it will save nerves and time on selecting insulation.
Modern heating infrared heater for the balcony
But, fortunately, in addition to steam heating, there are modern worthy alternatives. You can install a heated floor system or install an infrared heater on the balcony. In the latter case we are talking about a carbon heater.
Infrared heaters are:
Is such a heater dangerous in an apartment, much less a balcony? Infrared rays, one might say, do not have those characteristics that can negatively affect human health. They will also not harm animals and plants. They do not create noise or vibration, and do not burn oxygen like some other heaters.
It is even believed that this type of radiation allows the creation of molecules in the air, called anions. It is believed that they purify the air and have a positive effect on all living things. An IR heater will save 20 percent on electricity consumption. You can also install a programmable thermostat. And then you can save electricity by 35%.
How to choose an IFC heater for a terrace
Infrared electric patio or balcony heaters emit a targeted heat beam that is immediately felt by people within its range. Consequently, heating a terrace using such devices is more efficient, more economical and safer than gas heating.
What to look for when purchasing
- When choosing a patio heater, the first thing you need to do is check the materials it was made from and whether it is waterproof.
- In addition, it is necessary to check the water resistance rating with protection against water splashes from any angle.
- The housing should preferably be made of stainless steel or aluminum with an anti-corrosion coating.
- Choose all-weather IFC heaters.
Not sure what heater wattage you should choose for your patio? Here are some tips for choosing a radiator.
How many meters of terrace do you want to heat?
Remember that it is usually not necessary to fully heat your deck. Here's why it doesn't matter how big your terrace is
What is more important is which dedicated area on the terrace (surface) you want to heat. Think about where you usually stay: a sofa, a table with chairs? For example: if this is a table area and your entire terrace has an area of 50 sq.
M, then it is enough to heat about 10 square meters. M terrace area. Because the surface of a table with chairs rarely takes up more than 9 m2.