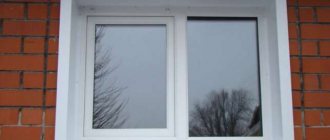
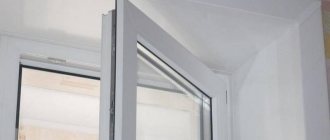
After the plastic windows have been installed, you can proceed to finishing the slopes. This will not only protect the construction foam from exposure to sunlight and further destruction, but will also make the interior of the house warmer. The finishing of window slopes from the outside can be done with different materials; it can be not only plastic, but also plaster, sandwich panels and other materials.
Purpose of external slopes
External finishing of window slopes is needed not only for decoration, but also for thermal insulation, as well as protecting materials from negative influences. After such work, the cracks are sealed, and the wind does not cause drafts.
If you want to refuse finishing window slopes from the outside, you should look at those houses that have not undergone such work. You will see that the construction foam first begins to change color and then turns into dust. It is used to fix the frame, which means that if strength and characteristics are lost over time, you may encounter condensation on the glass from the inside and failure of window fittings due to misalignment of the structure.
How to prepare the composition?
When preparing the composition, it is necessary to act in strict accordance with the manufacturer's recommendations .
The composition includes important components - water, filler and binder.
If you plan to prepare cement mortar, add one part cement and three parts sand .
Water is added to the composition to give the required consistency, which should not be too thick or thin. For gypsum mortar, use one part lime to 0.3 parts gypsum component.
Why is it necessary to finish window slopes from the outside?
If you can observe how windows are installed, you can understand that space is supplied between the frame and the wall. It is necessary to compensate for changes in the linear dimensions of the material. This technology is also due to the shrinkage of the building, especially after its construction. If such a gap is not left, the windows may warp, their structure will be deformed, and the glass may even burst. If gaps are left open, the construction foam will deteriorate over time.
Previously, the hollow space was filled with felt or tow. Today, these solutions are gradually being replaced by more modern construction analogues. In order to insulate the premises of a house or apartment, the windows should be finished from the outside. Metal slopes, by the way, are also used for this. This option is the most acceptable if you plan to carry out the work yourself and have a limited budget.
Alternative solutions are metal siding and drywall. The first one closes the cracks well and ensures high tightness. But it is recommended to use drywall on external slopes only when the windows open onto a glazed terrace. But even in this case, the sheets must be moisture resistant.
Methods of finishing external slopes and materials used
Depending on what construction skills you have, as well as what funds you are willing to spend, you should choose the material for cladding. It could be:
- plaster;
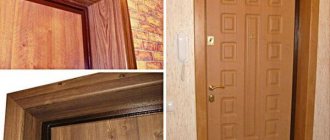
- metal;
- plastic;
- Styrofoam;
- sandwich panels.
One of the simplest options is plaster. It is prepared on the basis of cement and is quite cheap. The work will be carried out using wet technology. Finishing of slopes when installing windows is most often done with plastic. Among its main advantages are:
- durability and resistance to external influences;
- high moisture resistance.
But this type of finishing is more expensive than others. In addition, there is no way to restore PVC if it is damaged. Sandwich panels have been gaining popularity recently. This is due to the fact that the material plays not only an aesthetic, but also a functional role. The slopes are insulated and look quite attractive.
Metal trim is most often used on the outside of private homes. The material copes well with atmospheric influences, but requires additional thermal insulation. The external slopes of plastic windows can also be finished with foam plastic; it provides sound insulation, does not affect the walls, since it weighs very little, and its installation does not take much effort and time. This layer, however, will still need to be protected. It is better to use plaster for this.
The nuances of decorating window openings with polystyrene foam
This material is easy to process. To install it, you will need a construction mixer or a drill with an attachment, a bucket for the adhesive solution and the composition itself, a sharp knife, fiberglass, perforated corners, a notched trowel, and sheets of polystyrene foam. It is important to mix the solution thoroughly so that there are no lumps.
The advantage of this finishing method is that you don’t need to have deep construction knowledge to perform it and you can do the installation yourself.
During the work, the surfaces to be treated are cleaned, covered with cement mortar, and topped with a primer. Afterwards, the foam parts are mounted - the slopes are treated with glue, ensuring strong adhesion. Gluing is done from the bottom corner. When the entire perimeter is covered, the joints are taped again for greater strength - no voids should form. Excess glue is removed with a sponge, after which the fiberglass mesh is installed, all corners are finished with perforated corners. When the structure dries, apply a primer. Acrylic paint of a suitable color is used as a finishing touch, and to create a unique design, the surface is covered with decorative stones.
After drying, the surface can be painted with facade paint. It should be applied in several layers.
Tools and materials
Depending on what the external slopes will be faced with, you should prepare a set of tools and materials. If you want to work with plastic, you can install it on a frame made of wooden slats. To install them you will need:
- screwdriver;
- drill;
- saw.
If you want to work with metal, you need to prepare:
- construction glasses;
- hacksaw;
- pliers;
- roulette;
- level;
- knife with replaceable blades.
When finishing the slopes of plastic windows from the outside with plaster, you need:
- plumb line;
- knife;
- Master OK;
- construction mixer;
- plaster;
- metal grid.
Attention! When finishing the outside of the house with plaster, several layers of mortar should be applied. The first will fill in all the unevenness. If the layer should be thick enough, you need to install a mesh. It will reinforce the surface and will not allow the plaster to slide down.
Benefits of plaster
It's no secret that there are other finishing methods. For example, the use of panels made of plasterboard, wood, plastic. Plastering window slopes has a number of advantages:
- Long time of use.
- Low cost of material.
- Easy to implement, you just need to choose the right way to plaster the slopes.
- Stability, strength.
- Good thermal insulation.
- Hiding mounting parts if necessary.
It is possible to plaster the slopes of both plastic and wooden windows.
Plaster mixtures
Plastic window slopes can be finished with different types of plaster. She may be:
- silicone;
- acrylic;
- mineral;
- silicate.
Mineral is prepared on the basis of Portland cement and is very durable. The acrylic mixture is an aqueous solution of the material of the same name. The composition is resistant to temperature influences and is flexible. Dirt is easily washed off from the surface. But before purchasing this material, you should consider that working with it is quite difficult.
External slopes can also be finished with a silicate mixture. It is not so elastic and has a high moisture permeability. A significant advantage is that the layer does not attract dust and dirt. Silicone mixture is the most expensive. It is offered in a wide color palette, has high elasticity and self-cleaning properties. Although the wall will breathe, the plaster will protect the inner layers well.
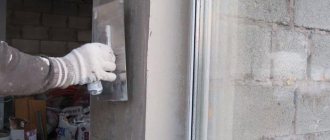
Roughing
Specialists know how to plaster a doorway so that the result is of high quality. The working surface is first cleaned of dirt and dust, and then thoroughly moistened. The solution is applied with a wide spatula or a paint bucket, moving from bottom to top. The plaster mixture is used to smooth out unevenness and defects. A template or rule is used to guide the applied mixture along the guides. After the first treatment, it is difficult to achieve an even base, but it is important to monitor the condition of the corners. Remove excess.
The process of plastering slopes
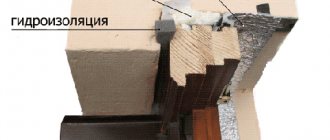
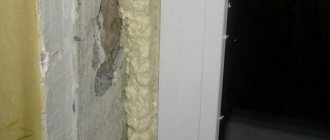
The external slopes of plastic windows need to be prepared first. Excess polyurethane foam must be carefully cut off. The surface is cleaned and coated with primer. To prevent moisture from penetrating into the seams, they can be covered with PSUL tape. Then galvanized plaster profiles are installed. They are fixed using gypsum mortar. The position of the elements is leveled using a building level. The profile will act as a plaster beacon and protect the corner from various types of influences.
The solution is applied with a spatula. Excess composition is removed, and in those places where unevenness appears, additional processing should be carried out by adding plaster. As soon as the layer has set a little, excess material is removed with a trowel. Leveling the surface can be done using a rule. If there are minor defects, you can deal with them using a grater. The solution is slightly soaked with a washcloth. The surface is rubbed in a circular manner, and then smoothed with a spatula.
Attention! If in the future it is planned to lay some finishing material, for example, tiles, on the slopes of plastic windows, minor defects do not need to be corrected.
Preparing the work surface
In order to properly and efficiently plaster classic slopes on PVC windows, you need to know the design features. It is better to install the window sill before plastering, otherwise you will have to remove frozen drops of the building compound and smooth out defects. A newspaper or plastic film is glued with mounting tape to prevent damage to the plastic structure.
If a novice master knows how to plaster and strengthen openings, the installed windows will last for decades. Surface preparation includes several stages:
- All traces of the frozen solution are carefully removed and the dust is swept away so as not to disturb the adhesion. Hardened plaster will become covered with cracks of varying depths or fall off.
- Protect the window frame and glass unit from dirt.
- During interior work, radiators and fittings are covered with paper.
- At the final stage of preparation, treat the surface with a deep penetration primer for maximum adhesion.
Attention! If you take into account the nuances, a beginner will be able to plaster the slopes on the front door or window.
Checking the surface with a level
Advice from the experts
- When making plaster with your own hands, you need to add a binder to the ingredients. It could be:
- building gypsum;
- cement;
- clay.
The filler will be sand.
- When preparing plaster for finishing the slopes of plastic windows from the outside, the proportions should be observed. If the putty layer is formed with a liquid or too greasy composition, this may lead to cracking or low strength of the layer. Experts recommend purchasing a ready-made composition in dry or liquid form, where you don’t have to think about the ratio of ingredients. If you decide to prepare the plaster yourself, you can check its readiness for work in the following way: the composition does not stick to the tool, which means it is too greasy. If it does not stay on the working surface of the tool, this indicates that it is too liquid.
- After the plaster layer has dried, putty can be applied to the outside of the slopes of plastic windows and, if desired, painted. If, when installing slopes, piece material is used that is installed with glue, the side parts of the windows should be checked for evenness before starting work. If the differences are too large, you may encounter overconsumption of liquid mixtures.
- It also happens that you have to work with a surface that has already been painted. If oil paint was used, it may reduce the adhesion between the materials. Therefore, it is carefully removed first.
Features of preparation
You can do the finishing yourself. Plaster is in greatest demand. At the first stage of work, you need to close the window. Scotch tape and film are suitable for this. Clean the side surface and then level it. The composition fits well on the base if the previous layer has been completely removed. The old mixture will simply fall off.
To figure out how to plaster the slopes on the door, you should know that brick walls are treated with a weak solution of hydrochloric acid, then they are washed with water. If there are oily stains, they are covered with oily clay and allowed to dry. Then wash with running water and dry.
Preparation and distribution of the solution
Using siding
Siding is also suitable for finishing window slopes from the outside. Insulation material can be placed in the hollow space between it and the wall. Installation is carried out on the sheathing, the location of the slats of which must be perpendicular to the cladding. The system is complemented by low tide. This is where you need to start working. A profile is installed in the upper part and on the sides, onto which the siding will be attached. The frame can be made of wood or metal. The first should be treated with antiseptics. Finishing elements are inserted into the profiles and fixed to the frame with galvanized nails. Self-tapping screws can also serve as mechanical fasteners. The slats are connected to each other by a system of locks.
Working with sandwich panels
These products are installed in profiles. First you need to measure the plane of the slope, and also clean the surface of excess foam. Next, you can install the starting profile, which is attached to self-tapping screws. The cladding is inserted into the profile and fixed with self-tapping screws.
Attention! In order for the joints to be airtight, they are treated with liquid plastic, but in this case it is better to refuse sealant. The space between the wall and the cladding should also be filled. Construction foam is used for this.
At the final stage, you need to try to give the window a finished look. To do this, profiles are cut, and their length should be slightly longer than each side of the slope. These elements cover the trimmed panels. There should be an overlap at each corner. You will need to trim along the intended line.
Window finishing. What does that require
Materials
Putty KNAUF ROTBAND (Rotband)
- If you are puzzling over how to plaster the slopes from the street, then a number of mixtures with waterproof binders are at your service, and one of them is KNAUF ROTBAND or simply Rotband, as craftsmen and sellers are used to calling it. In such cases, all putties (dry and liquid (paste)) are suitable for outdoor work, in which cement or acrylic is used as a binder component - after all, the most important condition for compatibility here is moisture-repellent qualities.
- For interior work, the instructions allow you to use almost all construction putties, such as gypsum, cement and polymer (acrylic and latex), both in dry and liquid initial states. Among them there are starting (leveling), finishing (smoothing) and universal mixtures that are suitable for any action from any side.
- It would be wrong not to mention cement-sand plaster, which appeared even before all of the above technologies and is still successfully used today as a high-quality and durable base. This solution can be used on any side of the window, especially since the price of cement is the lowest of all possible options, which means that for leveling the surface this may turn out to be the most profitable solution. Of course, working with cement is somewhat more difficult than with putties, and the top layer will still have to be made of one of the finishing mixtures.
- Drywall should also be mentioned, but in our situation it is suitable exclusively for internal slopes. The convenience of using such a material is that it is able to cover almost any damage in a given area, and there is no need to wait for it to dry before finishing (puttying).
Note. Plastering is usually called the process of leveling the surface with a variety of liquid mixtures, which subsequently harden, forming a hard coating. This word is also used to refer to solutions intended for this purpose.
Making slopes
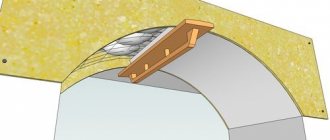
Correct installation of beacons
If the old frames were removed carefully and there is no particular damage, then to start work it is enough to simply clean the slopes from the facing coatings such as paint, lime and/or lime-sand plaster. But in some cases, not even through the fault of the workers, but due to poor-quality installation during the construction of a house, large holes may form that need to be sealed with something first.
In such cases, either drywall is used (installed using a frame as usual), or the potholes are smoothed out with brick or stone - any option is acceptable.
We are considering the topic of how to plaster window slopes from the outside and inside - if the differences on the plane are no more than 50 mm, then you can begin installing beacons, which will be perforated corners (on the edge) and perforated plaster beacons (under the frame).
Such profiles, as a rule, are fixed using any of the putties - this is much more convenient than cement-sand mortar, and they wait several hours for the mixture to set. Otherwise, when finishing (leveling) the plane, you will knock down the beacons with a tool (rule or spatula).
When installing beacons, you should calculate the space so that all slopes are the same and for this you can use a construction square. Apply it with the short side to the glass, close to the frame, and measure the distance from the long end to the edge of the slope - this way you can adjust the installation of the perforated corner.
But you can adjust the plaster beacon, which is fixed at the window, according to the width of the frame, that is, along its edge, but try to ensure that the slope does not cover it by more than half - it will be ugly.
Before installing the beacons, you must clean the surface from dust and prime it, and after they have set sufficiently (before applying the mixture), re-coat the working plane with primer. After two to four hours you can begin further work.
Recommendation. It is best to mix putty solutions in two stages - fill a bucket with water, pour the powder into it and beat with a low-speed drill and mixer (you can also use a regular drill at the lowest possible speed) for five to seven minutes. Let it sit for five minutes to soak up all the dry lumps and whisk again.
At one time, you should make as much solution as you can produce in 20-25 minutes, until it sets. If you mix the mixture again after this, it will lose its astringent properties - the putty will harden for a very long time, and after that it will begin to crumble.
Apply the mixture with a medium-width spatula
The mixed starting solution is applied to the slope with a small spatula with a blade, approximately 10 cm wide. It is best to immediately fill the entire niche on one side so that the solution protrudes slightly above the beacons. With the same tool, you can slightly level it with your own hands, but do not try to do it thoroughly.
After you have applied the mixture in sufficient volume to one of the slopes, cut off the excess mortar with a spatula, as in the photo above (if it is a cement-sand mortar, then it is better to use the short (meter) construction rule). This procedure must be done around the entire perimeter, with the exception of the window sill, but at the same time make sure that there are no large cavities or grooves left on the surface.
After the starting mixture has completely or partially dried (partial drying is determined by the slight appearance of dark spots on the surface), apply the finishing layer. With this, everything is exactly the same as with the start - stir the required amount in a bucket in two stages as much as you can work out in 20 minutes and apply the mixture to the slope in a thin layer (1-1.5 mm) on the slope. Once dry, sand with sandpaper or diamond mesh.