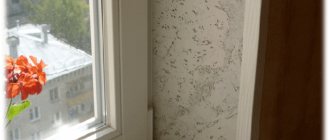
The window opening after installing plastic windows looks unpresentable. Pieces of plaster and polyurethane foam stick out, and the material of the walls is visible in places. To close all this, various methods are used. The most affordable and practical is the use of plastic slopes. It is better to equip them with sandwich panels, when foamed polypropylene is laid between two layers of plastic. They are durable, dense, made of high quality material.
There are two main methods for installing plastic slopes: with and without a starting profile. Both come with step-by-step instructions and photos. Decide for yourself how to attach slopes to plastic windows. Both methods give good results.
Advantages of plastic
To cover the slopes of a house, the plaster method was previously used, then plasterboard, which was widely used for cladding. But with the advent of PVC windows, plaster and drywall faded into the background. Since finishing slopes using the plaster method has significant disadvantages. The main disadvantages include:
- If you plaster the slopes yourself, it takes a lot of time.
- This type of finishing creates a lot of construction waste.
- Due to shrinkage and temperature changes, cracks may occur on the surface.
- The component elements do not form the required adhesion to the plastic, as a result of which the slopes peel off from the window.
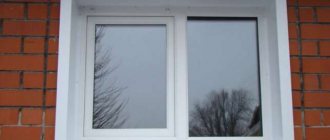
Internal window slopes made of plastic
To properly plaster the window opening, you should use a perforated corner and beacons. The perforated corner is installed on the outer corners of the slope. To do this, you need to cut off a corner of the required size, apply putty to the slopes and press the perforated corner. The plaster beacon is installed vertically along the window frame. To do this, cut the beacon to the required size, apply putty along the box and attach the prepared parts. After 40 minutes, you can plaster the slopes.
A finishing material such as drywall provides the opportunity to make slopes faster and warmer. But even the moisture-resistant version of this material cannot withstand temperature changes and the influence of condensation. PVC window slopes have a more interesting appearance.
Advantages of plastic slopes
But beauty is not their only advantage; positive characteristics include:
- The panels are made of the same material as the window frame, therefore, the space around the window takes on a monolithic structure.
- It is enough to simply install the insulation. It should be noted that with proper insulation, condensation is impossible.
- Installation of plastic panels creates virtually no debris or noise.
- This kind of building material can be used externally and internally, since polyvinyl chloride does not emit harmful substances.
- Insensitive to moisture.
- Duration of use.
- Tolerates temperature changes perfectly.
- Easy to use.
- The building material has an excellent pricing policy, therefore, it is available to anyone who wants to install plastic window slopes with their own hands.
The disadvantages of plastic include the impracticability of fragmentary restoration.
Do-it-yourself plastic slopes for windows (video)
What happens if you don't fix it in time?
If the framing structure is not replaced or repaired in time, the following problems may appear:
plates on the opening that begin to twist can damage the frame or its fastenings, as well as break out of their grooves;- if the slopes are deformed or damaged, the insulation of the installation seam will suffer, which is why it may collapse under the influence of the external environment;
- mold on the seam will destroy the insulation, begin to emit an unpleasant odor, and also worsen the indoor microclimate;
- due to broken or damaged slopes, drafts and cold bridges may appear, which will increase heat loss in the room;
- in some cases, failure to replace it in a timely manner may result in equipment failure or injury if the slope falls off.
Selection of building materials
Before you think about how to make plastic slopes yourself, you need to consider possible variations in materials. There are 2 types of plastic panels:
- Decorative.
- Sandwich panels.
Decorative slopes can be used:
- For the formation of partitions.
- As a facing building material for balconies.
Necessary tools for finishing window slopes
For all other purposes, preference should be given to sandwich panels. This kind of material differs in that it has 2 protective layers and a facing layer of insulation. This structure allows you to avoid additional insulation. Key points for selecting panels:
- Preference should be given to building materials made from virgin plastic. Since the correct material is chosen, it will not change color, and the composition will not cause harm to health.
- It is better to choose a material with a significant plastic cover. Panels with thin PVC sheet covering are not durable. Over time, the plastic peels off the surface.
Finishing window slopes with plastic requires the following materials:
- Profile.
- Self-tapping screws.
- Dowels.
- Wooden slats.
- Gypsum insulation wool.
- Liquid Nails.
Possible difficulties
When installing products, you need to carefully monitor to avoid inaccuracies leading to adverse consequences :
- Violation of the sequence of work - installation of the window sill after installation and design of the slopes. Thus, the coating of the element can be easily damaged, which will lead to repeated finishing work.
- Lack of preparation of the window opening or poor quality execution. This leads to peeling of the mounting seam, freezing of the window and reduced service life.
- Improper execution of the assembly seam means skipping one of the layers.
- Installation of slopes from pieces of material. As a result of poor sealing, mold appears.
- Working with materials not suitable for installation of internal slopes. For example, metal.
Careful implementation of installation technology will protect you from problems.
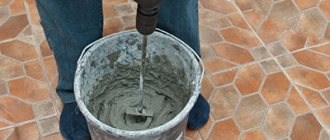
Preparatory moments
Removing the remnants of polyurethane foam
To finish the inside of the window slopes with plastic in a high-quality manner with your own hands, you need to clean the walls and prepare all the necessary fixtures and building materials. To form slopes, the thickness of the plastic strip should be 8 mm. The width and duration of the plastic must correspond to the size of the opening. You should prepare and clean the walls step by step:
- Remove excess foam.
- The shipping tape must be removed from the window profile.
- Seal the internal seams.
- The upper reaches and side sections of the hole must be freed from whitewash and leveled with putty.
- It is recommended to wipe the prepared area and apply 1-2 layers of primer.
Definition of the concept
There are niches in the window opening.
They are located on the outside and inside of the structure. The inner walls of these recesses are called slopes. They are located between the frame and the load-bearing wall of the room .
To increase the penetration of light inside, it is performed at an obtuse angle relative to the frame. Previously, a wooden box was mounted on the window and then decorated.
Modern double-glazed windows increase the width of the slope, because during installation only the frame is installed.
Important! To give the structure a holistic look, it is recommended to use slopes made of the same material.
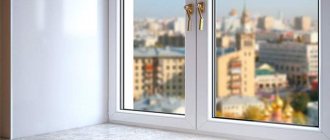
Why are they needed indoors?
The internal slope is necessary to design the joints between the wall and the frame, as well as to ensure the tightness of the window structure. They are subject to special requirements as a decorative element. They should be combined not only with the design of the window, but also the entire room.
In addition, the products are designed to complement the performance qualities of the entire structure and increase service life.
Formation and installation technology
After preparing the opening around the circumference, a vapor barrier film should be glued. At the combination points, sections of the film should be laid with an excess of 5-7 cm and glued along the seam. The tape must be glued so that the edges do not extend beyond the window frame. After this, you can proceed to the formation of slopes using the following instructions:
We fasten the bars with dowels
- Fastening timber material. For these purposes, wooden slats with a thickness of 15 mm and a width of 40 mm are taken. The slats should be trimmed to the width and height of the outer edge of the opening. The slats need to be secured with dowels around the circumference of the opening. If the walls of the hole are wavy, then it is recommended to place wedges under the planks.
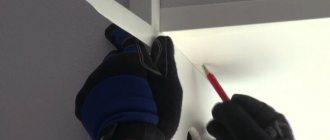
- Take the necessary measurements carefully. It should be understood that all measurements must be taken from the frame, and not from the edge of the special profile.
- Open the slopes. The length and width of the walls of the hole should be correctly measured, and attention should also be paid to the angle of inclination on each side. You should mark the cutting points on the slab and cut out the workpieces. The resulting elements should be attached to the wall and their location and angular fit should be checked.
- Special profile fastening. A special profile should be attached along the outer edge of the opening with short screws. When joining the bars together, the special profile should be secured in the corners so that no gaps are formed. Installation of slopes begins with the manufacture of edging. This structural component is made from an F-shaped profile. All manipulations should begin from the top element. The profile must be cut to the size of the external opening and the corners must be filed at 45 degrees. The prepared special profile should be attached to the block so that it can be covered with plastic, but without blocking the groove for fixing the slope.
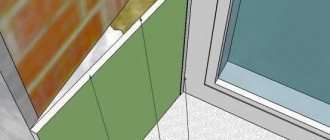
Installation of plastic slopes
- The profile is fixed to the beam with staples. The remaining sections are mounted in a similar way. The prepared slope element must be placed in a special profile, pre-coated with sealant. The resulting gap between the plastic and the wall must be sealed with insulation. It should be noted that the layer of insulation material should not be excessively massive or have vacuums. The outer edge of the slope must be inserted into the groove of the special profile and pressed to align the panel. Next, you should sew up the side slopes, while carefully distributing the thermal insulation. If the external walls are insulated, then such manipulations with the slopes do not need to be performed. In such a situation, the gaps between the panels and the base of the slopes should be sealed with polyurethane foam.
- The final period involves attaching decorative corners, which should be glued with glue. The contact points between the panels must be degreased and all cracks must be sealed with acrylic sealant. Acrylic should be squeezed directly into the gap, rubbed and leveled, and any excess should be removed with a damp cloth. All manipulations should be done in small areas and wiped carefully clean. Because while the acrylic has not hardened, it can be removed quite easily. The area of the opening under the window sill is being plastered.
Step-by-step instructions for installing external metal slopes
Before proceeding directly to the work process, let's familiarize ourselves with the materials and tools that will be required. For the convenience of site visitors, the information is presented in table form.
Table. A list of everything needed for installing slopes.
| Name | Short description |
| Construction knife | With its help you will cut a package of metal slopes. |
| Roulette | It is necessary in order to take measurements. |
| Mounting gun, sealant | Required for sealing joints between parts of the slope, as well as between it and the window itself. |
| Self-tapping screws | With their help the metal slope will be attached. Try to ensure that the screw heads match the color of the product. |
| Metal scissors | You will need them to adjust the slopes to the size of the window. |
| Screwdriver | Needed for tightening screws. |
| Drill bits for concrete/metal | Will be required to drill mounting holes in the wall and slope parts. |
| Long bit for self-tapping screws | Useful when working in hard-to-reach places. |
Finishing of external slopes
On a note! You will also need a large work table for trimming individual elements. A stepladder may also be required if the opening is high enough.
After preparing everything you need, you can proceed directly to the work process.
Step 1. First, the slopes are unpacked, their completeness and absence of manufacturing defects are checked. In our example, these are starting profiles, a pair of side slopes, an upper slope and a lower ebb.
The slopes are unpacked
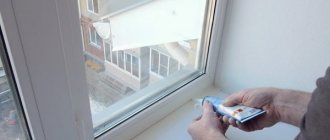
Step 2. The window opening is measured. It should be remembered that plastic windows are sometimes installed in a plane that is not parallel to the outer wall of the building. This point must be taken into account when adjusting slopes and lower ebb.
Bottom ebb is adjusted
On a note! Individual elements can be “tried on” to the window, installing them in the opening without fixation.
Step 3. The results are transferred to the lower ebb - it is usually at first slightly larger than the width of the opening. Subsequently, the part will be trimmed, and “ears” will be formed on the sides.
Transferring measurement results to the lower tide
Step 4. The ebb is cut according to the width of the opening using metal scissors, trapezoidal “ears” are left on the sides. The latter are bent upward (see photo below). In addition, a triangle is left on the outside of the ebb, which is necessary to cover the corner of the opening.
The tide is cut off
This is what the bottom edge should look like after trimming
Step 5. The lower ebb is tried on again and, if everything is normal with the dimensions, the mounting holes are marked and drilled (if the latter were not made earlier).
Next, the ebb is tried on
Step 6. The ebb is aligned in width, after which it is secured with self-tapping screws.
Low tide is fixed
Step 7. The F-shaped starting profiles are tried on in height on the sides of the window opening. The place where the profile reaches in height is marked.
F-shaped starting profiles are tried on
Step 8. Next, a starting profile is installed on top, with the help of which the upper slope bar will be installed.
The starting profile is mounted
Step 9. The required element is inserted and secured into the profile. If necessary, the part is pre-cut and “ears” are created, thanks to which the side starting profiles will be securely fixed in the opening.
The top decorative element is attached
On a note! Factory-made metal slopes are usually sold with a special protective film. During installation, it is necessary to remove the film where it will be impossible to remove it after completion of installation work. In other places, it needs to be removed when the slopes are completely installed (thanks to this, you will not damage the parts in the process).
Step 10. The side profiles are attached using “ears”, which are located on the lower/upper elements.
Side profile attached
Photos of the process
Step 11. Side slopes are installed on these profiles; metal rivets or screws are used for fixation. After this, if desired, the cracks and joints are sealed with sealant to more reliably protect the window frame from moisture.
Installation of side slopes
Video - Metal slopes for external window decoration
PVC slope cladding
Advice! You can veneer window slopes in another way, which differs significantly from the previous one. This method allows you to cover a window slope using any PVC material. It should be noted that this option is used when the installation seam has a small interval, that is, the distance from the frame to the wall is minimal.
The initial stage should be carried out in stages:
- Cleaning.
- Elimination of defects.
- Applying primer.
Sheathing slopes should adhere to the following rules:
- Remove excess foam, making sure that the cut is placed flush with the surface of the frame.
- Facing slopes with plastic plates involves treating the surface with a primer. Preference should be given to penetrating formulations with the addition of antiseptic components.
- Fixing slats.
- An important point is trimming the polyurethane foam. The cutting is done in such a way that a groove is formed for fixing the plastic. Trimming is done in close proximity to the frame to ensure maximum adherence of the material.
- Reveal the details.
Window slopes lined with PVC
After the manipulations have been performed, a number of actions should be performed:
- Using a jigsaw you need to cut plastic. As a rule, burrs may remain along the edges, which can be removed with sandpaper.
- Performing preliminary installation. This manipulation will allow you to determine the presence of defects. If double-sided plastic is used for cladding slopes, then one side needs to be sanded a little, thereby indicating the wrong side of the material. Carrying out such manipulation promotes better adhesion. Since PVC panels are fixed using polyurethane foam.
- The prepared elements are placed in the right place. They need to be installed in the prepared groove. Using a level, the structure is leveled.
- The outer edge of the part is moved back and foam is poured into spots.
- All structural parts are attached to each other using masking tape. Fixation is carried out along the circumference of the structure and at the joining points.
Important! Beginning craftsmen have a question: how long will it take for complete drying? As a rule, it will take a day for thorough drying. After which additional finishing activities are carried out. It should be remembered that external slopes also require attention.
Quite often, siding is used for such purposes. Working with building materials does not cause any particular difficulties due to the characteristics of the material. But if difficulties arise, then on the RuNet there are many videos and photos with detailed instructions regarding the installation of siding. The simplicity of installation work will allow you to do the cladding yourself.
Results
If you come to the conclusion that this is what you need, feel free to get down to business. Recently, plasterboard has become popular, since a large number of structures can be made from it, including slopes. During installation you may encounter difficulties, but there are far fewer of them than in the version with plaster. I would like to note in advance the fact that installation of slopes is not a type of service for which the cost is so high that it is better to save money. For this reason, many people try to hire specialists who will save you time and materials. All you have to do is enjoy the beautiful view with cleanliness and minimal costs. But since you still need to follow the masters, all the knowledge from the article will definitely be useful to you.