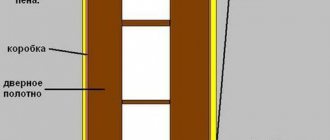
Compared to the advantages, there are also some disadvantages. For example, such doors do not have good soundproofing characteristics, since the leaf simply covers the visible opening. If these characteristics are not critical, then you can begin the process of selecting doors, purchasing them, and then installing them.
Sliding door system
Today, two mechanisms for implementing the function of sliding doors are known: suspended and rail. Each mechanism has both its advantages and disadvantages.
Rail mechanism
A supporting beam is used as a moving mechanism, to which a guide device in the form of the letter “P” is attached. This element is installed with the ribs up, which allows the rollers on which the door leaf is attached to move freely in it. In other words, it is a hanging door that slides on a track.
Basic design of sliding interior doors on the top rail
The installation of such doors does not involve the installation of any floor elements, so the floor remains flat and untouched. Bottom rollers are mounted on the right and left, which fit into grooves located in the lower part of the door leaf. This is necessary in order to fix the canvas in a vertical plane. It is believed that the installation of such a system is not difficult and is accessible to anyone who wishes to install it at home.
Installation includes several stages:
- The process of attaching the top rail.
- Attaching the rollers to the upper end of the web.
- Installation of the blade with rollers into the guide rail.
- Installation of the upper locking mechanism.
- Securing the lower guide roller.
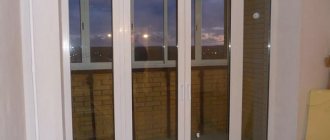
Single-leaf interior sliding doors
As you can see from the steps, nothing complicated, you just need to have the desire and the tool, and an assistant will not hurt. Such a system practically does not block any noise, but the passage is closed.
Rail sliding doors
Such doors are characterized by the presence of upper and lower guide rails. Rollers are also mounted at the top and bottom. This mechanism design is characterized by increased stability, since it cannot deviate in the vertical plane.
Rail sliding doors
The presence of a guide rail in the floor is a negative point that affects the cleaning process, and not only that, since it interferes with free passage. The best option is to install such doors in a closet or dressing room. Since this system is more stable, the presence of children cannot lead to various injuries, since children test the strength of many interior elements.
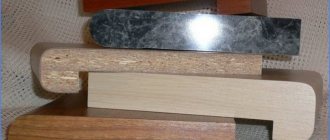
Materials for manufacturing accessories
DIY wardrobe door installation
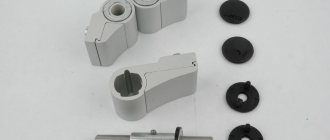
The mechanism consists of bearings and rollers. Aluminum and steel are used to make bearings. Reliable and attractive aluminum systems ensure silent gliding of the rollers. Steel structures are stronger and more durable, but more expensive than aluminum ones.
The wheels themselves are made from various materials:
- Plastic. Inexpensive accessories, but you must use them carefully, otherwise they will quickly break. These models do not take shock load well and wear out quickly. During use, chips and dents appear on them.
- Rubber. Soft products that do not create noise, but their service life is not very long. Such fittings wear out quickly and need to be replaced.
- Steel. Durable fittings are made with special soft linings for silent sliding. They hold a very impressive load, so they can be installed on large cabinets.
- Tarmonide. A composite material that hardens as it cools.
- Teflon. Has optimal technical parameters for a long service life. Steel rollers are coated with Teflon so that they move silently along the guides.
Options for using sliding systems
Sliding systems, regardless of design features, can be used as:
- For sliding doors, it is enough to fix the guides on the wall along which the door leaf moves.
Sliding doors. The guide is mounted on the wall above the correct opening - Cassette doors, when a special niche is made in the wall into which the door leaf is hidden when opened.
Cassette sliding interior door: the door is hidden in a wall niche - Cascade doors, which can consist of one fixed door and several movable ones, which, when opened, hide behind the fixed part.
Cascading sliding doors: one leaf pulls the other
Sliding doors are the simplest solution to the problem of occupied living space. These doors are easy to install yourself. It is very important that the preparatory work is of high quality: the wall must be vertically flat, as well as reliable, capable of withstanding additional load. The disadvantages have already been mentioned, so this system is not suitable for installation, for example, in an adult bedroom. The advantage of cassette doors is that when open they do not interfere with anyone or anything, since they are located in a niche. In addition, such doors have better sound insulation characteristics, since it is possible to stick a seal around the perimeter. The disadvantages, although not obvious, do exist: firstly, such doors can only be installed at the renovation stage, and secondly, they also take up useful space, since you have to install a false wall. Although, as mentioned above, not everyone can understand this, since the shortcomings are hidden.
Cascade doors are difficult to install due to the presence of several guide elements and leaves. Their installation requires precise calculations, so such a system will be expensive, and it is not possible to install it yourself without experience. As a rule, such doors are installed in luxury residential premises, when issues of saving money fade into the background.
Installation of a sliding system of 4 panels - standard option
Required Tools
Before assembling the cabinet doors and installing the guides, you should prepare a number of tools. Among them:
- Metal ruler, square and tape measure.
- Drill-driver.
- Electric jigsaw.
- Hacksaw for metal processing.
- Driver for self-tapping screws.
- Construction level and plumb line.
- Cutter and scissors.
Subtleties of the technological stages of installation
Despite the presence of some nuances associated with the technology of installing sliding doors, it is quite possible to do without specialists, although their installation will take more time. The main thing is to adhere to the recommendations outlined in this article.
Sliding interior sliding doors
Despite the differences in some systems, the technological stages of installation are no different, as are the requirements for preparatory processes, which must ensure:
- Ideally even dimensions of the doorway, so as not to install too large a door leaf.
- The appropriate load-bearing capacity of the doorway, as well as the walls.
- Finishing the doorway, with wallpapering or installing decorative panels.
After all the preparatory work has been completed, you can begin the process of installing the door system. First of all, you can secure the rollers using some recommendations from sliding system manufacturers. Some manufacturers recommend making a slight deviation from the edge of the door leaf, while some recommend fastening without departing from the edge. It is this fastening system that will be discussed further. Therefore, the profile on which the rollers are installed is attached immediately, without departing from the edges of the door leaf.
Marking the installation location of the rollers
At this stage it is very important to center everything and also make sure that the distances are the same. Marks are made using a pencil or marker, after which holes are drilled at these points. In this case, you need to make sure that the diameters of the holes are 1 mm less than the thickness of the screws or self-tapping screws.
Securing the Roller Shoes
After drilling the holes, the profile plates are installed in place and secured with mounting screws, the length of which can be 70 mm or even more: the longer the mounting screws, the more reliable. At the drilling stage, it is also necessary to ensure that the holes are drilled smoothly, without distortions.
Installation of rollers
After this, you can begin installing the rollers themselves; for this, special plates are inserted into the profile, to which the rollers secured to a threaded pin are screwed.
Roller platforms are screwed onto the pins
It is advisable that handles, as well as specially designed locks, be installed at this stage. If all these elements were included in the sliding system kit, then it is quite possible that in place of these elements there are all the recesses and all the holes are drilled. As a rule, you have to do this yourself, especially if the canvas was purchased separately. To cut the lock yourself, you will have to be patient, use a pencil and a sharp tool.
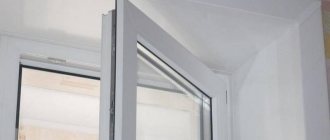
Handle installation
After the door leaf is prepared, you should begin installing the guide system. The most important thing at this stage is to secure it at the required height. If rollers are already installed on the canvas, then the task is greatly simplified.
Often, the guide rail is attached to a wooden beam of the same length, with a cross-section of 5x7 cm. The dimensions of the guide profile are calculated from the condition of two dimensions of the width of the door leaf, with an addition of 5 cm at the edges. The wooden beam is also taken of the same size.
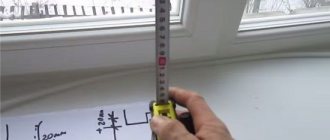
We measure the length of the carrier and mounting bar
To secure the guide to a wooden beam, it is laid on the floor, after which the guide is set. Fastening is carried out with self-tapping screws, no less than 70 mm long. The number of attachment points should be at least 3 - at the edges and in the middle: the more often, the better and more reliable, but within reasonable limits. Here a lot depends on the weight of the door leaf. Naturally, the lighter it is, the better for the entire system.
Attaching the guide to the beam
After this, you can take measurements to determine at what height the beam with the guide profile should be fixed. Before fastening, 4 holes are drilled in the horizontal plane of the beam.
The guide with the beam “rolls” onto the rollers on the door
The beam should be secured so that there is a gap of at least 10 mm between the floor and the canvas, especially if there is a floor covering. If you plan to lay laminate, linoleum or other coverings, then their thickness must be taken into account.
Trying it on to the doorway
During installation, such a sheet can deviate in the vertical plane, which significantly complicates the installation of the entire system. To prevent this from happening, the blade should be fixed with a wooden wedge, and there should be two wedges, near each roller.
We wedge the canvas
To mark the attachment points, the timber is applied to the wall, strictly horizontally, which is controlled using a building level. The fastening points are also marked with a pencil or self-tapping screws, which are inserted into the holes, after which they are tapped with a hammer. As a result, marks remain on the wall where holes for fasteners are drilled. The best fastening option is anchor bolts, and even better, fastening using through bolts, which is the most reliable.
Transfer the marks to the wall using a thin drill
If the strength of the wall allows, then the system can be secured with dowels. As a rule, this is practiced if the wall is concrete (in panel houses).
If the wall is brick, it is better to drill through holes and secure the system with bolts, installing large diameter washers on the inside of the wall.
Attaching sliding doors to the wall
The system must include locking elements that are attached after the door leaf is installed. Before fastening them, it is necessary to check that the doors completely cover the doorway and, when opened, roll back to an acceptable distance.
Installing stoppers on sliding doors
After this, they begin to attach the flag rollers to the floor. It should fit into the groove cut into the bottom of the door leaf. It is necessary to ensure that the doors cannot deviate in the vertical plane.
Installing Flag Roller
First of all, the roller must be inserted into the groove with the door closed, after which, using a pencil, marks are made for the fasteners.
This is what the installed flag roller looks like with the doors open
After installing the guide roller, we can safely say that the sliding doors are installed. All that remains is to test them for functionality and then cultivate them. For this purpose, a decorative overlay is used, with which the wooden beam is closed. This trim can be simply nailed or secured with screws, which is more functional. If you suddenly have to remove this cover, you won’t have to worry about breaking it. When installing the cover, you should make sure that all elements of the system are inaccessible to human eyes, otherwise you won’t get a beautiful interior.
The decorative overlay can be nailed directly to the beam
Video: a visual demonstration of the installation of sliding doors of such a system.
Installation of Sliding Doors interior doors
Cassette doors: installation rules
The installation steps for such a door are similar to the installation steps for conventional sliding doors, with one exception: at a distance of about 10 cm from the wall, it is necessary to mount a false wall to be able to form a niche. When making such a wall, you can use plasterboard as the basis of the material, since this material is the most technologically advanced, although you can use other building materials at your discretion.
The fact is that the main load will fall on the real wall, covered with a false wall. In this case, it is enough to use conventional profiles for installing drywall. When using other building materials, you should think about how and with what materials you will subsequently have to finish this wall.
Video: features of installing cassette doors.
Doors - compartment - pencil case (Installation features)
Installation of timber
The first step is marking and installing the timber. The door leaf is pressed tightly against the doorway, taking into account the width of the guide and 5 mm of additional clearance. At the appropriate level, mark the boundary of the future placement of the beam.
Depending on whether the door leaf will open to the right or to the left, the beam is positioned so that its middle is above the right or left side of the frame, respectively, and a mark is made again. Then a horizontal line between the selected points is built according to the level.
Next, the timber is installed directly. Holes are drilled in the beam and it is securely attached to the wall with anchors.
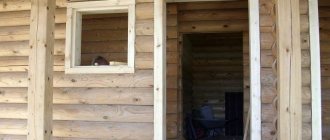
How to install sliding interior doors in your home yourself: technology and tips
Sliding or, as they also say, sliding doors are very popular today. They are convenient because the door does not swing open when opened, but slides along the wall, so the doors require less space to function. In addition, sliding doors look very attractive and suit a variety of interiors. It is quite possible to install such interior doors yourself; their installation is no more difficult than installing ordinary swing doors.
Sliding doors can be very diverse. Door leaves can be made from a variety of materials - wood, MDF, glass, or a combination of several materials. Doors may also differ in design. The doors can be moved along radius guides, moved in a cascade, folded, etc.
You can install interior doors that have a sliding opening mechanism with your own hands. Of course, this is not the easiest work; you will need to be patient and tune in to painstaking work.
Care and operation
When using a sliding structure, it may be necessary to adjust the canvas if sagging is noticed. To eliminate the defect, remove the top panel. An adjusting screw is located on the roller. It must be scrolled while simultaneously checking that the sagging of the canvas is eliminated.
Caring for the sliding system involves cleaning the guides from debris. The rollers are lubricated and replaced when worn. The door closes smoothly. With sudden movements, the rollers may fly out of the guide.
Types of sliding door blocks
On the construction market, many door manufacturers offer their models of sliding door structures. They may differ from each other in the following ways:
The material used to make the door leaf. Metal, plastic, glass, wood, and MDF panels are used as consumable materials. At the same time, there are combined models made simultaneously from several materials, for example, plastic or wood with glass inserts.
Option to move the doors. To open the leaf, a special track made of steel pipe, roller systems with only an upper guide or simultaneously with a lower and an upper one can be used.
The number of leaves of the door block. There are models with only one canvas and several.
The direction of movement of the door leaf. The leaf opens only in one direction or in both directions at once, two doors move apart in different directions, cylindrical and telescopic versions.
The upper guides, intended for the movement of sliding compartment doors, are fixed on the ceiling base. They visually increase the height of the room. Models that provide only an upper guide for moving the sashes allow you to maintain the integrity of the surface of the floor base in rooms and doorways.
When purchasing sliding door blocks for self-installation in interior openings, it is always recommended to check the product package, which includes the following structural elements:
- Pseudo-box for lining the entrance interior opening;
- Door leaf (one piece or made of several parts);
- Decorative plate;
- Set of decorative trims;
- Guide rails (the number of parts depends on the installation option);
- Roller mechanism;
- Guide flag (threshold);
- Set of fastening parts: self-tapping screws and screws, decorative plugs for them.
The number and parameters of rollers depend on the weight of the door leaf. If the door unit is not supplied with fittings and must be purchased separately, it is recommended to find out the weight of the door in order to select the correct roller mechanisms.