When decorating rooms, designers use a lot of techniques that promote proper use of space and create a stylish and cozy atmosphere.
For this purpose, textile compositions of curtains are used to decorate window openings. No problems arise if the windows have a familiar geometry. When decorating rooms with curved walls and bay windows, flexible ceiling cornices are used.
Window decoration
The bay window is an extended part of the building, reminiscent of a built-in balcony. Often it consists of edges that are difficult to achieve using conventional cornices.
In addition, flexible cornice is used for:
Advantages
Plastic ceiling cornices allow you to enhance any space, while focusing on the following advantages:
- Reasonable cost for the product and all components.
- Simple installation of elements.
- A stylish look that gives the room a special charm.
- Convenient delivery (despite the length of up to 5 meters, the product is folded compactly and easily transported);
- Functionality (used in rooms, on the balcony, in the shower).
- Giving the profile the selected shape.
- Unhindered sliding of curtains along the guides.
- Polymer quality that meets international requirements.
- Giving the product the required length.
- Product strength.
- Elasticity of the material.
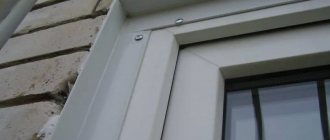
A cornice made of flexible polymers reliably hides uneven joints between the ceiling (including suspended, tension) and the wall. The product of various lengths helps create a finished look and helps round corners. It is rounded corners that allow a person to feel calm and comfortable, while a large number of sharp corners are associated with aggression, preventing a person from feeling safe.
The flexible curtain rod has such an elastic design that it can easily support a weight of about 80 kg and even bend at an angle of up to 100 degrees. Due to this, curtain materials of varying weights are used.
Experts in installing flexible consoles claim that in 5 minutes the products bend by an average of 5 cm.
Flexible cornice
Preparing the structure for installation
If you decide to hang the structure yourself, then you will definitely succeed, because this does not require any special skills.
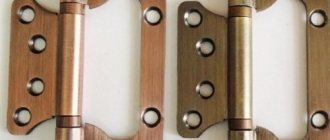
The cornice has the form of a strong and elastic tape of a certain length, complete with special fasteners, hooks, plugs and supports.
The curtain is hung on the tape using hooks. Calipers will help securely strengthen the tape. Caps are used at the edges of the profile.
Flexible wall curtain rods are attached to the surface using a bracket. It defines the space between the wall and the cornice strip itself. Aluminum or plastic is most often used for its manufacture.
The product comes with instructions for its assembly and installation. First you need to prepare the necessary tools:
- roulette:
- level;
- screwdriver or drill;
- screwdriver;
- hacksaw for metal.
Since the work is carried out under the ceiling, the next stage is the preparation of a stable structure. You can choose a stepladder, table or high chair.
If necessary, additional hooks and plugs can be purchased. They are sold both in packages and individually.
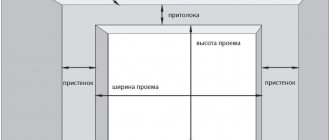
Taking measurements
Before purchasing a product, you need to measure the window opening, taking into account all bends. It is advisable to buy a profile slightly longer than necessary in case of unexpected material consumption.
Depending on the length obtained, an appropriate set of components and the tape itself are purchased. The shorter the length of the workpiece, the fewer hooks, plugs and supports there will be for it. For example, if you buy a product with a length of 3.5 meters, then it comes with 35 hooks, 4 plugs and 8 supports. For a seven-meter structure, the number of components doubles.
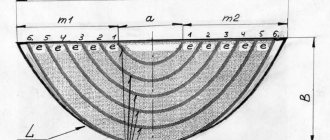
To make a structure of several rows, you can buy one long profile and cut it into equal parts. As an example, we will consider an option with a 10-meter profile, which is cut into three identical parts to obtain a three-row cornice.
Installation Features
Before installation, you need to prepare a profile of a certain length. If required, it can be cut into pieces: the length is adjusted during the fastening process.
Material of manufacture
Flexible plinth is made from polyurethane, which combines under one name many polymer materials that differ from each other in chemical properties, as well as functional characteristics. Polyurethane is known to ordinary people as a rubber substitute.
The elasticity and strength of polyurethane ranges from dense plastics to soft rubber. All of them are immune to aggressive environments, are wear-resistant, and serve in the temperature range from -60 to +80 degrees.
Caring for polyurethane skirting boards is simple and does not require special skills: the product is easy to wash, clean with cleaning products, even small abrasives can be used (with the exception of colored cornice).
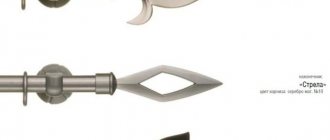
String cornices
Classic string model with chrome fasteners
Only light curtains can be hung on a string.
This curtain rod is a metal string stretched between two holders. In places where bay windows bend, it is fixed with special brackets. Curtains are hung on a string using hooks, small eyelets, rings or clips. To hang canvases in two or three rows, you will need to mount two or three cornices.
Advantages:
- string curtain rods are the most budget-friendly and affordable;
- when the curtain is attached to a string, it appears as if it is hanging in the air. It looks very original.
Flaws:
- you cannot hang curtains weighing more than 3-4 kg;
- due to the too laconic design, they are mainly suitable for interiors made in minimalist styles;
- Over time, the string sags and has to be tightened periodically;
- the curtain can only be moved in a straight line to the fastening element;
- Using a string structure, you can only create broken lines, but not smooth lines.
As you can easily see, the choice of bay window semicircular cornices is varied and, if desired, you can always find an option suitable for a particular style, vision and wallet.
Equipment
Structurally, the ceiling curtain rod is an elastic material that acts as a flexible profile and bends radially. In addition, the kit includes special holders-brackets (supports), runners on which curtains are hung, plugs-clamps for runners. For universal designs, special extensions are used.
Types of runners:
- upper ones (used for fixing lambrequins and curtains);
- bottom (designed for light and medium fabrics for curtains or curtains).
Balancing the weight of the textiles vertically allows you to move the curtains freely to the sides without blocking the bends.
Calipers are necessary for reliable fastening of the profile to the ceiling using a special movable element.
The plugs are flat parts that are installed close to the ceiling. They have hooks: the edges of the curtains are attached to the lower ones, and lambrequins are mounted to the upper ones.
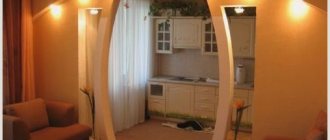
A flexible curtain rod is sometimes equipped with an internal rail and can be bent in two ways:
- In the shape of an arch (semicircular).
- Bay window method (in the form of a wave).
If these 2 types of fastenings are combined on one cornice, then the product has only one row.
Elastic consoles can be single-row or multi-row, that is, they involve hanging a simple composition from one textile fabric (curtains or curtains) or are used for attaching complex compositions (curtain + curtain + lambrequin).
How to hang a cornice correctly?
Curtain rods are, albeit not a very noticeable, but significant part of the interior, which bears a functional and aesthetic load in the design of the space. It is important not only to choose the right model in terms of design, style of curtains, type of fastening, but also to correctly install the cornice.
Installation Rules
There are several basic rules on how to hang a cornice, following which you will be able to avoid:
- sagging;
- incorrect space geometry;
- tearing out brackets from walls and ceilings.
Watch the video instructions on how to properly hang a ceiling cornice.
At the location of attachment
There are 2 types of fastening:
- installing curtain rods on the wall is a universal way to hang curtains; the only option when it is impossible to decorate a window in this way is the absence of top or side walls;
- installation on the ceiling is important if you plan to hang curtains from wall to wall, and, if necessary, visually make the room higher.
Today the market offers all types of curtain rods with both ceiling and wall mounting
Ceiling view
Installation of cornices on the ceiling is only possible on a strong, hard surface, on a concrete floor slab. If there are suspended or suspended ceiling systems in the room, it is necessary to think about the mortgages even before installing them. The distance from the window to the beam is selected in accordance with the technical characteristics of the opening - the projection of the window sill, the presence of heating systems. The indentation can be anything, it is desirable that the length of the central axis of the cornice is exactly at the center of the mortgage. The lower plane of the beam should come close to the tension system, so if the ceiling is planned to be lowered by 50 mm, therefore, the beam is chosen with a thickness of 50 mm.
When attaching the ceiling model to the tension system, use special spacers, this will help avoid damage to the canvas
Wall mounting does not require additional surface preparation. A limitation may be the leveling of surfaces with plasterboard. Here you need to think in advance where to lay the mortgages in order to subsequently attach the cornice.
The best option to install a cornice with suspended and suspended ceilings is to make a special niche. To do this, you should retreat 150-300 mm from the interface between the wall and the window opening/ceiling, and attach a support beam parallel to the window, to the floor slab, onto which the edge of the hanging or tension system will be fixed.
The niche can be decorated with a ceiling molding, and the lighting can be hidden behind it
We offer an overview video about all types of curtain mounts, which describes in detail how to hang curtain rods of different models.
Geometry of space
Where the cornice is installed directly determines how the curtains will be hung, and this is an accent part of the interior that can be used to transform, decorate, or, conversely, spoil the appearance of the space:
- In low rooms, it is recommended to hang a curtain rod on the ceiling; this is a visual trick that will make the space appear higher. If this is not possible, then when installing it on a wall, it is recommended to raise it as high as possible.
To decorate low rooms, choose thin models so that they are invisible in the interior
- In narrow rooms, the cornice should be hung from wall to wall to completely cover the opening.
- If the ceilings are high, then you need to optically cut it horizontally, so the bar for hanging curtains should be mounted on the wall, and the lower edge of the holder bracket should be located only 50 mm above the horizontal slope.
Contrasting wall mounts for curtains will enhance the effect of dividing the space horizontally
- If it is necessary to decorate a wide opening, then the space is visually divided vertically. Nowadays it is fashionable to hang the main curtain rod, and in the center, on top, they make a small additional fastening, onto which the decorative element of the curtains is fixed, as shown in the photo below.
Curtains fixed at different levels are an original design find that helps straighten the proportions of the room and decorate the opening beautifully and creatively
Interesting ideas
Curtain mounts are used not only in window design, but also for zoning space, for example, to separate a sleeping area, a dining room from a kitchen, etc. In such cases, the cornice must be attached to the ceiling, or it is necessary to form support walls from plasterboard to secure the wall holder. The principles of installation are the same as in window openings, depending on the model according to the type of fastening.
Photo example of how to divide space using cornices
Modern construction is not limited to simple shapes and straight lines; often a bay window is installed in the room: multifaceted, curvilinear, semicircular. Here it is important to install flexible cornices; in multifaceted openings, you can attach straight models through special joining strips, which help to form corners beautifully.
For arched windows, manufacturers offer special arch holders; the radius of the product is designed for a standard opening. Install this curtain mount on the wall, 50-150 mm above the slope line.
Tip: Avoid models with wide frames in small spaces. Here it is better to use thin strips or hidden fastenings; string fastenings are also suitable; they are practically invisible.
Proportions and layout
With rare exceptions, I install ceiling types of products over the entire width of the opening, minus 15-20 mm at the edges - a technical gap. Less commonly, ceiling models are installed according to the size of the window + 150-400 mm on each side. To decorate narrow walls, sometimes some of the cornices are placed on adjacent walls. Ceiling models are fixed every 200-600 mm, depending on the weight of the curtains, wide tires are fastened in 2 rows, the fastenings alternate in a checkerboard pattern.
The photo shows how to correctly change the proportions of a room using cornices
- Divide the height of the upper wall into 3 parts, and measure 1 part from the horizontal slope, draw a line parallel to the ceiling, along which the central plank will pass.
- It is necessary to arrange support points for all types of curtain rods every 1.5-2 m in length; the heavier the curtains, the smaller the distance between the brackets.
- It is ergonomically justified that the length of the cornice should be 200-600 mm greater than the width of the window; such an indentation allows you to move the canvas as far as possible and completely open access to natural light.
- The lower part of the bracket should be 5 cm above the horizontal slope of the window.
How to attach
It is important not only to make the markings correctly, but also to hang the cornice securely. The surface must be strong and smooth. For installation on concrete surfaces, dowels are used; on wooden surfaces, self-tapping screws are sufficient. To hang the curtain strip on drywall, it is recommended to use a butterfly dowel. The most difficult thing is to install a cornice on loose plaster; here it is better to use an anchor that can be fixed in the dense body of the wall.
The video shows very useful tips on how to securely fasten the plank to loose walls.
We offer another educational video instruction on how to properly install the anchor.
Interior
In children's rooms and bedrooms, a canopy cornice is often used. A translucent fabric suspended above the bed gives a feeling of peace, protects from annoying insects, and decorates the room.
For doorways, flexible cornice structures are used together with decorative accessories in the form of beads and ribbons.
It is ideal to use flexible elements in studio apartments to delimit the space into separate zones. If you do this in the kitchen, it is advisable to use synthetic fabrics, which absorb odors less than natural ones.
Also, elastic curtain rod structures have found application in the bathroom. If it is spacious, a patterned cornice looks appropriate and attractive, and a waterproof curtain hung on it reliably protects from splashes.
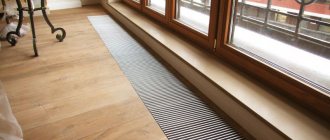
But the most popular place to use flexible consoles is, of course, the living room. Using an elastic product, they create a non-trivial interior with a comfortable aura. The functional characteristics of the element allow you to reliably hide heating pipes, while bending around wall recesses and projections of the room.
WATCH VIDEO INSTRUCTIONS
Flexible curtain rods and curtains that are attached to them give designers the opportunity to create a non-standard room style.
Home / Components and accessories / How to make a hidden cornice with your own hands?
Curtains are one of the most important elements of almost any interior. In order to secure them in the window opening, a cornice is needed, however, it is not always possible to choose exactly the kind of curtain that will fit into the existing design and become a full-fledged part of it. In this situation, a hidden cornice that you can install yourself will help out.
What can you hang on such a cornice?
All! For the living room, this is a wonderful design with everything you want: light tulle or thick curtains on the windows, lambrequins, curtains made of beads and other similar materials to delimit one zone from another.
In the bedroom there is the opportunity to make a royal bed with a canopy or separate the crib from prying eyes and daylight. For a nursery, this is a great opportunity to divide the room for children of different sexes or simply close the play part of the room from the study part.
Now it has become fashionable to build studio apartments. A flexible ceiling cornice provides an excellent opportunity to separate all the necessary zones.
There’s no need to talk about the kitchen or dressing room. The small area of these premises often does not allow the installation of any permanent barriers in the form of doors or screens. A photo ceiling cornice with curtains, fixed to the ceiling, and a special curtain will perfectly decorate doorways in these rooms, as far as your imagination allows and your wallet allows.
Curtain rods for ceiling photos in the interior
leave a comment
Click to cancel reply.
Installation opening
To mount a hidden curtain, you will need a special niche. It is better to provide for its arrangement at the stage of designing the ceiling composition. If you do not provide for this element in advance, you will subsequently have to either dismantle part of the ceiling or create a special structure that will cover the installed suspension.
The width dimensions of the recess must be calculated in such a way that the curtains hung on the curtain installed there do not touch the window sill. In addition, it is necessary to take into account the possible installation of additional elements, such as lighting.
In length, the assembled part should be 20–30 centimeters longer than the window opening on each side or extend from one wall to the other. The second option will help create a feeling of more space.
Tire curtain rods
The tire cornice is a set of straight and rounded parts
The tire also does not carry a decorative load and is usually hidden under fabric or baguette.
Tire curtain rods are mounted to the ceiling. They are made from rigid metal or plastic. Smooth lines and turns are achieved thanks to connecting elements curved at different angles and different lengths. In the standard version, the connections have angles of 90 and 45 degrees, if you attach them together you can get another additional bend of 135 degrees. In addition, recently they began to produce models with notches applied along the inner radius. By cutting the element along the notch, you can obtain an additional bending angle of 2.5 degrees.
Advantages:
- you can hang 2-3 rows of curtains on one track;
- withstands heavy loads;
- the sliders move along the guides easily and unhindered;
- the structure can be ennobled with decorative baguette.
Flaws:
- the bus configuration depends entirely on the connecting rotating elements;
- This design is not suitable for bay windows with complex geometric shapes.
Why is this necessary?
Such a detail, in addition to the fact that even the most unpresentable curtain hanger will be hidden from view with its help, can also have other functionality.
- If the room is narrow, a wall-to-wall niche will help make the room visually more spacious.
- Non-standard window sills will no longer cause inconvenience - the openings can be of absolutely any size and will cover a window sill of any width.
- Installation of a ceiling suspension on tension structures is often impossible, and the presence of such a part will easily solve this problem.
- In this part of the ceiling structure you can place wiring, disguise a pipe or other technical communications.
- The curtains will look more organic and nothing will distract attention from them.
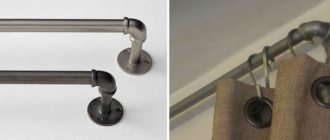
Round cornices
The photo shows round metal structures in the form of a bar, painted in different colors
Round cornices are a classic of the genre, appropriate in any interior.
The round forged cornice that decorates this arch is made to order.
Round bay window cornices are pieces of a metal or wooden rod connected to each other by hinges and can be single or double row. The magnitude of the rotation angles is adjusted using clamping bolts. Depending on the type of fastening, such a cornice can be mounted both on the ceiling and on the wall. Curtains on a round cornice are attached to studs, rings or eyelets.
Advantages:
- such a cornice looks very aesthetically pleasing and does not need to be hidden under a baguette or in a niche;
- You can hang curtains and curtains on the two-row model.
Flaws:
- hinges prevent the curtains from moving freely, so if this is necessary, you will have to purchase special rings with a connector;
- with their help you can only create a broken line, but not a smooth one, so round cornices are used for bay windows, where there is no need to completely open the curtains.
If you want to get a solid round metal cornice that exactly repeats the shape of the window opening, order a forged product from a special workshop.
If the ceiling is made of gypsum board
When installing such a ceiling covering, the easiest option for creating a recess for the cornice is to provide it in advance in the assembled composition. To do this, the ceiling frame must end before reaching the wall on which the window is located. After covering the frame with plasterboard, there will be space near the window, which will be used for installing curtains.
The second option is to create an opening using a three-dimensional figure protruding above the plane of the ceiling.
Assembling it is also easy - according to the dimensions of the future niche, a frame is assembled from an aluminum profile in the shape of the letter “P” and attached to the ceiling according to pre-made markings. Afterwards, the mounted frame is covered with plasterboard. It turns out to be a kind of beam, which all that remains is to be puttied and brought into line with the rest of the decor of the ceiling - painted, covered with wallpaper or decorated with another decorative coating.
Bay window cornices
Since any bay window has a rectangular, trapezoidal or arcuate shape, in order to beautifully design its glazing, a special cornice is needed, the geometry of which will correspond to the shape of the protrusion. Several types of cornices are suitable for these purposes, differing in design and technical characteristics. Bay window cornices are:
- Profile.
- Tire.
- Round.
- Strings
Profile models are made of flexible metal or plastic, which allows them to be bent during installation, copying the geometry of the bay window. The remaining varieties are mounted as polyhedra, consisting of numerous (according to the number of bends) segments using angular fastening devices. Almost all structures are attached, depending on the type of bracket, both to the wall and to the ceiling and have their own advantages and disadvantages. Let's take a closer look at them.
Things to consider
When installing a hidden curtain hanger, it is important to consider several points that will help you avoid some problems in the future.
- When choosing a curtain rod, be guided by the weight of the intended curtains. Plastic models will not withstand too much load, and aluminum ones are noticeably more expensive. It is better to make a choice in favor of more durable options.
- When arranging niches, do not forget about the possibility of installing lighting. For this device to function, an electrical wire must be installed.
- The plane of the ceiling in the recess must be painted before assembling the entire structure and installing the curtains - doing this with the tension covering installed or the cornice already installed will be problematic.
- If a ceiling plinth is installed around the perimeter of the room, it must also be attached along the edge of our opening. This solution will make the interior complete and the design will be more cohesive.
- The appearance of the cornice itself has practically no meaning - it simply will not be visible, therefore, you should focus only on the number of rows for attaching curtains and the strength of the structure.
“load...
Quite often, a flexible curtain rod is used as a holder for curtains in a room. Curtains are an integral part of the interior.
They can be of different types, from ordinary fabric curtains to a variety of blinds. Moreover, each of these options involves the creation of a special holding mechanism on which the canvases themselves are suspended and their movement is ensured. A flexible curtain rod allows you not only to securely hang and secure curtains, but also to significantly diversify the existing interior.
Installation
Regardless of the material from which the flexible cornice is made, it is attached to the surface quite quickly.
It is important that the ceiling has already been prepared, that is, finished. It is important to know that different ceiling surfaces may require different types of fastenings.
Pay attention to the packaging of the cornice! It usually contains step-by-step installation instructions.
Carrying out work:
- The entire suspended structure is assembled on the floor, in comfortable conditions, so to speak. This process includes not only giving the cornice the desired shape and assembling the rows, but also installing hooks, which must be fixed at the extreme points of the cornice with special plugs. This is necessary so that the curtains do not fall out of the runners during sudden movement. If you plan to install the entire length of the profile, you can immediately install plugs on both sides.
- Once the suspension system is assembled, based on its parameters, markings are made on the ceiling and the locations of the main fasteners are determined. The shape can be very varied - round or angular, it all depends on the interior of the room.
- Then, holes for the dowels are drilled using a puncher or drill. There are already holes in the cornice, and in order to transfer them to the ceiling, markings are made with a pencil.
- Next, the suspension system is fixed to the ceiling with screws and dowels. Sometimes you can use the fasteners that are usually included with any cornice.
That's it, the curtain rod is installed, now you can start hanging the curtains.
By the way, it is much more convenient to attach curtains to hooks on the floor, and insert hooks with threaded fabric into the cornice. The hooks are inserted into the profile runners easily, without additional effort. This is much easier than hanging curtains on hooks. You can also wash curtains together with hooks, you just need to purchase a special bag for such washing or make it yourself from an old curtain. You just need to remove the plugs, and the hooks with the fabric will fall out of the rails themselves with a slight movement of your hand. After washing, you put back the hooks with the fabric strung in the same way and install the plugs again.
Flexible cornice options
Traditional curtain rods are rather bulky systems consisting of many small and large parts. It is from them that a special structure is formed, fixed to the surface of the wall and representing a horizontal crossbar, onto which a fabric sheet is suspended through special clamps. Such systems are practical, but their use has some disadvantages.
One of them is the exceptional straightness of the guides, which does not allow changing the direction of the curtains or giving them any shape. The way out of this situation is a flexible cornice, characterized by increased practicality and versatility. Its design is quite simple compared to traditional horizontal wall mounts and consists of the following elements:
- flexible profile cornice;
- runners;
- holders;
- stubs.
- design of doorways;
- creation of figured partitions;
- window decoration;
- delimitation of room space;
- design of balconies, loggias and bay windows;
- creation of canopies and various screens.
These details are the main ones in the design of a flexible cornice, making it possible to form a functional and reliable suspended structure. Moreover, in some systems it is possible to change the length of the guide by installing additional parts of the supporting profile. But not all such devices have this property, and only a universal curtain rod can boast of it.
The scope of application of a flexible curtain rod can be quite diverse, since it can succinctly fit into almost any interior and become its highlight. Most often, ceiling flexible cornices are used to achieve the following tasks:
Such multi-directionality makes plastic flexible ceiling cornices truly irreplaceable, capable of significantly diversifying the existing interior of a room. In addition, versatility and reliability make it possible to install them both in the bay window and in the bathroom, while obtaining a truly magnificent result.
Possible alternatives
In some situations, a cornice on a window opening will simply be inappropriate. Then you can use regular fishing line, string or thick thread, which will need to be attached to the wall in certain places. Plastic lightweight curtain hooks are hung on it.
Another option for attaching curtains to the wall without a special design is hooks. They are screwed directly to the surface of the wall or ceiling. The disadvantage of this design is the fact that it will not be able to move. But the curtain can be removed and washed at any time - it’s not difficult.
The considered options are used in the interior of a country house or a rented apartment.
Installing a flexible cornice with your own hands: advantages and stages of work
A flexible cornice for a bay window or window opening makes it possible to obtain an excellent functional system by removing bulky structures and replacing them with a small and lightweight plastic frame. Such products have the following advantages over other types of cornices:
- visually expand the boundaries of the room;
- easy to install;
- easy to use;
- give the room personality.
Installing a flexible cornice makes it possible to obtain all these qualities, making the room exclusive.
The work will not take much time, and the result will speak for itself. In general, fastening similar structures can be done with your own hands, spending no more than 1-2 hours on it. The installation procedure itself consists of the following steps:
- preparatory work;
- creating markup;
- installation of holders;
- cornice fastening.
You can install a flexible cornice yourself, spending a minimum of time and getting an excellent result. Fixation is carried out directly to the ceiling, which means working at height. For fastening, you should prepare a ladder and collect the tools necessary for the work.
How to fix a flexible ceiling cornice yourself
Before attaching a single or double-row cornice, you need to prepare the ceiling. Its surface must be perfectly flat and monolithic, because if it contains bumps, holes or cracks, the profile will not be able to lie flat. In this state of affairs, the curtains will not close well, and the appearance of the cornice will be unsightly.
Before starting work, all surface defects must be completely eliminated and only then begin to fix the guides for the cornice. An important point is the preparation of the tool, since this process will make it possible to significantly reduce work time and optimize it. To hang curtain rods, you need to prepare the following tools:
- pencil;
- screwdriver;
- Screwdriver Set;
- hammer;
- knife;
- level;
- ruler.
It will also be interesting: Rings for curtains - like a story curtains on rings and eyelets
You can proceed to creating markings along which the guide profile will be installed in the future. It is carried out using a pencil and a ruler, displaying a visual image of the future system on the ceiling surface.
Next, you can install holders that have special grooves in their design through which self-tapping screws are screwed in to secure the product. The holders should be placed at least 30-45 cm apart from each other, since this is how the load is evenly distributed. In turn, exceeding this indicator will make the system extremely unstable and fragile, which will certainly affect its functionality. A profile is inserted into the holder, which is fixed using a special lock that securely connects both parts to each other. After this, the runners are put on, and the ends of the guide profile are fixed with plugs. In this form, the flexible cornice for a bathroom or balcony is completely ready, and you can put curtains on it.
Video of installing a flexible cornice on the ceiling:
Save
Save
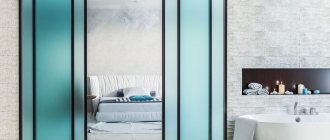
Semicircular curtain rods for bathrooms and showers
Small metal semicircular rods are most conveniently mounted to the wall
The geometric shape of such a cornice can be different
The gilded cornice looks stylish and expensive
If desired, you can also use a flexible plastic structure in the bathtub and shower.
Curtain rods separating the bathtub from the room are made of steel, aluminum or plastic profiles with a round or rectangular cross-section. Most often, a stainless steel profile is used, since it is not subject to corrosion in the high humidity conditions typical of a bathroom. A semicircular curtain rod for a bathroom can also be made of aluminum, but compared to steel, this metal has a smaller margin of safety. The plastic bath rod is the most budget-friendly. It’s true that plastic models are inferior to metal ones in terms of durability, but the affordable price allows you to easily replace them with new ones.
According to the degree of curvature, bathroom curtain rods are most often:
- In the shape of the letter G.
- Arc-shaped.
- Semicircular.
All varieties are used for bathtubs of the appropriate configuration: L-shaped for square and rectangular, arched for oval and semicircular. The semicircular rod itself is mounted on the wall, but in cases where the bending angle of the cornice or its total length is too large, the structure is reinforced at the upper point of the bend with additional fastening to the ceiling. The curtain is hung on the cornice with the help of rings, eyelets and, less often, loops or loops.
For designer plumbing fixtures with non-standard curved shapes, a flexible polyurethane profile is used, which can be given any rounded configuration.