In the summer, when the sun not only shines brightly, but also heats the entire room to crazy levels at which it is impossible to stay inside normally, the question arises regarding how to adjust the amount of light supplied. Horizontal or vertical blinds help perform a similar function. Among other things, this is a very attractive accessory for metal-plastic windows, easy to use.
Blinds
Dimensions and measurements of blinds
To determine the size of the blinds and the features of their design, you should take measurements of the window.
Armed with a tape measure and step-by-step instructions, it’s not difficult to do this yourself, without the help of professionals. Since such structures are produced in several types, the measurements for them differ. Therefore, before taking up a tape measure, you should decide on the type of product.
Measurements for horizontal blinds
Such products can be attached in three ways.
On the wall.
- The width of the blinds that will be attached to the wall should be ten centimeters greater than the width of the window.
- The height of the products is determined independently. They can cover the window sill completely or be slightly higher.
- It should be taken into account that the structure will be fixed to the wall, so its length should be five centimeters longer than desired.
In the doorway.
- Measurements are taken at least at three points in width and height. Then the smallest value from the three digits is selected. This should be done because window openings are often not entirely rectangular.
- The length of the product is equal to the height of the glass with sealing rubber bands and a margin of one centimeter.
- The width of the glass plus the rubber seals is the width of the blinds.
- The length of the chain should be equal to 2/3 of the length of the window.
- It is necessary to ensure that the structure does not interfere with the opening of the window.
On the sash.
- When it is intended to install blinds on a sash, the height of the product should be equal to the length of the window sash.
- The distance from one bead on which it is planned to fasten the structure to the other is measured, thirty millimeters are added and the width of the product is obtained.
- If you want to install some additional fasteners, you cannot do without the help of a specialist when measuring the window.
Measurements for vertical blinds
Such designs have become very popular in recent years. This is due to the variety of colors and textures of products, as well as ease of installation.
There are three ways to attach vertical blinds:
- to the ceiling;
- on the wall;
- into the opening.
When attaching the product to the ceiling, its width should be equal to the width of the window opening, plus at least ten centimeters. The height will be equal to the distance from the ceiling to the window sill plus two centimeters.
When choosing to install the blinds to the wall, the length of the product should be five centimeters greater than the height of the window opening. The width of the window opening plus ten centimeters will be equal to the width of the blinds.
For a structure that will be attached to a window opening, the length of the product will be equal to the height of the window opening minus one centimeter. The width of the structure will be equal to the width of the top of the window minus one centimeter.
Roller blind sizes
The products can be hung either on the wall or in the window opening.
The width of roller blinds that will be mounted on the wall can be arbitrary. In this case, it all depends on the personal preferences of the apartment owner. And in order to find out the required length, just measure the distance from the window sill to the window opening and add five centimeters to the result.
The width of the curtain that will be attached to the window opening should be equal to the width of the opening minus four centimeters. The length of the canvas is equal to the height of the window opening to the window sill.
Having measured the windows and decided on the size of the blinds, you will need to choose the type of construction mechanism and its location (right or left).
Carrying out repair work and necessary tools
Before proceeding with dismantling the structure, it is necessary to assess the dimensions of the system and the complexity of the problem so that it does not get worse. Repairs can vary greatly depending on the functional features of the structures and the method of their fastening.
Plastic door
Blinds are often placed on bathroom doors. Products are repaired in a hanging position or the entire system is removed.
If the slats on the toilet door are damaged, the door leaf must be suspended.
Window systems can be installed on a frame (street, for example), to the wall above the opening like roller shutters, to slopes or as a ceiling cornice. Accordingly, they need to be repaired in different ways.
If the system is fixed inside a double-glazed window, then the structure will have to be completely removed and moved to a place that is more spacious in width. This is necessary to keep the slats in their natural position.
Repair of roller blinds
Problems with roller blinds can arise for one of the following reasons:
- low-quality materials;
- non-compliance with the rules of use and care;
- incorrect installation;
- rough mechanical impact when opening and cleaning.
The method of repairing a breakdown depends on the type of damage. For example, problems with roller shutter fittings can be eliminated by completely replacing the element. This option is also suitable for breakages of small parts. The torn fabric is replaced entirely or patches are applied.
Repair of fabric curtains
If the integrity of the material is damaged, then in vertical fabric blinds it is enough to remove the broken part and install a new one, but in the case of roller blinds and Roman blinds you will have to make a complete replacement.
Long structures can be shortened in height. The product must be trimmed where it is attached to the cornices or lamella strips, because There must be a weighting agent at the bottom.
Small parts, PPM and connecting elements (chain or cord) require replacement with new ones if they break.
If the blinds are electrically driven, then you will have to contact an electrician for help with repairs.
Repair of aluminum structures
Metal products break less often than others, but if trouble does occur, then when making repairs you need to follow a few tips:
- If the lamellas are intact but slightly bent, you can pull them through the rollers of old washing machines or wrap them in several layers of thick fabric and try to bend the fabric with a hammer.
- If there are cracks on the surface, then it is better to replace the part with a new one. It is recommended to entrust this work to a specialist so as not to completely damage the blinds.
Repair of vertical blinds
Self-correction of problems in vertical structures also involves replacing broken parts, but great difficulties can arise when repairing the slider. In this case it is necessary:
- Remove the cord.
- Remove the control element.
- Remove the damaged part, first moving away the intact parts.
- Attach the new element until it clicks.
- Pull the cord through it.
- Assemble all elements onto the shaft.
- Lock the control mechanism.
- Return the cord to its original position.
You must act carefully so that the plastic does not crack. For the same purpose, the bolts are not tightened tightly. It is allowed to move the lamellas along the cornice only if they are located at right angles to the plane of the opening.
Pleated blinds
When repairing pleated products, it is possible to perform the following work:
- Replacement or retightening of the control cable or thread.
- Reinstallation of accessories (thread holder, corners and brackets, profile, chain and handles).
- Selection and change of fabric.
- Pleated cleaning (dry and wet).
- Adjustment of sagging and distortions.
Repair of horizontal blinds
In products of this type, the runners are also considered a weak point. To repair them, you need to dismantle the structure in order, and then reassemble it in the same sequence.
First remove the cord. Then carefully dismantle the control device and remove it from the cornice. Remove all the clues, marking the damaged one. The distance is compressed on both sides and removed from the broken element. After this, it is installed on the new slider and fixed until it clicks.
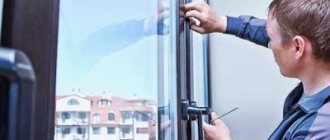
Installation of horizontal blinds on PVC window sashes
With this installation method, the blinds are attached with small self-tapping screws (included in the kit) to the window profile. They must be installed so that they do not interfere with the handle turning. Be careful: if you drill too close to the bead, you can damage the glass unit. Therefore, in this case, correct measurements are very important.
Installation of blinds on a PVC window
Installation step by step
The procedure is as follows:
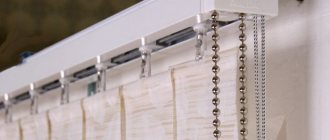
- We install the fasteners on the cornice so that they do not interfere with the moving parts inside.
- Let's try the product on the frame. We set it so that the slats overlap the drain frame and the right at the same distance.
- Mark with a pencil or marker the place where the fasteners should be located. During this operation, you need to keep the cornice as level as possible. You can follow the contours of the window frame or use a level.
- Although the plastic is quite soft and you can immediately screw self-tapping screws into it to prevent the frame from cracking, it is better to pre-drill the holes. The diameter of the drill is slightly smaller than the diameter of the screws. Usually the kit comes with self-tapping screws with a diameter of 3 mm, so you need to take a 2 mm or 2.5 mm drill.
- We take the brackets and fasten them to the frame with self-tapping screws.
- Insert the blind rod, pressing until it clicks.
- We close the ends with the plugs that come with the kit.
Having to drill holes in a window frame can be intimidating, but it's no big deal. In case of incorrectly made holes, the unsuccessful ones can be filled with sealant. White silicone, not acrylic (acrylic quickly turns yellow). The performance of the windows will not be affected. What can be dangerous is getting into a double glazed window. Then it may crack. But this is not fatal either - it can be replaced, although it will not be cheap.
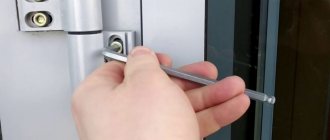
We install the lower clamps
But that is not all. To finally install horizontal blinds on plastic windows, you need to drill a couple more holes - for the clamps (also called anti-wind). These are additional fastenings at the bottom of the opening window sash. The lower edge of the blinds is tucked into them. They do this so that when ventilating, the blinds do not hang down, dangle in the wind, or knock over objects on the windowsill.
Don't hang out...
We install the clamps like this: we try them on, pulling the blinds down a little, mark the fastening points, drill holes, and install them. We tuck the bottom bar into the installed clamps. Now, even with a draft or an open shutter, the blinds will not dangle. The only thing you need to watch out for during installation is not to get caught in the glazing bead (this is a long strip that runs along the glass unit and holds it in place). It is necessary to drill a hole in the frame itself, stepping back at least 1 cm from the edge. Otherwise there are no problems.
No drilling
There is also a way to install blinds on plastic windows without drilling the frame. This method is only available for those blinds that are hung on opening sashes. In this case, they are simply hung on plastic mounts/brackets, which are placed on the frame from above. To prevent them from moving, a strip of double-sided tape is attached to the back of the bracket. After removing the protective film, you can glue it (but you don’t have to fix it).
The shape of the plastic fasteners depends on the type of cornice. So you need to select it specifically for each
These L-shaped plastic brackets are not included, but can be purchased at a store or company that sells horizontal blinds. This method is convenient by simply dismantling the blinds, which is convenient if they need to be repaired or washed.
How to repair horizontal blinds?
In some cases, repairing horizontal blinds by professionals is even more expensive than purchasing a new system. Therefore, if a problem occurs, it is recommended to evaluate the breakdown and, if it is not possible to repair the structure yourself, consider purchasing a new product.
Complex repairs are allowed when wooden blinds break down; new systems will cost much more. The same approach is welcome when repairing custom-made structures.
You can repair horizontal blinds with your own hands in the following cases.
- The lower slats are not parallel to each other. If deformation of the slats is not visible, this indicates displacement of the lifting cord. You will have to work with the cords until the slats are in the correct position. If necessary, the cords are fixed with clamps.
- The slats do not move relative to their axis. First you need to establish the cause of the breakdown. If the tilt cord just comes off, it needs to be returned to its place and secured. If the moving mechanisms jam, they are lubricated with oil. If the driving parts (wheel or pin) have jumped out of place, they are returned to the correct position.
- When the lifting cord no longer locks, this indicates improper handling of the structure. If a part has jumped out of the lock, it must be returned to its place. Sometimes you can simply pull the cord at different angles, and the element itself will fall into the desired position.
- If the control lock jams and the system cannot be lowered, you need to pull the cord down firmly, but without pulling, and then point it up.
- Replacing single lamellas is also possible, but you should pay close attention to the color of the plates: they can form a sharp contrast. To avoid this, sometimes several strips are replaced at once.
After repairs, you should think about your attitude towards the systems. Most often, breakdowns occur as a result of abuse of the strength of the lifting mechanism.
Types of blinds
The method of fastening blinds is largely determined by their design. There are blinds:
vertical – when assembled, located on the side;
horizontal - the slats rise upward when opened.
Rolled. Such blinds are a single fabric and are more often called roller blinds.
When fully or partially opened, they are collected at the top into a roll.
The design of roller blinds is extremely simple, and is often the most accessible and inexpensive option for darkening a room. Installing them yourself is much easier than other types of blinds.
The material from which vertical, horizontal and roller blinds are made can be different: plastic, wood, fabric, bamboo, aluminum. You need to decide which model to hang and which material to prefer based on the features of the room’s interior and personal preferences.
Horizontal aluminum or plastic blinds are a classic, the most common model, which is perfect for both home and office space. If you install vertical blinds with your own hands, they will adequately replace curtains or curtains in the room.
Rolled fabric models look very nice and will help emphasize the individuality of the room.
Cost of work
Attention: If you cannot cope with the breakdowns that have arisen on your own, seek help from specialists. The cost of repairing vertical models will range from 500 to 2,500 rubles. The price depends on the scale of work. There are many reasons why vertical blinds or their individual parts fail. To avoid breakdowns, carefully inspect the entire structure when purchasing, properly care for the product, and use it carefully. It is not always possible to carry out replacement or repair work yourself. To make your task easier, contact a professional who is well versed in these issues. It will help fix the problem. Buy products of decent quality from trusted stores that provide a guarantee. Try to repair blinds yourself only if the warranty period has already expired.
Installation of blinds with wall mounting
Despite the huge number of clever fastenings on the market, fastening blinds with a drill remains quite relevant. Everyone knows perfectly well how to drill correctly, so video instructions will be enough to understand the process. In the video, the craftsmen prefer not to waste time and use a hammer, but we recommend that you still take the time to drill a couple of holes, especially if you want the blinds to last a long time.
Installation of blinds in an hour
If you have bought or ordered vertical or horizontal blinds, then we suggest that you install them yourself, because you can cope with this task even without experience, the main thing is to have the desire, 1 hour of free time and several tools.
Attention! Installing blinds does not require special skills, but keep in mind that any damage that occurs during independent work will exclude the possibility of warranty repairs or exchange/return of curtains. Depending on the type of curtains, your preferences and conditions, blinds are installed:
Depending on the type of curtains, your preferences and conditions, blinds are installed:
We have compiled 3 step-by-step instructions and a selection of useful videos with which you can mount horizontal and vertical blinds of any type in any way.
To install horizontal blinds on a wall or to the ceiling, as well as to install vertical blinds above a window, you need to prepare:
Main types of breakdowns
Due to the different structure and order of the device, the problems in these two varieties are also different. Therefore, repairing horizontal blinds will differ from repairing vertical blinds.
Horizontal design
Horizontal structures are quite durable, and with careful use they can serve you for ten years without a single breakdown. But if used carelessly or as a result of poor-quality assembly, certain parts may fail. Let's take a closer look at how to repair horizontal blinds. The list of main faults includes:
- The lamellas (sashes) do not rotate around their axis.
- Broken cord.
- Damage to the lifting and turning mechanism.
- Broken horizontal bar.
Types of blinds
Blinds perform the same function as curtains - they protect the room and furniture from direct rays of sunlight, and, in addition, from curious prying eyes. But blinds have their undeniable advantages.
- Firstly, they do not block the flow of fresh air into the room.
- And secondly, with the help of blinds you can regulate the lighting in the room. You can make it twilight, you can make it completely dark, or vice versa - fill the room with sunlight.
Blinds correspond to the modern style of minimalism and rationality, maximizing the free space of the room. They do not take up much space and are easy to maintain.
Modern manufacturers offer us blinds that differ not only in appearance (vertical, horizontal, cassette - for use outside the window), but also in material. They can be plastic, metal, wood, bamboo, fabric, etc. There are roller blinds, roller photo blinds, protective roller blinds and much more.
Note!
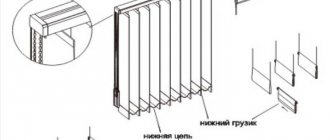
Standard vertical blinds are quite often used not only in office spaces, but also at home, and not necessarily on windows. A wide range of colors and a variety of shapes allows these structures to be used in the most unexpected design solutions. The design of vertical blinds consists of a cornice, runners, slats and a chain
The slats must be selected in accordance with the shape and size of the window. When installing vertical blinds, you first need to decide on the type of mounting - on the wall or on the ceiling
The design of vertical blinds consists of a cornice, runners, slats and a chain. The slats must be selected in accordance with the shape and size of the window. When installing vertical blinds, you first need to decide on the type of mounting - on the wall or on the ceiling.
Next we make markings and install the brackets. After this we install the cornice, runners and slats
When installing the latter, it is important to hang them in the exact order in which they were in the package
Helpful advice!
A special feature of installing vertical blinds is the installation of additional weights at the bottom. They are connected to each other by a chain from inside and outside the structure.
Horizontal blinds, just like vertical ones, are quite popular both in office spaces and at home. When installing them, several more fastening components are used. They are usually attached to the wall (completely covering the window opening) or to the window (installation occurs on each window sash).
If we decide to do this on our own, the main thing is not to damage the window and blinds, and strictly follow the instructions. The installation process is standard - markings are made, fasteners are installed, the cornice and slats are hung.
Everything new is well forgotten old. Our ancestors used wooden shutters in their homes as the most reliable way to protect from the sun's rays. In addition, they were an original decoration for every home. So today we are back to this.
Blinds are modern shutters, highly improved and modified, made from various materials. But essentially they haven’t changed anything. Firstly - protection, secondly - a harmonious element of the interior.
DIY shortening
When shortening blinds, you must adhere to the following rules:
- Perform all actions very carefully, since most elements are very fragile and can be damaged.
- Make sure that the horizontal slats do not bend, since it is very difficult to straighten them, and the wooden planks will need to be completely replaced.
- Burn all ends of the cut fabric or cord with a flame or a hot iron; in the second case, use newspaper so that the melted synthetic materials do not stick to the hot metal.
- It is necessary to assemble/disassemble the structure in a certain order so as not to damage or confuse the elements.
- Use the tool that is suitable for working with a specific material.
If you adhere to all the rules outlined above, you can efficiently shorten both vertical and horizontal curtains.
Shortening the height or width of any type of blind requires certain skills. But all the steps are easy to follow if you follow the instructions provided. It is important not to use force, since the components of the design of such curtains are very fragile and can break.
Have you purchased blinds, but they are made for standard windows and don't fit yours? Then you should ask how to shorten your blinds at home without turning to professionals. It's not difficult to do. The main thing is to remember that you need to work as carefully and carefully as possible so that the result is really good. There are different types of blinds (vertical and horizontal), and the process of adjusting each type to the desired size has its own nuances. For example, horizontal blind slats are usually made of metal. To shorten them, you need not a screwdriver and scissors, but other tools.
If the blinds are larger than the window, then you can simply shorten them with your own hands.
How to take measurements correctly
First of all, the blinds must be the right size. To do this, you need to decide on the method of fastening. Methods can be divided into two groups:
- Attach blinds directly to window frames. There are options here that involve the use of self-tapping screws and fastening the structure without drilling. In addition, you can install common fasteners on the entire frame or on each sash separately.
- Place blinds on walls or ceilings. There are also several additional solutions possible here. – installation in a window opening, on the ceiling in front of the window, on the side walls. For each case you will need to measure your parameters.
If you plan to install blinds on several windows, you should measure each opening separately. Although it seems that the window openings are exactly the same, this is not always true. A discrepancy of 2-3 cm can lead to consequences that are difficult to eliminate.
If you plan to mount a vertical structure, it is necessary to measure the height and width of the window opening. You should be careful when measuring, since you can shorten slats that are too long, but adding additional elements to narrow blinds will be problematic.
Read the article about installing plastic windows yourself: here
If the model has horizontal lamellas, the measurements will be somewhat more complex. If the blinds are attached to the opening, you need to determine what the width and height are. The length of the canvas is selected at your own discretion. You can find both models that reach the window sill, as well as long options that reach the floor. If necessary, blinds with plastic or aluminum slats are not difficult to make shorter.
When installing directly on the frame, you will need to consider whether the window will open.
If the window is solid and does not open, you can measure the entire width of the opening. If the shutters will open, it is worth ordering a separate structure for each half of the window. Measurements should also be taken accordingly. Measure the parameters of the glass (width x height) and add 20 mm on top and 5 mm on the edges.
When designing blinds attached directly to the frame, make sure that they will not interfere with the operation of the fittings and will not become an insurmountable obstacle to its maintenance (lubrication, adjustment, etc.)
Repair of other types of faults
In addition to damage to the runner, vertical, horizontal or roller blinds may receive other defects or breakages. Most often, movable fragile elements fail:
- hooks;
- clamps;
- cord;
- control chain;
- lifting and turning mechanism.
Fasteners and hooks
Attention
In horizontal structures, the lower clamps and hooks that rotate the slats are often damaged. Since there are slats of different sizes, the corresponding hooks for them will be of different diameters. It is necessary to clarify this parameter before purchasing to replace a broken element.
To repair, you will first need to remove the old hook from the structure and replace it with a working product. The new part is threaded into the hole in the mechanism that turns the slats . To do this, you need to fix the mechanism so that it does not rotate when inserting the hook. The reed is then inserted into the new part. The lower clamps are easy to replace: just unscrew the old elements and screw the new ones in their place.
These parts are fragile, so when replacing, you do not need to press or tighten them tightly into the blinds structure.
Cord
The cord is provided in all types of blinds: horizontal, vertical, roller blinds. This structural element can break or reduce tension in any type of curtain. To repair, it is necessary to perform a specific replacement algorithm for each type of product.
In horizontal:
- Measure the dimensions of the structure - width and height - to determine the required length of the cord.
- The damaged cord is removed from the blinds.
- A new rope is threaded between the roller and the cylinder through the lifting mechanism.
- In the place where the ladder is attached, a cord is inserted from the lower area of the plastic basket, and passed simultaneously between the ladder of the structure.
- Thread a cord into the eaves hole, stretching it between the ladders to the basket.
- Thread the second cord in the same way, but through the punching of the lamellas, located closer.
- Alternately thread the cord through the left and right ladders through the slats.
- Pass the cord through the ladder cap along the bottom of the blinds, forming a strong knot at the end. Tie the other end as well.
Operations will be more accurate and simpler when the structure is hanging.
In vertical:
- Having previously purchased a new cord based on measurements of the width and height of the blinds, thread its ends through the runners and the side cover of the cornice.
- Fix one end in the fixation device, and pull the other through the roller located on the other side of the cornice through the side cover.
- It is necessary that the other end of the pulled cord returns to the clamp, where it will be attached in the form of a loop, screwing a special device on top.
The length of the replacement cord is determined as the sum of twice the width of the cornice with the height of the blinds multiplied by 1.5.
In rolls:
- The cord is removed from the structure.
- A new rope is inserted in its place.
- Fixed in the control mechanism.
It is prohibited to tie a torn cord in a roll structure.
Lift-and-swing mechanism
Instructions for replacing the lift-and-turn mechanism in horizontal blinds:
- Remove the side plugs from the cornice and remove the metal or plastic shaft from the rotating mechanism.
- Untighten the edges of the cornice, remove all mechanisms, throw away damaged ones.
- Remove the mechanisms from the grooves, remove the cord, untying or cutting their hanging ends, then soldering them with a flame.
- Insert the ends of the rope between the shafts of the new part.
- Insert two ropes into the recesses, making sure that they do not get tangled inside the cornice.
- Reconnect all mechanisms. It is necessary to ensure that the antennae rest tightly against the back edge of the cornice, so the mechanism should be located closer to the central part of the cornice.
- The ends are straightened to their original state so that the shaft and the hole of the mechanism coincide (how to straighten blinds at home?).
- Cover the cornice with lids.
Read more about the types of breakdowns of horizontal blinds and their repair here.
Important
Before repairs, to maintain the order of all elements and the mechanism in the cornice, it is better to photograph it.
Lamels
If these structural parts break due to frequent mechanical loads, it is impossible to fix them without completely replacing them with new slats. After purchasing the necessary elements, actions are performed according to the following algorithm:
- The plugs are removed from the lower area of the bar.
- First untie the cord, then remove it.
- Remove the lamellas one by one, replacing broken ones with whole ones.
- Install the rope, pulling it back through the new elements.
- Tie the lower part of the cord with strong knots.
- Close the bottom of the strip with plugs.
Installing a new slider
To replace this element, you must first disassemble the cornice, carefully removing all the elements up to the broken slider. It is important to remember the location of all objects so that they are assembled in the same order.
Instructions for replacing the slider:
- Remove the control cord.
- Remove the runners until they are broken.
- After moving the sliders away from the damaged part, unfasten or squeeze out the distances to remove the broken slider from the cornice.
- Install a new part in this place.
- Pull the cord through all the runners.
- Thread all the runners onto the shaft.
- Screw the control mechanism into place.
Advice
If the breakdown is more complex, then it is better to entrust the repair to professionals.
Connecting chain
Often the connecting chain is broken due to careless or inaccurate use of the blinds. For repair you need:
- To determine the length of the chain, you need to multiply the width of one strip of the vertical structure by the number of elements.
- Buy a new part.
- Replace the defective element.
Replacement is simple: on the bottom of the lamella there are grooves in the plastic strip into which the plastic balls of the ends of the connecting chain are inserted.
Chain of command
After sudden jerks, the control chain often breaks. This damage requires the opening of all runners during repair. Instructions for replacing parts:
- The length of the chain is determined by the corresponding parameter of the lamellas.
- The blinds are disassembled in the order of removing the side plug and removing the gear.
- The lid unscrews.
- A new element replaces the broken chain.
- The gear is inserted into its original place, and the side cavity is closed with a plug.
Control cord
To repair the control cord you need:
- Determine the parameters of the blinds, calculate the length of the cord.
- A cord is threaded through the runners and the side cap of the cornice with two ends.
- The first end is attached to the fixation device, the other is pulled through a roller located at the opposite end of the cornice.
- The second end of the rope is directed to the clamp, a loop is made on it and attached to the clamp.
- The blind fixture is screwed on top.
Troubleshooting the slider
Repairing it is more labor-intensive and requires special attention:
- Connecting distances and suitable runners can be purchased from a specialized store.
- The control cord is removed.
- The control mechanism is unscrewed and removed.
- All runners are extracted. Among them, you need to find damaged ones and remove them, replacing them with new ones.
- To extract the distance from the slider, you need to squeeze it on both sides.
- New distances are inserted into entire sliders.
- The control cord is threaded through them.
- All parts are inserted into the cornice.
- The control mechanism is connected.
- The control cord is fixed.
Therefore, if you want to try your hand at making blinds yourself, we offer a detailed master class on making paper blinds with your own hands. Also from our materials you will learn the rules for choosing and installing such structures on plastic windows and how to straighten and shorten them in length and width.
Role in home decor
The main purpose of these roller blinds is to protect the room from sunlight. They effectively absorb light, providing pleasant shade in the room. The functional component does not prevent roller curtains from performing another task - decorative.
Roller blinds can be combined with regular curtains
The canvases fit perfectly into any style direction. They are used in classic design, hi-tech, minimalism. Curtains of this type bring a special piquancy to Art Nouveau, Provence, and English style. Light tulle can be used to complement their attractive design.
Mounting methods
Before hanging the blinds, you need to decide whether you need a window sill to place, for example, flowers. Blinds are attached in two ways: without drilling or by drilling. The cornice is the basis of any blinds. It is the cornice that is attached to the ceiling, to the wall, in the window opening or to the sash. Special brackets can serve as support for the cornice.
Installation of blinds using drilling
If the curtains are hung on each window sash, then fastening is carried out using self-tapping screws. The top bar of the blinds is applied to the top edge of the double-glazed window, where the attachment points are marked with particular precision. For more accurate fastening, you can pre-drill small holes. Then the brackets are applied to the marked places under the very top of the double-glazed window frame and securely fastened with self-tapping screws using a screwdriver, after which the blinds are installed on them.
Next, a fishing line is attached to hold the slats. To do this, two holes are made on the frame under the lower glazing beads of each sash. The holes are drilled exactly under the corresponding line exits located on the top bar of the blinds. The lower ends of the fishing line threaded into the blind system are threaded into the plugs. The plugs, in turn, are threaded into the holes made, and the fishing line is stretched.
This fastening method is used to install roller or horizontal blinds. Vertical curtains are attached to the upper slope of the window, to the wall or to the ceiling also by drilling. First, holes are drilled in the ceiling or wall using a hammer drill into which dowels are inserted. The curtain rod is screwed on with screws.
Installation of blinds without drilling
If you have to remove and put away the blinds in the future, the holes will become a big drawback to the appearance of the window. Therefore, to install blinds on a window sash, you can use brackets that can be attached to the frame in the following ways:
- fastening to the upper part of the profile if the sash opens;
- using double-sided tape.
Using magnets on the flap (bottom), the blinds are held parallel to the window when it is opened.
These methods are more gentle and safer in terms of damage to the metal-plastic frame. Attaching blinds to windows without drilling is quite reliable. And you can remove them for cleaning, for example, with almost one movement of your hand.
All blinds have the correct geometric shape, so the markings for attaching the top strip of the blinds must be done with extreme precision. The slightest distortion will spoil the overall appearance of the window, and will also complicate the operation of the moving mechanisms of the light filters.
Instructions for installing vertical blinds to the ceiling/wall and in the window opening
Installing vertical blinds with your own hands involves the following steps:
Step 1. Check the package and lay out all the parts on the work surface.
The set of vertical blinds includes: fasteners for blinds (brackets) 2 pcs., screws, cornice, curtains themselves in disassembled form (slats with weights, lower connecting chain).
Step 2. Before installing the blinds, you need to make sure that their length suits you.
To do this, attach one lamella to the desired location on the ceiling/wall/top plane of the window opening. If the distance from the bottom of the curtains to the window sill or floor is less than 1-2 cm, then it is better to shorten the slats. You can do this yourself: take out the weights, cut off the excess and hem the edges back.
Step 3. Now you need to attach the cornice to the ceiling/wall of the window opening, align and mark its right and left ends.
Then we do the following:
If you are installing curtains in a window opening, then you do not need to mark the ends of the cornice; you just need to make marks, stepping back from the walls of the opening 2-3 cm towards the center.
Next, we apply fasteners for the blinds to these marks and mark the drilling locations. This way you will have 2 marks on the right and 2 marks on the left. Be sure to apply fasteners to match the sides.
Note: to install curtains with a width of more than 1.6 m, you need to additionally install an intermediate fastener 10 cm from the adjusting cord.
Step 4. Now we drill holes along these marks with a drill. The drilling depth should be 4-5 cm.
Step 5. We screw the right and left fasteners (in accordance with the sides and marks) to the ceiling/wall with self-tapping screws.
Step 6. Insert and close the blind curtain rod into the fastener locks by turning and/or pressing the lever clockwise. If you use regular brackets for fastening, then the cornice is simply screwed to them.
Step 7. By adjusting the cord, we turn the runners so that they unfold across the cornice (as shown below in the left photo) and proceed to attach the slats, simply snapping them into the grooves of the runners.
Step 8. Attach the lower chain to the lamella weights, first from their outer side, then cut off the excess and do the same on the back side of the lamellas, and then with the second part of the lamellas. Well, that’s all, the installation of vertical blinds is complete, all that remains is to check the operation of the mechanism and adjust the position of the slats.
Below is a video instruction on how to properly install vertical blinds to the wall with your own hands.
How to fix the control cord
- The control cord is simply a rope that guides the slat through the cornice. And like every rope, it is not immune to gusts. However, this happens in rare cases; generally, the quality of the control cord fixations may deteriorate and it cannot stay in place. To replace and straighten torn control cords, perform the following manipulations:
- Before replacing the slats of vertical blinds, we measure the cornice of the vertical blinds in width with the height of the slats. This information makes it possible to calculate the required cord length. We carry out the calculations as follows: the width of the cornice should be multiplied by 2, the height of the lamellas should be multiplied by 1.5, we add these marks.
- It is worth removing the tensioner from the old rope and you need to secure it to the newly purchased cord.
- The ends of the control cord, one after the other, need to be threaded through the holes in the side covers of the cornice, and then through any slider.
- Then the first of them needs to be secured in the fixing technique, and the second needs to be threaded through the roller from the opposite area of the cornice, it should be returned to the fixing technique, it should be secured as a loop and must be screwed from above using any necessary device.
Drilled fasteners
This type of installation is much more reliable and durable, since screws screwed into a window frame or wall better withstand the weight of the structure and the constant mechanical loads placed on it.
Drilling requires precise preliminary measurements and perfect horizontal alignment using a level
Drilling the frame leads to damage to the window profile. Although they are insignificant (they do not interfere with sound and heat insulation), if you decide to remove the blinds in the future, when you remove the structure, noticeable marks will remain that will have to be masked, for example, with silicone or liquid plastic. Roller or horizontal systems are usually placed inside the window. To hang vertical blinds, drill into the ceiling or wall above the window opening.
Installation with drilling can be done independently or entrusted to specialists
For installation you will need:
- pencil;
- building level;
- screwdriver;
- drill (with drills 3 and 6 mm);
- hammer;
- screwdriver (flat or Phillips).
How to hang horizontal blinds
First, we mark the places for the mounting plates or brackets: measure 6 cm from the glass on both sides and mark with a pencil the places for the upcoming drilling. The line between the intended holes must be checked using a level so that it is strictly horizontal
This is important for the correct and long-term operation of the blind system. A window profile (especially not a new one) can crack when screwing in screws, so it is recommended to first use a thin drill in the marked fastening places, and then screw the screws into the prepared holes
On opening windows, holes for fastening brackets are made in the upper part of the sash
Holes for screws for brackets are drilled in the upper part of the sash (on opening windows) or on the outside of the glazing bead (on fixed windows). Then you need to hang the blinds, securing them in the brackets. When placing a blind system inside a window opening, a fishing line (clamp) is pulled to hold the roller blind or slats near the glass when the sashes are opened. A hole for the fishing line is drilled in the lower glazing bead (below the main beads) or on the side of the sash, the fastener is threaded through the plugs, achieving medium tension, and tied into a knot. All decorative and working parts are installed on the mounted structure: trim, latches, fastenings for the lever and chain.