A steadily growing trend over the last 5 years, the most popular interior doors are hidden doors. There is no prerequisite that trends will change; moreover, the types of finishes and the popularity of designer interiors only fuel the popularity of hidden doors.
Every day clients ask us questions related to the installation of hidden doors. How to prepare the opening? What should their sizes be? At what stage to install? How to install? And of course, how to prepare and paint the canvas?
We will answer these and other questions in this article - instructions.
At the beginning of the article, I will ask you to familiarize yourself with the catalog of hidden doors; there, at the bottom of the page, high-quality material has been prepared, we advise you to read it, you will learn how to choose the right one and what hidden installation is.
The hidden door has its own distinctive features, which lay down the, as we like to say, unlimited potential for its use in modern interiors.
At the same time, constructive solutions for hidden doors make changes to the usual, generally known, method of installing the classic design of interior doors.
The sooner you read this material, the more balanced and correct your choice will be. This knowledge will be enough to “put in place” any manager or even a builder, to control the knowledge and quality of work.
And, of course, we will gratefully accept an application for measurements or an immediate order for hidden doors and their installation.
In the first part , we will look at the options for completing and supplying doors. I think you need to know more features and configuration options.
In the second part , I’ll tell you about the dimensions for doorways so that the installation goes smoothly.
In the third part , step-by-step instructions for the entire installation process.
In conclusion , the basic rules of operation and care.
And also, I like to leave gifts at the end of the text, this article is no exception.
There are a lot of diagrams and images waiting for you, especially at the installation stage.
If you are EXCLUSIVELY interested in the price list for installing different types of doors + additional work , go to the page: Prices, costs and a complete guide to installing doors. There you will get an idea of the cost of services, get a detailed understanding of the stages of work, and know how to properly accept work from specialists.
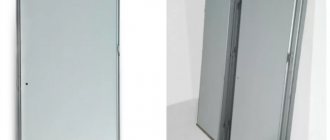
Standard equipment
When ordering and delivery, pay attention to the completeness of the package:
- aluminum box (configuration and parameters must correspond to the specifications that you agreed upon at the time of purchase);
- door leaf (with finishing, without finishing, with or without aluminum end, all depending on your order);
- lock mechanism (usually magnetic AGB);
- hidden door hinges adjustable in 3 planes;
- hinge protection;
- seal;
- (attention!) mounting kit of angles and plates (often “lost” during delivery or on site;
- technical data sheet, instructions for use and care.
Key features and delivery set of hidden doors
Standard equipment for installing a hidden door
Material of manufacture
As for the materials for making invisible doors, door leaves are made from:
- MDF . Such structures are coated with a primer to protect them from moisture. They are white in color and many people confuse it with paint. Such designs can be decorated independently in any way.
- Glass or mirrors . A good design solution that will suit a high-tech or minimalist style. When purchasing such doors, it is important to think through their fittings in advance.
- Veneer . They look stylish and attractive in interiors thanks to their natural finish. To make a solid veneered wall, it is recommended to order the door leaf without finishing, which will subsequently be veneered together with the wall panels.
- Chipboard . A very practical and profitable solution. They are suitable for installation in residential and non-residential premises and are durable and durable. Compared to veneered models, products made from chipboard are more affordable in terms of price. But when choosing them, it is important to pay attention to the minimum content of harmful substances in the panels.
- Acrylic . An excellent option for installation in a minimalist design. They are distinguished by practicality, durability and aesthetics.
Hidden doors can be purchased completely finished with factory painting. In this case, it is recommended to order an aluminum edge that protects the canvas and hides the color transition.
When choosing a door frame, it is worth considering that they come in two types:
- Aluminum . They are distinguished by their reliability, aesthetics and ability to cope with various loads. In economical options, the boxes are made of thin aluminum, and such structures require additional reinforcement with wooden beams or multi-layer plywood.
- Wooden . They are quite rare. They are characterized by naturalness, hypoallergenicity, and high technical characteristics.
Additional equipment
In addition to the standard configuration, there are a lot of additional options on how to improve the functional qualities of the product. These additions include:
- hidden threshold. A unique development of a door threshold that is mounted in the door leaf and is activated only when the door is closed, completely protecting you from drafts. Relevant for children's rooms, when babies like to crawl or play on the floor;
- hidden hinges with a closer. A handy feature when you like your doors closed, or for rooms where it makes sense to close the door behind you;
- lock mechanism with hidden handle. If you really decide to make invisible doors as invisible as possible. Not very familiar in everyday use, but definitely an interesting design solution;
- concealed mounting stopper. A real find when you need to prevent the door handle from hitting a nearby wall;
- electric deadbolt lock. Obviously not for home use, but for offices, hotel-type premises - a convenient addition to the standard package;
- mounting grid. Be sure to use it when finishing installation gaps. Without it, there will be trouble - the finish will crack at the joints of the wall and the door frame. It is supplied as an additional set, only because the installers do not do the finishing work, this is done by your craftsmen. Check with them if they have this mesh or if it is better for you to order it along with the doors.
For clarity, study and decide for yourself one or another additional function.
Additional equipment options for installing hidden doors
Application in the interior
A secret door in the interior has both direct and decorative purposes. Those who want to hide something from outsiders install such structures in secret rooms where antiques, art objects, weapons are stored, they hide rooms with safes, guarded rooms with jewelry. A barrier masking the passage will protect property in the event of illegal entry into a house or apartment.
In modern houses and apartments, such door leaves are installed to maintain a single interior style. An inconspicuous passage that merges with the wall will help visually expand the space of a small room. You can make invisible passages to dressing rooms, storage rooms, and protect the office from accidental “infiltration” of guests. An inconspicuous secret door can also be used to create a secret children's playroom.
Painting an aluminum box
Additionally, you can order painting of aluminum profiles in the required color. During installation, you will have to adhere more strictly to the rules and be careful so as not to damage the coating. But such a decision is often justified if the basis is an interesting design concept.
Painting options for aluminum door frames for hidden installation
Installation on construction foam
This method involves preliminary fixing the box in the opening using wooden wedges. Using a building level and plumb line, the verticality and horizontality of the structure is determined. Small sections of the opening between the box and the wall are fixed with polyurethane foam. After drying, the perimeter is completely filled. It is important to leave room for the foam to expand so that when it dries and is exposed to temperatures, it does not compress the box. For this method, you should choose professional and high-quality foam with a gun.
The method is only suitable for lightweight MDF products that will not be used frequently. It is not a reliable option.
Features of delivery of structures for concealed installation
The aluminum box, for hidden installation, is a welded U-shaped structure, with technical grooves and milling for fittings (hinges, lock).
The material and installation method of the door frame differs from the classic, wooden or MDF frame. Aluminum cannot be cut on site or connected rigidly, therefore, precisely to ensure the geometry of the structure and its rigidity, transportation and installation takes place in assembled form. With pre-installed hinges, locking mechanism, seals.
In the case of pre-installation, the door frame is delivered before the leaves, but still in a U-shape, according to the dimensions specified in the specification.
External view of the supply of hidden doors for further finishing
Advantages of secret doors
Secret doors have more advantages than disadvantages. The disadvantages of such designs are related to the technical side of the installation.
Advantages of hidden door panels:
- Merging with the wall will help decorate the room. This is especially important when there are 3-4 or more doorways in one room, the appearance of which spoils the overall picture. For example, in the corridor, where passages to rooms, a bathroom, a storage room, and a dressing room are usually located. By disguising at least a couple of passages to utility rooms, you can visually increase the space.
- Suitable for installation in openings of non-standard shapes, for example, for the entrance to an attic with a sloping ceiling.
- Space saving and the ability to install a rather narrow canvas compared to conventional ones.
- Possibility to choose a ready-made invisible door of large non-standard sizes. High and wide canvases are most often installed on a hidden box.
- Variability of finishing and decoration. The structure merges with the wall and fulfills its functions. You can hang a picture on it as if it were part of the wall.
If the decision to create a secret passage has been made, then you need to explore the possibility of installing it yourself.
Dimensions of hidden doors
One of the important features of doors for hidden installation is a large and variable range of sizes.
Of course, there are standard sizes, the most popular ones, they are usually kept in stock and are cheaper.
We strongly recommend considering the option of high doors, up to the ceiling, without a top lintel. Rooms with high doors look completely different, one might say, unforgettable.
For standard size, opening recommendations are as follows:
Dimensions of the leaf, block and opening for proper installation of a hidden door. SecretDoors brand table
Based on this table, it is easy to make a calculation for any non-standard opening, adding 40 - 50 mm in width in each direction. We add 50 - 60 mm in height, since in the lower part, during installation, it is important to leave a gap of 10 mm between the floor and the canvas. (1 centimeter)
Attention! The dimensions of the door block (leaf + frame) may vary from manufacturer to manufacturer. Mainly due to the dimensions and profile configuration of the aluminum box. Therefore, we recommend that before preparing the installation opening, you decide on both the type of door and the brand.
Tips for creating a secret door
If you don’t want to contact special companies for the production of custom-made secret doors, then when working independently you should adhere to the following tips:
- it is mandatory to install or replace regular hinges with invisible (secret) ones;
- selection and installation of special invisible fittings;
- if there is a cavity in the wall, the best solution would be to install a sliding structure;
- a passage disguised as a wall should be made flush with its plane;
- the box for the secret passage must be hidden in the wall or disguised;
- It is allowed to use a rotating mechanism for hidden passage.
If you follow the rules for installing secret interior doors, it’s not at all difficult to do it yourself. This design will help hide from prying eyes everything the owners want - from the pantry to the safe.
Requirements for the installation opening
Installation of hidden doors is possible in walls and prepared structures made of different materials.
Most often these are walls and partitions made of:
- drywall;
- openings made of aerated concrete, foam concrete and similar materials;
- brick walls;
- concrete walls.
Installation of hidden doors in a plasterboard opening
When preparing an interior partition made of plasterboard, it is recommended to lay a reinforced profile for the doorway, with a wall thickness of at least 3 mm. A mandatory requirement is the laying of wooden beams in the standing frames, measuring at least 50 by 40 mm.
Below is a schematic diagram of possible mistakes that builders make when preparing openings. Show them these instructions, this will prevent the most common mistakes that eliminate or significantly interfere with high-quality installation.
Profile location in the doorway
Scheme of laying a profile with a wooden beam when preparing the opening for installation
Reinforcing the opening with wooden beams
Reinforcing the beams of the doorway will significantly strengthen the structure and ensure high-quality installation
Installation of hidden doors with one sheet of drywall
Scheme for forming a doorway with one sheet of drywall on each side
Installation of a door block with two sheets of drywall
Scheme of forming a doorway with two sheets of drywall on each side
Concealed installation in aerated concrete openings
The peculiarity of the material also implies special preparation of the opening for installation.
A prerequisite for foam concrete (aerated concrete) structures is to frame the opening with plywood or OSB with a minimum thickness of 20 mm.
Along the perimeter, using screws and special fasteners for aerated concrete, we rigidly fasten strips of plywood of the recommended thickness.
Take a close look at the images below.
False frame reinforcing a doorway in foam blocks
Reinforcing the opening from the foam block with plywood along the perimeter
Installation of a hidden block in an opening made of aerated concrete
Installation diagram in a wall made of aerated concrete
Installation of hidden doors in an opening made of brick or concrete
Solid, capital walls require less attention to prepare for installation. Here are the standard requirements for all openings:
- walls on the outside and inside must be strictly vertical;
- The narrowing or divergence of the installation opening should not exceed 2 mm. on 1 (one) linear meter.
Brick opening diagram
Brick walls, provided they are strictly vertical, are the most preferred installation method.
Installation of a hidden block in a brick opening
Installation and external finishing in a brick wall
Choosing fasteners for the door frame
During installation, an important point is the fastening of the door frame. The prosperous life of the door block as a whole depends on how the frame is secured.
Since door frames can be made from different materials, there are different ways to fasten them.
There is a general certain condition - it can be used for all types of door frames. Often one person installs the door themselves. Before this, the box should be temporarily secured in the opening, a spacer should be installed, and the main fasteners can be done later. Components such as hangers (metal plates) are excellent for pre-installation. They are used when attaching metal structures to plasterboard. A minimum of four is required. They are used for installation of various types of door frames. The hangers are attached like this: one at the top and the other at the bottom of the combat box. The side chosen is the one facing the opening (door). Then the box is leveled and fixed, adjusted with plates, and wedged with bars. The adjustment should be made when the door leaf is hung.
Fastening methods:
- Hidden installation. Using anchors and screws for structural rigidity. This installation differs in that they do not make special mounting holes along the beams, but hide the fasteners in the mating locking element (hinges).
- Fastening to metal hangers - door frame. In this case, hangers are used to arrange a suspended ceiling. The plates are screwed to the box, inserted into the opening and adjusted for level. Make marks on the wall for fastenings and recesses.
- Standard fastening with anchor bolts and screws. Before installation, holes are drilled at the required points on the racks, and then the door structure is placed in the opening. Holes are drilled into the concrete at the designated locations for anchor bolts.
- Installation on foam. After the structure has been fixed and installed, the gaps in the opening between the wall and the frame are filled using foam.
Taking into account the characteristics of your interior, you need to choose a fastening method.
Step-by-step instructions for installing hidden doors along with the leaf
Just above we looked at the types of doorways and the features of their preparation before installation. Now we will install the doors step by step.
Concealed doors are installed before the walls are finished.
It is also absolutely important to have a final clean floor level at the time of installation. We control the gap between the door leaf and the floor at 1 centimeter (10mm.)
Main stages of installation
At the first stage , the aluminum frame is installed together with the door leaf.
At the second stage , we remove the fabric from the loops. This is done in order to avoid damage to the canvas during finishing work. We seal the loops themselves with masking tape.
At the third stage - finishing work, during which we close all the installation gaps, adjusting the finish to the very edge of the door frame. The hinges must be in the door frame - this is important.
At the fourth stage , the door leaf is installed back. The gaps around the perimeter are adjustable thanks to hinges in three planes.
We do not recommend it, but we must mention that it can be installed in one stage, without removing and reinstalling the door leaf. But in this case there is a big risk of damaging the canvas during work. If you are not ready to take risks, wrap the canvas tightly with thick plastic film, not a 100% guarantee, but it’s safer.
Sequencing
- Attach the mounting plates to the box; we do this before installing it in the opening.
Mounting plate attachments
- Use pre-prepared wedges (they are not included in the delivery) to secure the upper part of the box. Strictly parallel.
Use wooden wedges to set the level
- After the top jumper, we align the loop side. Check the level in two planes.
- We adjust the box at floor level. Using the same wedges, we fix the side of the box opposite to the hinges.
Fixing the position of the box in the installation opening
- Foam the box on all sides. At this step, do it point by point, as you may have to make further adjustments.
We foam it point by point and fix the box in the installed form.
- We wait. When the foam has dried, we perform a control check of the level and plane. As a result, when the door is slightly open, the door leaf should be fixed in any position and not close or open arbitrarily.
- We completely secure the box, filling all the gaps with foam.
Attention! The foam expands when it dries. When filling gaps, carefully dose the foam without excessive amounts. To avoid deformation of the door frame elements and loss of level, close the door leaf. Between the canvas and the inside of the box we insert cardboard or thin wooden planks of equal thickness. This will ensure that the gaps between the canvas and the box remain unchanged.
- Let the foam dry completely. As a rule, this is at least 12 hours.
- When the foam has dried, carefully, controlling the effort, remove the wedges. Sometimes it’s easier to cut them off, which is also allowed.
- Additionally, using mounting angles and plates, we fix the box.
It is important to ensure a reliable, complete fit and connection between the wall and the frame. Eliminate any possible backlash. If you do something incorrectly at the previous stages, play remains or appears over time, this will lead to cracking of the finish at the points where it connects to the frame.
Mounting kit for installation
The installation kit consists of two parts: the first part is attached to the inside of the box, and the second half is attached to the wall belonging to the doorway.
When you connect the parts of the kit to each other, you have the opportunity to adjust the position of the door frame.
In addition, by level, with the canvas installed, you can adjust the evenness of the box. It is permissible to check the evenness and adjust the installation at various stages of work. You will have the opportunity to correct the “jamb” at any stage, if it is present. The door frame will fit into its place securely, firmly and evenly in the opening using the mounting kit. At the same time, there is a significant saving of effort and time.
What are the advantages of the installation kit:
- Economical design. The cost of the set is lower than the price of all elements selected one by one.
- There is no need to take into account the features of the wall. Even the floor level is not particularly important.
- Hidden installation requires an installation kit. This quick installation system always preserves the original appearance of the finish.
- There is no need to level the walls and floors; there is no need to process slopes or fix additional planks, which also reduces costs.
- For permanent and temporary fixation, numerous devices are not required: spacers, wedges, anchors, plugs, etc.
- Just a drill and two open-end wrenches are required for all operations.
The noisiest part of the installation kit is the installation of fittings, which can be done in your utility room, but mainly the installation of the door and frame.
Installation of hidden doors without leaf
We mentioned that one of the advantages of hidden doors is the ability to install them without a leaf.
This need arises when it is important to reduce production time. First of all, the box is sent for installation.
This allows you to continue working without stopping to wait for the entire order to be ready.
When the panels are ready, in the second stage, door panels are delivered for installation.
In this case, the missing part of the block is replaced with rigid jumpers: top, middle, bottom.
The rest of the installation proceeds according to the instructions above.
Removing, adjusting, or reinstalling jumpers is strictly prohibited until the structure is completely and rigidly fixed in the opening.
Installation of hidden doors without door leaf
Seal the seams
Hidden installation is called so because the structure does not have platbands. The installation seams are sealed with plaster and wall finishing in such a way as to hide the foam, plates, and all gaps after installation.
There are a number of important features that we strongly advise against skipping or ignoring.
- We process the aluminum box. For reliable adhesion (adhesion is the adhesion of dissimilar surfaces at the molecular level), we apply “concrete contact” to the surface of the box that will come into contact with the finish.
Concrete contact is a liquid mixture, sold in a hardware store, that acts as a connecting element between a smooth surface and finishing materials. It is easily impregnated into concrete, brick... what is important for us is metal. As a result of this finishing, the surface of the box becomes rough, which reliably fixes the plaster, tiles or wallpaper.
At the time of processing the box with concrete contact, it is important to stop dusty construction work so that construction dust does not settle on the surface.
- We cover the perimeter of the box, with an overlap on the wall, with reinforcing tape. Plaster fiberglass mesh - serpyanka.
Preparing a hidden door for plastering work, laying out the reinforcing tape
- Apply polymer cement starting putty.
This type of putty contains reinforcing microfibers, which improves the elasticity of the solution and forms a strong base and bond throughout the entire volume and perimeter. The starting putty will provide strength and prevent the possibility of shrinkage and cracks.
Design examples
As already mentioned in the last section, the easiest way to hide entrances in an apartment or house is by finishing the canvas to match the walls. For this, the same wallpaper, paint or other material is used.
Even laminate, slats or other wood trim are fixed to the interior fabric. The main rule in this case is to decorate the wall at the same time as the door in order to install it in a single contour.
Important! Experts usually do not recommend gluing heavy tiles or porcelain tiles onto the opening panel - this will put additional stress on the hinges and can damage them.
Additionally, you can use original decorative options: paint the wall with the door up to half the height, make chaotic strokes of paint, catching both surfaces.
Advice! It is not necessary to repeat the finishing of the walls - for high doors you can use materials for the ceiling on top and floor materials below.
The photo shows a decor option for a children's room
A convenient option for the corridor is mirrors. Secure several panels, one of which will be on the door. This way you will simultaneously hide the entrance and make the space visually larger.
If there are paintings or other decor hanging on the wall, attach it to the canvas as well. This technique will further disguise the opening and literally dissolve it in space.
Preparing and painting the canvas
At your request, hidden doors, or rather their leaves, can be supplied without finishing, for further finishing. Whether this is so is up to you to decide at the time of placing your order. If you decide to paint the doors, or apply decorative plaster, or glue wallpaper, or cover the surface with wall panels, order the doors primed for further finishing.
The primer will protect the doors from weather conditions and also improve the contact of the paint with the surface of the door.
Preparatory work
You should start preparing for finishing work by removing the top layer of primer. Take fine-grain sandpaper 160 - 240 microns, without skipping places, we process the door leaf well. First remove it from the hinges if you installed it with canvas, this will make it easier for you to prepare and paint. Don't worry, they are easy to hang and adjust.
Let's start painting
It is best to paint doors with a roller, squeezing it well before applying paint. Treat one side first, then the other, then the ends of the door leaf.
It is a normal situation when after the first coat of paint the color differs from the desired one. Let it dry a little, apply a second coat.
The materials that make up the door leaf are made of wood or MDF; they tend to absorb moisture unevenly, so we paint the doors in one approach. First, cover completely with the first layer, then, after complete drying, with the second.
Important! The lock and hinges are not painted. Leave them in their original finish.
Preparation process, painting of the hidden door panel
Painting wooden doors
You need to decide how to cover a wooden door leaf:
- The paint is glossy, matte, “natural” (emphasizing the wood texture); it is alcohol, oil or nitro based.
- Varnish – The advantage is that it preserves the effect of “natural wood” due to its visible structure. There are glossy, matte and colored ones. The base is alcohol, oils, but the most reliable for painting wood is polyurethane varnish.
These paints can also be used for MDF canvas
If you are unable to dismantle the door leaf yourself, you need to cover all areas that do not require painting with masking tape. A day before starting work, comb out excess lint from the brushes and leave them in water (at least ten hours).
Stages of painting doors with your own hands:
- This point applies to new canvases: it must be sanded with fine sandpaper (the old canvas went through this procedure when removing the old paint). The procedure is necessary for better adhesion.
- Sand the door frame too.
- Wipe the surface with a clean cloth.
- Painting begins with hard-to-reach areas (panels).
- Feel free to paint the canvas with a well-soaked roller.
- Wait for the paint to dry.
Before repainting, it is necessary to sand the door leaf to smooth out small fibers and small debris.
The trend is antique painting and the effect of hidden doors.
Adjusting hidden hinges when installing invisible doors
So, the hardest part: installation, preparation and painting is over. It's time to hang the canvas in the door frame. Hidden hinges allow you to adjust the perfect gaps.
Follow, step by step, the instructions in the image, carefully studying each diagram. Difficulties may arise only on the first door, then, having understood the essence, you can quickly adjust each door.
Scheme of step-by-step adjustment of a hidden door after its installation
Door care instructions
Subtotal. We have covered in detail all the stages of installing hidden doors. If you have studied it carefully, you can safely proceed, the manual is before your eyes.
Still, I must note that experience is important in every business. Installation specialists install hidden doors every day and know all the nuances of each manufacturer. They can solve on-the-spot the most non-trivial problems that suddenly arise; this happens when mistakes are made at the stage of measuring or preparing an opening.
Therefore, I recommend using this instruction not only for self-installation, but also for supervising specialists at the repair stage, when openings are being prepared, doors are being installed, and finishing is taking place. Installation specialists only install the doors, but the preparatory and finishing work is carried out by your repair specialists.
Now you know the nuances of installation, be demanding and attentive at the stage of accepting work, the result will please you.
Order a measurer along with installation from our company, we work so that you have fewer problems and more free time.