It is believed that the arrangement of a residential attic is more difficult and more expensive than the construction of a conventional non-insulated roof with a cold attic. There are reasons for this:
- It is necessary to properly insulate the attic.
- It is necessary to properly install a vapor barrier and a superdiffusion moisture and windproof membrane.
- It is necessary to install skylights as required by the manufacturer.
Problems often arise with the last point. Errors when installing windows on the attic floor negate all the advantages of this room. As a result of the mistakes of illiterate builders, attic windows leak in the rain, and condensation drips from the ceiling, damaging the finish. It is not surprising that many developers are distrustful of attics, believing that it is better to build a cottage the old fashioned way. Our video and photo instructions, which tell you:
- How to calculate the size of a dormer window depending on the area of the room.
- How to choose a place in the attic roof to install a window.
- How to prepare a window opening for installing a roof window.
- How to install the frame and frame of a roof window.
- How to install a condensate drain.
- How to make waterproofing at junction points.
- How to install a roof window frame and make a heat and vapor barrier.
Installation of a roof window: planning
A roof window can be installed either at the stage of attic construction or on a finished insulated roof with the finishing coating and layers of vapor barrier and hydro- and wind protection already laid. In the first option, work is carried out sequentially, step by step and, usually, does not cause difficulties. In the second case, you need to rack your brains on how to install a window in accordance with the manufacturer’s recommendations, going through the entire pie of the attic roof with flexible tiles.
The main difficulties of installing a roof window left “for later” are that you will have to carefully dismantle or cut through it, moving from inside to outside:
- internal sheathing for finishing the attic;
- vapor barrier;
- insulation;
- superdiffusion membrane (moisture and wind protection);
- sheathing and counter-lattice;
- cut OSB boards for the opening;
- partially remove the shingles around the window opening.
The width of the attic window is determined by the pitch of the rafters. If the developer does not want to install a narrow window, fitting it to the rafters mounted at a distance of, for example, 60 cm from each other, then he will have to cut out one rafter leg, strengthen the structure, etc. This increases the likelihood of errors among installers, the deadlines and estimates for work. From here:
The installation of roof windows must be planned at the stage of designing a house and calculating the rafter system.
As a guide, we are guided by the following figures:
- It is recommended to install roof windows into roofs with a slope angle of 15 degrees or more.
- The window area is selected according to the formula: per 10 sq. m of attic floor should be 1 sq. m of glazing.
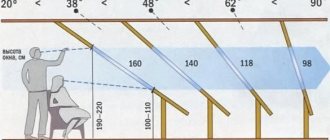
- The upper part of the roof window (from the floor) is located at a height of about 2 m, and the lower part is approximately 1.2 m.
- The opening for the attic window should be at least 4 cm wider than it, optimally 6 cm.
- The length of the opening is approximately 4.5-5 cm longer than the length of the attic window.
Types of windows in the attic of a house
Dormer windows (MO) are classified according to several criteria.
By installation method
Vertical type
It is characterized by a vertical frame arrangement, and for this purpose a special structure (“birdhouse”) is mounted on the slope. Such MOs give the roof a special, decorative look, but limit the access of sunlight to the attic.
Inclined
The windows are located in the plane of the roof slope. They provide better natural light, but look much more modest, and the glass is not protected from vertically directed influences (for example, hail).
By shape and design features
Classic
These are rectangular frames made of different materials with double-glazed windows, which can belong to both types of MO.
With extensions
The upper part of the opening has an original shape to give originality (triangle, arc, etc.).
Window-balcony
The window is combined with balcony elements, allowing access to fresh air. This could be an additional horizontal platform or a rising canopy in a design with a vertical MO.
Combined
The design includes an opening (pivot) and a stationary part.
Combination of vertical and horizontal types
This option provides good lighting and allows you to look outside.
Light tunnel
A rather rare design designed to direct natural light into the living space of the house. A tunnel is formed through the entire attic, and a diffuser lamp is placed at the exit. This design is needed when a room in the house does not have windows.
By opening method
Rotary with central axis
The sash can be rotated in any direction.
Raised axle
It is located at the top of the opening. The sash opens by lifting upward (inward or outward).
From the side
The sash tilts to the right or left.
From the bottom
The sash swings outwards.
Combined option
The window is divided into 2 parts. There is a raised axis at the top with the door opening only outwards. A side axis is mounted in the lower part, which makes it possible to clean the window.
By material
In addition to the specified criteria, MOs differ in frame material:
- wooden;
- plastic;
- aluminum.
Modern cottages have begun to use “smart” MOs. They have a drive, and the valves are adjusted using a remote control.
Stages of installation of a roof window
alexnrg FORUMHOUSE Member
I decided to install a roof window in my house myself. Roofing pie: rafters - board with a section of 15x5 cm, vapor-permeable moisture-windproof membrane, horizontal and vertical sheathing, OSB, underlay carpet, flexible tiles. Questions have arisen:
- How to install a roof window correctly?
- How to prepare the opening?
- How to fix a window in the attic?
- How to drain condensate?
- What is the salary for and how to install it?
The flashing (metal frame) is a system of gutters for hermetically sealing the roof window with the roofing. The flashing removes rainwater and moisture from the attic window when the snow melts.
All work on installing windows in the attic is divided into a number of sequential steps:
- Preparing the opening.
- Assembly and installation of the thermal insulation circuit.
- Installing a roof window frame into a thermal frame.
- Installation of the sash (glass unit).
- Adjusting the side gap and window shutter.
- Installation of a condensate drain.
- Installation of a waterproofing apron.
- Salary setting.
- Insulation of slopes around the window and restoration of the vapor barrier contour from the inside of the room.
We'll tell you about the key stages of installing a roof window and how to avoid mistakes.
How to install the structure correctly?
When purchasing and installing roof windows yourself, you may make installation mistakes due to ignorance. It’s worth noting right away that fixing them is much more difficult than installing a window correctly in the first place, which is why you need to carefully study the theory before you take on the job or hire specialists if you think you can’t do it yourself.
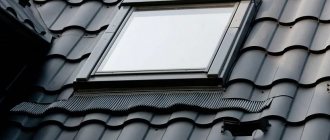
First of all, it is worth noting the difference not only in the installation technology of a conventional and roof window, but also, in principle, in the form of the structure itself. If a window is installed in the wall using polyurethane foam and special fasteners, then the roof windows are inserted into a specially prepared structure, which should be located between the rafters.
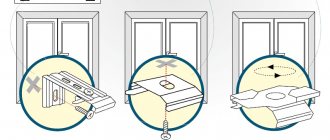
Attaching a roof window to the rafters
The connection to the roof of the dormer windows must be tight, the gaps themselves must be well insulated, otherwise moisture will get into the cracks, however, in this case it is impossible to close the gaps with polyurethane foam, since this material is not moisture resistant. In order to make the window unit waterproof, it is necessary to use a special flashing.
Do not blow out the outside of the window with foam alone, as water will seep through it over time. Use special salaries (circuit)
In order to understand what a roof window frame is, you need to carefully study the design itself. This is a finished product, which is usually sold together with the window, it is made of durable rubber, designed for different types of roofing, therefore, when choosing a flashing, you must take into account what material the roof itself is made of.
Pay attention to the climate zone in which the window is installed: the fact is that you need a good layer of thermal insulation made of soft material, such insulation fills the gaps between the window and the wall, serves as an obstacle to the penetration of cold air and the exit of warm air, in addition, it insulates sound. But soft materials are afraid of moisture, so they also require protection from it.
The flashing in the attic window is used as this protection. It will protect the joint from freezing and getting wet, and in addition, it will protect all heat-insulating parts of the structure.
Work of the frame around the window
The connection of the soft roof to the dormer window must also be done correctly; all joints must be carefully closed and sealed. Slopes should not be ignored. If you do not deal with them at the right time, condensation will appear in the room and the joints will freeze. Because of this, over time the condition of the finishing materials will deteriorate, fungus or mold may appear in the room, and living will be uncomfortable. In this case, common mistakes in installing roof windows are that the seams begin to be sealed with foam, which is absolutely forbidden to do.
Before work, you can carefully study the detailed photos of the installation; this will greatly facilitate your tasks, since you will already see what needs to be done. The more detailed the instructions, the better.
You should not listen to the stories of amateurs that in the Russian climate you cannot use skylights: installation errors lead to the spread of the belief that such structures are not suitable for houses in the Russian Federation
This type of window exists perfectly in our climate, but it is important to install the structure correctly, following the manufacturer’s recommendations and without violating the technology
Preparing a window opening for installing a roof window
In the video instructions, a specialist explains how to prepare a window opening for installing a roof window if the roof has been built and the roofing has been laid.
When installing vapor and waterproofing, the films are cut with an envelope (crosswise) and wrapped inside the room (vapor barrier) and outside (wind protection).
The upper and lower parts of the opening are reinforced with lintels (between the rafters).
And with sheathing bars, so that the edge of the OSB sheet does not hang in the air.
The lower support beam of the sheathing must be leveled in order to accurately align the frame of the attic window and avoid a noticeable difference in height on the side slope.
Important! If OSB has not yet been laid on the roof - the base for flexible tiles, then the opening is edged on top with a frame made of OSB sheet or plywood cut into strips.
This is necessary so that the mounting plates of the roof window rest on the OSB and not on the sheathing. In this case, the dormer window will be in the same plane with the future base for the soft roof.
Assembling thermal insulation and installing a roof window frame
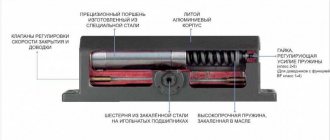
The thermal insulation circuit is mounted on a steel frame, which is easily assembled with latches.
The thermal insulation contour is installed in the prepared opening.
Then disconnect the rotating part of the sash with the double-glazed window from the frame of the attic window.
Mount the mounting plates and install the box in the opening.
Important! Mounting plates (4 pcs.) are installed in the corners of the skylight, in places in the frame prepared at the factory, in holes pre-drilled by the manufacturer for self-tapping screws.
If the roof window is long (more than 1.4 m), additional intermediate mounting plates (corners) are installed in the place of the rotating mechanism (hinges).
The roof window frame is installed in the finished opening. How to do this correctly, as well as adjust the side gaps and the rebate, is shown in the video.
Secrets of installing a condensate drain
The most important element of the roof window waterproofing system is a metal gutter for draining condensate.
The gutter is installed at a distance of up to 50 cm (optimally 20-30 cm) above the window in the same plane with the hydro- and windproof membrane.
To allow condensate to flow down the gutter, it is installed at an angle ( slope of at least 3 degrees ). Then the moisture will be removed to one of the sides (the ventilation duct formed by the sheathing).
Difficulties with installing a gutter arise if it needs to be mounted on a finished roof. In this case, you will have to manually cut out the openings in the sheathing, and do this carefully so as not to damage the wind protection film.
The easiest way to install a gutter is if the roof has not yet had sheathing installed, there is no base for flexible tiles and a soft roof has not been laid.
Preparing the site for gutter installation consists of the following steps:
- In the middle of the rafter leg (on both sides of the prepared opening) a vertical cut is made on the film of the superdiffusion membrane.
- A gutter is placed on the seat.
I lower the gutter, using it as a ruler, and make a horizontal cut in the film so as to align the vertical cuts.
The result is a windbreak valve that fits into the gutter and catches all the condensation.
Preliminary calculations
Buying and installing roof windows without preliminary calculations is a waste of time and money. Surely mistakes will be made that will not allow the window structures to be properly installed and operated. To save personal time and finances, you need to make preliminary calculations taking into account the tasks, type of roof and installation location.
Determination of glazing area
Determining the total glazing area is quite simple. According to sanitary standards, there must be at least 1 m2 of glazing per 10 m2. In this case, the dimensions of one window are not taken into account. That is, the required level of lighting can be provided by one large or several small ones.
Attic glazing has one important nuance - the height of the window opening. The higher it is located, the more light passes through it. At the same time, a too high location will not allow you to see the surrounding nature. For this reason, it is necessary to additionally take into account the angle of inclination of the roof slopes. If they are flat, then you can install the windows high. When the angle exceeds 20°, then the glazing should be lowered. Rules for creating
On roofs with steep slopes, window structures should be installed so that their bottom line is at a level of 100-140 cm from the attic floor.
The height of the window does not affect its size. Accordingly, the house owner must adhere to sanitary requirements when determining the glazing area, and the sizes of windows, their shapes and quantity are a matter of taste.
Selecting a location
The correct selection of the location for installing the frames determines not only the effectiveness of the glazing, but also the service life of the roof and the appearance of the roof.
When choosing a location for installing roof windows, the following points should be considered:
- Roof type. If it is soft, then there are no problems with opening it. Windows can be installed anywhere. It’s a different matter if the roof is made of metal tiles or other solid roofing material. In this case, you will have to select the installation location and the size of the window opening so as not to disturb the row of roofing elements.
- Step of rafter legs. Roof windows are mounted between the rafters. In this case, the edges of the frame should deviate from the rafters by at least 10 cm. This space will subsequently be filled with thermal insulation. When the distance between the rafters is small, then the task becomes more complicated: you will have to make changes to the rafter structure. And this is not only expensive, but also reduces the period of safe operation of the roof.
- Window design features. The handle on it should be located in a convenient place after installation.
When choosing a suitable location for windows, you must not forget about the mandatory presence of heating in the attic. Moreover, it is advisable to place radiators directly under the glazing to prevent the formation of condensation.
And now a little about how not to place window boxes:
- They have no place on the valley slopes. The resulting internal corner will cause condensation to accumulate.
- Windows should not be installed near ventilation ducts or chimneys.
- Windows do not belong next to horizontal walls, as the level of illumination in the room will be significantly reduced.
Professional builders recommend not grouping various elements of a roofing system in one place. This can compromise the strength and durability of the roof.
Steam and waterproofing at the junction of the attic window
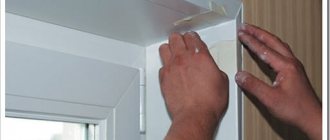
At the end of the work, a waterproofing apron is installed, which protects the junction areas from moisture.
The waterproofing apron is glued to the frame from bottom to top. Installation is simple - the protective film is removed from the adhesive layer (strip) and the apron material is carefully smoothed over the top of the frame. The waterproofing flashing is then secured around the window with staples.
Important! The upper part of the apron is placed under a gutter, which removes condensation, and the valve, cut from the windbreak, is placed on the waterproofing apron . To prevent moisture from getting into the places where vertical cuts are made in the rafters , they are waterproofed in advance with butyl sealant.
Next, the gutter is screwed with self-tapping screws to the rafter legs and presses the butyl tapes.
As a result, together with the correctly installed hydro- and wind protection, fixed on the gutter with spacer brackets, a reliable moisture-proof connection is formed.
Set of tools
Before starting work, the home craftsman should stock up on the following tools and materials:
- Hammer
- Plumb
- nail puller
- Saw
- Hacksaw
- Drill
- Screwdriver
- Construction stapler
- Level
- Marker
- Nails
- Self-tapping screws
- Edged board, the cross-section of which corresponds to the cross-section of the rafter leg
Part of the tools for installing metal roof windows