Dormer windows are a roof element whose installation requires a professional approach. Especially if the roof is already covered with roofing material. A small mistake or assumption will lead to leaks during the operation of the roof. Therefore, in this article we will talk about how to correctly install a roof window in a finished metal roof. We will tell you the entire sequence of operations, outline the nuances of the installation process and draw your attention to some subtle points on which the quality of the final result depends, plus, we will show you popular ideas for the attic that will allow you to properly arrange it.
Roof covered with metal tiles with dormer windows Source promobud.ua
Types of attic window openings
Under a gable roof, the simplest option would be a vertical window on the gable. Such openings provide partial illumination, the intensity depends on the direction of the world. The north side is completely useless in this regard. The advantage is that you can give it any shape: trapezoid, square, rectangle or circle. Inclined ones provide illumination all day long, but with minimal visibility. Fans of stargazing will be pleased with this review.
If the roof structure allows, vertical openings are combined with inclined ones. A panoramic effect is created, visually increasing the size of the room.
Roof window openings are also made recessed or protruding. The frame is mounted vertically in both cases, in the second - only at the main construction stage. This architectural solution functions more like a dormer window than a light source.
In this article we will talk about inclined windows built into the roof. They provide the maximum percentage of illumination, although they are not very aesthetically pleasing from the outside.
Frames and sashes are made from aluminum, composite material, wood of various species, and also with its coating. Wooden ones are suitable for bedrooms, living rooms, and children's rooms. For the kitchen and bathroom you need a frame made of moisture-resistant material.
Manufacturers are not limited to square and rectangular shapes, but non-standard (for example, arched) structures require special installation technology. This significantly increases their cost.
According to the opening methods, choose the central, lateral control axis or a combination of both.
Average prices for professional services
There are many installation organizations on the market offering professional installation of roof window sides.
Prices for this type of service depend on the following parameters:
- Internal price list of the organization.
- Installation elevation.
- There are additional difficulties during installation.
- The area of the translucent structure.
- Type of roofing pie.
- The need for construction scaffolding.
- Number of window blocks.
- The need to dismantle old windows.
- The presence of rework operations is the norm.
- The need to adjust the roofing pie, design the junction of the finishing roof covering.
- Moving door mechanism.
- The distance of the object from the city.
- Other factors that influence the value of decreasing or increasing coefficients.
Average prices for installation of window units, depending on the type of roof, vary within the following limits :
- Installation of a window without the need for a finished roof - from 4000 - 4500 rubles.
- Installation of a translucent structure with preliminary preparation of the opening - from 5500 - 6500 rubles.
- Installation of a window unit with the finishing installation of the roof - from 6500 - 7500 rubles.
- Complex installation of a roof window with adjustment of the location of the load-bearing rafter legs - from 8,000 to 9,000 rubles.
- Installation of additional protective equipment, electric drives and other accessories, fittings - from 1,500 to 4,000 rubles.
- Reduction factor when installing 4 or more window units at one address - from 5% to 15%
As a rule, many installation organizations indicate the minimum possible amount to be paid. This price varies from 3000 to 5000 rubles. If the final estimated cost of the work is below the specified limit, the company has the right to introduce additional coefficients for the installation team’s visit.
What to consider when installing roof windows
Violation of the integrity of the roofing layers will turn into a problem if you get down to business in a hurry. To ensure that the work is carried out at the same time and bad weather does not have time to interfere, it is worth thinking through all the details in advance and preparing materials. It is important to follow the technology and carefully isolate the window opening from moisture and condensation accumulation. Otherwise, at a minimum, there will be leaks and the insulation will be destroyed. If the wood is damaged, there is a risk of collapse.
First, determine the requirements for the window opening:
- The optimal combination of window area to room area is subject to the proportion of 1:10. Maintaining this attitude will allow you to do without artificial lighting during the day.
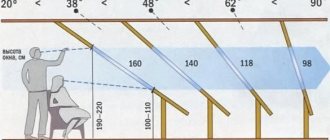
- The distance from the top of the frame to the floor is about 2 m, from the bottom for convenient control of the sashes - 1.2 m.
- The upper location of the fittings determines a comfortable height of 1 - 1.1 m from the floor, designed for the average height of an adult.
- The opening for the window frame is made 4-6 cm wider and longer for installation of insulation and insulation.
- The distance from the ventilation duct or chimney must be at least 1 m, otherwise most of the light will be scattered.
- From the valley, from another window, a distance of 50 cm is recommended.
- It’s good if the roof slope is from 15 to 90 degrees. Less than 15 degrees – this is already a flat roof; other window designs are installed on it.
- The steeper the roof, the lower the height of the window.
Installation in a roof with frequent rafter spacing may require cutting out the rafter leg. The structure will definitely need to be strengthened, which will require additional costs and accurate calculations. Adding strength will be added by placing beams under the window block and forming a frame on the inside from wooden blocks.
Tools needed:
- Screwdriver;
- Hammer;
- Drill;
- Nail puller;
- Stapler;
- Self-tapping screws, nails;
- Level;
- Marker;
- Measuring instruments;
- Wooden slats, bars;
- Thermal and waterproofing materials.
To dismantle the finished roof, you will additionally need a circular or band saw, a grinder, and metal scissors.
Tools and accessories
To install skylights in the roof, you will need the following set of tools and consumables:
To ensure safety and comfortable work process:- Folding stepladder of the required height.
- Mounting scaffolds with reliable fasteners.
- Protective suit, gloves, respirator, goggles.
- To mark the installation location window:
- Laser or regular mechanical roulette.
- Building level.
- Ruler with steel blade 1 m long.
- Joiner's metal corner.
- Plumb line with nylon cord.
- Pencil with soft lead.
- To arrange the opening:
- Circular or chain saw.
- Hacksaw with large teeth.
- Grinder with abrasive disc.
- A file for cleaning the cutting area.
- To finalize the opening, you may also need several chisels with different blade widths and a hammer.
- Construction knife with a retractable blade for cutting insulation, sealing roll materials and other elements.
- To install a window unit:
- Rubber hammer for fixing spacer wedges.
- A drill with a drill for wood, metal or other materials, depending on the design of the end of the opening.
- Screwdriver with a set of bits.
- Screwdriver for tightening screws and adjusting fittings.
- A rag for cleaning and degreasing the area where the assembly seam is filled.
- Gun for polyurethane foam.
- Dispenser for liquid sealant.
- Consumables:
- Anchor plates made of galvanized or stainless steel.
- Dowel-nails or a set of self-tapping screws.
- A set of drills for making holes.
- Polyurethane foam in a cylinder.
- Silicone or acrylic sealant.
- Self-adhesive vapor-permeable tape.
All tools must be in good working order, sharpened, cleaned of dirt and ready for use. Consumables should be purchased taking into account their expiration date.
Installation of roof windows on video
Basic steps:
- Opening selection and preparation. Before you take up the tools, calculate the dimensions and insertion location.
- Securing the window frame.
- Supply of thermal insulation circuit.
- Installation of gutters for water drainage.
- Adjusting the waterproofing apron.
- Installation of the salary.
- Installation of double-glazed windows.
- Insulation and vapor barrier of windows from the inside.
In the video, the author will show clearly how to act correctly on metal tiles:
Installation errors lead to disastrous results. Video about how not to build:
Video description
The video shows how to properly disassemble a roof window and the process of removing the sash:
But as for the slopes, there are a large number of options. But there are two important points in this event:
- The upper slope must be installed horizontally , and the lower - vertically . This is the only way to achieve effective blowing of double-glazed windows. If this is not taken into account, condensation will collect on the glass.
- The slopes must be warmed . For this, you can use any thermal insulation material. But foam sealants are better. It is better not to use polyurethane foam.
Installation of a roof window in a finished roof
Reconstruction of premises is not always planned. It is often necessary to increase the living space for new family members or improve the purchased cottage.
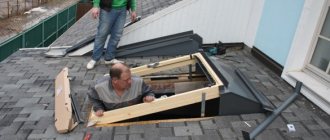
In a fully installed roofing pie, it is difficult to determine the location of the rafters. To clarify, disassemble or cut out part of the casing. It is better, of course, to have a rafter diagram as in the photo.
Installation features:
- First, markings are applied in accordance with the planned height of the lower and upper levels of the frame, taking into account the insulation allowance.
- Holes are made along the contour for unloading roofing materials.
- The opening in the diffuse protection is cut diagonally, not reaching 10 cm from the contour. The vertices of the triangles are cut off.
- The insulation is cut out, left to insulate the ends, and the waterproofing is simply folded back. The sheathing and solid base are cut out at a distance of 20 cm from the rafters. The roofing material is removed, leaving a gap of 5 cm on each side until the frame is positioned.
- The fastening is carried out to the sheathing, so it is reinforced around the perimeter in places where it is missing.
- The frame without a double-glazed window is secured with brackets installed on it to the wooden elements of the roof. The lower brackets are immediately secured, the upper ones are not fully tightened and are left for later adjustment.
- The glass is inserted and checked in the closed and open positions. After checking and adjusting, if there are problems, the fasteners can be tightened and the glass removed again.
- Now the waterproofing is secured around the outside of the frame with a stapler. The ends are tucked under the roofing.
- The flashing is installed first on the lower part of the frame, placing the apron over the roofing sheets. Then attached to the sides, top of the frame and sheathing. Finally, a sealant is applied along the outer contour of the frame.
- The internal opening is formed using rafters with the addition of bars made of similar lumber. The bars are stuffed horizontally at the top and vertically at the bottom, leaving a gap of 8–10 cm between the bar and the sheathing. This shape of the opening does not interfere with air movement and does not allow condensation to accumulate on the glass. The lines connecting the box to the frame are checked for levelness.
- Waterproofing is nailed to the formed box with staples.
- The glass unit is put in place. All that remains is to carry out the interior finishing of the window opening.
Sometimes the manufacturer includes interior finishing options for ready-made kits, but more often they are purchased separately.
How to install correctly in different types of roofing?
The installation of a roof window block in different types of roofing differs in the presence of a number of nuances, which are described in detail below.
In metal tiles
When installing a translucent roofing structure into a metal tile roof pie, you must complete all the steps of the following technological map :
When installing a window block at the construction stage of a building, the structure is installed between the rafters before the roofing pie is installed.- The distance between the load-bearing elements is verified with a tape measure.
- Transverse bars are installed between the rafters - supporting imposts, to which the window will be attached at the level of the window sill and lintel.
- The profile frame is covered around the perimeter with a vapor-permeable waterproofing membrane.
- Steel anchor plates are installed along the entire perimeter of the window structure.
- The window is fitted into the opening and wedged with plastic spacers.
- After wedging, it is necessary to check the alignment of the structure with a level relative to the installation line of the rafter legs. In case of distortion, the frame is adjusted with a rubber hammer.
- The structure is securely fixed with self-tapping screws to the rafter legs.
- The spacer wedges are removed.
- The installation seam is filled with foam to its full depth.
- On the outside, a PSUL tape and an additional layer of foam are installed.
- The roofing pie is mounted close to the protruding part of the window frame.
- Sheets of metal tiles are cut to the required size.
- The roof is suitable with a distance of 1 - 2 mm from the plane of the frame of the window unit.
- The space between the steel sheets and the profile is filled with sealant and closed with clamping strips.
- The inside of the window is sealed with vapor-permeable tape.
After installation, it is recommended to wait 12 to 24 hours until the foam is completely polymerized, then test open the movable sash and, if necessary, adjust the fittings.
Soft
When installing a window unit in a soft roof, the algorithm for its installation is repeated, but the master takes into account a number of individual features :
The basis for the soft roof is plywood with a thickness of 6 to 8 mm. If the frame is made of wood, then the coefficient of linear expansion completely repeats this indicator for plywood.- The base for the soft roof is cut to the required size to fit around the installed window.
- The roof insulation is closely adjacent to the window profile protruding beyond the rafters.
- The plywood is installed close to the frame profile and fixed to it from the outside with corners using self-tapping screws.
- The space between the plywood and the window is glued with waterproof tape, and then filled with silicone sealant.
- The soft roof is folded onto the surface of the frame profile of the translucent structure and closed with a pressure strip.
In order not to cause thermal inhomogeneity and moisture ingress, the protective element must be fixed without compromising the integrity of the wooden profile.
Folded
Seam roofing is made from the same material as metal tiles, with differences in the shape of the sheets and the nature of their fastening. This design is securely fixed using folds - bends from a steel sheet, which are folded into a lock using a special machine.
When installing a roof window in such a structure, the following rules are observed :
- Sheets with the required bend and dimensions are ordered in advance, taking into account the installation of the window, according to the working design drawings.
- The part of the window frame protruding beyond the rafters is glued around the perimeter with an elastic elastomer to form a damper gasket and ensure reliable sealing of the seam.
- After installing the roofing pie, the metal parts are laid out around the frame so that the standing seam is adjacent to the profile plane.
- The folds are fixed to the frame with short self-tapping screws.
- The upper edge of the fold is bent with pliers along the entire contact plane.
- A liquid sealant based on acrylic or silicone is placed into the resulting space.
- After polymerization of the substance, the mounting corner is covered with a galvanized strip.
When fixing steel sheets, it is recommended to pre-drill holes before installing screws to prevent displacement of dissimilar materials and the formation of waves.
Other types
When installing windows in other types of roofing, the junction of the profile to the finishing coating is drawn up according to the individual technological map :
In the case of installing an attic translucent structure into roofing tiles, clay or cement-sand piece elements are cut with a grinder, and the installation gap is filled with rigid mineral wool, polymer tape with a ribbed plane and sealant.- When installing a roof window in a slate roof, the mounting assembly is framed with asbestos cord, acrylic sealant and covered with a galvanized flashing.
- In the case of installing a translucent element in an ondulin roof, the material is cut in such a way that during the installation process, a tight connection to the wooden frame is ensured, after which an additional layer of roofing felt with sprinkling is glued on top of the assembly.
When installing a roof, regardless of the material, it is important to ensure that the effective insulation is tightly connected to the plane of the window. As a rule, mineral wool is used as insulating materials, which should be cut with a dimension 10 - 20 mm larger than the landing plane. In such cases, tension is created and thermal inhomogeneity is eliminated.
Features of installing roof windows along with the roof
The advantages of simultaneous roof construction and window installation are obvious:
- The width of the opening can be chosen at your discretion by making changes to the rafter diagram. It is possible to further strengthen the slopes along the entire length.
- Installing a window on bare rafters is easier; you can work directly on the roof.
- There is no need to destroy the structure of the roofing pie with the risk of causing accidental damage.
During installation, take into account the height of the roofing material so that after it is laid, the frame is not below its level. The frame is filled with sheathing bars of the required thickness around the perimeter.
A drainage gutter is made above the top of the frame, which will be located under a layer of roofing material to drain condensate. It is attached to the horizontal bar of the sheathing slightly obliquely. For a tight fit, vertical pieces of sheathing are cut to the size of the gutter.
Possible difficulties and errors in the process
When installing a roof window, every beginner can make serious mistakes that will lead to negative consequences and unnecessary expenses.
To prevent this from happening, when carrying out the installation process, it is recommended to take into account a number of important nuances :
- The window block protrudes from one side beyond the roof - before fixing the frame with screws, you need to make sure that the profile is installed strictly coaxially with the rafter legs.
- A leak forms at the junction of the window and the rafters - sealing the joint and the upper layers of the roof must be carried out strictly according to the algorithms listed above. As materials for sealing, it is recommended to choose products only from trusted, world-famous brands, whose products have many positive reviews on online forums.
- The window begins to sweat during operation - the problem may be the formation of fumes from the lower floors of a private house, which requires frequent ventilation, installation of a supply mortise valve, or an error was made during installation and sealing of the joint - the water-repellent tape must be vapor-permeable.
- The design of the movable sash touches the main frame - adjustment of the fittings is required. If this procedure does not help, the frame may be squeezed between the rafters, which indicates a violation of the size of the installation seam.
If the above recommendations are followed, as well as if the technological map is strictly followed, the installed window structure will serve for at least 20 - 25 years, without the need for major repairs or replacement.
Installation of a roof window in metal tiles
The procedure and nature of operations with metal tiles is identical to a roof with a soft covering. Unless the dismantling of the material should be more careful:
- Using a grinder, make an initial cut of about 10 cm on the tiles.
- Then they work with metal scissors so as not to damage the protection from flying sparks.
- After installing the window frame, the coating is restored by removing tiles or sheets of galvanized metal with a polymer coating of a suitable color.
With metal tiles, you have to take into account the height of the wave and profile when applying a waterproofing apron. For highly profiled material, a special flashing with reinforced sides has been developed. The principle of working with it is the same.
Installation of velux roof windows
With a full set of components and detailed installation instructions for velux windows, installation takes only a few hours. A special feature of working with the products of this manufacturer is the fastening of frames to rafters.
Velux roof windows
Installation conditions for long-term operation:
- The slope angle can be from 15 to 90 degrees.
- The distance from the floor to the upper frame is 185-220 cm.
- For flat roofing coverings up to 1.6 cm thick (bitumen shingles, roofing tiles), ESR aluminum flashing is used, for profile roofing with a profile height of up to 12 cm (corrugated sheeting, tiles made of composite, metal, ceramics) - EWR aluminum flashing.
- A combined installation is carried out using both types of flashing.
- If the flashing cannot be installed due to the characteristics of the roof, it is replaced with ZWR overlays.
- Vapor barrier is provided by the VVH apron.
- From the outside, metal fasteners are screwed at a distance of 10.3 cm from the corners of the frame.
- The issues of heat and waterproofing are solved by the BDX and BFX kits through a thermal insulation contour and a corrugated apron with a drainage gutter.
Installation steps after selecting an opening in the roof slope:
- The sash is pulled out of the frame and the corner fastenings are screwed on;
- Install a waterproof flashing;
- Fix the frame;
- The sash is inserted and the fittings are adjusted;
- The heat and waterproofing kit is laid on the outside of the slope.
The velux company not only provides high-quality products with components for standard and non-standard roofing, but also installs it with a guarantee. You can settle in the attic without fear of leaks.
Choosing an installation location
Let’s immediately make a reservation that roof windows are installed only between the rafters of the roof structure of the house. In this case, the width of the window product is chosen so that there is a gap of 8-12 cm between the outer ends of the frame and the rafters. If the space between the rafters does not allow installing a window with such gaps, that is, the installation step is small, then it is recommended to install not one big window, but two small ones. Fortunately, the standard size of roof windows is quite wide, in addition, manufacturers offer the service of manufacturing custom windows to the required parameters.
If the roof is built with a large angle of inclination, then it is better to install dormer windows at the bottom of the slope. If the roof is assembled with a flat structure, then in the upper part. On steep roofs, window structures are installed at a minimum height from the eaves within 10-12 cm, if the fittings for the attic window are located in the upper part. And at a height of 12-15 cm, if the fittings are located below.
On a steep slope, it is better to place dormer windows in the upper part of the roof Source budprom.com

