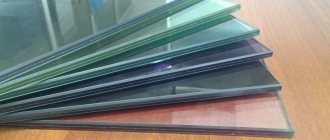
How to cut triplex glass
There was a need to cut off part of the car glass (triplex).
Can I do this myself? Using what tool? Or should you not try and turn to specialists? Professional glaziers definitely do not advise cutting triplex at home, but I managed to find out the information (I have a friend).
Of course, you don’t have many chances, somewhere around 40 to 60.
Triplex can only be cut with a professional glass cutter (ordinary glass will not work; it will ruin the glass).
The process of cutting triplex at home is almost the same as in a factory (or in a workshop).
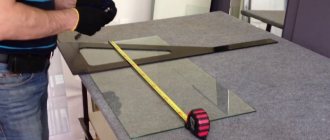
Clear markings are made, and on both sides, the lines must clearly coincide.
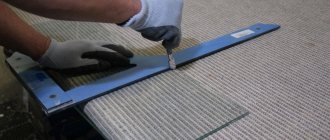
Next comes an important moment, very carefully break the glass (one end is firmly fixed, the other hangs down, the line is along the edge of the table, it is advisable to have an assistant.
Next, at home, this is done like this (in the factory they are heated with an infrared heating element): we fill a syringe with a flammable liquid (gasoline is suitable), pour gasoline into a narrow strip of glass broken along the line and set it on fire, the film warms up (in triplex there is a film between the glasses), we move the halves of the glass apart slightly aside and enjoy the result.
Or should you not try and turn to specialists?
Here you need to make a decision yourself, a professional branded glass cutter
In my opinion, there is no point in buying such an expensive tool for one cut, but with a cheaper “brother” it is difficult to cut a car triplex, and almost impossible.
Tools for work
Before you start cutting glass, you should decide which tool to do it with.
Most often, glass sheets are cut using a special tool - a glass cutter. It is ideal for small workloads. But there are many other tools with which you can adjust the glass to size at home. For example, many home craftsmen can successfully cut glass with a grinder. Almost every home owner has such a tool in their arsenal. But you need to keep in mind that you can use a grinder to cut glass only when you need to make a short cut. Using a ruler is extremely difficult in this case.
To cut off a piece of glass with a grinder, you will need to install a thin diamond disc on it. Carry out cutting at low speeds. This reduces the risk of premature splitting of the glass sheet and the production of glass dust in large quantities.
Further work is carried out as follows:
- A disk of suitable thickness is installed on the tool.
- The cut area is slightly moistened - it is better to simply pour water on the glass.
- Using a disk, a thin furrow is made across the glass.
- Then a chip is made along this groove.
So, to the question whether it is possible to cut glass with a grinder, the answer can be given in the affirmative. But at the same time it is necessary to monitor various little things while working. In particular, the glass should not be allowed to overheat - for this you can stock up on cooling liquid.
To cut glass, you need to choose only high-quality tools. Otherwise, vibration during operation may cause the glass to shatter. Before work, try to protect your vision and breathing organs well so that glass powder does not get into them.
Preparatory activities
In order for the cut to be of high quality, it is necessary to first prepare the material for work. If the glass is new, then just wipe it. Newspaper is best suited for these purposes; it mainly wipes the surface dry and also does not leave lint or stains behind.
If the glass has been used before, then before cutting the material with a glass cutter, you will need to spend a little more time preparing it. First of all, such a surface will need to be washed thoroughly using special glass cleaning products. A thorough degreasing process should then be carried out. Alternatively, you can use kerosene. To do this, use a rag soaked in kerosene to thoroughly wipe the glass and wait until it dries completely.
At the same time, the glass preparation stage also includes cutting it. There is no doubt that you will be able to achieve the final result without waste, especially if you need to cut a product of irregular geometric shape. But if you make the calculation as correctly as possible, you can reduce the amount of waste several times.
Also, make sure that the working surface is fairly flat and without slopes, but not too hard; it is advisable to make the working surface from plywood or fiberboard, and cover the top with oilcloth or soft cloth.
Windshield cutting
Moderator: User buggy
Windshield cutting
Post by wat » Tue Apr 01, 2008 4:29 pm
Posted by Goodwin » Tue Apr 01, 2008 5:21 pm
Post by Romich » Tue Apr 01, 2008 6:01 pm
Post by lunatik » Tue Apr 01, 2008 6:14 pm
Posted by Goodwin » Tue Apr 01, 2008 6:28 pm
Post by Voblin_UA » Tue Apr 01, 2008 6:36 pm
Post by lunatik » Tue Apr 01, 2008 6:48 pm
Post by lunatik » Tue Apr 01, 2008 6:50 pm
Post by Voblin_UA » Tue Apr 01, 2008 7:29 pm
I wanted to answer sharply, but I’d better explain it clearly. Safety precautions are written in blood, this time. The use of polycarbonate for windshields is prohibited. From my own experience of using polycarbonate glass in a sports car, they get scratched instantly. I apologize for the size of the photo, but for clarity, here’s a look at the transparency of the side glass:
And take into account, this is the side glass, into which pieces of dirt do not fall from the front, earth and sand do not fly, which does not rub against this sand with wipers, etc. Basically, decide for yourself. It’s just much more reasonable to adapt to sports technical requirements, because they are reasonable and have been repeatedly confirmed in practice. You don’t have to consider yourself smarter than several generations of athletes and designers from all over the world. So I would recommend keeping your categorical attitude to yourself, and even more so refraining from making recommendations. Because if, due to problems with transparency, a tree or ravine unexpectedly crosses your path, then believe me, polycarbonate also breaks, and into large and sharp pieces. And it’s better not to check this from your own experience. Because with such an approach, I’ll give you a hundred rubles that there won’t be a pipe correct for the frame of the car, no high-quality welding, no normal seat, no seat belts (especially fastened ones), no helmet. I'm not a megaguru building everyone here on windowsills. It’s just that I’ve been racing rallies since 2004, and I’ve seen some things, and I don’t remember all of them without shame or with particular pleasure. For example, how our wipers jammed and we still didn’t slow down, even though the glass was dirty and far from being properly transparent. Just at the level of the side ones in terms of condition. And how, in this form, we flew at 130 km/h onto a series of jumps, and by the third we were so shaken that we came out of it with our rear wheels up, I saw the ground in front of me like a book. And we didn’t tumble over our face simply by some miracle, but at the same time thanks to the lack of front overhang and the gas not being released. But negligence in preparing a car can end badly, very badly. I’m already silent about the fact that people here very often build a car from whatever they can in terms of materials. I was trying not to be boring, but then it just burst into me. And the dog said that this pipe weighs like a battleship, it’s just plasticine. And look at your frames. There are very often no diagonals in them that would keep the main arc from folding during a revolution. There is no headroom (minimum 80 mm), often the front arch, above the windshield, is located very low, and in the gallery of completed projects for some it is exactly opposite the forehead, and there is no smell of seat belts there. And so many people have already been killed because of their own trivial stupidity, when they considered themselves armor-headed and decided not to wear seat belts, saying, how long will it take to drive here, we’ll take it slow, etc. And they arrived with their heads in the frame. So you already have a lot of problems when developing and assembling cars, so at least don’t joke with the glass. And don’t, I repeat again, don’t consider yourself smarter than several generations of real professionals, but rather figure out why something in a sports car is done this way and not that way. Strive for the best and don't talk nonsense. Because you need to learn from other people's mistakes. Sincerely.
Glass preparation
Often many people simply forget about this important point. But high-quality glass cutting with your own hands is impossible without preliminary preparation. New glass should be wiped with a damp cloth. After it dries, wipe dry.
Some experts recommend using newspaper rather than a rag. It will not leave lint on the glass that could interfere with the movement of the glass cutter.
Glass that has already been used cuts much worse and requires more careful preparation. They are washed using special detergents, and after drying, degreased with turpentine or kerosene. During the drying process, it is necessary to prevent dust from entering the sheet.
Before cutting glass
Previously, both glass and the tools for processing it were expensive and only craftsmen with good skills were engaged in cutting glass, but in our time the situation has changed significantly. Nowadays, anyone can work with glass.
Tool
To work with glass, you need a very good tool.
That’s why, before you buy glass and work with it, you need to start shopping with the tool.
But you shouldn’t buy the first tool you come across, because it may be of poor quality and will not be able to cut the glass as needed.
It is very important to determine what tool you need, because there are several types of glass cutters:
- Roller;
- Diamond;
- Oily;
Roller
The roller glass cutter for cutting glass has a built-in special roller, which is made of a very durable tungsten-cobalt alloy. The usual roller diameter is 6.6 mm, this roller diameter allows cutting glass up to 4 mm thick.
Diamond
The diamond glass cutter is equipped with a correspondingly small diamond, this diamond cuts glass. The hardness of diamond is well known and therefore it has long been used for cutting glass.
Oily
Not long ago, an oil glass cutter was added to the list of glass cutters.
This is essentially an improved roller tool that has a reservoir built into the handle to supply lubricant to the roller. This lubricant binds particles that were formed when cutting glass while ensuring smooth movement. This glass cutter can cut glass up to 20 mm.
A couple of purchasing tips
- Before purchasing any type of glass cutter, it is best to ask the seller to check the tool.
- If you are satisfied with the instrument, then you can buy it, but buy the one that was demonstrated to you.
It is not recommended to buy an untested tool, since in most cases the cutting edge is defective.
Production cutting methods
One of the advantages that allows plexiglass to be widely used is light weight and good flexibility. This is especially important when installing a gazebo or greenhouse, since the creation of these structures often requires a large amount of organic glass of various sizes.
Many people are interested in the question of how to cut plexiglass, and what tools are used for this ? After all, if you do not know certain technological subtleties, it is quite easy to damage this material. To process large volumes, industrial cutting methods and related equipment are most often used:
- milling cutting;
- laser cutting;
- band saw cutting;
- cutting with a circular saw.
Some time ago, the most commonly used were special milling machines that had a shaft rotation speed of at least 4000 rpm. Milling cutting of plexiglass is used in cases where it is necessary that the material does not have time to quickly heat up in the cut area. After cutting, a number of additional operations are usually carried out, including polishing or engraving.
Today, one of the most popular methods is laser cutting of glass. Only in this way can an accuracy of up to 0.005 millimeters be achieved, which was made possible thanks to the laser beam width of 0.1 millimeters. The edges of the cut are immediately transparent and absolutely smooth, and there is practically no waste.
Industrial cutting of polycarbonate or polypropylene is carried out in the same way. The downside is that this method affects the internal stress of the material, after which it is not recommended to glue such a composite.
Band saws are most often used for cutting plexiglass blanks. The negative side of this method is that the cut will be somewhat curved. A circular saw makes a straight cut, but you must know how to work with this tool, and also follow certain rules of caution while working.
Cord and kerosene
Woolen or cotton rope with a diameter of about 1 mm is soaked in a flammable liquid, such as kerosene. Next, the cord is fixed where the cutting line will be and set on fire. As soon as the rope is completely burned out, cold water is poured onto the surface of the glass. A heard click means that the material has cracked due to a sudden temperature change. The method may not work the first time, in which case the steps are repeated again. Important: the ends of the cord should not hang down, the work table is protected from fire with a tablecloth made of non-flammable material, the fire extinguisher is located nearby, ready for use.
How to cut glass without a glass cutter
Before we begin a detailed description of glass cutting techniques, we would like to remind you about safety. Always wear work gloves and safety glasses while working to avoid cuts and small debris getting into your eyes. Be careful not to apply excessive pressure to the glass.
Burning thread
We soak the thread in a flammable liquid and fix it on the glass along the cut line. We set it on fire, wait for it to burn completely and immediately place it in cold water or pour it onto the heating site. The main thing is that the glass cools down as quickly as possible and bursts due to temperature changes. A characteristic click will signal the success of the work. If the glass does not crack, you can try repeating the operation.
This method breaks bottles fairly smoothly, but does not always work with large glass sizes. It is also very fire hazardous and requires a fire extinguisher or a container of water on hand, which is already required.
Soldering iron
Having marked the line of the future cut on the glass, take a file and make a small groove with it from the very edge. Having retreated 1-2 mm from it, we heat the place with a soldering iron until a microcrack forms between it and the mark. Next, we retreat from the crack itself to the same distance and gradually move towards the finish point. This takes a long time to cut glass, but you can get any shape. To speed up the process slightly, the glass can be periodically cooled by applying a damp cloth to it.
Scissors in water
A simple method of directional chipping of glass. Allows you to easily cut out round shapes, but is not suitable for creating straight lines. For such cutting, you will need ordinary scissors and a container of water, which will serve as a kind of lubricant. The maximum glass thickness should not exceed 4 mm.
The cutting process using this technique is extremely simple. We take a piece of glass to be processed, immerse it in water and break off small pieces from the edges with scissors. Water will prevent the glass from cracking, allowing you to make a controlled chip. In this way you can get oval and round shapes.
Diamond blade
Not the safest way to cut glass, requiring increased care and mandatory compliance with safety rules. It can easily break glass and throw a fragment in any direction. Otherwise, the method is quite effective and can cope with the task. For cutting, you will need a special tool (grinder, drill or drill) with a diamond disk 0.1 mm thick.
The cutting process itself is quite simple, but it requires some skill and a steady hand to guide the tool clearly along the line. We place the piece of glass to be processed on a flat place, then take a cutter and draw a line on the surface of the glass with a disk. The main thing is not to dive deep, but only lightly touch it so that a small hollow is formed, similar to a wide line from a glass cutter. Next, we simply break the glass in the right place.
To reduce the likelihood of glass chipping and reduce the amount of glass dust while working, you can periodically water the cutting area with water.
File
Another way to cut glass at home without a glass cutter or expensive power tools. To work, you will need a file and a little experience in handling glass. Please note that the file must have corners, so a round one will not work.
To cut glass, it is enough to make several cuts on its surface with the corner of a file. You need to apply a little more pressure on the file than average so that the force is enough to form a clear groove, similar to the cut of a glass cutter. When the place of the chip is marked, we simply break the glass on the edge of the table or by placing a match under the place of the cut.
This method requires a certain skill, and if you are faced with cutting glass for the first time, we strongly recommend that you practice on small, unnecessary fragments before moving on to the main material.
Pobedit drill
If you know first-hand what glass cutting is, then we suggest considering another way to cut glass without a glass cutter. If you have some experience, one drill with a Pobedit tip may be sufficient for this operation. The main thing is that the drill is more or less new, with sharp corners on the head.
The process of cutting glass with a drill is in many ways similar to a conventional roller glass cutter. The differences include a higher pressure force, but otherwise all actions are standard. We lay the glass on a flat surface, mark the cutting line, apply a bar, and draw a line along it from top to bottom. Before cutting, rotate the tip so that the sharpest angle makes contact with the glass. Having received a clear line, we break the glass along the cutting line.
The method of cutting glass with a Pobedit drill requires skill and practical experience in handling this material. Beginning craftsmen have very little chance of making an accurate cut using this method, but with patience and straight hands, the desired result can be obtained.
Fault
This technological process can be performed in several ways:
| Indications for use | Description |
| Thin workpieces up to 5 mm | The material can be broken by hand (to protect against cuts, wear fabric gloves). |
| Thick material from 5 mm | Use pliers or wire cutters to “bite off” a piece of the workpiece. To avoid damaging the material, it is recommended to place rubber or plastic tubes on the jaws of the tool. |
| Thick material and narrow strips breaking off | A pencil or a similar non-metallic object is placed under the workpiece, after which you need to press firmly on the glass with both hands on both sides. |
| Large pieces | The workpiece is positioned so that the cut is 3-5 cm from the edge of the table. After which, holding the half lying on the table with one hand, the other sharply presses on the opposite one. Be careful, a piece of glass may fall, with this method of breaking it is better to ask someone to help. |
How to cut a mirror without a glass cutter
The mirrors around us: in the car, bathroom or women's cosmetic bag, are in structure ordinary glass with a layer of metal applied to the back surface. Cutting glass with a mirror coating is practically no different from regular glass and can be done with a regular glass cutter or using the methods described above. When you don't have a special tool at hand, the most effective cutting tool is a file or diamond blade. Let's take a closer look at how to cut a mirror at home without a glass cutter, using improvised means.
The first step is to prepare the surface to be treated: wash, degrease and dry. The mirror must be clean, without stains or strong streaks. Otherwise, the cut line may be drawn and the chip will be uneven. The working surface where cutting will be done must be flat and not very hard. You can lay a thick cloth or a piece of linoleum on the table.
Having prepared the material and workspace, mark the line of the future cut on the mirror. It is better to draw straight lines using a ruler or staff with a height of at least 5 mm. To prevent the stop from slipping, you can glue a strip of electrical tape to its bottom. Next, take a file, grinder or other tool and make a cut along the marked line. A more detailed process of various cutting methods is described above.
When the cut is ready, all that remains is to break off the mirror in the right place. To do this, you can place a small object (match, pencil, nail) under the cut line and apply light pressure on both sides. You can chip the glass on the edge of the table or gently tap it from underneath with a small metal object (drill or spoon). If the glass does not break, you do not need to press very hard. It is better to make the second cut a couple of centimeters from the first.
How to cut a glass bottle without a glass cutter
Creating beautiful interior decorations from glass bottles is a great idea. You can use them to make magnificent lamps, original flower vases, interesting stands for accessories, and even legs for a small table.
Often, to produce such decor, you need to cut the bottle width, height or diagonally. This can be done at home, without a glass cutter or special equipment. There are two simple ways to cut a bottle.
First way
This method requires a thick cotton thread, a lighter, a flammable substance, a container of cold water and a large file or sandpaper.
In the place where the cut was to be made, the bottle should be tightly tied with cotton thread. This thread must be carefully moistened with alcohol, gasoline or another substance that is easily flammable. You should carefully light the thread with a lighter, and when it burns out, quickly lower the bottle into a container of cold water. Due to a sharp temperature change, the glass will crack exactly along the line of the thread. After this, you need to sand the cut using fine sandpaper or file the edges with a construction saw to avoid cutting yourself.
Second way
This method of cutting glass involves using nail polish, a lighter, a container of cold water, and sandpaper or a nail file.
This method is more suitable for cutting a bottle into shapes. Where the cut should be, draw a thin line with nail polish. You need to slowly run a lighter along this line so that the glass heats up well in the area painted with varnish. Immediately after this, the bottle should be lowered into cold water at lightning speed. A sudden change in temperature will cause a crack to appear along the line drawn by the varnish. It is important not to forget to carefully file the edges at the cut site using a file or sandpaper, so as not to get hurt.
How to cut triplex glass at home?
Mon May 21 2007 23:48, Alexander S Menshinin wrote Dmitriy Tkachenko:
DT>> Two 4mm glasses glued with film. DT>> How can you cut it at home?
AM> Diamond blade for ceramics?
Gets stuck in the film. All the diamonds will remain there.
Good bye! Serge aka Shumik ALFIST(GAV)YANDEX.RU AKA 2:5030/1165.42 AKA 2:5030/1080.128 It is necessary to harm bad singers by cutting their throats so that they do not organize gatherings. Atua Mati Riri |
Once (May 23, 2007 09:26), Oleg A. Yelokhin wrote All about Re: Cut
OAY> Try using a glass cutter on both sides?
It won't work. A glass cutter makes a concentrator and breaks along it, but here the second layer will not work. Even if it is possible to develop cracks uniformly across both sheets, the film will not allow separation, and forceful breaking can crumble the glass. If only with a good allowance and then grind on the circle. Or just a circle, but not a steel one with diamond chips, but an ordinary thin circle, which is used to sharpen a tool.
Cutting Rules
To quickly and accurately cut a workpiece, you need to follow several rules. They “work” for most synthetic materials: organic glass, polycarbonate and others. Let us list the basic rules on how to cut 4 mm plexiglass and other sizes at home.
- It is much easier to make a straight or curved cut if the part is heated. To do this, it is warmed up a little before processing. A hair dryer or gas burner is used as a heat source. Important point. In order not to melt the acrylic, it is kept at a distance from the heating device.
- For work, it is best to choose a canvas marked MP.S. This is high strength hardened steel.
- Sawing with any power tool should only be done at low speeds. Otherwise, the acrylic glass will heat up from the blade and melt. The speed for each device is selected individually.
- Do not cut material without eye protection. You must wear a mask or special glasses. During operation, many very sharp small fragments are formed, which fly away from under the cutting unit.
CUTTING TRIPLEX
The device for cutting triplex consists of two parts: a stationary frame and a carriage with cutters moving along it. The frame is welded from steel angles 50×50 mm and a steel pipe with a diameter of 48 mm.
The carriage is a simple device that moves along the vertical stand of the frame on three reel wheels. Diamond-coated hacksaw blades purchased from a hardware store are used as cutting tools. The canvases are cut with metal scissors and holes are drilled in them for the fixing pins. In addition, a glass blank is attached to the vertical posts of the frame with clamps through porous rubber gaskets.
Device for cutting triplex glass:
1 — horizontal support (steel angle 50×50), 2 — vertical stand (steel angle 50×50, 2 pcs.), 3 — processed glass, 4 — clamp (3 pcs.), 5 — horizontal connection (steel angle 50 ×50, 2 pcs.), 6 — guide (steel pipe Ø 48), 7 — pulley (steel, 2 pcs.), 8 — nylon cord Ø 6.9 — carriage assembly, 10 — brace (steel strip 50× 2), 11 — clamp-limiter (2 pcs.), 12 — counterweight.
Carriage:
1 — cutter holder (steel, 2 pcs.), 2 — compression spring (2 pcs.), 3 — bushing (fluoroplastic, 4 pcs.), 4 — cylinder (steel pipe 28×1, 2 pcs.), 5 — middle coil bracket (steel angle 45×45, 2 pcs.), 6 — bracket for upper and lower coils (steel angle 45×45, 2 pcs.), 7 — washer (steel, 2 pcs.), 8 holder bracket (steel rod Ø 12.2 pcs.), 9 - coil axis (M12 bolt, 3 pcs.). 10 — bracket (steel pipe Ø 27), 11 — coil (steel, 3 pcs.), 12 — cross link (steel pipe Ø 27), 13 — tension spring (2 pcs.), 14 — bed guide, 15 — workpiece glass, 16 — locking pin (steel wire Ø 2, 2 pcs.), 17 — cutter (diamond-coated hacksaw blade, 2 pcs.).
Glass is cut on both sides at the same time. The pressing force of the cutters against it is regulated by the tension of the springs. To avoid distortions, which is unacceptable, the carriage should be moved up and down using a cord thrown over two pulleys. To facilitate work, there is an unloading counterweight. Two clamps mounted on the stand are used as movement limiters. During operation, the cut line is generously moistened with water from a foam sponge.
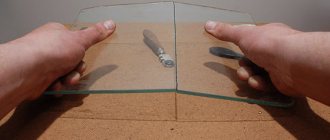
Having “sawed through” the glass, all that remains is to cut the film with a knife. No heating is required since the gap is wide enough.
If the corners of the triplex should be rounded, then this is done by successively cutting along tangents and then trimming the edges with sandpaper.
The glazing of my car made in this way has been serving perfectly for two years.
V. BEZRUKOV, Elektrougli, Moscow region.
We recommend reading
- SILVER TEAPOTS Every day we use a huge number of things and have almost stopped noticing them. But it turns out that in the production of seemingly insignificant things there is a lot hidden...
- SURGERY OF A CAST PLUG With frequent use of electrical and radio equipment that has a “molded” plug, the latter often fails due to a break in the power cord core in it. “Cast” electrical parts are considered...
Here you can evaluate the author's work:
Preparing for work - what tools are needed?
Often, in the hands of beginners, hardened material becomes unusable precisely because of haste and lack of experience. In such cases, the only correct option is a laser, but not everyone can afford to buy such a device. In this regard, you will have to look for another way out. Many experts advise working using the pre-annealing method. This will allow you to cut the glass quite accurately and use it for its intended purpose.
It is necessary to take into account the peculiarity that when cooling the annealed material, its outer side will cool much faster than the inner one. If the surface has completely cooled down, this does not mean that the inside is ready for cutting. Due to the fact that the glass cools slowly, the appearance of a large amount of stress in it is prevented. Because of this, it is possible to obtain a better quality cut. This is worth considering every time you want to cut material.
Glass cutter for working with glass
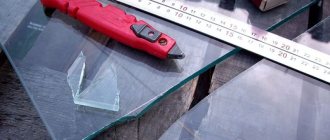
In order to do the job correctly, you need to prepare the following tools and materials:
- a piece of tempered glass;
- warm clean water;
- bake;
- a thermostat, however, if it is not there, then you can cut the material without it;
- square;
- marker;
- grinding stone;
- glass cutter;
- a wooden rod with a diameter of no more than 6 mm;
- glasses for protection.
Having prepared everything you need, get to work. When slicing, follow safety precautions to avoid damaging the skin of your hands and face.