Sandwich panel assemblies – Technical solutions
Instructions for handling and installation of panels.
- n
- 1) It is prohibited to transport several packages at the same time on the construction site.
- 2) It is prohibited to transport bundles longer than 6 m using a forklift. With such a pack length, the spread of the forks of the loader should be at least 1.7 m. (damping pads must be provided between the bottom sheet in the bundle and the forks of the loader)
- 3) It is prohibited to use steel slings and chains to unload and move panel packages.
- 4) When moving panels less than 3.5 m long, the distance between textile slings is taken equal to 2/3 of the length of the package.
- 5) To move packages 6m or more in length, it is necessary to use a traverse equipped with textile slings.
- 6) Panels in bags should be stored in their original packaging indoors or under a shelter. (Short-term storage of packages in the open air is allowed, provided that the original packaging is intact and the packages are protected from precipitation with waterproof material with the ability to ventilate the packages.)
- 7) When storing, bags must be placed on pads on a hard, level surface. When storing in multi-tiers, the linings must be oriented in the same vertical direction relative to the linings of the bottom panel. The height of the stack should not exceed 2.5 m.
- For natural drainage of surface water, the slope of the storage area must be at least 3%. The bags are also installed with a slope to ensure water drainage.
- 9) Manipulations with individual panels, depending on their size and weight, are allowed to be carried out in the following ways: -mechanized using special mounting devices) - may be recommended by the manufacturer. - manually and using textile slings - using special equipment with vacuum suction cups.
- 10) When moving panels, care must be taken to avoid significant deflection. Otherwise, it can lead to deformation of the locks and loose fit of the panels during installation.
- 11) It is prohibited to use angle grinders (grinders) for cutting panels.
- 12) It is necessary to use safety gaskets between the slats to prevent damage to the finishing layer.
- 13) Installation is not recommended in rainy weather or when wind speeds exceed 8 meters per second.
- 14) After installation is completed, the protective film is removed from the panels.
- 15) It is forbidden to walk on the panels!
- 16) In order to avoid scratches on the panels, the removal of each top panel from the stack for subsequent installation is carried out by shifting it so that the transverse ends of the panel being shifted and the one below it are parallel. Shifting the panels relative to each other along the longitudinal axis of the panels is PROHIBITED.
- 17) To avoid tearing off the metal coverings of the panels from the insulation, removing panels from the stack manually (as well as carrying them manually) by lifting the panel by its upper metal skin is strictly PROHIBITED.
- 18) Impacts on panels during installation, installation of fasteners, sealing of joints and junctions are NOT allowed.
- 19) Attaching ladders, industrial wiring, process equipment and fittings to panels is NOT allowed.
- 20) The surface of steel sheets of panels should be cleaned using detergents that do not damage the protective coatings of the sheets.
- 21) It is not allowed to use sand, alkalis and other substances that can damage the protective coatings of metal sheets to clean and wash the surface of the panels.
If the above requirements are not met, claims will not be accepted!
Assemblies of wall sandwich panels
Stable installation of sandwich panels is ensured by preliminary assembly of the supporting frame or the presence of existing building structures for fastening sandwich panels and distributing weight loads.
The wall sandwich panels themselves, used as fencing, are not designed to be used as load-bearing structures. The supporting frame of the building can be assembled from shaped metal or wooden beams. The foundation of the building, depending on the type of soil, can be strip, slab or with a grillage on driven piles. The method of assembling sandwich panels depends on the presence of the base part and the width of the supporting strip of the foundation structure.
Installation of wall panels on foundation structures
Sandwich panel units can be installed supported on the foundation or fixed to it with a side connection. In places of support installation on the plinth, the presence of thermal insulation or wooden beams is provided, as well as ebbs from additional elements that are laid along the entire perimeter of the building.
When hanging panels, two corners are fixed to the base part of the foundation. One serves as a load-bearing support, and the second holds the panel in a vertical position. A strip of sealing material is provided between the base and the sandwich panel. Protection from the adverse effects of precipitation is provided by installing low-tide extensions along the entire adjoining line.
Assembling the wall structure
Installation of sandwich panel assemblies can be carried out with external or internal arrangement of parts of the supporting frame. In each case, all end sections must be protected with a waterproofing layer and metal extensions of the appropriate profile.
The sandwich panels are fastened to the supporting frame using long self-tapping screws with washers on rubber gaskets. The joints between the sheets must provide additional thermal insulation and a waterproofing gasket.
Ordinary and corner joints are covered with additional elements for protection from atmospheric influences. The best fastening option is to match the supporting frame element with the joint between the sandwich panels, since in this case additional sealing of the joint is provided.
What is a layout diagram, why and who needs it
Layout of sandwich panels is a set of drawings, specifications and attached documents that allows you to correctly perform all the work on installing and sealing a wall enclosure or covering an object. This kit includes:
- facade drawings or roof plan with factory marks of wall panels or covering panels; marked fastening points and joints with each other and with other structures, incl. filling openings - windows, doors, gates;
- specifications, which calculate the number of wall or roof panels by brand, the total length of each type of flashing, the required weight of hardware, the length of seals and the approximate weight of the sealant;
- Detailed drawings of the components are included as accessories in the project.
Such a detailed study of wall and roof fencing will minimize the possibility of incorrect installation of panels or installation of an assembly unit, as well as simplify operational quality control over the installation of sandwich panels and sealing their joints. As a result, the customer will receive a durable wall fence or covering structure with good frost resistance and water resistance.
Possibilities of sandwich panels
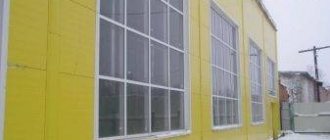
Depending on the technological features of the facility and the architectural requirements for it, wall sandwich panels can be mounted horizontally or vertically.
When cutting horizontally
façade sandwich panels are attached directly to the main columns of the frame. Their length is equal to the distance between the axes of the columns or more if the corner of the building is closed. The features of horizontal cut sandwich panels include:
- the need for half-timbering only in places where doors and gates are installed;
- high tightness of the tongue-and-groove joint;
- minimal labor costs for the installation of horizontal joints, since their compaction occurs from the weight of the upper sandwich panel.
Horizontal cutting of the wall fence visually lengthens the building.
When cutting vertically
facade, the sandwich panels are fastened to the half-timbered crossbars, and their length is equal to the height of the wall. Vertical cutting of wall fencing is used based on technological or architectural requirements. It is more difficult to install and more metal-intensive, but at the same time:
- minimizes the number of seams that are sealed manually, reducing the importance of the human factor, which increases the thermal efficiency of the wall enclosure;
- makes the building visually taller.
The choice of the type of wall cutting is made by the design organization developing a complex project, based on an analysis of a number of factors.
Source: kraftspan.com
Assemblies of roofing sandwich panels
The design of sandwich panel assemblies always provides for the presence of waterproofing gaskets, thermal insulation and a protective coating with an additional element. In this case, each joint must be protected by installing an additional element made of sheet steel. The panels themselves are secured to part of the supporting frame made of shaped metal using long self-tapping screws with washers on rubber gaskets.
Two types of joints during installation
Depending on the accepted type of roof slope and the presence of overhangs, the insulation of joints at junctions with wall elements can be simple or reinforced. Simple protection of joints during the assembly of sandwich panels involves laying a sealing tape over the mineral wool insulation. With reinforced insulation, a waterproofing layer is located in the upper space of the joint.
Ridge extensions are installed after attaching the sandwich panel to the supporting structures, sealing the joint with thermal insulation and covering it with insulating tape. The ridge itself is fixed using self-tapping screws to the metal panel.
Installation of sandwich panels
Hello, friends, in the article installation of sandwich panels you will learn how and how to install sandwich panels, what tools are used, installation rules, my story of how we installed the panels for the first time at a construction site. I will provide a technological album for downloading on the installation of sandwich panels with assemblies of windows, doors, roof ridge and much more.
installation of sandwich panels
In the article on installation of metal structures, I promised that I would write an article on this topic and provide an album for downloading on panel installation units.
Work on the installation of sandwich panels begins, after the installation of the building's metal structures, the base is laid out around the entire perimeter, the panels and fasteners are supplied (delivery and acceptance to the construction site) for the entire building. What a plinth should be like and how it is made can be read in the article “Construction of a plinth.”
The installation of metal structures is completed by applying an anti-corrosion coating (cleaning and painting) to all welded joints and checking the geometric dimensions, verticality, and flatness of the frame. The construction of the plinth ends with the laying of waterproofing over it.
The supply of sandwich panels begins long before their installation, during the installation of metal structures and the construction of the base. The main thing is to prepare the storage location; on uneven ground, the panels bend under their weight and become unusable.
Panels are ordered at the factory based on the drawings of the architectural part of the AR according to the layout, which indicate the dimensions, location of each panel and their color. Panels are delivered to the construction site on pallets with insert sheets, which indicate the object, volume in square meters, type (wall or roofing) and information about the manufacturer.
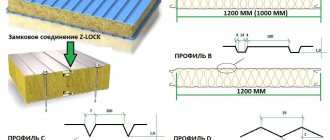
Layout drawing of sandwich panels
Start of installation of sandwich panels.
When everything is ready and equipped, the installation order will be determined. Depending on the size of the building, the panels can be mounted in a horizontal or vertical position.
Sandwich panel tape
Before installing the panel on the columns and crossbars, special self-adhesive tapes are glued at the points of contact. The tapes reduce vibration and ensure a tight fit of the panels to the building structures.
The panels are secured with special self-tapping screws made of carbon or stainless steel with a seal, with a metal drill if they are attached to metal structures.
If the building frame is made of wood, then the panel is pre-drilled and secured with wood screws. They are attached to the concrete with special dowels after pre-drilling the panels and concrete structures. The length of the self-tapping screws is selected based on the thickness of the panels.
If the panel is 50 mm thick, then use a 75 mm screw or a 200 mm panel then use a 240 mm screw.
Installation of sandwich panels begins from the corners of the building. The panels are mounted using special gripping clamps. Clamp is a special screw grip with rubber-coated jaws, with loops for lifting by crane.
Traverses with a vacuum grip are also used to lift the panels. If the panel is not large or heavy, it can be lifted and secured manually. The panels are mounted taking into account all the technological holes specified in the project.
Installation of roofing sandwich panels
Openings for windows, doors, utility networks are marked and cut out on the ground. In this case, the proverb “measure seven times and cut once” is very useful; panels cost from 1,500 rubles per 1 m2 and if they are not cut correctly, then in most cases you will not be able to install it anywhere.
Mark the holes on the sandwich on both sides and cut it with an electric jigsaw with metal files. When cutting with a grinder and a metal cutting wheel, the edges on the panel turn out torn. Screwdrivers are also used to fasten panels with screws to the building structure. The equipment used is a crane and a telescopic tower, which work in pairs.
Completion of the installation of sandwich panels
After installing the panels, preparatory work begins for the installation of windows and doors. Windows and doors are not attached to the panels themselves, but to metal plates welded to the columns or crossbars of the building. After this, windows and doors are installed and the final stage is the installation of shaped elements.
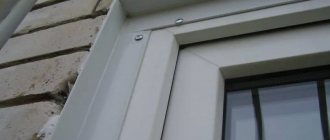
Window fastening unit to sandwich panels
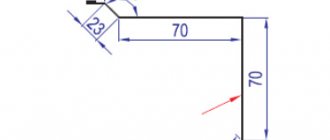
Before installing the shaped parts, all empty cracks are filled with polyurethane foam. Shaped elements consist of strips, window sills, ebbs, external corners, cornices.
Installation of vertical flashings will be inserted from the bottom up, so that the whips are located along the flow of water to prevent it from getting inside. The shaped elements are fastened with self-tapping screws and the joints are sealed with sealants. How to properly seal and the consequences of poor quality work can be found in this article.
General principles
When purchasing sandwich panels, you must immediately buy shaped elements: strips, corners, profiles, ebbs, etc. You must also stock up on the required number of fasteners and sealants. It is recommended to purchase all components from the same company that manufactured the panels.
Sandwich panels are connected to each other with self-tapping screws. Dowels are used for fastening to concrete. The panels are attached to the metal using metal screws.
The resulting small gaps are filled with mineral wool or polyurethane foam. All panel joints and junctions are additionally sealed with special sealants for a given climate zone.
My experience in installing sandwich panels
Everyone has ever had to do something for the first time. This was the case with my editing work. It seems like you read all the instructions, study the drawings, and still, while working, you wonder if you’re doing it right. This is because you don’t know what result to expect.
The article “My Construction Site 3” describes the beginning of my next shift at a construction site and my first acquaintance with the installation of sandwich panels and their dismantling. At this checkpoint facility, sandwich panels were installed and dismantled 5 times.
The panels are installed once, as they break easily and the insulation peels off. The appearance of these panels has deteriorated greatly after repeated installations.
Measurements, alignment and rotation angles
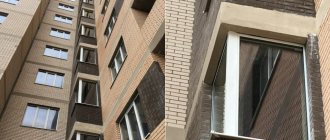
Visually, the slope panels are a continuation of the window frame, so close attention must be paid to their careful alignment. There are, however, technical techniques that seriously simplify the process.
A spacer strip is installed along the outer perimeter of the opening flush with the wall. If the wall has potholes and sagging, the lath is placed at the most protruding points. For fastening, plastic plugs and hardened screws are used, which, after fastening, are adjusted with a screwdriver.
A few words about sandwich panels
Sandwich panels for window slopes consist of two plastic sheets, between which there is insulation. The latter can be used:
- polyurethane foam;
- extruded polystyrene foam;
- free foam plastic.
Thanks to the presence of insulation, the amount of heat loss through the window opening is reduced. As for the plastic itself, it comes in a variety of colors. This allows you to select panels for any window.
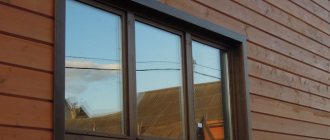
Many people believe that sandwich panels are intended for plastic windows, however, they can also be used for wooden double-glazed windows. Thanks to this finish they will not freeze.
Another advantage of this solution is that windows in sandwich panels do not fog up (provided there is normal indoor humidity). In addition, the material is easy to install, as you can see below, and also does not require additional finishing, which is also a big advantage.
Thus, finishing sandwich windows with panels is one of the best solutions.
I would like to note that there are also metal sandwich panels, which are often used for the construction of all kinds of sheds, hangars, etc. Installing PVC windows in sandwich panels is associated with a number of difficulties.
Most often, for this purpose, the opening is sheathed with a profile or board (if the room is heated), and only after that the windows are installed in a sandwich panel. However, this is a topic for another article, which we will talk about next time.
To simplify the installation of windows in sandwich panels, use special fasteners
After the window is installed in a sandwich panel, the foamed area on the outside must be immediately hidden with platbands, otherwise the foam will quickly turn into dust under the influence of sunlight.
What materials should be used
When finishing slopes, the developer most often makes mistakes in choosing the material. The rule here is simple: the angle between the slope and the frame must be filled with plastic and elastic material, this is the only way to guarantee that cracks will not appear when the building settles. The problem is that sealants have not yet been invented that would have the same high adhesion to plaster or drywall as to plastic. Therefore, the most suitable material for arranging good slopes is plastic honeycomb and sandwich panels for interior decoration.
Additionally, you will need one or two cylinders of good quality polyurethane foam for normal temperatures. You will also need a spacer strip along the perimeter of the opening. In special kits for installing slopes, it can be supplied in the form of a plastic profile with grooves. If you collect materials at random, you can use a wooden plank of approximately 15x40 mm.
The slopes can be additionally insulated; for this purpose, mineral wool with a density of 40 kg/m 3 is packed into the gap between the panel and the opening. Consumables include plastic plugs, self-tapping screws and decorative sealant containing silicone.
Installation technology
The process of installing slopes consists of several stages:
Main stages of installation
It should be noted that finishing the slopes of plastic windows with sandwich panels and wooden ones is done in the same way. Next I will tell you in detail. how work is carried out at each of these stages.
An example of leveling a window opening with wooden slats
Surface preparation
Before. How to install sandwich panels on windows, you must prepare the surface. This is done as follows:
- First of all, level the window opening. To do this, remove old pieces of plaster and other irregularities. In some cases, to level the opening, wooden slats are installed around the perimeter using self-tapping screws or even dowel nails. When installing the slats, be sure to use a building level to ensure that the window opening is level ;
- you also need to trim the mounting foam between the double-glazed window and the window opening, which may interfere with further work;
- then the opening must be cleaned of dust. To do this, vacuum the surface or wipe with a damp cloth.
Now that the opening is prepared, you can proceed directly to installation.
Installation of the starting profile
Installing window slopes from sandwich panels involves installing a U-shaped profile around the perimeter of the window. This work is carried out in the following sequence:
- First of all, measure the window frame around the perimeter;
- then cut the profile into strips of the required length. To do this, you can use a mounting knife or special scissors;
- Now, using a building level, mark the location of the profile on the window frame . This is necessary so that the vertical guides are positioned strictly vertically, and the horizontal guides, respectively, horizontally;
Example of mounting a starting profile
- Now attach the guides to the window frame according to the markings using self-tapping screws. The latter should be located in increments of about 20 centimeters.
This completes the installation process of the guides.
Cutting
Cutting is a very important stage, so the work must be done carefully and carefully . The instructions look like this:
- First of all, measure the outer sides of the window opening;
- after that, measure the depth of the opening on each side in several places;
- Now, according to the data obtained, you need to apply markings on the panels, taking into account the fact that their inner ends, i.e. adjacent to the glass unit must correspond to the length of the guides. To simplify this task, you can use a special angle meter (small), which will allow you to measure the angles of the opening, and then use it as a template for marking;
- Now you need to cut out the blanks according to the markings. To do this, you can use a jigsaw, a mounting knife, or even a hacksaw.
There is low-quality material on the market that quickly turns yellow in the sun and even cracks. Therefore, it is advisable to make a purchase at a large hardware store. However, keep in mind that the price per panel starts from
600 rubles per m2.
Useful tips
When making slopes from sandwich panels, you must adhere to the following recommendations:
- For hot climates, it is better to choose a material with a renolit coating. This film will protect the slopes from high temperatures and deformation.
- When working, it is important to take into account the coefficient of linear expansion.
- To prevent cracking of the top layer of panels when cutting, it is worth using a circular saw with small tooth pitches.
- Do not cut parts at low room temperatures (below +5). Such conditions lead to brittleness and cracking of the material.
- When choosing a starting profile, you must take into account the recommendations of the panel manufacturer.
- Before installation, wooden slats must be dried and treated with antiseptic impregnation.
- The joint sealant must completely match the color of the panels. After drying, the difference in shades will be obvious.
Finishing window slopes using sandwich panels is a simple option for completing the installation of new windows. This material is characterized by high performance, ease of installation and ease of maintenance.
Sandwich panel fastening units
There is probably no need to say many times that sandwich panels are quite a popular product. A lot depends on the correct installation of these products. Namely, the durability and strength of the entire structure. If the work is done poorly, then nothing good should be expected.
Sandwich panels are one of the most common and most popular building materials used for assembling prefabricated structures. In addition, they are successfully used for cladding walls, ceilings, various partitions, as well as for finishing and roofing work. This building material undoubtedly has a huge number of advantages. It is high-quality, modern and reliable, and is also distinguished by durability, functionality and mechanical strength. Such panels have excellent protective properties and, above all, they are incredibly easy to use. Many buyers have long been able to appreciate all the positive aspects of such products.