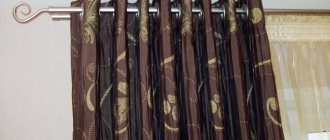
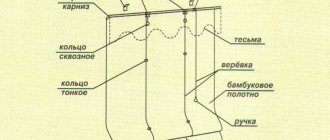
The interior of an apartment is a complete organism in which every element plays an important role. The window, the appearance is not in the last place here; the decor includes fabric and various variations. Beautiful curtains, unlike blinds, add a cozy atmosphere to the room and make the apartment warm.
Beautiful curtains in the interior
It is better to decorate windows with classic decor, using curtains with drapery - then they will be lush and recognizable. Bow folds on curtains can be made in different styles and types. Just always take into account that the presence of tape implies the possibility of the curtain tearing under strong tension, because at the seam the fabric becomes somewhat thinner.
When they want to make a curtain themselves, the first thing they do is buy even scraps of fabric. This does not mean at all that you can’t make beautiful folds on the curtains yourself. This is not such a difficult task that you should outsource the work to a professional and pay a lot of money for it. The advantage of working independently is that you can always correct the points you don’t like, try them on the window and see what the result is. Today we will figure out how to make folds on curtains ourselves, what is required for this, and so on.
How to make folds on a curtain?
Assembling a curtain with your own hands can be done in two ways:
- using a special braid;
- manually.
A distinctive feature of the first method is its simplicity and high speed. To form soft waves it is enough:
- purchase curtain tape with the required assembly factor from a specialized store;
- attach the braid, pull the threads located on it;
- straighten the bends carefully;
- tie the ends of the threads.
The result is smooth, uniform assemblies. Disadvantages of this method:
- it is not suitable for decorating dense fabrics;
- the threads may fray over time, and the braid will have to be replaced;
- Using tape you cannot make curly large folds.
More expressive options are obtained manually, but this process is labor-intensive. Also here you will have to make a preliminary calculation of the size, number of folds and, if necessary, the distance between them.
Secrets of choosing the right curtain tape for tulle
In order to get the expected result with minimal effort, you need to choose the right accessory. It is enough to know a few simple conditions:
- The tape can be secured to the canvas not only by machine stitching; curtain tapes with an adhesive base, which are fixed during heat treatment, are also widely known. They are precisely intended for thin gas material. This braid will perfectly hold tulle and its like.
- Depending on the shape created by the curtain composition, a tape with loops, a seal or pockets for hooks is used.
- The width and transparency of the fabric play an important role when choosing curtain tape. For tulle, a narrow, porous, almost invisible braid is most suitable.
- It is also necessary to take into account the number of cords running through the tape and the required intensity of drapery. This must be correctly compared with the size and quality of the material so that the resulting folds look harmonious.
Types of folds
Most often, when making curtains or lambrequins with your own hands, you get three fold options:
- one-sided - the fabric is laid evenly or at intervals in one direction in even waves;
- bow - are one-sided folds directed in different directions, the finished structure looks like a flat bow;
- counter - the opposite of bow ones, in them, on the front side, the folds of the fabric are directed towards each other.
Important
It will be interesting to look at a curtain in which one-sided folds go towards the center towards each other, and the central gather is counter.
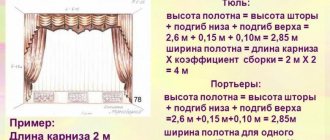
Calculating tulle into a fold
So, we take into account 6 meters of fabric, already processed on the sides and adjusted to the desired height.
We count: 6 – 3 = 3 meters. We subtracted 3 meters of fabric that would take up the space along the cornice. We have three meters left for folding.
If we take an arbitrary distance between the folds equal to 15 centimeters, then 3 meters / 0.15 meters = 20.
We get the number of intervals equal to 20.
If tulle with folds starts with a fold and ends with a fold, then the number of folds will be equal to 21. That is, there are 20 spaces and 21 folds.
We divide the remaining 3 meters by the number of folds = 21, we get 14.28 cm of tulle per fold.
It is advisable to draw it like this on the stand: divide 3 meters into 20 intervals, first lay a fold, which takes 14.28 centimeters, then a distance of 15 centimeters, then another fold, etc.
Seamstress tip:
You don’t have to place the folds on the stand right away; leave a loop of fabric and pin it with needles on both sides at one point.
Tulle pleats
By laying out the gaps along with the loops on the stand, make sure that the calculations are correct.
Now you can fasten the loops made of folding fabric on the stand with needles, having previously marked the shoulder of the fold, which in our case is equal to, for example, 3.6 centimeters.
This is how we get the desired fold. As a result, you get a fold about 7 centimeters wide and a distance between the folds of about 7 centimeters.
You can experiment on a sheet of paper and draw out different fold options on a scale and calculate the one that is most suitable for you based on its appearance.
Tulle folds can be folded not only in the form of a bow fold, but also in various other options, for example, a one-sided fold, where the fold is directed in one direction, either from left to right, or vice versa, from right to left.
Folds can be tucked, for example, from the center to the sides. This version of tulle with folds looks softer visually, the folds are not so strict, but more romantic.
Did the option of folding tulle by hand seem complicated? Then we move on to another, easier option.
What calculations are needed?
Before carrying out the calculation, it will be necessary to measure the length of the cornice and decide on the method of processing the side edges. The depth of assembly depends on the density of the fabric and the size of the window (the smaller, the narrower the parts should be made). Experts advise taking the depth of the part within 14-20 cm.
Unilateral
An example of calculating such a model for a cornice 1.2 m or 120 cm long. The width of each finished part is 10 cm.
You can calculate the required footage using the formula:
cornice length * coefficient + seam allowances
1.2 * 3 + 0.03 = 3.63 m = 363 cm.
If one piece of fabric is missing, then when stitching you need to make sure that the seam gets as close as possible to the inner fold line.
Bow
Bow pleats on curtains come with or without gaps. Any part consists of an external assembly width (a) and two internal widths (c).
Solid models
An example of calculating a continuous assembly (without gaps) for the above cornice. For this option, the coefficient is 3. Therefore, the fabric footage is determined as in the previous case.
Calculation of the number of bows:
cornice length / fold width
120/10 = 12.
Option with gaps
If you have chosen a fairly dense fabric for sewing a window curtain with your own hands or you need to save material, use bow folds with intervals of different sizes. The gathering coefficient depends on the ratio of the width of the fold (a) and the gap (b):
- a = b – the coefficient is assumed to be 2;
- b = ½ a - the coefficient will be equal to 2.5.
An example of calculation for the previously selected cornice with a coefficient of 2. The distance between the individual parts and the width of the fold is taken to be 8 cm.
- Let's calculate the fabric footage:
cornice length * coefficient + seam allowances
1.2 * 2 + 0.03 = 2.43 m = 243 cm.
If you have little experience in sewing with your own hands and doubts arise, it is better to add 15-20 cm in case of errors when laying the gathers.
The number of bows is:
cornice length /(a+b)
120/(8+8) = 7,5
Round to the nearest whole number – 8.
- Specify the size of the assembly and the gap:
a+b = 120/8 = 15 cm.
Therefore, the width of the fold and the gap between the individual parts are 7.5 cm.
After this, you can start decorating the fabric.
Manual laying option
Hand-folded tulle requires certain sewing skills, since it mainly consists of thin fabrics that are very slippery and capricious to work with.
The fabric slips and moves in different directions, therefore, if possible, such work should be given to a specialist, and if you still decide to try your hand at the work, follow a few rules.
Seamstress tip:
All sewing lines should follow in the same direction, this will help you avoid skewing the fabric.
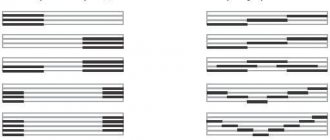
Tulle can be folded with different fillings of the fabric. The basis for the calculation is the distance along the cornice. For example, let’s take the distance along the cornice equal to three meters.
Ideally, there should be three times more fabric to place tulle on the fold, that is, 9 meters.
Tulle pleats
The principle of laying can be seen here.
But it’s not always possible to purchase 9 meters. Sometimes you already have fabric with a spacing of less than 1:3, for example 6 meters.
Double filling of tulle involves the arrangement of folds, in which the fold goes through a certain distance, it looks like: fold, distance, fold, distance.
Tulle pleats
Such tulle folds already need to be calculated.
How to lay one-sided models?
Laying one-sided assemblies is not very difficult. To do this you should:
- mark the fold and alignment lines, setting aside segments equal to the width of the fold (10 cm in the example);
- lay the first piece - take the fabric at the level of the third mark and pull it to the first, pin it together (line 2 will be inside the fold);
- move the fourth and pin at the level of the second and so on until the end of the material;
- after forming all the assemblies, they should be secured with machine stitching;
- treat the top with curtain tape, having previously pulled out the strings from it, or with decorative braid.
Curtain tape for curtains and tulle
Curtain tape resembles a ribbon and can be white or colorless. Along its entire length there are parallel ropes, and in the middle there is a dense layer with loops for hanging the curtains to the fixing device.
Curtain tape consists of fabric strips of different widths, along the entire length of which thin ropes or laces are stretched in one or several parallel rows.
The material for curtain tape can be either natural or synthetic fabrics of different densities.
Curtain tape is a special type of soft decorative fittings used to form curtain folds of various sizes and shapes. This is a kind of framework for all variations of assemblies. With the advent of tape, securing curtains has become much easier and more convenient. There is no longer any need to attach metal clips that damage the base or sew on eyelets manually. In total there are approximately 70 varieties of braid.
In the middle of the tape there is a denser layer with loops designed for hanging curtains from a baguette, and ropes are used to create gathers of the desired shape and size.
They differ in the following characteristics.
- Fixation methods. These can be eyelets, loops for hooks, strings, pipes, as well as sticky stickers.
- Fold configuration There can be many options here, which depend on the wishes of the customer or the imagination of the author.
- Dimensions. Braid from 1.5 to 10 cm is considered standardized. 2.5 and 6 cm are more in demand.
- Material. For draping airy organza and veils, fishing line is used, and for thicker, weighty textures, polyester, cotton and paper are used.
After tightening the laces, folds form on the surface of the curtain; they can be given the desired shape.
To remove the curtains, you just need to untie the laces and straighten the tape.
IMPORTANT! Curtain tape is sewn from both natural and artificial fabrics of varying densities. The braid, sewn from rigid materials, holds its shape perfectly
How to create bow folds?
In bow versions, the fold lines are located at the back. The central part (bow) is located on the face of the curtain, and the folds are connected on the wrong side.
When marking bow pleats, it is important to always start with a value of c. In the future, this distance is not laid down, but is wrapped on the opposite side. Next, you should make the markings according to the calculation (for continuous ones, 10 cm, for the option with intervals, 7.5 cm each). For greater convenience in the latter case, it is better to mark the gaps with colored chalk or a felt-tip pen.
After applying the markings, you can begin decorating. For solid model:
- lay the first bow - move the fabric at the level of the first mark to the beginning of the fabric, and align mark 2 with 3 and pin it. In this case, the fold lines should meet in the center of the bow. After this, the extreme bend can be released;
- second bow - combine mark 4 with 3, and 6 with 5. Pin both folds;
- continue until the end of the fabric;
- stitch and finish the top.
For the spaced option, the first bow is formed as described above. For the second bow: combine mark 5 with 4, and pull 7 to 6. Pin and similarly form the remaining bows and process the top of the curtain.
We sew curtains ourselves
You can make cylindrical folds on curtains yourself, the main thing is to buy braid and prepare thoroughly. If the operation is carried out exclusively by hand, then you will simply have to pull the strings sewn into the tape, but they quickly wear out and require replacement. And if the lace breaks somewhere in the middle, then you will have to completely rip out the top of the curtain.
Step by step instructions
First you need to calculate the folds for cascading Roman blinds. In addition, here you will need to calculate the dimensions from ceiling to floor, the width of the cornice. You also need to take into account the number of windows on which there will be curtains with drapery. If the fold depth is required within 15 cm, then initially you need to sew at least 10 cm with tape. When making initial calculations, you should add an extra 3-5 centimeters so as not to make mistakes with the fabric, otherwise there may not be enough for full folds.
After the fabric is ready, you should move on to creating high-quality drapery. To do this, a ribbon is sewn on, this is how a manual fold is made on the curtains. Before this, you need to remove protruding threads and laces; there is a special technology, but this is done by hand. Of course, if you have the skills to use a sewing machine and the seams come out smooth, then you can seriously make your work easier.
What you need to do the work
Regardless of what kind of drapery and type is required, certain tools and devices are always required:
Curtain fabric
- Curtain fabric;
- Tape, taking into account the type and quality of the material;
- Needles;
- Threads;
- Sewing machine.
When you first come to the store, taking into account the fact that you are planning to make folds on tulle curtains, immediately take fabric with a reserve. In order for the view to be beautiful and the curtains to cover the window, the calculation must be done as follows: multiply the desired number of folds by the depth. The resulting number should be added to the width of the curtain, which should cover the window as it is already completed. Well, plus small side hems, they require 2.5 cm on each side. The length from the bottom to the cornice does not change at all, here you only need to make an adjustment for the upper and lower processing.
Before beautifully laying folds on the curtains, smooth fabric, canvas, should be well processed.
The threads should be removed, the lacing should be tied, and the edges should be processed and stitched. This is best done on a sewing machine; doing it by hand will take too much time. Before stitching, it is advisable to practice on a scrap of fabric that you don’t mind.
Most of those who design curtains professionally do it by hand. When the fabric is sewn independently, the stitching of the fabric is tighter and the destruction of such an assembly is less likely. In this case, the labor intensity increases significantly, but this pays off due to the growing reliability of the fabric - if you pull a hanging curtain that is sewn on a machine, the colloquial line will remain on the cornice, and the curtain will remain in your hand.
Conclusion
DIY assemblies can be done using curtain tape or by hand. The first method is simple and does not require much effort. The second is more labor-intensive, but you can create beautiful, stylish folds.
Typically, curtains have one-sided, counter or bow options with or without gaps. The calculation and sequence of actions to create the necessary composition depends on this.
How to properly attach eyelets for curtains?
How to sew curtain tape and get a beautiful drapery?
How to make wooden blinds with your own hands?
Methods for attaching weights
If you wish, you can sew your own curtains with additional weights. A load, fabric to match the color of the curtains, a sewing machine, threads, and scissors are prepared in advance. Measurements are taken with a measuring tape or tape measure. The method of attaching coins or wire depends on the weight of the web.
Tulle and lightweight materials - use weights weighing 12-22 grams.
The sequence of internal fastening of the weighting material to the lightweight fabric:
- If the curtain is light in weight, it is recommended to sew the strips on the sides. It is enough to take 2 parts weighing no more than 22 grams.
- Each element must be placed in a fabric pocket, which is sewn separately.
- A small cut should be made on the back side of the bottom hem of the curtain, keeping an interval of 5 cm from the bottom. If the material is not tucked, then it is allowed to use curtain tape.
- A pocket with a weighting agent is inserted into the resulting cut and sewn to the curtain.
To insert the parts, preliminary preparation of the bottom edge or side of the curtain is required.
When the curtain is made of dense, heavy material, the weight needs to be sewn in in a different way. On the reverse side at the bottom there are several pockets into which coins or metal balls are inserted. The folded bottom of the curtain can serve as a place for placing the parts.
Curtain tape is sewn to cover the holes
It is important to secure the weights so that they do not fall out when the curtain is in an upside-down position. To fix a wire or chain, you must first fold the fabric 10 cm and stitch it
A weighting agent is threaded into the resulting hole.
To prevent the load from shifting, the side edges of the hem are sewn up.
It is not necessary to sew a special pocket to fix the curtains in one position. Frequently, loads are attached to the outside of the curtains. In this case, weights for curtains or products with holes are used. From scrap materials, old coins will come in handy. The bottom of massive curtains is decorated with fringe or pendants, but such a detail is appropriate in classic or retro-style interiors.
Another weighting option in the form of a special fringe sheet attached to the bottom is suitable for massive heavy curtains.
The weighting material on organza curtains does not need to be placed in a special pocket. Here a special cord is used to match the curtains and is sewn on the back side of the fabric. It is prohibited to use chains and slats for curtains made of organza.
To sew weighting to organza, the material chosen for balancing is sewn directly to the bottom edge without forming a pocket.
How to sew on braid
Before starting work, you need to prepare the necessary tools and equipment. You will need thread, scissors, chalk, measuring tape, pins and, of course, a sewing machine.
Everything is prepared - you can start working. The author of the GidShtor website figured out how to properly sew curtain tape to a curtain.
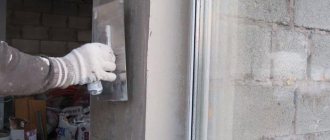
- The first step is to cut the edges on the fabric from which the curtain will be made. Usually the factory hem tightens the material and the curtain wrinkles at the hem on the side, so it’s better to cut the edge. To make an even cut, you need to pull out the thread along the entire length at a distance of 1.5-2 cm from the side edge and cut the material strictly along the resulting line.
- Next, fold the side edges. To do this, wrap the material on the wrong side of the canvas twice, laying 2.5-3 cm each. It is better to pin the hem with pins or baste with large stitches, but experienced craftswomen can do without this. The side seams are stitched and steamed with a hot iron from the front and back.
- Before sewing the braid to the curtain, the top of the fabric must be thoroughly ironed. To avoid shrinkage, the tape should also be steamed with an iron.
- Apply the tape to the front side of the material so that the top edge of the fabric is 1 cm below the top edge of the curtain tape. The side edges of the braid are folded inward.
- Sew the bottom edge of the braid onto the curtain, being careful not to pull the material.
- Turn the fabric inside out and fold the ribbon over. Pin along the entire length and sew along the very edge of the tape, constantly adjusting the fabric to avoid the formation of wrinkles.
- If there are two or more cords on the braid, you can place a seam in the middle of the strip, being careful not to touch the loops for the hooks and the tightening cord.
- The tape is sewn tightly to the curtain. Now you need to iron it again and close one side cut with a short stitch. On the other hand, the side edge of the braid is left open. This is a convenient place to hide the ends of the cords after the folds are completed.
- Pull the braid on one side, distributing the waves of folds evenly along the entire length. Having finished the drapery, the ends of the cords are tied and tucked into the side under the ribbon.
So, step-by-step instructions will allow any housewife, even the most inexperienced in sewing, to sew curtain braid on her own. In order not to make a mistake with the choice of accessories, you can use a small piece of material to see how the braid will work and whether the resulting drapery matches the overall design.
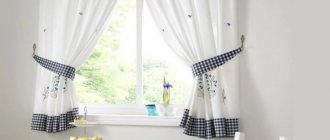
At what distance from the floor should curtains hang in a room?
The length of the curtains may vary. This value can completely change the room. Make it strict, cozy, stylish or homey. So, at what distance from the floor should curtains hang?
For the bedroom, it is better to select curtains that will lie on the floor covering. Thus, the room acquires coziness and comfort. Long curtains are also suitable for the living room. To prevent them from getting dirty when receiving guests, they can be raised using ribbons, laces or other clamps.
When sewing standard curtains, it is important to know the height of the room. The curtains should not reach the floor a little. To prevent them from getting dirty or torn off by children or animals, a distance of 3–6 cm is sufficient. For rooms with low ceilings, choose curtains that are flush with the floor. This will visually lengthen the room.
When decorating a room, do not forget that curtains are an important element. They should be in harmony with the design of the room in color and style. It’s easy to make a room neat, original and complete. All you have to do is listen to our recommendations and hang the curtains correctly.
How to properly and beautifully hang tulle on a curtain tape
If a very thin and delicate fabric was purchased for the curtain, when decorating it, it is important to know how to hang the tulle on hooks, and to be extremely careful and attentive, avoiding unnecessary punctures of the fabric, so as not to deform it
The braid sewn to the curtain allows you to decorate the window opening in an original way and drape the curtain with soft waves.
It should be noted right away that to work with such thin materials, you will need transparent or translucent tape. It is available in various widths. The craftswoman decides which one is suitable for decoration.
Curtain braid is a simple, quick way to hang light tulle, curtains or heavy curtains.
Before hanging tulle curtains, you will need:
- measure and carefully trim the fabric,
- cut off excess;
- process the edges and cut areas.
After this, you can sew the ribbon in the following order:
- bend the top edge to the width of the strip;
- carefully iron the edge of the fold;
- Tuck the edges inward and attach it to the edge of the ironed fold line, which will prolong its service.
As a rule, narrow (2.5-4 cm) braids are used on curtains where drapery is not needed.
Additional Information. Before starting work, it is necessary to wash the fabric so as not to spoil the finished curtain if it suddenly happens that the material shrinks after washing.
How to sew braid to tulle
In this option, a thin ribbon is suitable. The first step is to calculate the parameters of the tulle and braid. This is easy to do by multiplying the length of the cornice by the material assembly factor with the addition of 25 cm for deformation and processing.
There are also such types of ribbons as the column, which forms 1 to 2 gathers, and the Austrian ribbon, which forms various patterns and forms folds into “puffs”, “butterflies”, “glasses”.
A tape of 1.5-4 cm is considered narrow. It is necessary when the cornice is covered, when the hooks are covered with a special decorative strip.
When choosing a wide braid, follow the following sequence of actions:
- Carefully process the tulle on all sides except the top. If the material is loose, then additionally overlock it with an overlocker. You can pull back three threads and cut straight.
- Fold the tulle on top with the wrong side to the width of the curtain ribbon and iron.
- Apply tulle braid to the finished fold, stepping back up to 1.5 cm from the fold. The more complex the tails, the greater the distance required. Make sure that the braid does not protrude beyond the border of the canvas.
- Secure the ribbon with pins and baste it to the tulle.
- Sew the tape on the machine. The number of seams should match or be greater than the number of rows on the braid. To avoid creases, the material should be slightly stretched and always stitched in one direction.
- Finish the side edges and remove the basting.
Narrow tape is also used for short curtains made of lightweight fabrics.
If the braid is narrow, the upper cut is folded inside out by 2 cm and then stitched by hand. The curtain tape is secured with 5 mm pins. from the top edge. Then sew on in any convenient way
It is important to remember that the loops must be on the outside of the ribbon to secure hooks or rings
Just as there are many types of curtain tapes, there are also many options for decorative types of folds.
Note! When working with tulle, it is necessary to avoid unnecessary holes from needles and pins, as the material can become deformed. Tulle is an obedient material, and many novice seamstresses begin to “get their hands on it” with it.
How to sew curtain tape to a curtain: step-by-step instructions
To accurately attach the braid and hang the curtains, you need to know how to attach them to the cornice. An incorrect choice of canopy method can harm the author’s idea and spoil the design concept. In addition, this often causes the collapse of the entire mechanism. In construction hypermarkets you can see various samples of cornices. However, the most popular products are made of metal, wood, as well as ceiling and string models.
Curtain tape makes window decoration much easier, especially since you can easily sew it on yourself.
The methods for attaching curtains to them are as follows:
- Rings. The most inexpensive and common fastening method. In addition, they are often included in the main set.
- Drawstrings or pockets located along the top line of the curtain. Designed for fastenings with a circle-shaped cut.
- Clothespins. Suitable for weightless materials only.
- Clips. They are similar to clothespins, but lack the teeth. Designed for products made from weightless textiles. Some subtypes are equipped with locks and may have designer treatments.
- Textile loops are made from the same material as the main product or similar to it.
Tapes made from rigid fabrics retain their shape very well.
Next, using photos and step-by-step instructions, we will look at how to sew ribbon to a curtain. This master class will be useful for both beginners and more experienced craftsmen.