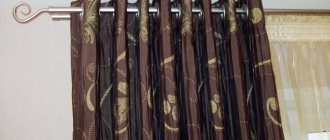
The modern variety of curtain products allows you to choose the most suitable option for any interior design. Housewives are happy to purchase lined curtains to decorate their living rooms and kitchens.
This version of curtains allows you to extend the service life of the product and give the fabric a more solid look. If you sew a lining layer to the curtain, the fabric will be reliably protected from scorching sun rays and humidity and temperature changes. There are some rules that, if followed, will allow you to sew the lining to the curtain fabric with your own hands.
First of all, you need to prepare the necessary materials. To work you will need:
- Lining material. Sewing hooks. Curtain tape.
To sew lined curtains in the photo, the lining fabric should be 12.5 cm smaller than the curtain itself.
Don't forget about allowances. You need to leave 9 cm at the top of the fabric, 4 cm at the sides. For stitching, it is recommended to use a regular stitched seam.
Basting
To sew curtains with lining by hand, you need to bend the bottom edge of the curtain by 5 cm, and the side edges by 4 cm.
It is important to get the corners right. They should be folded into an envelope, ironed and sewn with a goat seam. Next, fold the lining 20 mm and iron it.
The master class on how to properly sew the lining material to the main material recommends making guide marks using a square. Working parallel to the straight side of the fabric, use chalk to mark vertical marks on the wrong side of the base material. The distance between the marks should be no more than 35 cm.
The next step of the master class is pinning the lining to the main curtain using pins.
It’s easy to do it yourself: you need to attach two canvases with the wrong sides and fasten them with pins. To make the basting uniform, the pins should be laid along the intended lines. At the top of the product, the lining is sewn at a distance of 15 cm from the edge of the main fabric.
What fabric to choose for lining
For classic curtains, a universal lining fabric is considered to be plain cotton or mixed sateen in a neutral white, beige or cream color. If you choose a colored material, it will enhance the color of the curtain when exposed to light and give it a slightly different shade. In order not to make up the lining from several pieces, it is advisable to purchase fabric for it that is the same width or slightly wider or narrower than the main one and buy the same amount of both.
In cases where it is necessary to shade or insulate a room more, for sewing lined curtains, preference is given to dense materials with improved thermal insulation characteristics.
Stitching
The lining fabric for the curtains is sewn using a quilting stitch in the photo.
First of all, you need to bend the lining material along the first marking line and carefully sew it to the curtain. You need to start stitching at a distance of 15 cm from the top of the product. To ensure that the material lays evenly, there is no need to tighten the thread during the sewing process.
It should pass through the fabric easily and freely. Having started sewing along the top line, you need to sew the entire product in the same way. Once the lined Roman shades are ready, you need to pull out the basting stitch.
Cut out the panels
To cut a curtain panel, you need to decide on the length and width of the finished product. The width, as a rule, is determined based on the size of the window - the curtain should completely cover the opening. But if you need the fabric to cover not only the window, but also all or part of the wall, measurements are made with this calculation in mind. The length of the curtain can be of four sizes (the most common options):
- to the window sill (the fabric ends before reaching 1-2 cm);
- slightly below the window sill (10-15 cm);
- to the floor (does not reach the coating by 1-2 cm);
- long, lying on the floor (such curtains are made 15-60 cm longer than the height of the ceilings in the room).
Final stage
A master class on how to properly sew lined curtains ends with sewing curtain tape to the product. Doing it yourself is as easy as sewing a lining to a curtain.
Having sewn the ribbon, you need to gather the fabric into beautiful folds that will fall from the cornice. To be able to decorate a window opening with a finished curtain, it is recommended to wash, iron and immediately hang the product on the curtain rod. A properly sewn lining to the curtain will not only give the product strength, but also increase its service life.
A detailed master class on how to properly sew a lining to a curtain with your own hands is shown in the video.
A unique curtain for any interior
Double-sided curtains fit not only into a classic interior, but also into Provence, romanticism, art deco, and modern classics. Most successfully, they can be used to complement the design of a bedroom, office or living room, but if you think carefully about the colors of the panels, they will also favorably emphasize the decor of the children's room. At the end of the article there is a video series that presents many great ideas for using them in the interior of different rooms.
This video will be especially useful for those who do not know how to sew double-sided curtains with their own hands. We are sure that novice craftsmen will choose for themselves the most suitable option for designing a window opening.
Removable lining
If the curtain is made of expensive material that requires special care, seamstresses recommend making a removable lining for such a product.
As a rule, the addition of lining material allows you to darken the room or create additional thermal insulation. To be able to fasten and unfasten the lining material, we sew ribbons with buttons to the inside of the curtains. We sew them on at a distance of 40 cm from the side edges of the curtain.
Having measured the resulting rectangle from the sewn braid, we cut out a segment from a suitable material from which we sew the lining. Sew the second part of the braid with buttons onto the finished lining. The result is a removable lining material that is attached to the curtain if necessary.
Treatment with adhesive tape
A simple and convenient way for thin fabrics with a non-textured surface is using adhesive tape or braid. Injections with a needle will not leave marks on the material, and the edges of the curtains can be processed in a matter of minutes.
This method will be a lifesaver when you are in a hurry and don’t have a sewing machine at hand - carefully finishing the edge of the fabric by hand will take at least several hours.
To work you will need:
Let's get started:
- We bend the fabric (once), adjusting the desired length of the product.
- Smooth out the fold with an iron.
- We insert adhesive tape between the layers of the lower edge of the curtain and apply it again with a hot iron, fixing the hem.
Attention! If you are working with curtains made of heavy thick fabric or making a wide hem, glue the braid in several rows.
This method is quick to perform and “low-traumatic” for the fabric (since needles are not used), but not as reliable as classical methods with seams. After washing, the tape will come off and then you will have to repeat the operation.
In conclusion
If the curtain in the room does not darken the room enough or lets the cold in, you can correct the situation in a simple way.
Having cut out a lining from a suitable material, you should sew the piece to the curtain or make it removable. Recommendations from professional seamstresses will help you learn how to properly sew a lining to a curtain. Following the master class, you can easily transform the curtain, making it more light-proof and durable.
Lined curtains always look much better. In addition, the lining provides higher sound and heat insulation, and what is the main argument if we are talking about silk curtains, protects delicate fibers from the harmful effects of sunlight.
Finishing the edges of organza and tulle
Working with dense fabrics is not particularly difficult. The main thing is to decide on the hemming method and select materials (threads, braid) that match the color of the curtain. Another thing is thin fabrics with transparent tulle textures.
Organza is often used as light curtains in combination with thick and massive curtains. But finishing the edges of organza tulle is not easy. Trimming excess length fabric is done in two ways:
- At the desired level (along the cutting line), the fabric is sewn with a zigzag seam and only then cut off. This is done so that the thinnest threads of the material do not fray.
- In the second method, additional processing of the edge is carried out immediately after cutting off the unnecessary length with scissors. The edge is brought to a candle (or other source of open flame) and burned. But this needs to be done quickly so that only the threads sticking out at the cut ignite, and the main fabric is not damaged by the high temperature.
Now let's start hemming. We form a neat double hem, baste it and sew it on the machine. For a beautiful drapery design, use weights.
Advice! To properly process the edges of the organza, when forming a double fold, ensure that the hem is the same size across the entire width of the curtain. A broken geometry of a straight edge line will look sloppy on the finished product, and a slipped seam will be covered with unaesthetic folds.
Another way to process tulle made from thin fabrics is with bias tape. This elastic braid is used to trim the edges of coarse mesh curtains, veils or light curtains with embroidery. In fact, this is the same edging of fabric with a finished ribbon or a cut strip of material: a veil, mesh or organza is inserted between the trim halves folded in the middle and stitched.
Fashionable double-sided curtains bring elegance and grace to the interior of the apartment. Models may have grouped folds with laces. Curtains of this type are heavy, they are usually placed where it is necessary to protect the window from bright sunlight, to delimit space, for example, to separate one room from another or from a hallway.
Double-sided curtains protect the room from bright light and add sophistication and elegance to the interior.
Curtains that have a front and a lining are practical, cover windows well from sunlight, and have a longer service life compared to other types of curtains due to less wear. In addition to being functional, they have a decorative function: both sides are decorated, then you can change the front side depending on the time of year, mood, to create a festive accent. Now the market for double-sided curtains offers consumers a huge number of exclusive models from leading brands around the world. But if you have the desire and a little tailoring skills, it’s not difficult to sew double-sided curtains yourself. Let's look at some tips and tricks.
How to sew lined curtains
Curtains with lining are only slightly more difficult to make than without them. The consumption of lining fabric is equal to the consumption of the main fabric. Below is one of the ways to make lined curtains with your own hands:
Cut out the required number of main and lining fabrics. The lining fabric should be 5-8 cm narrower and 15 cm shorter than the main fabric. Mark the middle of the top and bottom lines with a notch on both the main and lining fabrics.
Place the main and lining fabrics right sides together, placing the top line of the lining 1.5 cm below the main one. Pin the side edges together and machine stitch the sides with an allowance of 1.5 cm. At the bottom, do not go all the way to the end of 20 cm.
Press seams. Turn right side out. Align the center notches of the lining and main fabric at the top and bottom.
Iron the folds. On the side of the lining, a border of the main fabric with a width of 2 to 4 cm was formed. A width of 4 cm is preferable, since the lining is better fixed and does not “walk” during use. Fold in a 1.5 cm seam allowance of the main fabric, covering the raw upper edge of the lining.
Stepping back 2 mm from the top line, pin the curtain tape, the length of which should be 10 cm longer than the width of the curtain. At the end of the curtain tape, which falls on the edge of the curtain in the center of the window, pull the ends of the cords to the wrong side of the tape and tie tightly, placing the knots close to the point where they exit the tape. Trim off excess ends.
Trim the end of the ribbon to 2.5 cm, tuck it flush with the fabric, and pin it with pins. At the other end of the tape, pull the cords at the level of the curtain fabric onto the front side of the tape and tie the ends together. Trim the ribbon to 2.5 cm, tuck it inward and pin it to the level of the fabric.
Sew along the curtain tape, departing 2 mm from the edges, also between the cords, always laying the lines in the same direction, making sure not to catch the cords. Along the bottom edge of the curtain, make a double hem 5x8 cm with ironing. Fold the seam allowances inwards at an angle of 45 degrees and sew the bevel by hand using a blind stitch. Hand hem the bottom hem of the main fabric.
Also make a double hem on the lining, 6x6 cm, so that it is 2 cm shorter than the main fabric. Sew using a sewing machine. Hand-sew the free ends of the lining with a blind stitch. By pulling the free ends of the cords, gather the top of the curtain into pleats to the desired width.
Tie the cords in a knot so that the folds do not come apart. Do not cut the ends of the cords, otherwise it will be impossible to straighten out the folds for cleaning. The number of hooks corresponds to the number of runners on an aluminum curtain rod, or every 5 cm for a plastic rail. Hooks will not spoil the hanging of a curtain with folds gathered with curtain tape.
The more there are, the better. Practice shows that one hook every 10 cm is not enough; sagging occurs. This is one way.
There are several known ways to preserve the ends of the cord in the finished product. Can:
use a special cord reel holder.
It has a hook on one of its ends, with which it is suspended from the cornice; insert the ends in a neatly wound form between the lines with which the tape is sewn. The thickening is almost invisible; sew a special pocket, etc.
Tips from craftswomen
Before you start making curtains, we recommend reading the recommendations of experienced seamstresses. They are happy to share their experience and tell you how to sew double-sided curtains. Most of their recommendations apply to lined curtains, since it is their sewing that usually causes the most difficulties:
- the best fabric for lining is satin: it is quite cheap, looks good and is easy to care for; you can also use silk and heavier curtain fabrics;
- when choosing the color of the material for the back of the curtain, it is better to choose companion fabrics that are similar in shade and texture, but contrasting options also look good in the finished product;
- if the main and lining fabrics require different care, then the back side should be made removable; an additional advantage of this choice is that in the summer the lining can be removed so that more air and light enter the room from the window;
- the back of the curtain should be slightly narrower and shorter than the front, so the lining will not protrude from the back, and the side sections of the curtain will fit beautifully.
Now let's figure out how to sew double-sided curtains. Curtains without lining are made in the traditional way. We will demonstrate the sequence of steps in the next section.
How to sew curtains with a removable lining
If a removable lining is used, the curtain may have a sewn lining or be without it. Due to the fact that the two fabrics will hang independently of each other, the effect of lush drapery may be less pronounced than in the case of a sewn-on lining. But the removable lining performs all other tasks just as well.
A curtain without a lining is sewn with a double hem on the sides of 2 - 2.5 cm, at the bottom - 5 - 8 cm. A removable lining is sewn in the same way, but its length should be 2.5 cm less when finished.
It is better to check its final length during fitting. The width when not folded can be significantly less than the length of the main curtain, but it is desirable that it still exceeds the size of the cornice by 1.5-2 times. Gather the folds so that the width of the lining is 2 cm narrower than the main one curtains. Thread special metal hooks first into the lining braid, then with the other end into the curtain braid.
Curtain tape can be placed on both the front and back sides of the removable lining.
Save
Save
Save
Loading…
You may also like
- Date: 04/01/2015 Comments: Rating: 51
If you want to decorate the windows of your home with curtains, you can sew curtains with or without lining. The advantage of lined curtains is their longer service life and solid appearance. This element will protect the material from the negative effects of temperature changes and sunlight.
Lined curtains have a rigid base and thereby increase their service life.
If you decide to sew curtains from a delicate material that cannot be machine washed, then using a lining is the best option. The color of this additional element must be chosen in accordance with the effect you want to achieve. The lining fabric should be narrower than the main fabric.
This will allow you to make the side seams completely invisible. If the windows face the sunny side, sew curtains with lining. It will shade the room better.
Finishing the edge of the curtain with a regular seam
But you must admit that without a bottom seam, a curtain made of the most expensive and exquisite fabric looks untidy - you can’t do without hemming. Going to a studio with such a small order will require not so much financial costs as time and effort. It is much easier to finish the edges with your own hands using a regular seam. You can do it on a typewriter or manually.
First you need to accurately determine the length of the finished product. To avoid making mistakes with your measurements, leave the fabric hanging for 2-3 days: it will stretch and take its final shape. The edges of the fabric can be processed using different seams: depending on the type of fabric used for the curtains:
- It is better to hem light materials (organza, veil) with a double hem. In this way, you can process the edge of the fabric without an overlocker, because the edge will be in the middle of the folded material, without being subject to mechanical stress during operation.
- The edges of multi-layer, dense or lined fabrics are processed with an ordinary fold.
You can process the edges of the fabric manually; this is even preferable for plain materials with a smooth texture - the stitches on the front surface will remain invisible. The main thing is to use a needle to hook only one thread of the main fabric. If you make the stitch wider, it will “appear” on the curtain in small stripes or dots.
To shorten curtains with a machine, cut the fabric to the required length, taking into account seam allowances, make a hem, baste and stitch the product.
To make the seam less noticeable, use thin threads that match the color of the curtains as closely as possible.
Sewing the main part of the curtains
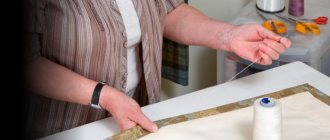
Before you figure out how to sew curtains, prepare the tools and other necessary equipment for the job. You will need the following:
Tools for making curtains.
- Material of suitable width and length. Tailor's scissors. Measuring ruler. Set of needles and thread. Sewing pins. Iron. Sewing machine.
First you will need to sew a regular curtain and then sew a lining to it.
Measure your window. Standard windows have a size of 215x170 cm, but come in other sizes. Take into account such important parameters as the distance between the cornice and the floor, the length of the window.
You can make the width at your discretion. The wider the curtain, the more folds you can make. Think about how long the curtain will be: to the window sill/battery or to the floor.
Don't forget about important things like seizures.
At the top, a 5-7 cm width will be enough. At the bottom, you need to make it 20-23 cm wide. You can do more, it all depends on your personal preferences.
When sewing sliding curtains, it is desirable that both halves have the same width.
The attacks on both parts should also be the same. For the previously mentioned window sizes, you will need a piece of fabric 260x360 cm if the curtain reaches the floor. You can also change the width at your discretion.
An example of a pattern for simple curtains.
Cut out the fabric.
To do this, you need to fold the piece of material 2-3 times. Cut into equal parts. The fabric should be placed wrong side up.
Fold the edges of the material in length by 2-3 cm and iron. Fold the fabric another 3cm and iron again. Grab the material with pins and do the same on the other edge.
After this you will need to stitch on a sewing machine. Sew as close to the edge of the material as possible. It is recommended to do a double stitch.
Next, you will need to trim the bottom side of the future curtain.
Double-check that the fabric is laid face down. Measure 20 cm, tuck this part of the fabric and iron it carefully. Such folds should be made across the entire width of the bottom.
The result is a neat and interesting edge at the bottom. Pin it in place and stitch as close to the edge as possible. At this point, the main part of the do-it-yourself curtain is ready.
Return to contents
The lining will be sewn on with stitches. This will allow you to get the most professional result. This method is especially good for long and wide products that are sewn from several pieces of fabric.
The lining must be attached to the main part of the curtains. Use quilting stitches at regular intervals from top to bottom along the wrong side of the base material. Prepare the following:
- lining material; hooks; curtain tape.
Scheme for hemming the main fabric and lining material for curtains.
First you need to cut strips of fabric for the curtain and sew them with a quilt stitch if necessary.
After this, you can move on to cutting out the lining. Take a length 12.5 less than the length of the main fabric. To connect, use a regular stitch seam.
Don't forget about allowances. You need to leave about 4 cm on top, and about 9 cm on top. Cut strips of material 4 cm wide from each side.
Fold the bottom edge by about 5 cm, the side edges by 4 cm.
Next, you will need to process the corners of the product in the form of “hoods”, and then iron the corners and hem. The hem must be sewn with a goat seam. Fold in the hem and side edges of the lining by 15mm and press.
In the next step you need to mark the guide lines. To do this, take a square. Move parallel to the straight side of the material and use a tailor's chalk to mark vertical lines on the wrong side of the main material at a distance of 35-45 cm.
Next you need to pin the lining. This is done extremely simply.
Take the base material and pin it with the lining fabric, folding the wrong sides together. Clip along the lines outlined in the previous step. At a distance of 15 cm from the top edge of the main material, you need to baste the lining along the first vertical marking line.
Connection diagram for curtains and lining fabric.
The lining is sewn on with quilting stitches.
You need to fold back the lining fabric along the first vertical marking line and sew it with quilting stitches. Start quilting 15cm from the top. Don't pull the thread too tight.
because this may cause the fabric to wrinkle. Sew along all the remaining lines using the same principle and pull out the basting.
On this one the lining is almost sewn on. All that remains is to pin, baste and sew the lining fabric to the main material of the curtains at the bottom and sides.
Use hidden stitches. When everything is ready, you can remove the basting. Finally, all that remains is to sew on the curtain tape you like, attach the hooks, and then hang and drape the curtain.
Return to contents
If you wish, you can make a replacement lining. It is useful in situations where caring for the lining fabric is carried out differently than caring for the main material. The base material is usually more expensive than the lining and requires more delicate handling.
Satin of any color is suitable for lining. If you need to darken and insulate the room more, choose a denser material with better thermal insulation characteristics. There are also special darkening linings.
To ensure that the lining fabric does not protrude beyond the edges, it must be fastened to the main curtain material using tape with buttons.
To ensure that the lining does not protrude beyond the edges, it is necessary to sew braid with buttons to the curtains.
Adjust the braid. Sections 25 mm long are used.
They are sewn at a distance of 40 cm along the side edges of the curtains. Calculate the required length of the braid using these data. To work you need to prepare the following:
- Fabric for lining. Threads and needles. Cotton braid. Lining tape for curtains. Buttons.
Proceed to the stage of cutting and stitching the fabric. Take measurements of the finished curtain without lining fabric. The lining panels need to be cut and stitched so that the main part of the curtains is 5 cm longer than the lining.
Fold in the sides and bottom of the lining 2 cm and press. After this you need to pin and stitch the hem. Measure the top edge of the lining fabric.
Add about 2 cm to finish the ends. Measure a piece of backing tape to the appropriate length. The braid needs to be pinned symmetrically along the top edge of the lining fabric.
Take the ends of the cords and pull them out.
The ends of the braid need to be turned to the wrong side of the lining fabric, and then the sides and bottom are stitched. At the top, the ends are hemmed with a hidden seam. The cords are tightened and the width of the lining fabric is adjusted to the width of the draped curtain.
The edges are marked for the fastener. From the bottom of the curtain tape along the side edges, you need to measure using a measuring tape and mark with tailor's pins lengths of about 40 cm. The lining is also marked using the same method.
At the next stage, the braid with buttons is sewn on.
As noted, the braid is cut into pieces 25 mm long. One half of the button is sewn to one end of each such segment. The ends without buttons are sewn along the marks to the lining material.
The second halves of the buttons are sewn to the curtain. That's all - you can hang the curtain. Happy work!
Home improvement
Instructions for sewing curtains lined with satin, muslin or calico yourself
If your goal is to securely drape the window, then regular tulle or light curtains are not enough.
In this case, you will have to resort to sewing curtains with a lining - satin, calico or muslin. The choice of lining fabric will depend on the material the curtains themselves are made of and personal preference. To sew curtains with lining with your own hands, check out the master class presented in detail on this page.
Adding a lining to your curtains has practical benefits: it will help protect the room from light and direct sunlight. This will also improve the appearance of the curtains - they will become more interesting from a decorative point of view.
Adding lining fabrics to window decoration is both a practical and aesthetic solution. The liner reduces the amount of light, noise and dust that comes through the window and gives the window openings a more organized appearance from the outside. Medium and heavy fabrics with lining take on a more solid appearance, and the folds become softer and deeper.
The most common lining fabric is white or cream satin. However, you can use any plain fabric of similar weight, such as calico or unbleached muslin.
Features and types of double-sided curtains
In ordinary curtains, the panel has a clearly defined front and back side. However, they are not interchangeable - that is, the curtain can only be hung with the front part. The back side of the panel has characteristic differences; it has a different color and texture. Because of this, there are no problems with how to sew curtains. Double-sided curtains also have a face and a back, but their “trick” is the ability to turn the fabric with the wrong side to demonstrate its contrast or support decorative features in the interior.
Between themselves, double-sided curtains are divided into two types:
- lined curtains;
- panels without lining, in which both the front and back sides can be used as the main curtain.
These curtains are very beautiful and practical. In addition, they are more functional compared to regular ones. Double-sided curtains retain heat inside the room better and do not allow cold air flows coming from the window to pass through; they have more effective light and sound insulation.
DIY Roman blind step by step instructions
Methods for installing Roman blinds and taking measurements.
In order to make the correct pattern for a Roman blind, you need to take the dimensions of the window opening.
Calculation of fabric and choice of design largely depends on the method of fastening the product. Roman blinds can be attached to a window opening or directly to the wall above the window.
The first option is appropriate when there is a large window sill that requires easy access, when a Roman blind is used in conjunction with drapes, curtains, or a lambrequin.
Curtains are attached to the wall if there is a window or the window opens into the room.
Marking of rivets and their installation, types of fastening models
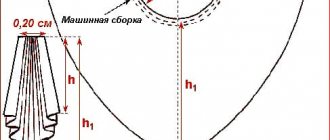
Now markings are made on the canvas on the side of the lining fabric to place the bushings. The distance between the centers of the elements is 12-20 cm, the number of bushings is always even, the number of spaces between the eyelets is odd. We make markings, draw a line (axis) of the eyelets using chalk and a tape measure (centimeter). The first and last element are placed at a distance of 3-5 cm from the top and side edges of the canvas, first determine the place for the first element, then for the last.
Eyelet fastening diagram.
Measurements are taken between markings of elements. Let's assume that the distance between the centers of the outer bushings is 207 cm. The gap between the eyelets is 18 cm. To find out how many eyelets are required, you need to divide the length by the required distance between the bushings: 207/ 18 = 11.5 pcs. We round the result obtained to 12, and recalculate the distance between them: 207/12 = 17.25 cm.
As a result, we calculated the number of eyelets and the distance between them. Now we make the appropriate markings along the line (axis) of the bushings, lay out the rivets along it, trace the inner diameter with a pencil, and cut out circles. After this, we place one part of the rivet under the product so that the diameter of the rivet coincides with the cut hole. Cover the top with the other part of the rivet, apply force, and press until you hear a click. This is how we install all the rivets. We thread a rod through them, and place the curtain with the rod on the cornice.
A double-sided curtain can be attached to a cornice in several ways. One of them is fastening with a special curtain tape. It is attached to the lining part of the panel. The tape is equipped with loops into which the hooks of the rail cornice can be threaded. Double-sided curtains with curtain tape can be attached to a rod with rings. Heavy curtains can be attached to a curtain rod using loops made of the same material as the models themselves. The number of loops and the distance between them is calculated in the same way as in the case of eyelets.
The length of the loop is equal to double the diameter of the rod plus 2-5 cm or more, it all depends on the length of the curtain, the desired effect: floor-length curtains lying on it, above the floor level; The width of the loops is arbitrary. The elements are adjusted to the lining and facing fabric from the outside according to preliminary markings; button rivets can be used. Stylish models perfectly cope with their main function - protection from bright sun and light; they are an unrivaled window accessory.
Sewing double-sided curtains yourself is not difficult; they become the highlight of the interior.
DIY fabric curtains
At first glance at French and Austrian curtains, it seems that they are very complex. But this is an appearance: there is nothing simpler than a rectangular piece of light or dense, but elastic fabric, sewn “in the drawstring” at a given interval and gathered. Sewing is not necessary: there are types of fabric that are not afraid of punctures; here you can even use a wide ribbon. Much depends on the material of the curtains. The French awning has the advantage that it does not deform, neither in the “under the eaves” position, nor in the lowered form.
On a special cornice with a lifting mechanism, awnings will, of course, be more convenient. But for the kitchen or children's room, you can easily adjust the French curtain manually by tightening several ribbons or cords, and even with this there is a plus - the curtain will always look original. There is a classic rule for cutting ruffled curtains: the width of the fabric cut should be one and a half times wider than the window opening, and the length should be 2.5-3 times. But you can break the rules if you want to create your own design. The length, the number of ruffles and their folding, the width of the ruffles, the interval between them, the decor of the curtains - everything is in the power of the master. By using curtain tapes of various widths, you can perfectly assemble both the scallops and the horizontal line of the curtain under the cornice.
Another popular curtain is the lined curtain. An indispensable item for a children's and very sunny bedroom, as well as for a classic living room. The lined curtain holds its shape perfectly and looks perfectly even. Linings – protect the front side of the curtains from direct sun and color fading, which guarantees a long service life of the curtains. For a bedroom or a bright attic, where the owners plan to relax during the day, it’s hard to think of better lined curtains: air enters the room unhindered, but at the same time the room is shaded and hidden from prying eyes. Expensive blackout curtains can be successfully replaced with lined curtains.
Traditionally, the lining is selected from cotton or satin, preferably a blend, neutral beige, cream or pale gray shades. The color of the lining should not distort the shades of the front fabric of the curtains when exposed to light. It is better to select decorative and backing fabrics precisely “through the light”, this makes it possible to emphasize the beauty of the shade of the front side with an unexpected, perhaps richer color of the backside, and at the same time will protect you from mistakes, because if the color selection is unsuccessful, the curtain in the direct sun will become dirty shade.
The lining should be moderately dense and preferably elastic. Cotton fabrics, twill, satin, calico must be subjected to wet-heat treatment before cutting - steamed with an iron. This operation ensures that the curtains cannot warp as a result of shrinkage of the lining. WTO for facial tissue is also desirable, but it all depends on the type of material. However, for curtains it is rational to choose easily washable fabrics.
A great option is a removable curtain lining. The fabrics are sewn separately, and the assembly can be done using buttons, hooks or buttons. Snap-button tapes and braid with corsage-type hooks are convenient for assembly, as well as light types of textile fasteners - burdock tapes, contact clips.
DIY voile curtains
Light veils are used as curtains not only for living rooms and bedrooms; voile curtains are also possible in the kitchen. Sewing French curtains is practical in the kitchen - airy and cozy. Options for lightweight fabrics with tiebacks, for example, in the middle, like an hourglass, are also interesting. The kitchen window is not shaded, but there is a spectacular elegant decor. For the kitchen, any veil colors, patterns and brightness are possible, as well as decor, even shocking ones.
A special type of veil - microveil - is known for the combination of the properties of organza with its record strength and plasticity, resistance to both ultraviolet radiation and deformation; and the soft subtlety of a classic veil. Microveil is used when you plan to create a beautiful drapery with even volumetric folds. An excellent option for decorating a canopy or curtain for a crib. No less interesting are micro-voile curtains for windows, arches and niches.
Features of fashionable double-sided models
Newfangled products are lined curtains. They once performed the function of protecting the room from winter cold, they were created as additional thermal insulation, they covered the walls from drafts and low temperatures. Today it is a trendy decorative accessory that emphasizes the beauty and unsurpassed beauty of the interior space.
Pattern pattern for double-sided curtains.
Popular products are made from dense fabric, they often have a simple style - their decorative function lies in the resulting folds that arise as a result of the sagging of the material and the action of its own gravity, the models have excellent drapery quality.
The products are used as an auxiliary option for window and room decor: the product can be picked up with curtain fittings and special accessories - tiebacks with a brush, bugles, beads, the model is tucked in such a way that its other side is visible. An important role belongs to the lining fabric, which is selected so that it is in harmony with the design and colors of the main (front) side of the model, and the palette of models should be combined with the main color scheme of the interior.
An example of double-sided models are Vietnamese curtains, which are used to decorate the living room, kitchen, veranda, halls, and complement the decorative load of country and Provence styles. Such models are perfectly combined with the interior of restaurants and bars, look elegant in residential buildings, and bring comfort and nostalgia for a country house.
When sewing Vietnamese fabric curtains, textiles of subdued colors with floral or natural patterns are mainly used.
When making Vietnamese fabric curtains, textiles of subdued colors with floral and natural patterns are often used; preference is given to chintz, linen, and wool fibers. Using two fabrics of different shades makes it possible to make curtains the highlight of the interior. The lining fabric is often chosen to be white. The models are wrapped up and tied with a decorative rope or ribbon made from the same material as the curtains themselves. Initially, such models were made from bamboo. New-fashioned curtains perfectly perform the function of protecting the room from bright sunlight thanks to the lining fabric present in the product.
Weighten the roller blind and prepare it for work
Scheme for weighting roller blinds.
The sewn model needs to be prepared for use, weighted, and secured to the cornice. We take the panel and make marks under the pocket for the guide at a distance of 20 cm from the edge on the right and left. We place ribbons on them, into which we first strengthen the rings. We sew ribbons with rings by hand to the front side; you can use beads and sequins as decorative elements. We put a weight bar into the bottom pocket. We pass the guide through the pocket and fix the structure on the brackets. The model is weighted and placed on a ledge. Now we screw the hooks into the upper corners of the window frame. Then we take a decorative rope to match the curtain, the length of the rope is equal to 3 lengths of the model.
The end of the rope is tied to the left hook, the rope goes down, it should grab the weight, after which it rises up, the second end is threaded through the left ring, where it is left. We take the second rope, its length is 3 lengths plus the width of the curtain. We tie one end to the right hook, perform the same actions with the rope as in the previous case, thread the second end through the left ring, and then through the right one. It turns out that the ends of both ropes are in the left ring. If you pull them, the curtain rises up due to the counterweight.
Master class for advanced
Well, now a step-by-step lesson for those who either have experience in creating more complex masterpieces, or patience and a great desire to bring this project to life. So let’s start making wonderful curtains called “the radiance of nature.”
This model looks great both closed and open. The instructions contain calculations for one panel; if you wish, you can make the quantity you need yourself, using the following steps. Depending on the size of your window and the height of the curtains, you will do the calculation and you may end up with different numbers. Below we will show you how to carry out the calculations.
- Curtain fabric: 50 cm x 110 cm (height x width).
- Fabric for the bottom and for the curtain holder: 2.5 m, width 110 cm.
- For hinges, holders and edges: 50 cm x 110 cm.
- 2.5 m for lining, you can choose cotton.
- Rings that can withstand heavy loads
- 8 decorative buttons (6 for tabs and 2 for garters)
- Threads
- Transparent ruler
- Fabric pencil
- Iron and ironing board
- Scissors and cutter
- Pins
Taking measurements
Step 1 . Some calculations need to be done. But most likely your window is different in size and the curtain is located at a different height from the window. Using the example of key details, let's look at how all the measurements were made so that you can calculate your own dimensions.
Full Height
The height from the curtain to the floor is 215 cm. But in order for the curtains not to hang on the floor and not get dirty, we will subtract a few centimeters. Let's take 210 cm.
Loops
The length of the loops is 6 cm from the curtain to the edge of the curtain. These are standard sizes.
Height
Final height of the product (excluding loops): 210 - 6 = 204 cm
Top fabric length
Our curtain consists of two types of fabric. The upper part of 40 cm is approximately 1/5 of the entire length of the product: 204 ÷ 5 = 40.8 cm
Decorative frill
As you can see, between the top and bottom of the product there is a frill several centimeters wide, but since it is sewn in, it will not affect the final length of the product.
Bottom part
Bottom of the product: 204 - 41 = 163 cm
Allowances
Now we need to add a hem at the top and bottom, as well as seam allowances where the top fabric is sewn to the bottom fabric.
Loops
As you remember, the length from the curtain to the top edge of the curtain is 6 cm. This is half the length of our loops, since they are bent in half. In the place where the buttons are attached, add another 5 cm and get: 6 x 2 = 12 + 5 = 17 cm. Plus allowances of 1 cm, in the end we get 18 cm.
You can also calculate the remaining elements yourself using the examples above.
Step 2 . Time for the sewing machine and ironing board
Prepare 6 loops
1. Fold in half and pin stitches wrong side up.
2. Use a straight seam, keeping in mind the 1 cm seam allowance. Sew all edges starting with the smallest one and secure the corners. You can turn it inside out and iron it.
Note: you will sew up the free edge later with the raw parts inside.
3. Sew another top stitch.
Connection of frill and product
1. Fold the frill in half, wrong side up.
2. Pin along the raw edge of the bottom piece.
3. Hand stitch to the top.
4. Keeping the allowance in mind, sew the top part to the rest of the product and iron it.
5. Place an outer seam along the top of the garment.
Bottom edge
1. Make a double hem. Roll 9cm and iron, then roll 10cm and iron. Stitch as close to the fold as possible.
2. Do the same with the lining.
Sew the curtain and lining around the perimeter
1. Lay the curtain face up and place the lining on top, face down.
2. The edges should match, but the length of the lining will be 12 cm less.
Attach loops and stitch along the top edge
1. Place the loops between the curtain and the lining. Align the edges. The loops are 14 cm apart.
Note: this interval is based on our calculations; you will need to divide the width of the product by the number of loops if you use your own measurements.
2. Keeping the 1 cm allowance in mind, sew a line.
Attach the top tape
1. The tape will prevent the curtains from sagging between the loops. Place the ribbon right side up, pin it with the curtain and sew taking into account the seam allowance.
Turn out and fasten the loops
1. Turn the product right side up. All seams remain inside.
2. Carefully pull out the loops and bend them in half towards the front side of the product. Pin, decorate with buttons by hand or use a sewing machine to sew a seam.
3. At the corner of the product, fold the remaining raw edge.
4. Using small stitches, using threads of a suitable color, sew the frill to the fabric.