Sewing curtains yourself is easy, because there are many master classes on this topic. How to sew curtains with the correct pattern, this issue has its own characteristics.
General sewing rules
How to sew curtains? So, this is a large piece of material that anyone can sew. Neat curtains can be sewn by following these rules.
- Prepare for sewing. Choose the material that you like best, consider the density.
- Calculate the fabric. Curtains are divided into: tulles and drapes. Calculate the size using the height of the window or wall and the length of the cornice. Consider the hems of the bottom and top, as well as the gathering factor.
- Take care of further care. Take any piece of fabric before you buy the entire fabric and try washing it with the product you will use in the future, in order to protect yourself from deformation of the seams. Another way to find out about care is to ask a sales consultant.
- Cut before sewing. Before working with the main fabric, it is better to do the first cutting and sewing option on any other, so you will take into account all your mistakes. Determine the front side. The curtains will be placed vertically on the window, so a precise, even seam will be visible. Don't forget about the pattern; if there is one, it should be symmetrical with the other curtain.
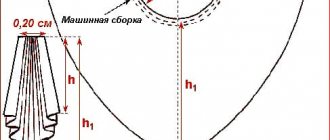
- Create a pattern according to your measurements. A pattern of length, width and height is created on graph paper or tracing paper.
- Open the fabric. Trace the pattern with chalk or a felt-tip pen and cut along the contour.
- Process the edges using a sewing machine , remembering accuracy and safety precautions.
What materials are needed to sew curtains?
Specialized stores offer a huge selection of materials that are suitable for the implementation of any idea. Fabrics and textiles differ in density and texture, colors and prints, and complexity of processing, so after choosing an idea, the best material for its implementation is selected.
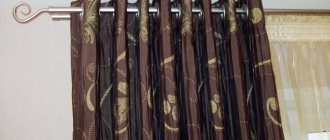
Dense and heavy fabrics look good when gathered; they are easy to form into folds and multi-layered curtains. Most often these are curtain textiles, thick silk and brocade, iridescent velvet and patterned tapestry; satin and taffeta are used for lining.
Light and airy fabrics such as organza or muslin are chosen for curtains and help add variety to multi-layer curtains. They are quite difficult to work with, but they allow maximum light to pass through, so such products are combined with curtains to create a harmonious composition when decorating window openings.
For the kitchen, children's room, and country house, you can choose materials such as cotton and satin, silk and natural linen. They are distinguished by wear resistance and a huge variety of thematic decor, images and ornaments, and these materials are the easiest to work with even for a novice craftsman.
Required tools and materials
Includes both auxiliary and basic materials. To sew tulle or curtains use:
- A sewing machine is equipment that can be used to sew products and make even and clean seams.
- Presser feet for a sewing machine , they come in different types; they are needed for curtains: for finishing edges and for main seams.
- Pins - safety pins or tailor's pins - are needed for basting and hemming the material.
- Sharp scissors , use tailor's scissors, but if you don't have them at hand, use sharp ones;
- The iron is the main equipment, as it is needed for the stage when working with the product. First of all, they are processed, ironed and steamed, and at the end of the work, they are also ironed well.
- Needles and threads for basting and sewing seams , it is better to baste by hand and then sew on a machine.
- Graph paper or tracing paper.
- Pen, felt-tip pen, pencil or chalk.
- A flap will help you choose fabric and needles for your sewing machine.
- Curtain tape , it is needed to attach the product to the cornice, otherwise called braid.
Sewing a lambrequin: from creating a pattern to forming the finished product
Materials and tools for sewing:
- base material;
- lining fabric;
- nuts and screws.
Decorating with tassels
First you need to create a pattern; you can find many options on the needlework website. Once the style of the curtains is known, the fabric is purchased and sewing begins.
To begin, attach the material 8 cm above the window, the distance on the side should be no more than 7 cm. This type of lambrequin can be sewn in length up to the window sill.
It is important to make the calculations correctly. For a 45 cm cornice you need 70 centimeters of material.
Trim the backing material that is used to provide rigidity. It will hold the wrinkles. Connect and pin all layers and make a seam, leaving 25 centimeters on top unfinished. Turn the product inside out and close the holes. Attach the curtain rod to the curtain and make the required number of folds, tightening them with laces.
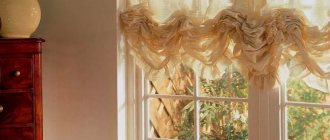
Draping a veil
Choosing fabric for sewing
How to sew curtains for the kitchen, living room, bedroom and other rooms? So, it’s worth deciding what kind of curtains you want to make for your interior. If it is tulle, then the fabric can be different:
- Organza. The material it is made of is polyester or viscose. The advantages are that it allows sunlight to pass through, dries quickly and does not wrinkle. The downside is low breathability.
- Veil. Material: natural fibers. Pros - breathable material, that is, high air permeability, does not electrify, does not attract dust. The downside is that it requires delicate care, since natural fibers have the ability to deform when washed.
- Net. The classic look of tulle, made of synthetic threads. It allows air to pass through well and matches with curtains of different colors and patterns. The downside is that it is highly electrified, which requires quite a bit of maintenance.
- Muslin. Cotton material, natural. Pros: pleasant to the touch, has many shades. Cons: It wrinkles quickly and requires constant ironing.
- Chiffon. Material: cotton or silk. Pros: attractive appearance, good air permeability. The downside is that chiffon is difficult to work with for beginners and is expensive.
For curtains you need others, here the density is greater, they are not light like cotton fabrics, since they protect from the sun.
Therefore, the following options are recommended:
- Linen. It will last a long time, is resistant to ultraviolet radiation, dirt and stains are easily washed off, and is quite durable. Disadvantages of linen - price, deformation after washing, because... requires special care.
- Matting. The material is coarse and made in a checkerboard weave. The advantages of matting are that it does not require maintenance, has an impressive appearance and is wear-resistant. Disadvantages - in the filing, in the sprinkling of the edges, there are puffs left.
- Gabardine. Material: wool, cotton, silk. Gabardine is dense due to the weaving of the threads diagonally. Pros: breathable, waterproof and easy to care for. Cons - crumbles.
- Velvet. Chic, luxurious fabric is used in a classic interior. Pros - does not allow sunlight to pass through, does not fade, provides good sound insulation. Disadvantages - they are harmonious in large rooms, the cornice on which the curtains are hung must be well attached to the wall.
- Jacquard fabrics. Made with drawings or ornaments. Stylish, but unfortunately not suitable for all interiors. They are easy to care for and do not fade in the sun.
Factors to consider
Coping with the task of sewing and decorating is not difficult. What is important here is simple adherence to the rules given in the article, the ability to cut and work with a sewing machine.
But before choosing fabric, taking measurements and sewing, you need to decide on style, color and other aspects that affect the overall appearance of the room in the future.
There are a number of rules that should not be neglected. Here is a list of recommendations, taking into account which you can avoid mistakes.
- It's no secret that using a color palette you can achieve the visual effect of reducing or expanding space. Dark colors will visually reduce the volume of the room, and light colors will, accordingly, increase it.
- It is recommended to choose fabric for curtains that is darker or lighter than the main color of the walls. Otherwise they will merge.
- The presence of a horizontal pattern on the fabric can also expand the space, and a vertical pattern can make the ceilings high.
- When choosing fabric, it is worth considering that some types require certain care. For example, natural silk and velvet do not “like” washing; only hand cleaning is allowed. For fabrics prone to fading in the sun, a lining is required.
- Heavy fabrics decorate the interior, but require the installation of a reinforced cornice, as they are heavy.
- Curtains made of linen with lavsan are good for kitchens; the shimmer of the fabric will add an impression of lightness.
Calculation of fabric cuts for curtains and tulle
So, first of all, you need to know how much material you will need, for example, for a do-it-yourself Roman blind. The length of the cornice is measured, and the gathering factor is taken into account, usually it is 2. Using these values, the fabric consumption for the tulle is calculated. Multiply the length of the cornice by the assembly factor.
The consumption for curtains is calculated with folding elements according to the dimensions of the curtain height, bottom hem and top hem.
DIY lifting curtain
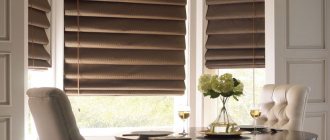
There is little difference between lifting curtains and Roman or English curtains (in terms of execution). You can make a simplified version, which is a hybrid of these curtains:
- Cut the canvas of the required size from dense material, process the side edges.
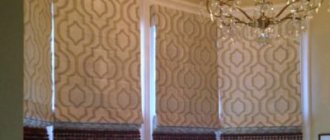
- Make a pocket at the bottom for weights, like in Roman blinds.
- Mark and sew along the entire length from the inside of the tape with rings in increments of 30-40 cm in width.
- Sew Velcro on top.
- Glue the second part of the Velcro onto the cornice bar.
- Screw on the hooks and rings at the bottom.
- Attach the curtain.
- Thread the cords as in an English curtain.
- Connect them into one at the end with a knot.
- Tie the cord to the clamp.
Uncover
To cut correctly, you will need a grain thread: it makes cutting easier, since there will be no deformation of the product, and you will not get asymmetrical curtains for the kitchen, living room or bedroom.
- draw a pattern by elements;
- small details are indicated;
- trace the constructed pattern from the wrong side, not forgetting about seam allowances;
- To prevent the material from shifting while tracing the pattern, it is better to pin the paper to the fabric;
- cut with sharp scissors.
Cotton
An ideal material for decorating various windows. Cotton material is durable, wear-resistant, dyes well, and can be printed without any problems. Cotton fabric has different textures, thermal conductivity and drape properties. It is easy to iron, and the reliefs of the folds hold their shape perfectly. The curtains can be machine washed and dry cleaned.
How to fold fabric correctly
There are step-by-step instructions for performing a hem:
- Once you iron the material you are going to sew, measure from the top edge the same amount of cm as the width of the curtain tape. Bend the measured cm inward and go over it with an iron, thereby fixing the bend with steam.
- After either using pins or basting with a thread and needle, secure the hem.
- Use your sewing machine and make sure the sewing machine foot is positioned along the edge of the folded fabric.
Tulle
Most window design models include the use of tulle. That is why this option is being considered first.
Required material
In this case you will need:
- A piece of thin translucent fabric;
- Special tape;
- Colored threads.
Instructions
- In this case, the width of the fabric should correspond to twice the width of the window. The length consists of the sum of the desired length of the curtain, ten centimeters for the hem at the bottom and three centimeters for the hem and processing with tape at the top.
- The process is so simple that there is no need for a pattern. Using a ruler or measuring tape, points are marked on the laid out material according to preliminary measurements and connected to each other. The workpiece is cut along the resulting lines. For convenience and space saving, the fabric can be folded in half.
- The upper part of the curtain should be folded inward by half a centimeter, smoothing it with an iron. Next, you need to once again bend the edge of the fabric inward by two centimeters, securing it with safety pins or ironing it again. Thus, this will take five centimeters of fabric. Now you need to make a neat stitch along the edge of the hem at the bottom.
- Next you have to complete a slightly more difficult task: sew on the ribbon. The main goal is to avoid the stitching on the drawstring cord. The ribbon is sewn to the fabric at the top and bottom. If the width of the tape is more than five centimeters, it is necessary to stitch it in the middle.
- At this stage, the edges of the product are processed on the sides and bottom. From the left and right edges, you first need to bend the material by five millimeters and iron it with an iron, then fold it again by 7-10 millimeters and carefully stitch along the edge. When processing the lower edge, five millimeters of fabric are also folded for the first time, and then another 2-3 centimeters are stitched.
- The finished product must be ironed, slightly stretching the seams.
You can hang curtains by pulling out the drawcord on both sides, thus adjusting the number of folds. Finally, the lace is secured by tying and the excess is cut off.
How to make a pattern yourself
How to make patterns for kitchen curtains for sewing yourself using a pencil, ruler and paper? A pattern is an exact drawing with dimensions for a product. You have all the calculations, lengths and widths of the canvas, assembly factor and allowances. Taking into account all the details, we build a pattern on paper, noting the calculations for length and width.
Using these patterns you can sew Roman or Imperial curtains and even decide on sewing curtains and bedspreads.
The importance of pattern direction in rolled fabric
The curtain material sold in retail chains has 3 width standards:
- 140 cm;
- 280 cm;
- 300 cm.
This nuance must be taken into account when choosing. As a rule, the pattern is most often located along the roll, so it is most profitable to purchase fabric 3 meters wide. It will be enough for the entire length - from the eaves to the floor - in rooms with standard ceiling heights (from 2 m 50 cm to 2 m 70 cm). The required footage is calculated, after which the required amount of fabric is purchased.
If the ceilings in the room are low or you need to sew curtains of shorter length, then the first 2 standard options are suitable. Proper calculation of dimensions and the correct choice of fabric will help to avoid unnecessary costs and the appearance of unnecessary flaps of material.
It's worse when the print is located across the roll. In such cases, the width of the curtain will be limited by the width of the material. If you need curtains with a high gather factor, the pieces will have to be sewn together, and the fabric itself will have to be purchased with a reserve in order to match the pattern.
Difficulties in cutting yourself
The self-cutting master class is conducted without basic knowledge, since there are not many difficulties.
- When placing the pattern, pin it in place so that the fabric does not move.
- Soap is not visible on all fabrics; they are used to trace the pattern, so washable felt-tip pens or chalk are used.
- They forget about allowances; they are needed so that the length of the product does not shorten.
- Use tracing paper; it is better to pin it to the material.
- Before cutting the main one, it is better to make a sketch on unnecessary fabric to make sure that you sew everything correctly.
Patterns and sewing instructions for basic models
Before you start sewing, you need to find or create a product template yourself, which includes a sketch, pattern and the necessary material. The resulting dimensions are marked on the pattern.
Don't be afraid, templates made yourself are not inferior to store-bought ones if the measurements of the window and cornices are made correctly.
When deciding on a design, it is worth considering the organic combination with the overall style of the room. To create models of varying complexity, it is proposed to consider patterns of the most commonly used options.
Stitching elements
How to sew curtains with elements correctly? There are several options for how to sew elements with curtains. Usually it is curtain tape, fabric loops, ties.
- With curtain tape, everything is simple - you bend the edges of the curtain tape so that it does not crumble and stitch along the hem of the curtains from above.
- Fabric loops have different shapes, so the pattern is constructed in the form of a rhombus, rounded, rectangular.
- Ties are ribbons of different lengths that are attached at your discretion at any distance and of any length.
Sewing these elements is a process where only the fold ratio is taken into account so that the curtains hang beautifully.
Attaching curtains to eyelets
A grommet is a ring that acts as a loop on a curtain. It can be made of metal or plastic, and there are many colors and eyelet designs available. Such accessories can be installed on curtains of any type, except those equipped with a lifting mechanism or requiring a large number of folds.
To make a curtain with eyelets, you need to buy the rings themselves and the eyelet tape. The stock of material in height should be 10 cm more.
The algorithm of actions is as follows:
- Cut out the canvas.
- Finish all edges.
- Place grommet tape at the top of the curtain on the wrong side.
- Wrap the fabric inside with it.
- Sew.
- Mark places for the rings.
- Install the eyelets and outline their inner diameter.
- Cut a hole.
- Place rings on both sides and snap them into place.
Useful tips for beginners
- To ensure an even stitch, attach tracing paper with seam markings and stitch directly across the paper.
- If you use bias tape for the side seam, then use clips like clothespins - they will help you avoid the fabric shifting.
- Don't forget to use the sewing machine to secure the seam so that it doesn't fall apart.
- Remove any unnecessary threads from the seams to keep the garment looking neat.
- If the seam is crooked, it’s better to rip it open and do it again, don’t be lazy.
- Use accurate calculations, with cm allowances marked.
- Don't forget to steam iron your curtains.
Curtain classics
The classic is perhaps the easiest to execute and consists of straight-cut curtains combined with tulle.
The sewing process is almost identical to the previous version.
- It is advisable that the width of the fabric corresponds to twice the width of the window. In the case of cutting and sewing one curtain, you can use the instructions from the section on tulle curtains. If there is a need to create two curtains, then it should be taken into account that the width of each must match the width of the window opening, which will provide the required size and number of gathers.
- The marking on the surface of the spread out material is done as in the previous version, it is simply then cut lengthwise into two parts.
- Next, the seams are processed, the tape is sewn, but all this is done twice.
Short curtains for the kitchen
For the kitchen, it is proposed to sew curtains with your own hands in the form of short curtains. The style is selected depending on the style and available space. These can be classic, Roman, French, Japanese, Austrian, London curtains, curtains with hinges, eyelets, blinds. For a kitchen of the same style, several types of curtains may be suitable. Thus, curtains with lambrequins are suitable for spacious rooms with high ceilings. For a small space, it is better to choose lightweight short models. Short curtains are characterized by such advantages as: ease of care, the ability to use the window sill area, and ease of adjustment.
What types of curtains can you sew yourself?
The first step is to decide what style of curtains you want to sew. There are many different options for curtains and curtains, but the main ones are no more than 8. The main curtain models are very similar to each other and differ in small design nuances.
Curtains with piping
For those who do not have experience in sewing curtains, you need to familiarize yourself with the product models. The most popular curtain styles:
- English curtains;
- Roman curtains;
- classic curtains with laces;
- lambrequins;
- corner.
After studying all the basic styles of curtains, you need to prepare a set of tools and materials for the job.
Curtains for small windows
Curtain patterns
Silk
Thanks to the silk material, the curtain looks rich. Silk is expensive, but this is compensated by the beauty and durability of the fabric. It hardly creases and leaves no creases. To extend the service life of silk curtains, you need to combine them with lining material.
Silk dyes wonderfully, the material has a rich color range. It should be taken into account that the material gets dirty easily and water stains are clearly visible. Most silks are dry cleaned.
Loops
Wide short stripes are made from the same or additional contrasting fabric, which are sewn in the form of loops evenly along the upper edge of the curtain. The loops can be either stitched or fastened with large decorative buttons sewn to the curtain. Another option would be to tie a loop into a bow.
Where to start?
First, determine the model of curtains that you like. It is important to decide what the purpose of the future product is. Functionality or aesthetics may come first.
Start by looking at sketches of curtains; you need to find out how closed the window opening will be, how to make patterns, what additional elements will be needed to sew the design. Read the original instructions for beginners, it will help you understand every step.
Now you can start taking measurements. You will also need to find out which curtain dimensions will suit you best. Do not ignore certain nuances:
- The length of the cornice matches the minimum size. Protect yourself from intense natural light by adding approximately 20 cm.
- For fans of styles with folds, an additional 1/3 of the length is added to the length of the cornice.
- Curtain length is affected by many factors. The product must match the style of the interior. Your fantasies and preferences play not the least role. The canvas can completely cover the window, reach the floor, or cover only 1/3 of the window. For a short model to look beautiful, the curtain must completely hide the upper wall.
Curtain design for residential premises
Naturally, the design of curtains is selected not only according to personal preferences, but also according to what kind of interior is chosen for finishing and decorating the room, what its main purpose is.
- Living room. Curtains complemented with lambrequins are ideal. They also choose “marquises”, Austrian, imperial or double.
- A children's room should be light, airy and spacious. The curtains must fully match it. As a rule, these are textiles with a classic design, decorated with original overlays in the form of butterflies, bugs, and cartoon characters. If this is a girl’s bedroom, then the curtains can be decorated with flounces and lambrequins.
- Bedroom. The room was created for relaxation, rest after a hard day of work, however, a combination of light tulle with thick, heavy curtains will look best in it. Basically they are made: elegant, strict, and therefore straight, without frills.
- Studio apartment. Curtains with eyelets and hinges are suitable for it.
The most important thing is to make a list of requirements that ready-made curtains must meet. They should fit perfectly into the overall environment, become a harmonious addition to it, and at the same time create coziness and comfort.
Sewing a product with your own hands is not difficult, you just need to approach this process correctly, prepare materials, equipment and accessories, threads, sketches.
Types of seams
During stitching and processing, several types of seams can be used in the form of:
- Zaposhivochny;
- Roller;
- Moscow;
- Zigzag.
The latter option is more in demand among home craftswomen. Professionals work with Moscow stitching technology.