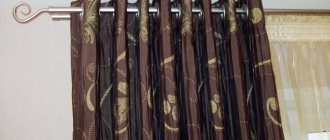
What are Roman curtains?
Curtains made based on the sails of a ship of the ancient Romans are called Roman in the modern world. They have a fairly simple mechanism of action - they lower and rise quickly and efficiently.
Modern Roman blinds have the following characteristics:
- have a stylish design;
- hide the penetration of bright sunlight well;
- easy to use;
- moderately strict, but at the same time elegant;
- have an original appearance.
In addition, if you make Roman blinds with your own hands, you will need much less fabric as for other curtains.
Roman curtains are sheets of material in which for every twenty to thirty centimeters of fabric there are horizontal strips that create folds when the structure is raised. In order for such a curtain to hold well and not sway from the slightest breeze, a small weighting material is attached below.
Roman blinds have an original appearance
The mechanism of operation of such curtains is quite simple - you just need to pull the attached control cord and the curtain opens or closes. This control mechanism consists of several cords, which are located along the edges of the curtain in special ring holes.
On a note! Roman blinds are an ideal option for rooms of any functionality: kitchen, living room, bedroom or children's room.
We sew frame-type curtains
They are the most popular and look impressive. For sewing, heavy fabric without lining or lighter fabrics with lining are used.
Let's consider the option of how to make frame-type Roman blinds with lining fabric step by step with your own hands:
- we cut out two rectangles from the main and lining fabric according to the window measurements taken, taking into account seam allowances, as in the option described above;
- We make a basting on three sides with our hands, folding the fabrics with the right sides facing each other;
- sew on three sides using a sewing machine, cut the corners, turn over to the front side;
- iron it with an iron, stitch along the edge;
- we sew adhesive tape to the fourth side of the rectangle in the sequence as described above;
- On the wrong side of the curtain we make markings - horizontal lines, starting from the bottom edge;
- We make the first marking at a distance equal to half the fold;
- We draw the remaining markings 30 cm from the bottom;
- along the marked lines we sew a curtain or other tape, do not stitch the ends, leave holes, we get drawstrings;
- we thread rods or strips into the holes through the drawstrings, and thread a weighting agent into the lower drawstring;
- we sew the rings along the top of the drawstrings in three rows: along the edges and in the middle;
- We also attach rings to the top bar;
- we stretch cords through the rings: the first cord through the first row of rings, the second through the middle row and the top ring of the first row, the third through the outer row and sequentially through the top rings of the second and first row;
- in the first row of rings three cords will be stretched, we adjust their length, weave them together, cut off the excess;
- We attach the finished curtain to the curtain or strip to which the lower part of the adhesive tape was previously glued or nailed;
- We fasten the ends of the laces to a special hook attached to the wall.
Materials for making Roman blinds
We need the fabric itself first of all. In terms of quality, for a Roman blind it is better to use a fabric that is not very heavy so that it can drape easily. At the same time, the fabric should be dense; do not use knitwear that will stretch under the weight of the inserted slats.
You won’t need much fabric for one curtain; we determine its consumption based on the length and width of the window, taking into account seam allowances. Plus, a little more fabric is needed for the pockets into which the slats will be inserted.
For lifting mechanism:
- Sticky double-sided tape for attaching the curtain to the curtain rod, 2.5 cm wide. These are sold in sewing supply stores.
- Metal or plastic rings and screws with a hook through which the cord will be threaded. For a narrow curtain you will need three hooks. Number of rings = number of folds on the curtain multiplied by 3.
- Nylon cord. You can use any other one, and for better glide, connect it with a fishing line (4mm).
- The slats along which the folds will be formed. The width of the slats is approximately 1.5 cm. You can use a plastic profile, glazing beads, cable channels, pins, bamboo sticks.
- A weighting agent is a strip that is inserted along the bottom of the curtain. You can buy some cash at a repair supply store.
- A block at least 2.5 cm wide, on which our curtain will be attached to the window, is essentially a homemade cornice. We prepare slats, weighting material and a block one centimeter less than the width of the finished curtain.
- Fastenings for cornices.
- Hot glue, furniture stapler or nails with decorative heads.
We will also need a needle, thread, scissors, sewing machine and iron.
What do you need to prepare for work?
Before you start, you need to buy and prepare:
- Cut of fabric - the fabric should be dense so as not to sag and keep its shape;
- Adhesive web tape 0.5 mm-1 cm wide on a paper base;
- Auxiliary materials: chalk, scissors, ruler, tape measure;
- Brush and fabric glue (sold at any sewing store, but you can also take Moment for Shoe or Moment Crystal glue);
- Any plastic blinds that fit the width of your window (old blinds will work, even with chips and broken slats, as long as the lifting mechanism is in working order);
- Iron and gauze as an ironing iron.
The best fabrics for Roman blinds
Sewing Roman blinds should begin with the choice of material. Absolutely any fabric is suitable for their manufacture, both very dense and light veils. But it is still better to give preference to denser fabrics, since they can emphasize all the beauty of symmetrical folds, and when lowered it will be a smooth, heavily hanging fabric. Among specific fabrics, we can distinguish thick and translucent cotton, linen, heavy satin and jacquard.
In order for a DIY Roman blind to be not only beautiful, but also functional, it is very important to decide how much your room needs to be darkened, or whether you want the curtain to transmit light well. It all depends on the fabric. To keep the room light and protected from the scorching rays of the sun, choose light-colored fabrics with a dense texture. Translucent ones will simultaneously protect the room from prying eyes and let in the necessary light.
Dense fabrics in light colors can protect from unwanted sun without making the room dark and gloomy
For complete protection against fading and simply annoying rays, we recommend choosing a unique material with a black out effect. Its reverse side is impregnated with a special solution that protects not only the curtains themselves, but also the walls and furniture from fading.
For the living room and bedroom, choosing fabric is not difficult; here it can be different. But for the kitchen you will need a material with special properties. After all, no matter how hard you try, random stains, ingrained odors and soot are inevitable. Therefore, this is the place for practical and wear-resistant materials. Manufacturers took into account all these nuances and created a wonderful fabric special for kitchen curtains. Basically it is polyester with water-, dirt- and fire-resistant impregnations.
In the kitchen, especially near the sink or work table, hang Roman blinds made of non-marking fabric
The color and pattern of the fabric you choose for Roman blinds should match the entire interior. Plain materials are the most versatile, they are suitable for any setting, but when choosing a patterned fabric, pay attention to whether you have such colors in your everyday life or where else you can repeat them. Pay attention to the choice of textures. For a modern style, the best choice is smooth fabrics, and for elaborate baroque and empire styles, printed designs and voluminous embroideries are incredibly good.
Although velvet is a very capricious fabric, it has no competitors for creating luxurious Roman blinds in an oriental style
To reinforce this, we suggest watching a video on how to make Roman blinds with your own hands.
Material selection
To make Roman blinds with your own hands, you can use fabrics of any texture. It all depends on the intended functionality and the degree of darkness that you would like to create in the room with their help.
Curtains black out
This is a type of modern materials that have the highest degree of light protection. Fabrics of this category are treated with a special impregnation that completely blocks the penetration of sunlight, and also prevents heating of the air in the room and prevents furniture from fading.
Roman blinds blackout
Curtains made from natural materials
Blinds made of natural fabrics (linen or cotton) have average light transmission, so they are more appropriate to use in living rooms or dining rooms. Linen and cotton curtains are not electrified, have increased wear resistance and look very elegant. However, when choosing natural materials, you need to make allowances for the fact that after the first wash the fabric may shrink. When measuring, this point must be taken into account.
Roman blinds made of natural materials (linen)
Synthetic fabrics for Roman blinds
Curtains made of synthetics or with a large percentage of artificial thread are very convenient both to sew and to use. They hardly wrinkle, do not shrink and wash well. And if they were treated with dirt and moisture-proof liquids during production, such canvases hardly get dirty and do not accumulate dust. Synthetic products are optimal for the kitchen, balcony or loggia windows. The variety of colors and additional fittings allows you to decorate the window in any style. The main thing is that the direction of the design coincides with the interior decoration of the room.
Synthetic Roman blinds
Roman blinds made of mixed fabrics
Mixed fabrics, the production of which uses threads and fibers of different compositions - both natural and artificial - are perhaps the best option for sewing home textiles. They have excellent performance properties and are resistant to damage, tearing and tightening. Often such materials have a bright color that does not lose its intensity for a long time, and a large selection of density levels will allow you to choose the canvas specifically for your needs.
So, we figured out the choice of fabric. Now we just need to decide what tools and materials we will need to sew a Roman blind with our own hands.
How to take measurements correctly
Making Roman blinds at home is not that difficult; the main thing is to choose the right material and take accurate measurements. The measurements also affect the amount of fabric needed. So, the frames can be installed both inside the opening and on the wall above the window. We measure the height and width of the window where the curtains will hang and add 5-7 cm to the sides, and about 10 cm at the top and bottom to fix the weighting material.
In order for the folds to be even and the distance between them to be the same, you need to calculate it correctly. To do this, use the approximate calculation table. We determine the number of folds by eye, divide the height of the curtain by their number and get the distance between them, it should be no more than 30 cm.
Common steps for all methods
There are many ways to make Roman blinds with your own hands, but they all have two common steps: taking measurements and calculating folds.
P1 Taking dimensions
Layout of curtains relative to the window
In order to correctly calculate the dimensions of the future Roman blind, you need to decide where in the window opening it will be attached:
- Outside. To obtain the length of the panel in this case, you need to decide at what height the cornice will be located and measure the distance from the top point of its attachment to the window sill. To obtain the width value ─ measure the width of the window opening and add 12-16 cm to it or take the width of the window sill as a basis, including its parts protruding beyond the opening. This is done so that the fabric covers the window completely.
- Inside. To obtain the length of the curtain when fastening it inside the opening, measure the distance to the window sill from the upper slope of the window. To calculate the width, it is necessary to measure the width of the window opening in several places, since it may not be very even. The calculations are based on the smallest value obtained and subtract another 2 cm from it. This is done so that the curtain can be easily raised and lowered without touching the slope.
- On the window frame. In this case, measure the length and width of the transparent part of the window (glass). In order for the curtain to completely cover it, but not interfere with the functioning of the sash, add the distance from the glass to the base of the handle multiplied by 2 to the width, and 10-12 cm to the length. Another way to get the length of the curtain when attaching it directly to the window frame is to measure its height .
P2 Calculate folds
Any Roman blind consists of identical horizontal folds that gather on top of each other when raised. After the main overall dimensions of the curtains have been made, you can begin to calculate their number and depth. There can be as many folds as the length of the fabric allows, but most often from 5 to 9. A smaller number will simplify the design of the curtain, and a larger number will make it too fluffy.
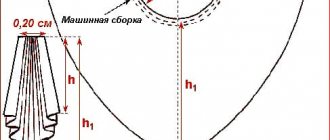
Calculation procedure
To make a Roman blind, the number of folds and their depth are selected individually in each case, based on the height of the window opening or window.
Let's take a curtain 145 cm long as a sample.
Find out the length of the fabric for folding. Let's assume that the top indent = 5 cm, 145-5 = 140 cm. Using the selection method, we calculate the height of each fold. To do this, divide the resulting length by numbers starting from 5.
140:5=28 cm; 140:6=2.3 cm; 140:7=20 cm; 140:8= 18.5 cm; 140:9=15.5 cm.
From the results obtained, select the one in which, in your opinion, the curtain will look most impressive.
Methods for attaching strips to fabric
It is precisely at this point that you need to pay special attention. The appearance of the Roman blind will depend on how you secure the duplicating fabric, as well as sew on the “pockets” for the rigid rods. First, let's look at how to sew on the pockets. The easiest way is to sew ready-made tape or strips of fabric (with hems). But in this case, the seams will be visible on the front side and, moreover, they will probably “wrinkle”. Decide for yourself whether such a curtain will look beautiful.
But, nevertheless, such a method, as in this figure, will be less noticeable. In any case, there will be only one securing stitch on the front side. In addition, you can secure this area not with a seam, but with a double-sided web, then the front part of the curtain will be completely without seams. And so that the edges do not bend into a hem, you can connect the side seams of both panels and then turn them out. It will be enough just to iron these seams and you don’t even need to finish them with stitching. Decide for yourself which option suits you best.
Master class: how to sew it yourself?
This master class will describe step by step how to sew a curtain consisting of one piece of fabric.
There may be several paintings. In this case, each piece of fabric will need its own curtain rod. Sewing such a product is much more difficult. Therefore, if you are sewing it yourself for the first time, start with a single model.
Materials
- Textile. For a double curtain, you will also need lining material.
- Velcro tape. Its length corresponds to the width of the curtain.
- Rods for the frame. They can be plastic or steel. Their diameter is about 5 mm, and their length is 3 cm less than the width of the curtain. You will need 7 or 8 of them. It is ideal to find special plastic rods for curtains. They are sold in curtain stores or sewing workshops. You can buy whalebone, which is sold in sewing stores and is used for sewing underwear. It will have to be straightened first by heating it with an iron or placing it under a press. If you don’t find any of this, you can take regular stainless steel wire. But it is not very convenient, since sharp edges can easily damage the fabric. You can also use round wooden blocks.
- Plastic rings with a diameter of about 1 cm - 10–12 pieces.
- Nylon cord. You will need three cuts equal to two lengths plus one width of the curtain.
- Weight bar.
- A wooden block that will act as a cornice. You can use a ready-made cornice with a lambrequin strip already attached.
- Screws and hooks on a screw leg.
Pattern and step-by-step instructions, sew it yourself
Measure the window opening. Add 5–7 cm to the width of the opening on each side for seams, and 10–15 cm to the height. Prepare the fabric for cutting. To prevent the curtain from shrinking during further washing, “adjust” it in advance: soak it in warm water, dry it and iron it. There is no need to wash the fabric in a machine, because without treatment, the edges can become very frayed, and the fabric itself can stretch diagonally. Lay the fabric evenly on the floor or table. Outline the outline of the future curtain with chalk. Mark the folds immediately
It is important to accurately observe their sizes. This is one of the main secrets of tailoring
Dimensions and quantities depend on the length of the curtain and are shown in the table. We mark the lines of the gates and the installation locations of the rings - holders for the cord. The resulting pattern will look like the picture.
Finish the sides by folding the fabric twice. Watch the thread tension. The stitching should not tighten the material, otherwise the finished product will bulge unsightly. Attach Velcro tape to the underside of the cornice bar. This can be done using glue, a furniture stapler or screws. Fold and finish the top edge. Sew the second part of the Velcro to it. This is done so that the finished frame can be easily removed from the cornice and washed. We process the bottom edge. Make a “pocket” on it in which the weight bar will be located. As a weighting material, you can use a thin wooden beam or a piece of aluminum profile. If the fabric is translucent, paint the strip in the desired color in advance. Sew decorative braid from the inside. At the same time, make pockets for the rods. Insert the rods into their proper places. Make sure that they do not catch or pull the curtain fabric. Sew the pockets on one side. With the second one, you will remove the rods when you remove the curtain for washing. Hand sew the rings according to the markings. To fix the lifting mechanism, three rings must be placed on the cornice. Do this using regular screws or hook screws. The rings must be symmetrical relative to the middle and located no less than 5 cm from the edge. Use Velcro to attach the curtain to the curtain rod.
Thread the cords into the rings. To do this, tie them in a knot around the bottom rings. For reliability, you can secure the result with glue. Then, from the bottom up, go through all the rings, including the top ones. Bring all the cords to one side through the top row of rings. Pull all the cords and straighten the tabs on the curtains. Secure the folds with ribbons. Attach the curtain rod. Untie the tape and lower the curtain. Equalize the tension of all the cords and connect them with a knot behind the outermost ring. Thread the cords through the handle that lifts the curtain. Tie a second knot at a distance of 40–50 cm from the first knot. Cut off the remaining free ends of the cord. To prevent the edges from crumbling, you can melt them over a fire.
969e8f8d7435fba682dd97f1e926d6cb.jpe
Required Tools
To sew Roman blinds for windows yourself, you must have:
- a piece of fabric from which you will make a curtain. If your goal is thicker curtains with good light protection, also purchase lining fabric;
- a wooden plank, the length of which should be equal to the expected width of the product, the width should be 5 cm, and the thickness should be about 2.5 cm;
- thin wooden or metal slats that will be sewn horizontally into the fabric. Their length should be a couple of centimeters less than the width of the fabric, and the number depends on how many folds you want to make on a classic Roman blind;
- weighting agent - a wooden block or metal plate with a length equal to the width of the curtain;
- lace made of synthetic material (best nylon). Its size should be no less than the length of the curtain, multiplied by 5 times;
- furniture stapler;
- a roll of Velcro tape;
- a skein of finishing border, about 2 - 3 cm wide;
- plastic or metal rings;
- cord retainer (bracket or hook);
- needle, thread, scissors;
- sewing machine.
What does it represent?
A Roman curtain is a curtain of a special design that does not have draperies, but is opened by folding the fabric into folds using cords and slats sewn into the panel. They are suitable for office and home windows, for modern hallways and kitchens. Will fit into any environment with the right color selection.
When unfolded, it looks like a canvas that covers the entire opening of the window. When folded, the folds gather at the top of the window and do not interfere with enjoying daylight.
There are two types of such curtains:
simple. When closed, it is a straight, even canvas; when open, it is smooth, uniform folds that overlap one another. They have a completely simple appearance, but that is precisely why they fit perfectly into any interior. These cannot be wider than 1.5 m. If the window is larger, then it is necessary to decorate it with several such canvases.
Simple open Roman blinds for a modern kitchen
Original bathroom with simple Roman blinds to match the bathroom
Cascade. These do not align completely even when unfolded, creating an elegant cascade.
Cascading Roman blinds with fastening above the window opening in the interior of a classic bedroom, decorated with materials of noble colors and shades
Cascading Roman blinds with fastening to the window frame in a delicate white and pink color scheme, suitable for decorating a girl’s room
Roman blinds feature cascading pleats when folded up for a bright, beach-inspired room. The peculiarity of the interior is the use of natural materials for decoration
How to make a lifting mechanism for a Roman blind
And finally, we have reached the main and final stage in the manufacture of Roman blinds.
Carefully sew rings along the edges (preferably as close to the edge as possible) and in the center on all pockets for slats using a needle and thread.
We attach the curtain to the curtain rod with Velcro.
We lay out the entire structure on the floor.
We determine on which side the cord will hang, by which we will pull the curtain and thread it through the rings.
We burn the edge of the cord with matches so that it does not unravel.
The wrong side of the curtain is facing us:
- We pass the cord through the hook on the bar on the left, then through the hook in the middle, then through the hook on the right and go down along the right edge of the curtain, pulling the cord through the rings.
- We tie the cord with a knot on the last ring.
- We straighten the curtain, pull the cord and cut it on the left side approximately at the height of the middle of the curtain.
- We take a new rope, thread it through the left and middle hooks of the curtain rod and then through the rings along the middle part of the curtain. We tie the end of the cord to the bottom ring. We align the beginning of the cord with the first cord and cut it at the same level.
- We thread the third rope through the first hook and go down the rings on the left side of the curtain. We tie it on the last ring. We cut the beginning of the cord in the same way as the first and second.
- We tighten the threads again, checking that the tension of all three is even. Otherwise, when lifting the curtain, the folds may become distorted. We braid the three free ends of the cord and tie them beautifully.
If you decide to run the ropes some distance away from the edges, then you may need to screw in another hook on the block to secure the rope.
If the curtain is wide, then the threads for lifting can be passed not along three, but along five vertical lines.
We insert slats into the pockets; it is better to leave the edges unsewn. Then it will be easier to wash the curtains: take out the slats and wash them without any problems.
At the bottom of the curtain we insert a weight strip.
All that remains is to hang the curtain on the window. A man's help may be needed here.
They pulled the cord and the curtain gathered into folds and rose.
We loosened the cord, pulled the curtain down - it fell.
I hope you understand how to sew a Roman blind with your own hands from my detailed step-by-step description.
And here is the video that inspired me, but I made my own changes to this master class, which I wrote about:
Types of mechanisms
An important design feature of Roman curtains is the various options for their control. That is why the mechanisms that do the main work also differ. Main types of mechanisms:
- Cordova. The main feature is that this mechanism was first used by the Romans, so it can rightfully be considered the most reliable, having passed the test of centuries. The work is carried out by a system of cords and rollers, which some users create themselves. Disadvantage: this system will not support more than 4 kg. The number of eyelets is predetermined by the manufacturer.
- Rotary with chain. There are 2 main elements in this system - a chain through which the curtains move, as well as a special block. In fact, this system differs from the previous one only in that instead of cords, a chain is installed here, and this significantly increases the durability of the product. The rotary chain mechanism can withstand loads of up to 7 kg.
- Motorized. The modern principle of automation and product processing is used here, which is why the motorized control mechanism is most often chosen by manufacturers of Roman curtains. There are practically no disadvantages, with the exception of the complex design, which is quite problematic to repair on your own. An important advantage is the possibility of remote control.
Step-by-step instructions for making lifting curtains
Now that everything is ready to make your own Roman blinds, you can safely start sewing. Detailed step-by-step instructions accompanied by informational photos and videos will help you with this.
1. Take measurements of the window and buy the required amount of fabric. You can sew your curtains in one layer of fabric or in two. This depends primarily on the density of the fabric; if it is thin, then it is better to sew a double fabric. Then you will need twice as much material.
2. Calculate the number of folds according to the height of the opening to sew curtains that will suit your window.
3. Cut out the product as shown in the photo. Don't forget to leave allowances for finishing the edges. There should be a large allowance at the bottom, as this will later be a pocket for the weighting material. From the inside out, mark the places where the rods will be inserted and the plastic rings will be attached.
Approximate pattern of Roman blinds. For your window, the height and width of the product may vary, but the recommended allowances should be followed.
4. Cut out the workpiece and trim the edges with a double hem. You can also use spider web adhesive tape, which glues the fabric together with a hot iron.
Fold the edge of the product along the marked line and stitch. Iron with a hot iron for greater precision.
5. If you have a double curtain, then fold the two parts with the right sides inward and sew them together, leaving one edge unsewn.
6. Now you need to make special drawstrings for inserting frame rods. To do this, you will need specially cut strips of fabric or ready-made border braid. We sew it like a pocket on three sides, leaving one unsewn so that the pins can be easily removed before washing. The rods should be smooth and easily slide over the fabric, so it is better to choose them from plastic or metal.
According to the marks for the rods, sew pockets for those same rods
7. Having marked the location of the rings, sew them to the pockets by hand, they will serve as the basis for the lifting mechanism. Attention! There should be as many rings for threading cords as you think necessary, but the curtain should be easy to lift.
The photo shows how to properly thread nylon cords to lift curtains
8. Sew one part of the Velcro to the top edge, and glue the second to the future cornice.
9. Fold the bottom edge so that you get the same drawstring where the weight strip will be threaded.
10. Thread the cords into the rings from bottom to top, bring them out to the outer ring with the shortest cord. Tie all the cords into a knot, and roll the curtain itself and tie it with a ribbon.
To prevent the cords from falling out or coming apart, tie them into a knot and secure them at the bottom
11. Fix the cornice in the form of a strip to the frame or wall above the window, depending on where you planned to hang your DIY frame. On plastic windows, if the curtain will be attached to the frame, the curtain rod can be hung using double-sided tape.
12. Hang the Roman shade on the curtain rod using Velcro. Remove the tape and adjust the tension level of the lifting cords, check the serviceability of the mechanism. Tie the cords into a knot at the top and bottom and trim off any excess edges. In order for the curtain to remain at the desired level, it is necessary to fix the cords on the side on a wall hook.
Making curtains without sewing
There are several options for Roman curtains without sewing.
Curtains made from wallpaper (they are also called pleated) should be made like this:
- Take a roll of paper 1/4 longer than the height of the window opening. Line the wrong side with a pencil in transverse stripes at equal distances from each other (2-3 cm).
- Gather the paper into accordion folds. It is better to make the first folds using a ruler.
- Turn the folded pleated on its side and pierce holes with an awl at a distance of 10-12 cm from the sides.
- Thread ropes through the holes (the minimum length of one is equal to the height of the window).
- Attach the pleated with double-sided tape.
For the second option, you will need old blinds with a working lifting mechanism.
Sequence of work:
- Close the slats and lay the blinds flat on the table.
- Cut off the threads responsible for turning the lamellas.
- Calculate the number of folds. Remove excess planks, leaving the first from the bottom, and then, for example, every fifth. Bend the parts where they are attached to the threads: they break easily.
- Cut the fabric 3-5 cm wider and longer than the blinds.
- Turn the seam allowances to the wrong side and glue with thermal tape.
- Apply a thin layer of glue to the volumetric bar, which acts as a weighting agent, and then apply a thin layer of glue to the convex side of each plate and glue the fabric.
- After the glue has dried, the curtain is ready for use. It can be hung on the brackets on which the blinds hung.
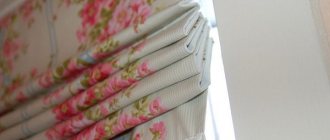
Instead of slats, you can use slats. They are inserted into drawstrings (pockets), which are made by folding the fabric right sides together and fastening it along the marked line with a thin strip of glue.
Making curtains without sewing requires available materials and a minimum of time. Delicate and short-lived, but well-chosen in color, they can decorate a room and protect from the scorching sun. They can be used to decorate a cottage, balcony or loggia.
Sewing features
Before sewing Roman blinds, you need to get acquainted with the advice of craftswomen:
- when choosing thin fabric for curtains, you need to sew on lining fabric to reduce the light transmission of the curtains;
- if there are window openings that are not proportional in shape, to sew curtains you need to take care of the pattern to avoid mistakes;
- In order for the folds to be smooth and beautiful, the fabric must be folded sequentially along the bends and ironed;
- It is better to sew the rings with very strong nylon threads, as they must withstand a large load.
We sew frameless curtains
This is the easiest way to make curtains for beginners. The curtain panel is also sewn from the main and lining fabric in the same way as for frame curtains.
The top edge of the curtain, which is attached to the curtain or bar, and the bottom edge, where the weighting material is threaded, are processed in the same way.
Unlike the previous version of the tape, the drawstrings are not sewn on. On the reverse side, along both edges of the curtain, markings are made every 30 cm, where the rings are sewn. Two laces are threaded into the rings. The curtain is ready.
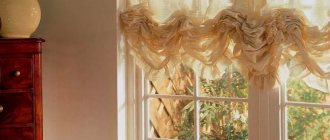
Roman curtains will not look too strict if decorative frills, ruffles, scallops, tassels, appliques, fringe, etc. are sewn onto them.
It is important that the fittings, fabric, and decorative elements identically repeat the design of the surrounding furnishings. They can be used in combination with a dark curtain, tulle curtain, or lambrequin.
Hand-made Roman blinds create a unique decor for window openings.
How to attach Roman blinds to a window?
Curtains can be attached to the ceiling or to the frame. They are attached to the ceiling or to a stationary window using fasteners and screws. Of course, it is better to entrust this work to your man; he will cope with the task in five minutes.
They are easy to install on a plastic window using brackets.
How to attach a Roman blind to a plastic window
We insert the bracket into the frame.
We install the curtain on the frame.
You need to take a string weight, insert it into the bracket and install it on the bottom of the frame.
And we make a loop on the thread and fix it at the bottom in a weighting agent.
We install the same bottom bracket on the second half of the window and also tighten the thread.
Be sure to check how easily the curtain moves.
The Roman blind gave impetus to the creation of fabric roller blinds. But it looks much richer and more comfortable.
Combination of curtains with tulle
Roman models combine well with tulle. You can use this element of window decoration in any room of the house: in the living room, bedroom, nursery, kitchen and loggia. The photos below demonstrate various options for combining tulle with lifting curtains, differing in color, texture and style.
A double curtain looks interesting, where one sheet protects from the sun, and the other, less dense, serves as tulle. It is better to install such products on a wall or ceiling. When marking the places where the curtain rod is attached for a double curtain, you should take into account its width.
Decor for the top and bottom edges
The upper part of the curtains is decorated with lambrequins (ribbon, modular and lace), appliques, compositions of rhinestones and sequins.
To finish the lower edge, decorative elements such as:
- satin ribbons - along the contour, at a distance of 15-25 cm from the edges or in the form of bows;
- lace;
- figured fringe;
- lush ruffle;
- beaded scallops;
- bugles;
- braid and fringe;
- straight ruffles;
- butterflies;
- beads;
- rivets;
- buttons.
Step 8. Connect the lining to the front side
Place the lining on top of the facing fabric. The lining should extend 2 cm on the sides from the edges. Secure the fabric with pins. Check with a ruler whether the pocket spots match the front side.
Fold the bottom part of the facing fabric in half to form a pocket for the weighting material. Cover the resulting pocket with a lining on top.
Hand sew the lining to the facing fabric using a hidden seam.
Sweep the corners, but so that there is room for inserting the weighting agent.
The lining in the corner should not be completely sewn. This will make it possible to insert and remove the weighting material.
Fold over the top part with Velcro and sew it also using a hidden seam.
Materials and care
Caring for such a window decoration includes the following activities:
- Before washing, it is necessary to remove the weighting material and detach the fabric from the base, and after the procedure, reinstall it, since this method will dry it faster.
- The water temperature when hand washing should not exceed 30 degrees, otherwise the fabric will quickly discolor.
- Never use bleach - if you need to wash a stain, use a sponge and mild solutions.
- When washing in automatic mode, fill the machine only halfway, and after finishing, rinse the fabric several times.
- It is necessary to squeeze only manually, carefully, slightly twisting the fabric.
- It is best to dry the fabric in a vertical position.
If you used natural fabrics when sewing, then after washing and drying you will need to iron them thoroughly. If the material is thin enough, it will stretch under the weight of the weighting agent, and you will no longer need to iron it.
Choosing fabric
Fashionable New York living room with bright harmonious color combination on Roman blinds
Linen curtains for a light-filled Atlanta bathroom. Window arrangement of each curtain, saving fabric consumption
Geometric pattern on Roman curtains in the interior of a traditional kitchen
Silk Roman blinds with Asian motifs
Before sewing such a curtain with your own hands, you need to choose the appropriate fabric and fittings. The most important criterion for fabric is that it should not stretch. The ideal solution is fabrics with a dense weave. This is due to the peculiarities of tailoring - there will be a weighting material at the bottom. It forms tension when unfolded. If the weaving is weak, then over time the curtain will stretch.
Elegant interior with designer interior items. Thick fabric and a weighting material sewn into the bottom of the curtain create tension when unfolded.
Plain Roman blinds of different lengths and widths for a Scandinavian-style living room. The main criterion when choosing fabric is tight weaving to avoid stretching
A plain gray Roman blind with a dense weave for a children's room with a neutral finish, but with bright interior details
The fabric can be plain or multi-colored, even transparent. The latter are often used as tulle Roman curtains; these are covered on top with a standard thick Roman curtain fabric.
eb48669b69880a60d67c42632cb6017d.jpe
c27f87833feaeec0e3d3c6ba1a70b620.jpe
Sheer fabric for Roman blinds that double as tulle in an elegant kitchen
A laconic dining room with Roman blinds of low density natural fabric as tulle that lets in sunlight
An eclectic bedroom with a white and blue color scheme with wood and metal elements. For the dense, non-transparent structure of the Roman blind, additional fabric and lining are used, attached from the outside
The main canvas can be decorated, the only limit is your imagination. Braid with pendants, fringe, tassels, eyelets, buttons. But there is no need to overdo it. One decor option is better, but appropriate.
Decorated with tassels, the main fabric of Roman blinds with a white background and an orange pattern
Two types of Roman blinds for an elegant living room. Top Roman blinds made of thick fabric with decor covering the fastening to the cornice
How to decorate wide windows with Roman blinds?
Sometimes windows are wider than the standard window size. So in rolls of fabric 1.4 meters wide, which does not make it possible, taking into account allowances and folds, to make a curtain for a window larger than 1.2 meters. There are several solutions:
Turning the canvas. This is suitable if the weave of the fabric is dense and there is no pattern. But this option is only suitable for a wide window of standard height. Adding piping or decoration. If there is a shortage of up to 20 cm, the fabric must be calculated in the manner suggested above; the shortage will be supplemented with piping. Moreover, they can be the same color as the canvas or contrasting
In the second case, it is important that the color combination fits organically into the decoration and complements the textile elements.
Contrasting rich blue edging for plain white Roman blinds in a nautical-style bathroom interior
Thick Roman blinds with piping decorating a wide non-standard window in a child’s bedroom
If the windows are very wide and high, and there is also a balcony door, you can make a separate panel for each sash.
Three separate patterned panels to decorate a wide three-leaf window
Action plan
We measure the window opening. On each side we add allowances of 5-7 cm in width and 10-15 cm in length. We wash, dry and iron the selected material.
The correct number of folds is calculated using special tables. This is a very important point in making curtains.
We cut the fabric according to the Roman blind pattern. We mark the hem lines, folds and the location of the rings on the wrong side. It is better to fold the material twice on the sides.
Using nails, we nail Velcro tape to the bottom of the strip for attaching the curtains. Sew Velcro to the finished top edge of the curtain. This will allow you to remove the product. We paint the timber that acts as a cornice in a suitable shade.
Fold up the bottom of the curtain, creating a pocket for the weight strip. On the wrong side we sew a border as a trim. We thread hooks through the holes and sew them up at one edge.
Mark the location of the rings and sew them on. To fix the lifting structure, we nail the rings to a wooden beam. The rings should be placed symmetrically, and should be 50-100 mm away from the edges of the panel. We attach the curtains to the beam with Velcro tape.
We insert a rope into the rings along the entire length of the curtain. After all the ropes are inserted into the rings, we bring them out from above on one side of the curtain.
We attach the beam above the window opening or to the window frame. We remove the ribbons that hold the curtain folded. After lowering the curtain, we equalize the tension of each rope.
We tie all the ropes into a knot at the outermost ring and thread them through the handle that raises the curtain. After 45-50 cm from the place of the knot, we tie another knot and cut off the excess. The curtain is ready!
"Romans" are very popular. Don’t be lazy to make them - you will get a fashionable and stylish decoration for your windows.