A mini-greenhouse for an apartment is a greenhouse that helps you obtain fresh vegetables and herbs throughout the year without leaving your home. It can even be placed on a windowsill. It is characterized by efficiency and compact dimensions. A mini-greenhouse can be purchased ready-made or made by yourself.
Mini-greenhouse for an apartment
Purpose
The main purpose of the design is to obtain a harvest of fresh vegetables and herbs at home throughout the house. Inside, the device creates an optimal microclimate necessary for normal growth and development of plants.
A greenhouse helps not only to grow plants at home, but also to prepare seedlings for the new season for further planting on the site.
A greenhouse helps not only to grow plants at home, but also to prepare seedlings
Requirements for mini-greenhouses
Home greenhouses must meet the following requirements:
- maintaining the microclimate inside the structure necessary for plants. Only in this case can you get a rich harvest;
- ease of use. The structure should be easy to open so that you can access the plants at any time, perform irrigation, etc. All plantings must be visible when viewed from any angle;
- aesthetics. The design of the structure must fit into the interior of the room in which it is installed;
- strength, reliability. The device must withstand repeated opening and closing;
- transparent walls. They provide light access to plants.
Transparent walls in the mini-greenhouse provide light access to the plants
Types of structures
There are several types of greenhouses that can be used at home. Each of them has advantages and disadvantages that need to be taken into account when choosing a greenhouse.
Simple
It is a metal frame on which a cover made of polyethylene film is fixed. On one side there is a rising flap, providing free access to the inside of the greenhouse.
The cover can be easily removed. This allows the structure to be used as a flower stand.
Another version of the product is with glass or plastic walls.
There are several types of simple structures, which are distinguished by size, number of shelves, and method of arrangement. You can purchase a compact greenhouse to place on a window or a floor-mounted greenhouse of impressive size.
The main task of a simple design is to maintain the optimal temperature inside the device. Additional lighting, ventilation, and irrigation are provided by the user.
Attention! Simple designs are placed near the window. This allows plants to receive natural light, which promotes their growth and development.
Automated
They are greenhouses that provide plants with complete care. Functions of structures:
- maintaining optimal temperature inside the device;
- automatic irrigation of crops;
- organization of additional lighting;
- regular ventilation in automatic mode, etc.
Attention! There are other additional options, depending on the type of greenhouse, manufacturers. They increase the functionality of the product, but increase its cost.
Hydroponic farm cabinet
Automated greenhouses can be placed anywhere in the apartment, regardless of the light source. This is due to the fact that the devices are equipped with lamps. For this reason, they do not depend on natural, artificial light.
There are several types of automated mini-greenhouses:
- Growbox. It is a closed structure. A reflective coating, lighting fixtures, and a ventilation system are installed inside. Occupy an apartment area of up to 4 m2;
Growbox, greenhouse for an apartment
- thermobox. A device that completely relieves the user of caring for plants. The design is equipped with an automated system that regularly irrigates crops, monitors the level of humidity in the greenhouse, controls the supply of nutrients, and turns the lights on and off in a timely manner. Allows you to grow plants even at sub-zero ambient temperatures;
Thermobox, greenhouse for an apartment
- Aerogarden. A device in which crops are grown not on soil, but on aeroponics. This is a material that is a nutrient solution in the form of a mist. Plant roots are placed in it. The nutrient solution promotes the rapid growth of crops and their proper development, which allows for a rich harvest. In addition, an optimal microclimate is maintained inside the greenhouse.
Aerogarden, greenhouse for an apartment
How to increase the usable area of the window sill
Avid gardeners and flower growers know that there is never too much space. I would like to plant as much as possible, but often the space does not allow. Even the widest window sills cannot cope with this task. I propose to consider several ways to increase the useful area of window sills.
Projecting edge
The easiest way.
- A solid sheet of plywood, chipboard or other material that will be at hand is placed on the windowsill. It should be a single piece that will extend 40–50 cm beyond the edge.
- We choose a material at least a centimeter thick. If it is thin, for example fiberboard, then do not place long seedling pots on the protruding edge.
- The fiberboard sheet will easily support cups of seedlings. The protruding edge will also protect the seedlings from hot air flows from the battery.
Photo: Plywood can easily support small cups of seedlings.
Creating an additional top shelf
- We make reliable fastenings above the window. We attach a rope or cables to them, on which we install the shelf.
- On the side of the shelf you can screw in self-tapping screws with a loop through which the rope is threaded.
- This entire structure must be very durable and withstand a load of at least 9–10 kg. The width of the shelf should be wider than the glass in the window, so that the shelf does not press on the glass with its weight, but rests on the frame.
Rack with tiers
On a wide window sill you can make a high rack with several tiers. We place the tiers at a distance of 40–60 cm from each other. The width of such a rack also varies from 30 to 50 cm.
Photo: The shelving looks impressive.
Preparing to create additional space on the windowsill
- Select the desired window sill. Ideally, these will be southern windows or those facing southeast. We will arrange additional lighting on the window sills on the north or east side.
- We do general window cleaning. We carefully clean the glass to allow as much light as possible. Wash the frame. In winter, condensation forms on frames and glass. High humidity causes mold to appear in the corners and bottom of frames. We thoroughly wipe and dry everything so that the plants come into a clean space. For those who don’t have this, just wash the windows.
- If there are gaps in the frames, then we carefully seal everything.
- You can insulate a window by placing another glass along it. The second glass will protect the leaves of the plants from contact with the main, cold glass, and will not allow the root system of those plants that will stand near the glass to become overcooled.
DIY apartment design
It is not necessary to buy a greenhouse for an apartment. You can make a greenhouse with your own hands. There are several ways to do this.
From the aquarium
To make such a greenhouse, you will need an old aquarium of large dimensions. And they simply cover the plants or seedlings.
Aquarium greenhouse
From plastic bottles
To set up a greenhouse you will need empty plastic bottles. The bottom is cut off from the containers. The tops are fixed onto pots with culture.
Pranik made from plastic bottles
Greenhouse showcase
This design looks aesthetically pleasing and fits into any design. Make the device as follows:
- Assemble a rack whose dimensions correspond to the size of the window opening.
- Install shelves made of plexiglass.
- A lighting fixture is fixed on top.
- Transparent material is fixed on all sides. Typically, polyethylene film is used.
The design of the Miya-greenhouse looks aesthetically pleasing and fits into any design
How to choose a ready-made home greenhouse
When choosing a ready-made home greenhouse, you should adhere to the basic rules, namely:
- pay attention to the material from which the greenhouse is made: it must be durable, transmit light well and be environmentally friendly;
- consider the size of the finished structure: it should fit in the place in your house where you plan to place it.
You will be interested to know how and from what to make a greenhouse for seedlings with your own hands.
Following all the necessary recommendations from experts will allow you to grow high-quality vegetables and herbs in your own apartment throughout the year. In this case, you just need to choose the type of greenhouse that fits the dimensions of your home.
Pros and cons of a homemade greenhouse
Advantages of compact greenhouses for an apartment, made by yourself:
- low price;
- ease of creation;
- mobility.
Flaws:
- To effectively use greenhouses, it is necessary to maintain optimal conditions in the apartment. It is necessary that the room is always warm and dry. Low temperatures and high humidity will lead to a lack of seedlings and poor crop growth. Consequently, the user will not be able to get a rich harvest;
- the need to organize an additional lighting source. This will lead to higher energy costs;
- can only be used in an apartment. Cannot be placed on a loggia or balcony, otherwise the plants will die;
- external unattractiveness. This especially applies to plastic bottles. Because of this, the entire design of the room is spoiled. The exception is the display greenhouse.
Compact greenhouse for an apartment
Greenhouse lighting
If simple or homemade greenhouses are used, it is important to provide them with natural light. To do this, the structures are placed on the windowsill or near the window.
Such greenhouses also require additional light sources. Usually special devices are used. It is important to choose the optimal lamp color for plants:
- blue, purple. These colors promote photosynthesis. Thanks to this, crops grow actively and bring a good harvest;
- yellow green. They impair photosynthesis. This leads to the appearance of pathologies in plants. For this reason, these colors are not used for greenhouses;
- red, orange. Lamps with such shades are used during the flowering period of plants, the formation of ovaries, and the formation of fruits. However, red and orange colors are served in doses. Its excess can lead to the death of the entire crop.
LED seedling lighting
It is also important to choose the right type of lamps:
- incandescence. They provide high-quality lighting and heat the air. However, they are rarely used for greenhouses, since they promote leaf curling and cause burns on plants.
- luminescent. These lighting fixtures can be used for home mini-greenhouses. They are characterized by low heat transfer, low energy consumption, and moderate cost.
- ultraviolet. They have different wavelengths, which allows you to select a lighting device for specific crops.
- mercury. Used for photosynthesis, but in limited dosages. Usually used at the stage of fruit formation.
- LED You can use several ribbons of different shades to create the optimal color scheme for the crop. The devices are characterized by durability and low power consumption.
- infrared. Optimally suitable for plants. Their light is identical to natural light, which has a beneficial effect on the development of culture. In addition, infrared lamps heat the air.
Greenhouse lighting
Which backlight to choose
In January and February it is necessary to use additional lighting. With insufficient lighting, the seedlings stretch out, their immunity and growth rate are weakened. They take root less well when transplanted; the main trunk becomes bent, which subsequently leads to damage from the weight of the fruit and inconvenience during care.
For lighting, phytolamps, low-power cold-light fluorescent lamps, halogen lamps, and ordinary low-power incandescent lamps are used.
Photo: In winter, when there is little sun, plants need lighting. ______________________________________________________________________________________________
Advice from professionals
When organizing a home greenhouse, it is recommended to listen to the advice of professionals:
- The windows should be decorated with blinds or small curtains that are fixed directly to the frame. This will help control sunlight, which can cause burns on plants, especially on young shoots.
- Instead of soil for crops, you can use hydro- and aeroponics. These nutrient mixtures saturate plants with substances necessary for normal growth and fruit formation. As a result, the gardener reaps a rich harvest even at home.
- A window for ventilation and irrigation is placed on top of the structure. This ensures a uniform air outlet and a fresh, clean flow inside. If the door is made at the bottom, then cold air will enter the structure, which will negatively affect the health of young shoots.
Video - How to make a mini-greenhouse at home
A mini-greenhouse for an apartment is a small greenhouse that will allow you to enjoy fresh vegetables, berries, and herbs all year round. You can make it yourself, or you can purchase a ready-made version. It all depends on the desire of the user and the size of the budget.
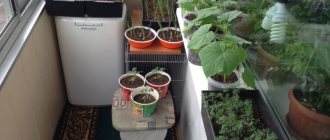
Growing seedlings in a greenhouse on a windowsill
Growing seedlings on a windowsill is not difficult, since the process of sowing seeds is no different from planting them in a regular greenhouse or greenhouse (Figure 5).
Figure 5. Seedlings and greenery on the windowsill
First, you need to choose the optimal time for sowing, taking into account the climate and the data of the Lunar calendar. Secondly, prepare a loose nutrient substrate in which the seedlings will take root. It needs to be placed either in the greenhouse itself (if you are using a container model), or in separate containers (if you have a rack or other spacious structure). Next, the seeds are sown, but when growing on a windowsill, it should be borne in mind that such seedlings will need much more attention.
First of all, it is necessary to provide the seedlings with additional lighting, especially in winter, when the duration of daylight hours is short. In addition, containers with seedlings or the mini-greenhouse itself must be placed in a tray to protect the structure from the dry air of heating devices. It should also be taken into account that seedlings grown on a windowsill need to be fed weekly and watered regularly, after first checking the moisture level of the substrate.
From the video you will learn even more useful recommendations about arranging a mini-greenhouse in an apartment.