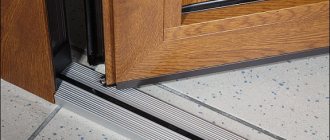
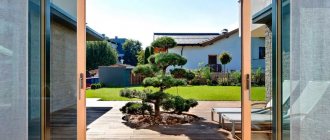
Wooden shutter doors look great as the front of wall cabinets, kitchen furniture and as interior furniture. It is possible to make shutter doors with your own hands, but you need to know the technology.
Louver doors are gaining popularity in modern design. They are used in furniture production and installed as interior doors. The cost of such doors is quite high, so many people wonder whether it is possible to make such a door themselves. Let's try to figure out how a shutter door works, what advantages and disadvantages it has, and how to make such a design with your own hands.
Types: wooden, plastic, metal
A shutter door is a durable frame into which thin slats are inserted. The slats are inserted into the frame at an angle to block the path of light, so the louvered door is impenetrable to prying eyes. But the gap between the slats allows air to pass through the canvas.
Since the lamellas are very thin, they are not able to provide high structural strength. The role of the load-bearing element in a louvered door is played by the frame. A handle, hinges and other fittings are attached to it. If necessary, you can even embed a lock into the frame, but a louvered door, for obvious reasons, cannot be a reliable barrier.
A number of materials are used to make doors of this type:
- Tree. Wooden slats look the most luxurious. This door will serve as a decoration for various interiors. The main disadvantage is the high cost, although the price of a louvered door will be somewhat less than that of the same door made of solid wood. This material is also afraid of high humidity, because... wood tends to warp and swell from water.
- Aluminum alloys. This is the most durable material used in the construction of louvered doors. The strength and durability of the material allows the use of such doors in technical rooms, storage areas, etc. In addition, aluminum is not afraid of moisture. Disadvantages: high price and relatively heavy weight of the structure.
- Polymer profile. This is the most budget option, which is inferior in strength to aluminum, and in aesthetics - to wood. The main advantage of plastic shutter doors is their affordable price for a wide range of people.
When designing doors, blinds can be combined with other elements. For example, doors look good if the two lower quarters are made of solid wooden panels, and the two upper segments are filled with slats.
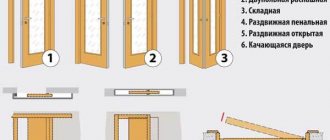
The design solutions also differ. Blind doors can be hinged (with one or two leaves), sliding or folding like an accordion. Such a variety of design options allows you to fit louvered doors into almost any interior.
How to choose the right one
Several factors influence the choice of a suitable model:
- humidity - if it is high, cabinets made of plastic or with fabric doors are suitable;
- build quality - the planks must be in the same plane, distortions, depressions or deflections are not allowed;
- reliability of fastening - no swaying, instability;
- features of the functioning of the mechanism in a sliding structure - smooth opening indicates its correct operation;
- guide material (for accordion-type doors) - it is better if they are made of aluminum, such products are durable.
The cost of cabinets with louvered doors may vary depending on the materials, dimensions of the product, and the type of doors chosen
However, when choosing, it is important to remember that such a design is initially more expensive than the standard model, so you should beware of cheap options - most likely they are not of the proper quality and will not last long
It is important to consider what will be stored in the closet. If it is intended for products, it is better to choose dark furniture with a minimum gap between the slats
And if the sun and air are not harmful to the contents, you can purchase a white or light version with wide gaps to visually lighten the structure.
Louvered doors solve many problems - with their help you can use space more ergonomically, they provide ventilation
True, in order for such a structure to last as long as possible, it is important to choose the right material and placement area. For example, wood does not like moisture, and plastic cannot cope with heavy loads
When choosing, it is also important to pay attention to the quality of assembly, fastenings, and fittings. The reliable model is characterized by stability, convenience, smooth door opening and, of course, a complete absence of defects
The correct operation of the mechanism is indicated by its smooth opening
It is important that the planks are in the same plane; distortions, depressions or deflections are not allowed
If the room has high humidity, it is better to choose products made of plastic or with fabric doors.
Advantages and disadvantages
Before making a decision to install louvered doors in a particular room, it is worthwhile to thoroughly understand their positive aspects and disadvantages inherent in the design. Otherwise, there is a risk of being disappointed in the purchase by installing such a door where it does not belong.
Therefore, in a room with a closed louvered door, the air will not become stale. Rooms with such doors are effectively ventilated. Also, the space between the slats allows heat to spread from room to room, so there is no effect when one of the rooms is clearly more humid or hot than the others.
Other advantages of this type of door leaf are:
- Less risk of waterlogging and swelling. The air passing between the plates carries away excess moisture, due to which the louvered door will swell less than a door made of solid wood. Condensation forms less on a metal door. All this extends the service life.
- Less weight than a solid door. Thanks to this, there is less need to adjust the fittings.
As happens very often, disadvantages are a continuation of advantages. They are also available for louvered doors:
- Although the slats form an impenetrable barrier to prying eyes, such a door cannot boast of soundproofing qualities. Smells will also pass through such a door. Therefore, this is not a suitable option for the kitchen, and for the bedroom such a solution is not always justified.
- The design of the louvered door is not durable.
- Since it is difficult to make a louvered door (a large number of small elements need to be adjusted to each other), this is one of the most expensive types of doors. Only solid panels made from expensive types of wood can be more expensive.
Doors equipped with louvered slats are perfect for storage rooms and dressing rooms. The ability to pass air helps to avoid the formation of musty air in such rooms. This type of door is also suitable for installation in technical rooms. And of course, wooden slats can decorate almost any furniture.
Application area
The scope of use of louvered doors is determined by their properties. They are indispensable in rooms that require constant ventilation.
At the same time, the degree of sound insulation should not be important for these rooms. There are several such rooms in our houses and apartments:
- Technical rooms - storage rooms, laundries, wardrobes. In the case of dressing rooms, it is worth thinking about the feasibility of this option. After all, it is advisable to protect clothes from dust. A compromise is possible: make a louvered grille in the upper part, where there is less dust and the warmest air accumulates.
- Bathroom.
In the bathroom, it is desirable to quickly remove excess moisture and louvered doors will help with this. But this option is only good if the bathroom is separate, since a combined bathroom will become a source of not very pleasant sounds and smells. Louvered doors to technical rooms are an excellent option to achieve ventilation without organizing a special air duct - Boiler rooms facing the street. The street door for such a room may have a louvered grille. Only it should be adjustable so as not to make the room too cold in winter. One thing: before installing such doors, check with your local fire department. Just in case.
In addition to serving as doors between rooms, louvered structures can be used in furniture. They are good:
- In kitchen cabinets, both floor and wall mounted. In the dryer and the cupboard with cereals they provide quick ventilation, in the rest - more like decorative ones.
- In cabinets that cover the pipes in the toilet as an enclosing structure.
You can hang them on hinges, or you can put them on magnets. In bathrooms, toilets, kitchen cabinets can be used as cabinet doors - As blinds on windows. The problem of light scattering is solved very well. It does not cut off completely, creating twilight lighting.
- For wardrobes, chests of drawers and other furniture located in living rooms. The advantages in this case outweigh the disadvantages, and the appearance is interesting.
Another area of application is as shading structures with a large glazing area. On terraces, winter gardens, large balconies and loggias with continuous glazing. Why are louvered doors better than regular blinds? The fact that “fixed doors can be opened while leaving shutter doors closed. There will be free air access and there will be no too bright light.
Louvre doors can be used as shading
As a partition that delimits a room. For example, fencing off the sleeping area in a studio apartment. This option is ideal if there is no window in the fenced off area. Such a partition will provide air access, let in sufficient light and create privacy.
A partition made of blinds to separate the sleeping area
In principle, louvered grilles can be used for other purposes than their intended purpose - as a notice board, a screen, covering or separating something.
Element sizes
You can see the main dimensions of the elements from which the blind door is made in the figure:
To make the support frame, a wooden beam is taken. The most common option is with dimensions of 2.5 cm x 4 cm, although other options can be considered. The upper and lower parts of the frame can be made from timber of slightly smaller dimensions or the same. The entire tree must be thoroughly dried and treated with special compounds that prevent rotting and the appearance of fungi.
The slats are made from wooden planks with dimensions of 3.8 cm x 0.5 cm. Such plates must be made in strict accordance with the dimensions. To do this, you need to know the technology and use professional-grade carpentry tools.
To determine the door parameters, you need to take the dimensions of the doorway. The door should be 50-60 mm narrower and 70-80 mm lower than the opening. Dimensions are taken in the same way when making cabinet doors, but if necessary, tolerances can be reduced or removed altogether, depending on the method of hanging the doors.
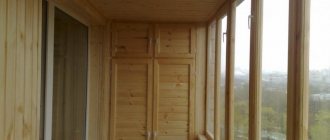
Wooden louvered doors for wardrobes, bathrooms and toilets, kitchens
All photos from the article
Louvre doors have been used by furniture makers, builders and other specialists in one way or another connected with interior design and building equipment for centuries. They are periodically forgotten, then again, having remembered, they are actively used in the most expanded range of areas. In our article we will describe possible options for using such products.
Doors with horizontal rivers improve ventilation of living spaces
Possible options for the location of wooden shutter doors
Standard wooden shutter doors for cabinets are installed on cabinet furniture as facades. Below you will learn how to apply them directly in this way and “outside the box.”
Bedrooms and living rooms
As you know, the best storage for clothes, linen and other things are wardrobes and chests of drawers.
So, a louvered cabinet facade has several advantages over solid doors:
- Possibility of ventilation (things can “breathe”), which significantly improves the quality of storage.
- As a result of good ventilation, moths will not appear in the closet.
For your information! The moth does not like dry and fresh air; its best habitat and breeding habitat is humid, warm nooks with a stagnant climate.
Two types of furniture are used for the wardrobe:
“Ventilated” furniture allows you to avoid the appearance of unpleasant odors on clothes
Regardless of the design features of the clothing and linen storage, louvered doors can be used, installed in various ways:
- Using furniture hinges for wooden door frames, the leaves of which open and close in the usual way.
- With a set of guides for wardrobes with sliding doors.
Wardrobe rooms
Now it has become fashionable and, I must say, affordable for large apartments to arrange entire dressing rooms. So, on the line between the space of the dressing room and other rooms (usually the bedroom), it is customary to install louvered doors. For dressing rooms, in addition to the two methods of fastening doors described above, the “accordion” option is possible.
These doors fit especially well in wooden rooms, where they blend with the interior
It is possible that wooden shutter doors can be installed inside a room – a wardrobe, or on separate parts of a “storage room”.
Bathrooms and toilet rooms
Doors with slats look very impressive in bathrooms and toilets.
In these rooms, blind doors are used:
In the photo - all unsightly communications under the washbasin are hidden in this way.
- Bathroom screens.
- Panels for decorating niches with pipes, shut-off valves and metering devices.
- Screen for water heating system.
Attention! For covering water supply and wastewater pipelines, as well as for the boiler piping system, ventilated structures with blinds are a priority.
The instructions recommend their use, as this will help avoid condensation on communications.
Kitchens
Following the same principle as in bedrooms, louvered facades are installed on kitchen units, usually made of natural wood. Cabinets for storing groceries, just like clothes, need constant access to fresh air to prevent the appearance of cereal bugs and moths.
In addition, it is worth noting that regardless of the installation location, louvered doors make the interior of the furniture and room extremely attractive and unique.
Design of openings
Separately, we should talk about the equally frequent use of such doors in the design of windows, balconies, and doors. This style “a la Provence” is in great demand today not only among the French.
Louvered wooden painted doors are installed as shutters both indoors and outdoors. In any case, they are not only a decorative element that makes the appearance of the openings from the outside completely complete and quite elegant.
Covered up on a hot summer day they:
- They will protect from the heat without interfering with the free circulation of air.
- They will not provide complete blackout like blind shutters.
Other Applications
The use of louvered doors does not end there.
You can make wonderful decorative elements from them:
- False shutters for openings and street buildings.
Louvered doors can be installed as both entrance and interior doors
- Screens - for dividing space, for small partitions separating, for example, a bedroom from a ladies' corner.
- Ventilation grilles for heating devices.
With the help of blind products, huge radiators will no longer confuse you and your guests
Purchase or self-production
Recently, simple door designs - blinds made of pine - have been sold in domestic stores. Their price is quite affordable, and, what’s even more pleasing, there are a variety of sizes of wooden louvered doors.
Here are some of them:
- Width options - 294, 394, 494, 594 mm for all door heights shown below.
- Heights – 606, 720, 993, 1100, 1700, 2013, 2422 mm.
As you can see, the range of dimensions is presented in abundance; anyone can choose the appropriate option for themselves and do the finishing and hanging on site with their own hands.
You can also purchase more expensive louvered doors made of valuable wood, painted at your discretion.
Without a doubt, there are woodworkers who can make similar cabinet doors to individual sizes on their own. (See also the article Wooden stools: features.)
Conclusion
The use of the above-mentioned products is not limited to generally accepted standards; in this case, only two things serve as the framework: financial capabilities and your ideas. To come up with something unusual, look at non-standard solutions using blind doors on the Internet.
Required materials and tools
First of all, to make doors you will need high-quality dried wood. An importance of no more than 12% is allowed. Also, the presence of knots and other defects in the wood is not allowed. You will also need to stock:
- PVA glue.
- Finishing materials: dowels, varnish,
- Tools for assembly: mallet, hammer, screwdriver. Self-tapping screws are usually used as fasteners.
- To process wood you will need a sanding machine. You will need medium to fine grit sandpaper.
- For marking you will need a ruler, tape measure, and pencil. To install the elements correctly, prepare a level (bubble type, construction) and a plumb line.
- To make lamellas quickly you will need a milling cutter and a thickness planer.
As you can see, a fairly wide range of tools and the ability to use them at a good level are required. Therefore, it will often be a better decision not to make the doors yourself, but to turn to manufacturers.
What types of louvered interior doors can there be?
There are two main characteristics by which structures are divided. To get a complete picture, you should consider them in as much detail as possible:
- Material used for manufacturing. At this stage, it can be divided into three main types - made of wooden material, metal and plastic. Today, of course, wooden ones remain popular, with metal ones in second place. The first and second options can be painted so that they fit perfectly into the interior. A painted door will be much better and will fit, for example, already installed furniture;
- Direct appointment. In this version, the door can be an entrance type, an interior door, or intended for furniture.
DIY shutter doors. Step-by-step instruction
The procedure for making a door with louvered slats is as follows:
- First, the bars from which the frame will be made are cut according to previously determined dimensions.
- The lamellas are made using a thickness planer, and the corners are removed using a router.
- Using a router, fastening grooves for the lamellas are cut out in the side bars. This is a very important operation, on which the quality of the door as a whole depends. The size of each cut and the angle of inclination must be measured as carefully as possible so that there are no problems during assembly.
- All parts must be carefully sanded. First, take medium-grain paper, and then fine-grain paper. After which all elements are painted over.
- In one of the vertical racks, grooves are selected and dowels are placed in each groove.
- The slats are placed in the inclined grooves. When everything is ready, the horizontal crossbars are fixed to dowels. The last element is the second vertical stand.
The assembly procedure is shown in the figure. To make the structure stronger, the dowels are lubricated with PVA glue.
How to paint a louvered door
It is better to paint the door with a spray gun. However, if it is not there, you can take a brush. Ideal quality is obtained if all elements are painted separately. But if the entire door is being painted, you need to carefully work through all the joints with a thin brush.
Photo report on the assembly
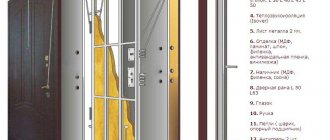
First, all profiles are cut exactly to the calculated dimensions. The accuracy must be perfect. The cut is strictly perpendicular, at 90°. Holes are drilled in the handle profiles for installing rollers and fasteners.
The holes are made through two diameters. The exact size depends on the dimensions of the purchased fastener, but basically there are two sizes: 4 mm and 6 mm, as well as 6 mm and 10 mm.
How to drill holes
One such hole is made at the top, the center of which is located at a distance of 7 mm from the edge of the profile, at the bottom there are two holes - the first at a distance of 7 mm from the edge, the second at a distance of 42 mm from the profile cut.
Holes at the bottom of the side profiles
During assembly, all parts of the filling are assembled first. First, if there is glass or a mirror, sealing rubber is installed around the perimeter. It is simply put on the end of the part by pressing a finger. The seal is cut off along the edges and placed end to end, but without overlapping on the next side.
Seal on the mirror
A protective film is glued to the back of the mirrors. You can use regular self-adhesive. This film will prevent fragments from scattering if the mirror breaks.
If the sash is composite, we assemble it using connecting profiles. The filling parts are simply inserted with force into the profile. Sometimes considerable effort may be required. You can tap the end with the back of your hand or use a rubber mallet for this.
Simply insert the filling parts into the grooves of the profile and tap on the end
When the sash is assembled, the corresponding profiles are installed at the top and bottom using the same principle.
Top profile installed
Then it’s time to install the side handle profiles. Everything is the same: push the filling into the groove, make sure that it fits all the way along the entire length without distortion. When the frame is assembled, it is necessary to tighten it with fasteners. Let's start from the top. Take the fasteners and insert them into the previously drilled hole. If the distance was measured accurately, the screw fits into the groove of the upper cross member.
If drilled correctly
Tighten the connection using a hex wrench. Slightly not tightening it all the way, insert the upper rollers between the screw head and the profile jumper, then tighten the screw.
Insert the upper rollers
We repeat the same operation on the other side. Then we move down. Here the fasteners are installed in the upper hole. Just tighten it all the way. We repeat similarly on the other side.
Install the fasteners from below
Next, install the lower rollers. We insert the thrust plate into the groove and press it.
Installing the lower roller - insert the plate into the profile
We press the spring, tucking the roller body inside. We insert a screw into the hole, trying to get into the socket, and tighten it with a hexagon. You may need it in a different size - slightly smaller than the others - since this screw is usually thinner and longer.
Press the roller, insert the screw
There is no need to tighten it all the way. So that it goes into the plate half a centimeter or so. Then, when installing the door and adjusting its travel, this screw adjusts the position of the sash - the angle is raised or lowered.
Tighten the screw that fixes the roller
If you press the roller wheel, it will go into the housing, then return due to the elasticity of the spring. This simple mechanism ensures smooth movement of the sliding wardrobe door.
First screw on the top guide. It is attached either to the ceiling or to the top of the cabinet. The distance from the shelves is at least 100 mm, otherwise the doors will touch shelves, things, and hangers.
Screw on the top guide
We insert bumper springs into the grooves in the lower guide from the sides. They will limit the movement of the door. The number of springs is equal to the number of leaves; they are installed at both ends.
Door stoppers
Insert travel limiter springs
If you don’t have a laser level, so you don’t have to worry about plumb lines, you can start by simply laying the bottom guide without fixing it yet. Then install one blade, placing its upper rollers at the top and installing the lower ones in the desired groove. This way the doors will connect the upper and lower guides.
Having aligned the sash vertically, automatically align the bottom guide
By aligning the canvas strictly vertically, you will automatically align the lower guide. All that remains is to screw it on. Just be careful that the doors do not move.
The last thing left to do is to glue the Schlegel on the sides. This is a fleecy self-adhesive strip that softens the impact of the sash on the walls of the cabinet (or simply on the walls, if the cabinet is frameless).
The final touch is the Schlegel sticker
Here the wardrobe doors are installed and ready to go. You can watch the process again in the video.
Installation without drilling
Installation without drilling can be done easily and quickly with your own hands; even a woman and child can hang blinds in this way. The advantages of installation are that there is no need to make holes and spoil the profile of the plastic window. There are two options for attaching the cornice:
- on double-sided tape;
- on clamp brackets, metal or plastic.
Here it is necessary to take precise measurements; the width of the canvas should be from the handle to the hinges minus a gap of 5-10 mm on each side, otherwise the curtain will cling to the fittings and quickly break.
Types of mounting brackets for different surfaces
For clamps
Clips can only be attached to opening sashes:
- assemble the cornice according to the manufacturer's instructions; there is no need to fasten the curtain;
- put the clips on the cornice, be sure to check that they do not touch the moving elements;
- open the sash, try on the cornice in place, mark the installation locations for the fasteners;
- snap the clamps onto the fold, usually they are put on as staples or as clamps;
- hang the curtain rod and put on the canvas.
We invite you to watch a video on how to properly hang blinds with your own hands on an opening sash using special brackets.
With double-sided tape
It just so happens that if not everything, then a lot can be glued to tape, including horizontal blinds, there are 2 types of designs:
- first, brackets with hooks or magnets are installed on the tape and the curtain rod with the canvas is fastened to them;
- The tape is already glued to the cornice and it is simply fixed to the frame or glazing.
Installation steps:
wash the surface thoroughly, wipe with acetone or solvent; make marks on the sides and draw a line with a pencil, be sure to check with a level and a tape measure, the line must be strictly parallel to the surface of the window sill, otherwise there will be an ugly crooked gap at the bottom; if the geometry of a plastic or wooden window is broken, it is important to hang the cornice correctly: make a vertical plumb line from a thread and a bolt, attach it to the upper intended point and make a mark at the bottom, the same must be done on the other side; connect the top and bottom marks; attach a square and connect the 2 upper marks, the angle between the vertical and horizontal lines should be 90°, the canvas should hang strictly parallel to the plumb line, if the cornice skews up or down, the curtain will not work well and will quickly fail; remove the protective film from the tape and carefully glue the cornice along the line; fasten the cloth.
The diagram shows one of the options for fixing the brackets with tape
Expert advice
- Professional manufacturers advise: before starting work, make a draft of the future product. This will allow you to avoid making mistakes with the sizes. Every little detail must be taken into account. For example, the width of the material.
- To fill the interior of the closet, you can select special baskets for things, place modern drawers, install nets and organizers for things.
- Choice of material: laminated chipboard is a standard economy class furniture option, it requires covering the edges and does not allow moisture to enter. MDF - made from tightly compressed chips, covered with PVC film, which protects the part from liquids, can be milled and does not require an edge. Plastic (PVC) is the most moisture-resistant option and can be easily cut and processed at home. Any of the materials is suitable for filling the installation.
Subscribe to our Social networks
Technical use
Due to their high air permeability, iron shutter doors have become very widespread. Wooden structures do not provide sufficient protection against intrusion by criminals. And metal blinds combine the ability to create a good barrier and provide ventilation and maintain temperature conditions. Due to this, they are often used - steel blinds can be seen at substations, blind doors
used where there is equipment that generates a lot of heat.
At home, the property of blinds to allow air to pass through is also conveniently used. Use in the toilet to save from condensation and mold has already been mentioned.
Another popular case is decorative wood louvres.
panels on heating radiators. They allow warm air to flow freely, while at the same time serving as a wonderful decoration and part of the style of room decoration.
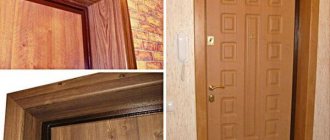
Laminated varieties
As you can see from the reviews, side doors made of laminate are the most budget option. The decorative coating is applied to the MDF strip frame. The film material is created from prepared paper that imitates wood. To make the product stronger and more resistant to moisture, the base is impregnated with resins. It is worth noting that such modifications are not intended for installation in rooms with high humidity levels. In addition, laminated models are not recommended for installation if there is a high risk of external influence (small children, pets).