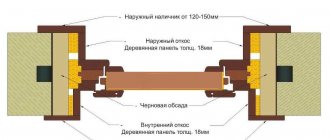
Scope of use and additional information
The framing corner is made by hot bending a PVC sheet. The decorative element allows you to choose colors that will suit any interior. Application area:
- Window slope inside a house or apartment.
- As an external material to protect external or internal corners.
- Door or arched opening.
- To protect the corner of the wall when decorating with wallpaper.
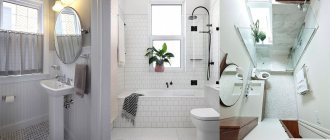
- Protection of corners when finishing with plastic in the bathroom.
- Draping the joint when decorating external siding.
The plastic element is a good protector from mechanical stress, but, like any material, it has advantages and disadvantages:
- The installed corner is used as a finishing seam at the junction of finishing materials.
- Long service life - up to 25 years.
- Installation is carried out independently; you can glue the corner without prior preparation.
- The plastic element is easy to trim and comes in different colors.
- Acceptable price.
Why are plastic corners needed on slopes
? Among the disadvantages, the following turned out to be significant:
- Plastic is a fragile material, so it must be cut with special tools - cracks may appear.
- The flammable finishing element does not tolerate high temperatures.
Comparing types and sizes
Framing always begins with choosing the type and size of the plastic element. The table shows data about plastic corners, their sizes and types for slopes:
| View: | Size: |
| Equilateral: | 20*20 – 50*50 mm, standard length, attached to give strength. |
| Not equilateral: | 5*17 and 20*25 mm, lining of arch openings, usually installed on curved compositions. |
| T-shape: | 12*10, 18*10, 20*10, 22*10 mm, installation is necessary to hide the seams. |
| Removable (with latch): | Standard, the shelf bends for dismantling. Easy to install, no need to stick. |
During installation, it is necessary to cut the corner to form the desired length. A sharp utility knife will help with this. If you need to cut at a clear angle, you will need to prepare a miter box and a hacksaw.
Important! The colored plastic corner for internal slopes is available in lengths of 2.6 m, 2.7 m, 2.8 m, 3.0 m.
How to glue plastic corners onto slopes (video)
Preparatory work
The installation process begins with the selection of an adhesive mixture. Polyurethane glue holds plastic elements well and allows you to frame surfaces where there will be a load. Makes it possible to glue parts in the bathroom if ceramic tiles will be glued.
Silicone sealant is used as a fastener with less stress. The corner can be glued using liquid nails, if the edging is dark in color, then it can be glued using black compound, for light and white – transparent.
Installation of plastic corners
The work of installing plastic corners on slopes is as follows:
- Regardless of where you need to glue the plastic corners - on the door, if there is no trim or window, outside or inside, you need to take measurements and cut the material correctly to length.
- Prepare the surface where the gluing will take place - remove excess elements, clean the base.
- Install and glue the strips correctly.
How to properly glue plastic corners to any slopes:
- Degrease the surface thoroughly before attaching the corner piece.
- Polyurethane foam is not used during the design process.
- Excess protruding plaster is cleaned to a noticeable smoothness.
How to properly glue plastic corners
- The sticker is marked with a pencil.
- Before gluing all the parts, you should take this advice: it is better to measure the corners for the slopes of doors and plastic windows locally. Install the top horizontal element first, and then use a cutting tool to mark the vertical stripes.
Important! Using photos and videos, every beginner can cope with the gluing process on their own. The metal element is also fixed using self-tapping screws.
Covering with corners also involves additionally securing the strips using narrow masking tape. Fix the strip with it in several places and leave it for about 24 hours. This time is enough to reliably glue the corners to the surface.
If the corner is used as a finishing touch, then the place where it is glued should be cleaned of finishing materials. This increases the quality of grip. When fixing to an area decorated with trellises, you should cut a strip a couple of millimeters wider than the plastic corners. By adhering to simple design rules, fixing decorative elements will be simple and quick, and in the end they will delight you with an aesthetic and relaxed appearance.
Video text
Kraftool metal scissors for cutting plastic corners - https://goo.gl/GTjBnBHow to glue plastic corners onto slopes! Sooner or later, but any repair fortunately comes to its end.
And we have a lot of different surfaces that need to be somehow combined into one pattern. Wallpaper on the walls is adjacent to plastic slopes, ceramic tiles in the bathroom rest against a wooden door jamb, arched ceilings hang over decorative plaster. How can we frame all this correctly?! PVC plastic corners will help us! Video No. 79 - “How to glue plastic corners on slopes”! By the way, it is not so important how to glue the PVC corners and where (door slopes, bathtub, window), it is much more important than gluing the plastic corners. For such cases, liquid nails and a sealant gun have been around for a long time. And how to properly cut plastic corners and then glue and glue them onto the slopes, see our video No. 79!
Our construction and extremely educational channel “PiK”, and a simple video on how to glue PVC plastic corners onto window slopes - https://www.youtube.com/c/GuysstoneAlso, don’t forget about the page on VKontakte, which contains more than one video about how and what to glue not only corners, but also wallpaper, baseboards, slopes - https://vk.com/guysstoneOur Instagram with photos from the world of repair and finishing - https://www.instagram.com/guys_stone_/
See also a selection of video tutorials on how to glue plastic corners on windows and doors with your own hands: No. 20 How to use a sealant gun - https://www.youtube.com/watch?v=VmCh_Vw6KyQ No. 63 How to glue slopes from drywall - https://www.youtube.com/watch?v=pvrtu8H2cBo№78 How to install a plastic baseboard - https://www.youtube.com/watch?v=7GRDeGPEMxA
Gluing plastic corners is an important question, and if you know how to glue them, then there is an answer!
How to glue the plastic corners on the slopes!Sooner or later, any repairs fortunately coming to an end. And we have a lot of assorted surfaces that need to be like that and than connect one pattern. Wallpaper on the walls side by side with the plastic slopes, ceramic tile in the bathroom. How are we to frame it all right?! Our help are the PVC plastic corners! Video No. 79 - “How to glue the plastic corners on the slopes!” By the way, it is not as important as PVC paste corners and where (door slopes, bath, window), much more important than to glue acrylic plastic corners. For such cases, there has long nails and liquid sealant gun.#Plastic Corners #Slopes #PVC
DIY installation of a decorative PVC corner
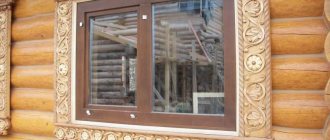
Plastic (PVC) corners
They are very widely used in interior decoration; they are installed on the slopes of plastic windows, they frame the outer corners of walls and the slopes of doorways. In this article we will take a detailed look at the process of installing a PVC corner on the slope of a plastic window, and also consider how to make a neat joint between two corners.
Step 1.
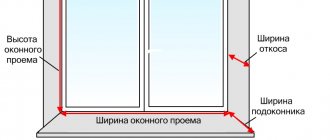
We make markings. We need to attach the PVC corner to the slope and make a mark along the edge of the vertical slope:
Minimum length
the applied corner (L) must be greater than the height of the slope (a), by the width of the corner (b), taking into account a small margin (c):
For example, if the height of the slope is a = 1500 mm, and the width of the corner b = 30 mm, then the length of the corner must be at least
a + b + c = 1500 + 30 + 15 = 1545 mm.
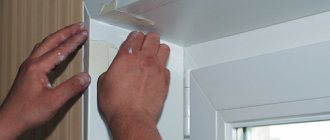
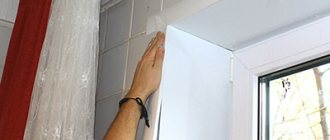
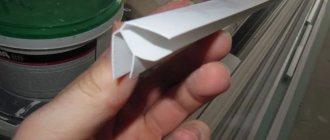
Step 2.
We make a cutout on the PVC corner, removing one edge, as shown in the photo below:
We apply the corner to the slope:
The corner fits perfectly, you can proceed to the next step.
Step 3.
The plastic corner is glued only to the slope, this is enough for fixation, so we apply glue only to one of the edges.
“How to glue the PVC corner?”
As glue you can use “Moment Montazh”, “QUELYD Masterfix” and their analogues. It is not recommended to use super glue, as it will be almost impossible to correct mistakes.
Glue is applied to the inner surface of the corner either pointwise or in a thin strip:
We fix the PVC corner with masking tape (while the glue dries):
Step 4.
Repeat step 1-3 for the right slope:
Step 5.
We mount the corner on a horizontal slope. The length of the corner is taken with the same margin as for the vertical one, but taking into account two sides. Markings are also made, and then cuts are made and the corner is glued to the slope:
Step 6.
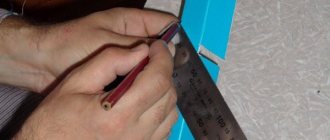
Mark the cutting location. The corners will be joined at an angle of 45°:
Step 7
Carefully cut two corners at once. It is very important that the knife is sharp:
Step 8
Seal the joint between the corners with white acrylic sealant. After the glue has dried, remove the masking tape. The installation of the PVC corner is completed.
Main characteristics
Among other characteristics, such as fastening method, material of manufacture, manufacturer, color and weight, special attention should be paid to the dimensions of the fittings. Corners for slopes come in the following sizes :
- 10x10;
- 20x20;
- 25x25;
- 30x30;
- 40x40;
- 50x50.
All dimensions are indicated in mm, so it’s easy to figure out which length is best to choose for your window. The smallest ones are suitable in those places where you just need to strengthen a corner, and those that have dimensions of 50x50 mm will already allow you to hide serious imperfections in the finishing.
Manufacturers also produce corners with dimensions of 60x60 mm. The entire size range is available in both plastic, aluminum and wooden models. Wider elements are often used for exterior decoration.
Important! The Russian market has corners of local production and foreign production. They are supplied in 2700mm lengths and can also be sold to order.
Why do you need to attach corners to slopes?
Let's start with the most important thing - why is this necessary? What role do the corners play - only decorative or do they have more serious functions? Let’s not argue with the fact that if you frame the slopes of doors or windows with special decorative elements that fit perfectly into the design of the room, then the interior will immediately change for the better.
But besides this, they also perform a very important protective function. Sooner or later you have to carry large items through the opening, which can damage the corners, and you can simply accidentally touch the outer corner and damage it. There can be a lot of situations, the main thing is that the result is the same - a damaged surface and, accordingly, a damaged appearance. In addition, as practice shows, most often the wallpaper begins to peel off in these places. So it is best to protect the outer corner of the slope with the help of a decorative element, which will also transform the interior.
Corners are not only protection, but also a neat aesthetic appearance
We cut the ceiling plinth in the corners at home without a miter box correctly: Review + Video
Ceiling plinth is a narrow decorative demarcation between the ceiling and adjacent walls.
They are very convenient for masking joints on walls and ceilings, especially if they have a different structure and are not made very carefully.
Its presence makes the room design clearer and more complete.
People often wonder: how to properly and accurately decorate a room with ceiling plinths?
This is especially true for those cases when the home owner prefers repairs done with his own hands.
Ceiling plinth - fillet
To do this correctly, it is important to strictly follow existing recommendations and rules for finishing work. And then the result will please you.
There are no difficulties in attaching the fillet (this is the name of this element): virtually all types of products are attached with reliable glue.
Even inexperienced repairmen have no difficulty hanging the ceiling plinth. They are worried about something completely different: how to properly cut the ceiling plinth? In fact, almost every room, no matter how intricate its shape, is equipped with corners.
Plastic, wood or MDF - which one to choose?
Having made sure that installing corners is not just a whim, but a necessity, we will study the construction market in order to make the right choice. These products are divided into types depending on the material from which they are made. So, the corner can be plastic, wooden, bamboo, made of cork or MDF. Absolutely each type has its own pros and cons; let’s look at them in more detail.
Plastic corners are made by hot bending a sheet of polyvinyl chloride. Basically, they have the same shelf width - from 10 to 40 mm in increments of 5 mm. However, there are asymmetrical specimens, for example, 10x25 mm, but regardless of this parameter, the angle between the sides is 90 degrees. If it is necessary to transform an arched opening, this is done using a special flexible profile. Their advantages include their relatively low cost; they do not require painting, unlike wood.
The next type is cork corners. Such decorative elements are quite often used for arched openings, but this does not mean at all that their use is limited only to this area. They can also be used to finish slopes of various shapes. Cork has a number of advantages, including strength, fire resistance, practicality and environmental friendliness. In principle, this material has practically no disadvantages, except that if your pet wants to sharpen its claws on it, this will damage the surface.
It is also worth noting wooden and bamboo products, which will always be signs of excellent taste and will fit into almost any interior. In addition, we must not forget about their environmental friendliness. True, such elements are somewhat more expensive than their counterparts made from other materials, and besides, they often require painting. A material such as MDF can also be compared to natural wood, but it costs significantly less, because wood dust is used to create it.
Photo gallery: finishing materials
It can be seen that the range is quite extensive, and there is plenty to choose from. But what should be guided by this? Of course, no matter how much we would like to, the budget is almost always limited. Therefore, first of all, we have to proceed from our financial situation. As mentioned above, plastic products have a very reasonable price, while their appearance is not much inferior to their counterparts made from natural materials. But, in addition to the price, you should also pay attention to the fact that these decorative elements fit harmoniously into the design of the room.
For arches, you should purchase special arched corners of different sexes; they ideally maintain their position when bent. Please note that the wider the sides of this element, the greater the load it can withstand.
Preparing the walls
Despite the fact that one of the advantages of finishing walls with PVC panels is the absence of “wet” work, repairs usually cannot be done without them.
Old walls may have cracks, crumbling plaster, areas affected by fungus, etc. Cracks and crumbling areas can “grow”; without strengthening the surface, loose areas serve as a source of dust, and a colony of fungus or mold in many cases causes allergies.
Therefore it is necessary:
- find out the nature of the crack, eliminate the causes, seal it with repair solutions (based on cement, gypsum, epoxy resins, etc.);
- clean crumbling areas, strengthen loose areas with penetrating primer;
- clean the surface of fungus and mold, treat with fungicidal solutions (or primer with an antiseptic).
Before installation, panels of switches and sockets, wall lamps must be removed, and the contacts must be protected with electrical tape from accidental contact.
Installation of corners on window or door slopes
Having figured out what such products are made of, what their features are and having decided on the choice, you should learn how to install corners on slopes. Detailed instructions are given below.
What glue to use
In addition to the corners themselves, we will also need an adhesive composition with which we will attach the selected element. When choosing it, it is worth remembering that quite often, especially if it is necessary to glue a narrow product, the glue seeps out from under it and, naturally, ends up on the walls. As a result, the latter may be damaged, which, accordingly, will negatively affect the appearance of the room as a whole. Therefore, you should choose an adhesive composition whose excess can be removed from the surface.
Basically, corners are glued to new slopes, but nevertheless, check that the surface is relatively flat, since large bumps cannot be hidden by any decoration. It should be free of foreign objects such as nails, screws, etc. It also needs to be degreased; white spirit is suitable for this purpose.
How to cut correctly
Before discussing how to attach corners to slopes, you should find out how to cut them correctly. After all, this stage is the most labor-intensive and, perhaps, even the most important, since it determines how closely their edges will be joined, and this directly affects the aesthetic appearance of the entire room. It is best to trim with a fine-tooth hacksaw. First you need to measure the length of the opening, then put marks on the corner itself so that the segment corresponds to this parameter. Then we cut off the part that will be adjacent directly to the slope strictly according to the marks, and the part that will be adjacent to the wall at an angle of 45°.
To trim the corner, use a fine-toothed hacksaw
How to glue
Finally, we got to the main question, how to glue the corners onto the slopes. However, before proceeding directly to fixation, you should carry out, so to speak, fitting. Once you are sure that everything is trimmed correctly, you can move on. We apply an adhesive solution to the inside of the corner, at the junction of the sides, in increments of approximately 10 cm. At this stage, a mounting gun will be an indispensable assistant. After this, we quickly press the product to the surface and fix it in this position with masking tape. You should start with a horizontal slope, and then proceed to the side slopes. We remove excess sealant from the surface of the walls with a damp cloth and let it dry thoroughly. You can remove the tape only after 24 hours.
Gluing
Installation of the corner is not difficult if you approach the matter without haste. The first step is to accurately measure the length of each of the outer corners of the slope. After this, blanks are made from the corner. Their size should exceed the length of the slope by 3 cm. This is necessary to make it easier to fit the elements to each other in the process. This factor must be taken into account when purchasing corners, because with a large number of windows, you may need to have one additional strip with a length of 270 cm in stock. After cutting the elements, you need to try them on in place. It is necessary to start installation from the top bar, since it is easier to fit the side corners to it.
It is installed in its place and marks are made on the corner along the edge of the slope. After this, the excess part must be cut off. But it is not necessary to trim the entire corner, but only that part of it that will lie directly on the slope and not on the wall. If the corner comes with a lock, which is designed to be fixed in a sandwich panel or lining, then the lock is cut at an angle of 45 degrees so that it does not rest against the lock of the adjacent corner. The side corners are trimmed in the same way. The protruding parts must be overlapped so that the elements from the lower corners overlap the protrusions from the top. The next step is to trim the elements in place at an angle of 45 degrees. Thanks to this, the excess part is cut off and the ideal abutment angle is ensured. This method for installing corners on window slopes is discussed in more detail in the video below.
https://youtube.com/watch?v=d3jUehO2JA0
If the fixation is carried out by gluing, then the elements can be adjusted in a similar way, with the only difference that there is no need to tinker with the lock. If the slopes near the window are made with high quality, then trimming the ends can be done using a miter box, and not on the spot, which will partially facilitate the task. The glue on the surface of the plastic corner should be applied to the bend
It is important to select the quantity so that when the lining is pressed against the slope, it is evenly distributed under the shelves
Exposed adhesive residues must be immediately removed with a damp sponge or a lint-free cloth. Before polymerization, the corners must be firmly fixed; to achieve this, you can use masking tape, which fixes them directly to the surface of the wall and slope. There is a little trick that must be followed when gluing the corner to the joint of the wallpaper. The wallpaper under the corner should be cut so that the corner can cover it. This is done so that after gluing the overlay, the wallpaper does not peel off along with the product.
In some cases, installation of the lining can be done using small self-tapping screws. This should only be done when other methods are not suitable. The option with self-tapping screws is applicable for planks that have a thickness of 1.4 millimeters or more. In this case, it is necessary to accurately mark where the screws will be located. Holes are drilled using a drill with a diameter slightly larger than the diameter of the cutting edge of the self-tapping screw. The upper part is further expanded so that the head of the screw is partially or completely recessed. To completely hide the heads of the screws, furniture pads or stickers are used. The fixation points will remain visible, so this method is best used as a last resort.
How to Cut a Plastic Corner at 45 Degrees
During renovation work in premises, plinths play a decorative role and are the finishing touch of the design. They are also designed to close the gaps between different surfaces. Proper gluing of ceiling and floor plinths is an easy task, but a responsible one. In this regard, the issue of their installation becomes particularly important.
The photo shows the joining of skirting boards in the inner corner of the room.
Floor plinths are available in a very wide range of products:
- Made of foamed PVC, plastic , produced with cable channels for laying wiring and in their absence.
- Made of wood , made from different wood species, solid, in other words laminated; Installing a wooden plinth is no different from installing plastic fillets.
- Iron, iron and duralumin , with cable channels and flat.
Included with plastic or iron products are various connections and endings that make installation easy. Therefore, in fact, there is never a question of what actually is, how to cut plastic skirting boards at the joints. Wood lacks such connecting parts. They need to be cut for a perfect connection.
Fundamentally. Before installation, wooden fillets must be kept in the room for which they are intended for more than a day. Just like any wooden product, it must adapt to temperature and humidity.
At work we will need the following:
- miter box;
- a hacksaw with a small tooth;
- sandpaper.
Let's look at how the pruning process is carried out.
To connect planks when going around corners, the question is how to cut the baseboard at 45 degrees? This is painfully simple to do, but it is better to have a special device called a miter box.
Read:
pros
Today, PVC panels are the most used material for interior decoration, since this building material has many advantages:
- the price is not bad;
- wide range with a variety of colors;
- strength and lightness;
- moisture resistance;
- antistatic coating;
- easy installation and dismantling;
- you can replace the damaged part of the structure;
- easy care.
Due to these properties, PVC is used for the production of plastic panels. The strength of plastic depends on the amount of polyvinyl chloride in its composition. The more PVC in the composition, the stiffer the plastic sheets.
Flaws
Prolonged exposure to ultraviolet radiation, for example when exposed to direct sunlight, on PVC products leads to photodestruction, as a result of which the product loses its elasticity and strength. To prevent this phenomenon, light-absorbing dyes are introduced into the PVC composition, which allows limiting the degradation of a thin layer, about 0.05 mm thick, which changes its color (the process of “bleaching”, “burning out”).
SLOPE 5 min. How to glue a plastic corner on slopes and outer corners of walls. Angle Plastic Video
It doesn’t matter whether you buy a professional tool made of metal or more ordinary versions of plastic or wooden devices; they will help you do this work in a makeshift environment without unnecessary problems.
In this case, the cost of a professional device is justified if you often have to do such work. For small volumes, you can limit yourself to more ordinary and cheap variations.
Fundamentally. The height of the walls of the machine should overlap the height of the trimmed strip to obtain an even cut.
A device for sawing down molded products, arrows indicate technological gaps for performing work in accordance with the instructions.
Note on cutting internal corners:
- prepare two pieces of river for joining;
- We take the first piece, insert it into the miter box from right to left so that it lies as if on the floor and leans against the wall of the device far from us, as if against a wall;
- we cut the product from the left end, passing the saw through the holes numbered 1;
- We insert the 2nd segment into the device from left to right, accurately observing the orientation of the floor and wall;
- we cut it from the right end, passing the saw through the holes numbered 3.5.
Note on cutting external corners:
- prepare two pieces of plinth for joining;
- We take the first segment, insert it into the instrument from right to left so that it lies on the base, as if on the floor, and leans against the wall of the instrument, far from us, as if against a wall;
- we saw it from the left end, passing the saw through holes numbered 5;
- We insert the 2nd segment into the tool from left to right, accurately observing the orientation along the floor and wall;
- we cut it from the right end, passing the saw through the slots numbered 1.
Advice. At the joints along the walls, it is better to cut the planks at 45 degrees; after such a connection is completed, the joint will be virtually invisible. The strips to be trimmed are inserted into the tool on both sides, seemingly leaning against the wall; trimming occurs through one technological slot. First, they cut one, then push the second one towards it, moving the first one away from the slot, and cut the second one.