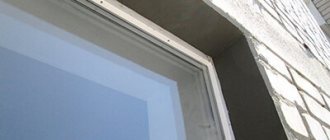
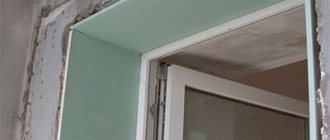
After installing the glass unit along the edges, it is necessary to install corners for slopes.
This element allows you to give the work a finished look, and if plaster is used as finishing, then the corners smooth out the transitions between different types of material.
All existing elements can be divided into several groups according to their properties.
To understand how to choose the right corners for PVC windows, it is recommended to pay attention to their characteristics, as well as instructions for self-installation.
What are they?
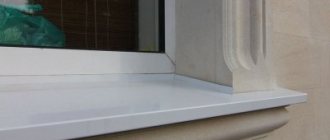
A corner for slopes of plastic windows is a type of fittings that is installed after installing a double-glazed window on the slope of a window.
Corners perform not only a protective function, but also a decorative one .
This element is made from various materials and protects slopes from wear.
It often happens that unprotected slopes are constantly worn out for various reasons: you can accidentally touch the slope while passing by, animals can climb on the window sills and also damage the corner itself, which was finished with plaster, putty or other materials.
Note. The slope corner will protect the surface and extend the life of its finishing.
Purpose
Corners have several main functions :
- Protect corners from wear. This was mentioned above, we just need to add that the wallpaper pasted on the wall will be well protected from defects at the corner.
- Hides unevenness. If, during the repair process, unscrupulous craftsmen performed poor quality finishing of the slopes and did not remove defects, then such an element of fittings will perfectly hide them.
- Universal function. Using such corners, made of plastic, aluminum or other material. You can seal transitions and irregularities on almost any surface that has corners. For example, if one surface does not fit tightly against another at a corner, you can easily use this type of fittings.
The elements are colored, so they can easily be used as decoration and diversify your home interior in this way.
Perforated corner for plaster
Home renovation is a desire for beauty and comfort.
And it’s not scary if the walls are not level or there are differences in plane. The main thing is that it is visually smooth and beautiful. How to achieve this? Few people know that the secret to the visual beauty of walls lies in a straight, clear edging. This concept refers to the following areas of application of plasters and putties:
- external and internal angles;
- junctions of walls at ceilings and floors;
- protruding parts of any structures (arches, boxes, other structures).
All these places (edges) must correspond to the intended design. Straight should be straight, oval should be oval. The former plasterer-painter achieved acceptable quality with almost his bare hands. But modern accessories simplify and speed up the process.
In fact, all of them are perforated corners for plaster. There are only two varieties of it - straight and arched, and there are many more subspecies. They are used almost everywhere where plaster mixtures with putty are used.
What are they?
All corners for slopes can be divided into several groups according to different properties: by material of manufacture, by place of use, by design . Once you understand the types of these accessories, you can purchase them yourself in the store.
According to the material of manufacture
Traditionally, manufacturers of window fittings produce the following types of corners for slopes:
- metal;
- plastic;
- wooden.
Aluminum is most often used in metal products. This is a durable material that is lightweight.
Important. Aluminum corners are used in places where increased rigidity is needed and a plastic corner cannot cope.
Metal corners can be solid or perforated.
They are available in different colors and are well suited for hiding the joints of slopes with drywall.
Such products are mounted using glue; if the corner is perforated, then after installing it, the element must be covered with a layer of putty.
Plastic corners for window slopes are considered the most common. Here are a few of their advantages :
- light weight;
- different shapes and colors;
- easy to cut;
- Fixes perfectly with glue, putty or self-tapping screws;
- hide all the irregularities on the wall;
- have a long service life;
- have low cost.
Corners of this type can be used without further finishing . They are sold in pieces or pieces of a certain length, which you can cut yourself.
Wooden corners for slopes protect them or act as decoration. They can be internal or external, but both options can be used, since the wood has the same pattern on both sides. Installation is carried out using adhesives or self-tapping screws. Wooden fittings are made from pine, alder, linden or oak.
By place of application
According to the place of application, all corners for slopes can be divided into 2 groups :
- for internal;
- for outdoor.
This difference is determined by the type of finishing work. The outer corners have 90 or 105 degrees. If the angle is 90 degrees, it is fixed so that only one part of the edging is visible. If the turn is 105 degrees, then the fittings are attached with both shelves to the top.
Note. Internal elements make it possible to hide all unevenness at the joints between surfaces.
By design
Angles for slopes are distinguished by design. For example, we can highlight the following :
Equilateral . They are often used to make window slopes even, as well as strengthen them and add rigidity to the corners.- F-shaped . They will help give the end a decorative look, as well as level the overall plane. Used for finishing window openings.
- Removable . Equipped with a latch to facilitate repairs. One of the advantages is that you do not need to remove the slope profile.
- Non-equilateral . One side of such fittings has a smaller height than the other. If the window is of an arched type, then an unequal angle can handle such a slope.
- T-shaped . To hide the joints between an uneven wall and a slope, this type of fittings is used.
The corner design is selected depending on the requirements of finishing work and the structure of the window opening.
Details about gluing
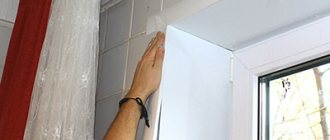
Before fastening, you need to apply the part, leaning it against the installation site in the window or door opening.
- When it is cut correctly, then glue is applied to the inner section of the corner every 10 cm, also at the junction of the planks.
- During this phase it will be good to use a mounting gun.
- Then you need to quickly press the object to the plane and secure it in this state with masking tape.
- The process starts from the transverse slope, and then the turn of the side elements comes.
Use a damp cloth to remove excess sealant from the surface of the walls and give it time to dry completely. The tape can be removed after 24 hours.
How to choose?
To independently select fittings for the slopes of a plastic window, you should pay attention to the following nuances :
- bend angle of each side of the slope;
- side size;
- budget for corners;
- product color;
- material of manufacture;
- type of finish.
Knowing the bend angle of each side of the window slope, you can decide on the design of the fittings. For example, if the corner is too large, then external corners for windows will do. The size of the side is also important; this determines all the dimensions of the fittings. It is necessary to take into account the cost of the corners in advance, because elements of different materials will have different costs.
Note ! Plastic products will be much more affordable than aluminum or wood.
The color of the product is selected according to the interior design, but most often they prefer to install traditional white models of fittings.
Sometimes the apartment owner chooses wood if the double-glazed window itself is also framed in a wooden frame .
Metal corners are more suitable for windows made of aluminum profiles - they will be in harmony with each other.
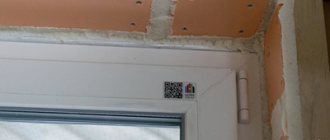
Plasterboard slopes
When installing plasterboard slopes, the following rules are followed:
- use moisture-resistant types of material;
- install the side elements first, then the top elements, or vice versa;
- when using U- or L-shaped profiles, the grooves must correspond to the thickness of the sheet; it is advisable to use components from the same manufacturer;
- if you need to change the angle of dawn, a V-shaped groove is cut on the back side of the plasterboard piece, allowing you to slightly bend the sheet.
Plasterboard blanks are fixed in three ways:
- glued with polyurethane foam or gypsum glue;
- installed in the profile system;
- screwed to the frame with self-tapping screws.
The choice of fastening method depends on the curvature of the edges of the opening and the need for additional insulation.
Preparation
It is much easier to prepare slopes for plasterboard windows than for plaster. Remove old coating, debris, and dust. It is recommended to prime the surface to protect against fungi.
If the curvature of the walls is significant, install a frame made of metal profiles or wooden bars treated from rotting. The cut drywall is attached to it with self-tapping screws. The space between the guides is filled with insulation - mineral wool, expanded polystyrene, polystyrene foam.
If the opening is geometrically correct, without major defects, there is no need to build a frame. The parts are simply glued to flat surfaces, adjusting the position according to the markings.
Main characteristics
Among other characteristics, such as fastening method, material of manufacture, manufacturer, color and weight, special attention should be paid to the dimensions of the fittings. Corners for slopes come in the following sizes :
- 10x10;
- 20x20;
- 25x25;
- 30x30;
- 40x40;
- 50x50.
All dimensions are indicated in mm, so it’s easy to figure out which length is best to choose for your window. The smallest ones are suitable in those places where you just need to strengthen a corner, and those that have dimensions of 50x50 mm will already allow you to hide serious imperfections in the finishing.
Manufacturers also produce corners with dimensions of 60x60 mm. The entire size range is available in both plastic, aluminum and wooden models. Wider elements are often used for exterior decoration.
Important! The Russian market has corners of local production and foreign production. They are supplied in 2700mm lengths and can also be sold to order.
Arch finishing
Arch design often becomes a problem. In general, there are not many external corners in the apartment, but there are always some on the arch. And in the aisle they very often get touched. Either furniture, or other cargo, or simply a resident who did not fit into the opening. And there are no questions with the straight part, but the rounded part can be a problem.
And not only in the doorway can there be an arched vault
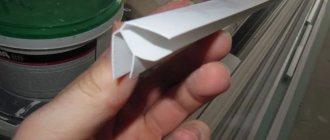
In general, you can use universal corners for an arch. They are flexible, which is very convenient. There are flexible, non-universal ones - plastic, made from a special polymer with increased elasticity.
But in general, corners with different shelf widths are used to decorate arches. They are even called arched. They have one shelf 10 mm (external) and the second - internal - 30 mm or more. They bend easily. You can’t twist it into a donut, but it’s not difficult to get an arc of any curvature. You just need to use a secure hold while the glue dries.
This is an arched plastic corner
If you want to bend a regular corner, you can do this by heating the plastic. For this work you need a hair dryer. The usual one - for hair - will not work, since its temperature is too low. We also need a template according to which we will bend the plastic corner. Take a piece of fiberboard, tighten screws or drive nails, forming the profile that you require.
This way you can decorate the corners of the arch with protective corners
They start bending from the middle. Warm up the area, constantly pressing on the middle, and using a hairdryer, moving from the center to the edges. So you need to bring the corner to the desired curvature and leave it in this position to cool. To prevent it from straightening out, holes are made in parallel with a row of screws for the second row. The distance between the rows is equal to the width of the corner shelf. After the plastic has bent, insert and lightly tighten the screws. After the plastic has cooled, remove them.
How to glue the corner?
To install fittings on a window slope, you need the following materials :
- glue;
- self-tapping screws;
- masking tape.
Self-tapping screws are often used when the corner is made of wood. Often, wooden fittings are attached with glue, but when it is necessary to securely fasten an element, self-tapping screws are more often chosen.
Masking tape is used to prevent any remaining adhesive from getting onto the finished surface. The choice of glue is approached responsibly . For example, the best adhesive option is liquid nails.
When selecting glue, you should pay attention to what the glue is intended for.
If you have to work with a plastic corner, then the adhesive composition should be designed for PVC products.
Liquid nails work well for the job . This material does not lose its performance characteristics over time; it does not turn yellow like sealant.
By the way, the sealant can also be easily washed off with water over time, which does not add practicality to this material.
Important. Liquid nails create a single monolithic structure with a corner; it is even possible to stick a window sill on them.
Adhesive mixtures
Installation steps begin with the selection of an adhesive mixture. Polyurethane-based adhesive perfectly secures PVC elements and makes it possible to frame the planes on which the load will be placed.
- Provides the opportunity to glue parts in the bathroom when ceramic tiles are being glued.
- Silicone sealant is used for fasteners with less load.
The corner is glued using liquid nails; when the border is dark in color, it can be glued using a black compound; for light and whitish options, a colorless look is suitable.
Step-by-step instruction
To fix the corners on slopes yourself, it is recommended to consider step-by-step recommendations: for each type of corner they will be the same, the only differences are the material of manufacture and the installation location. Using plastic fittings as an example :
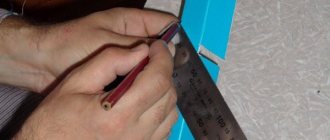
- Attach the products to the wall and make the necessary marks for height and width.
- Use metal scissors to make cuts: for the inside, cut at a right angle, for the outside - at an angle of 45 degrees.
- Apply glue to the inside at intervals of 1-1.5 cm.
- Press the product against the slope and hold it for several minutes; you can fix it with masking tape for a while.
If wooden corners are used, they can be attached to wooden surfaces with self-tapping screws. Often an adhesive composition is also used. But here it is important to understand: before work, the wooden element must be treated with an antiseptic to prevent the appearance of mold.
When working with metal corners, if they are perforated, they are attached to putty. If they are decorative, then the fixation is carried out with glue.
Important! Particular attention should be paid to the slopes in the arched window. Here, 3-meter sections are used, which must be carefully laid along the arch. The upper arch is glued starting from the central part of the arch. Then the sides are laid, all joints are cleaned and leveled.
Learn more about how to glue corners to slopes in the video:
Preparing for work
Before attaching the plastic corner to the work areas, they are freed from dust particles and construction contaminants. If there are protruding parts, remove and level the surface, otherwise the profile will lie crooked.
For work you need to prepare the following devices and tools:
- glue gun;
- roulette;
- construction knife;
- masking tape;
- square, preferably made of metal;
- miter box (you can do without it).
Clean and dry surfaces to be bonded are degreased with any solvent.
It is important to correctly measure the window slopes and prepare the finishing material. The basis should be one of the sides of the corner, which is cut off from the outside with a margin of 20 mm, this applies to the vertical, upper parts, taking into account both sides. All parts must consist of one whole segment; connections are not allowed.
External corners are joined in the following ways:
- overlapping each other, then leveled with putty to match the color of the plastic;
- cutting at an angle of 45°;
- by cutting one of the allowances to the base (the top one remains with a margin, and the vertical ones are cut flush).
It is advisable to check the accuracy of the cut elements by joining the parts. Cut with a special knife, otherwise the material may be damaged.
Possible difficulties and errors
One of the mistakes is the wrong choice of mounting adhesive . Often, when doing the work independently, they do not pay attention to the composition of the glue and its purpose. As a result, over time, the glue begins to move away from the structure and wears out.
Another mistake is using corners that are not suitable for the design: you need to choose only those fittings that are specifically suitable for the given case.
also not recommended to apply glue too liberally to prevent excess of it.
Why are the corners of the walls crooked?
To understand how to align the corners of walls, it would be nice to understand the nature of possible distortions and the reasons for their occurrence.
Although builders use cords, plumbs, levels, and other tools and guiding techniques, bricks and blocks are still laid by hand. This inevitably leads to errors resulting in angular deviations of the walls from the vertical, convexity or concavity, and even general waviness of the walls, both vertically and horizontally. Even the design geometry of the premises of our apartments is often not rectangular. That is, it initially contains angles of more or less 90°. All this lies at the heart of the problem of crooked corners.
The corner is the place where two walls meet. Ideal walls fit together perfectly. If the walls are curved, then in most cases even practically imperceptible errors in the walls themselves in the corners give such curvature that one is amazed. The transition line between the walls turns into a curve and deviates from the vertical.
Wallpaper cannot be hung directly - the joints and the pattern do not match. Do not place a closet or shower stall in a corner so that there is not a large, and even crooked, gap. Attaching skirting boards and fillets smoothly and without gaps is generally a task bordering on science fiction.
In general, the problem is obvious. And we have already figured out a little about the reasons for its occurrence. You can begin to correct the situation. But first, let’s solve one more question: “How many right angles do we need?”
Pros and cons of use
The main advantages of using such fittings:
- Lightweight - the material is light in weight.
- Possibility to choose color and material.
- Availability.
- Easy cutting and processing - everything is done with metal scissors or a file.
- Convenient fastening with adhesive compounds.
- Ensuring slope rigidity.
- Hiding joints between planes.
- Possibility of independent installation work.
Among the disadvantages, we can highlight the features of the materials : for example, plastic and wood will be flammable, and low-quality fittings can be fragile when cutting.