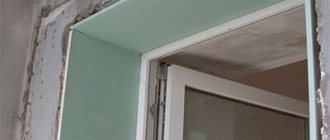
Plastic panels are often used for interior decoration. When working with such material, it is extremely important to position it strictly vertically. Let's consider how to correctly use the starting profile for slopes of plastic windows and other guide elements.
Guide corner for window slopes Source blogspot.com
Profile Features
PVC panels remain a very popular material. After all, it is not afraid of moisture, and processing it is not difficult. And to facilitate the installation operations, a special frame is prepared. An important part of which is the mounting profile.
This element gives the structure additional strength. And this is of particular importance if the installation is carried out outside the building. First, covering the cracks will prevent water from entering them. Secondly, the panels themselves will be reliably strengthened and will be able to resist strong gusts of wind well.
Advantages of guides for plastic panels:
- Plastering work will not be required to level the plane of the opening.
- All installation operations are carried out quickly and easily.
- To fasten elements you can use “liquid nails”. Or screw them to the frame using self-tapping screws.
- Plastic is easily cut with scissors and even an ordinary stationery knife. But you can also use either a grinder or a jigsaw.
- The starting profile for the panels will provide perfect joints that do not require putty.
- All elements are covered with a layer that does not accumulate static electricity.
Plastic corners Source sumyplast.com
Appearance is also important. The material has high decorative properties. And its colors are the most diverse. Only the cheapest materials have serious drawbacks. They do not have a light-absorbing layer and therefore their surface fades in the sun.
Plastic is durable, but at the same time has a low price. The material is more often used for interior decoration. But if you turn to a good manufacturer, you can get elements that will be able to easily withstand any natural aggression. You can even order the desired surface color.
Tools and materials
To install slopes made of sandwich panels, you must have the following tools:
- screwdriver;
- Bulgarian;
- metal scissors;
- stationery knife;
- roulette;
- level;
- goniometer (small);
- marker (pencil);
- gun with polyurethane foam;
- liquid plastic;
- masking tape.
Material to be used:
- Sandwich panels according to the dimensions of the slopes.
- “P” and “F” shaped plastic profile.
- Bracket for fastening slopes.
- Self-tapping screws.
Types of starting elements
Plastic guides for PVC panels serve specific purposes, and each one performs a specific task. And for the name they use Latin and Russian letters. Because the elements are similar to them.
I-profile
The part has a wide main shelf, which is covered above and below by two narrow ones. Therefore, it resembles a capital English “I”. Serves for joining plastic panels or slopes together. In the latter case, you can also use it to connect plasterboard elements. It is used when the length of the panel is not enough and you have to extend it in a small piece.
Connecting profile for extending PVC panels Source stul-stol33.ru
The guide for PVC panels is attached to the wall. It can be placed in any position. The main thing is that the wide part is perpendicular to the surface that is covered with plastic. It is considered a universal element.
See also: Catalog of companies that specialize in doors, windows and related work
F-profile
On one edge of the wide base there are two narrow shelves at a short distance from each other. Therefore, the detail is similar to the capital English “F”. It performs the same function as the previous profile. With the small difference that in addition to the fasteners, the joint of the facing panel itself is also closed. Because of this, the element is also called finishing or decorative.
L-profile
People often call it a corner. It is needed to join the panels at the corners. Therefore, it can be external and internal. The simplest part has only two elements - a wide and narrow shelf, connected at right angles. But there is a special molding that also has several grooves. It is used in difficult places.
Corner with embossing Source palitra-vl.ru
U-shaped
This starting strip for window slopes is installed at the very beginning of installation work. It covers the ends of the panels. And since its partition between the two main shelves is quite wide, the part allows you to hide either wide seams or very uneven ones.
There are also skirting boards and slats. They cannot be called classic profiles. But they partially perform similar functions. The first ones cover the ends of the facing panels in the area of the floor or ceiling. The latter act as supporting elements. But the need for them is infrequent, so they cannot be called mandatory.
Do-it-yourself installation of plastic slopes on windows
The window opening after installing plastic windows looks unpresentable. Pieces of plaster and polyurethane foam stick out, and the material of the walls is visible in places. To close all this, various methods are used. The most affordable and practical is the use of plastic slopes. It is better to equip them with sandwich panels, when foamed polypropylene is laid between two layers of plastic. They are durable, dense, made of high quality material.
Content
How to make slopes on plastic windows? In total, there are two key methods: with and without the use of a starting profile. Both of these methods are effective and give good results.
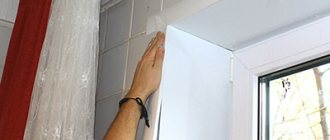
Without starting profile
This method of installing window slopes can be used when the distance from the window frame to the wall is too small. Installation with a starting profile in this case is either very complicated or completely impossible. The arrangement of slopes of plastic windows begins with preparing the opening. In this case, the foam fragments are cut off with a stationery knife. It doesn't take too much effort to remove it.
The polyurethane foam should not be cut, it should be removed evenly. In this case, it will cope with its function of fixing the frame. It will also insulate it, preventing drafts from the street. It is also necessary to remove pieces of plaster that interfere with work and protrude, giving the window opening an unattractive appearance. If they hold up well, you can leave them alone. The foam will slide off less.
Along the perimeter of the window, a thin 10 by 40 mm strip is nailed with the wide side to the slope. Usually it is nailed as is, but it can be leveled by placing thin planks and pieces of plywood in the necessary places. Following this, the foam is cut around the perimeter of the frame so that the sandwich panels fit here. It should go 1 cm.
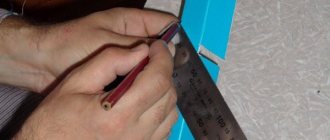
The foam must be cut carefully so that the plastic does not get damaged. After this, they begin processing the plastic panels. You can do the standard thing by making a stencil after all the necessary measurements. To do this, take a sheet of paper. It should be larger in size than the window slope. They apply it to it, crimp it, remove the excess. The paper is cut along the curved edges, tried on, and adjustments are made as necessary. The top part of the frame is the easiest place to start.
After forming the paper stencil, outline it on the plastic. Approximately 1 cm will go into the foam groove. It is necessary to cut with a small margin, since cutting will be easier than covering it up later. Using a hacksaw, they try on the plastic and make adjustments so that it stands up straight, without bending. Align so that the panel is flush with the plaster. The edges turn out to be almost even; where necessary, some finishing is done with a file.
After removing the strip of material along the outer edge, which will be nailed to the plank, drill a hole according to the thickness of the nails, retreating 6 cm from the edge. This will make it easier to secure the plastic without causing damage to it. The slope is then put back into place. Take a balloon with polyurethane foam and little by little fill the entire gap with foam. We must try to get as deep as possible, but a large consumption of material is undesirable. Foam can spill and damage the plastic.
Working with polyurethane foam
If there is smooth plastic, the foam provides good adhesion to it. If you have to treat the surface directed towards the wall, it is necessary to use a primer or sand it for improved adhesion. Another nuance is that moisture is necessary for optimal polymerization of the foam. That is why before installing the plastic, the slope must be sprayed with water from a spray bottle. There should be no dust on the wall. It is cleaned with a brush or removed with a vacuum cleaner. If the solution is loose, treat the opening with a penetrating primer in advance. It carries the function of binding concrete particles together.
Subsequently, the panel rises. Nails are inserted into the hole and the outer edge is secured in the strip. The internal surfaces are fixed, resting against the window frame.
The work is carried out according to the same algorithm:
- cut out a paper template and try it on;
- transfers it to plastic, cutting out the side of the plastic;
- process the edges with sandpaper so that there is a minimum of space between the upper slope and the panel.
Next steps include:
- Adjusting the parts until they match perfectly at the bottom and top.
- Installing elements in place. In this case, one edge is driven into the groove near the window.
- Drilling holes for nails along the outer edge.
- Installing the panels in place.
- Filling gaps with foam from bottom to top. This should be done in small portions to penetrate as much space as possible.
Working on the vertical parts of slopes requires a slightly different approach. Foam is applied here before parts are installed. The panel located along the far edge is processed if it is ready for installation. She is brought under the frame. The foam strip should be applied in a thin stream, stepping back slightly from the edge. After inserting the plastic part, the cut groove is filled with the rest of the foam gap. Before doing this, be sure to wet the wall. After this, the slope is pressed, leveled and secured in the plank with nails.
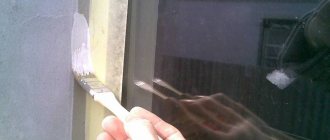
To prevent the foam from moving the edges of the slope during polymerization, the joints in the lower and upper parts are taped with masking tape. But even if all manipulations are performed perfectly, small gaps will remain. They are covered with acrylic. It is sold in tubes similar to packaging with polyurethane foam. The product is applied in the same way, through a mounting gun.
Further actions
All excess gaps must be filled and leveled. Excess acrylic must be removed with a damp cloth or sponge. This must be done carefully until the surface is completely clean. Manipulation is carried out in small areas. The acrylic should not be allowed to harden, otherwise there will be problems with its removal. It is more convenient to seal cracks immediately. The horizontal slope panel is processed first. After this there are joints, then they move downwards. First close the gaps on one side, then on the opposite. Lastly, the joints with the window sill are processed.
It takes 12 to 24 hours to dry, depending on the characteristics of the sealant. If the gaps are large, the acrylic may be pulled into the seam. All these areas must be worked out again using the same method. After the second layer has dried, if there are unevenness and roughness, you can smooth out these defects with fine-grained sandpaper, folding it in half. It is recommended to carefully level the materials while they are gray, otherwise the plastic may suffer mechanical damage.
The slopes can be considered installed. They should be puttied when the final polymerization of the foam occurs. Their surface should be flat relative to the plane of the walls. After this, the protective blue film is removed.
Installation with starting profile
To install slopes on plastic windows with your own hands, first prepare the window opening. How it's done:
- cut off the mounting foam;
- remove all elements that are not secured well enough;
- clean the surface from dust;
- the working area is treated with a primer for improved adhesion.
A wooden block is fixed around the perimeter of the opening, but already near the frame. Select the thickness depending on the distance. It should almost fit into the frame. Adjust one side of the block with a plane and make a slight tilt. In this case, an angle is formed that is comparable to the installation angle of the slope. You can saw it off, but it is quite difficult to do such work with precision. And in terms of labor costs, this is quite problematic, unless you have a circular saw with an adjustable angle.
After processing, the block is screwed around the perimeter of the opening onto the walls. The method of fastening depends on what material it is made of. If the wall is brick, you can place the block on the screws. For concrete it is necessary to install dowels. You can purchase a starter profile in the store. It is installed with the long side facing the block and secured. Fixing a construction stapler with staples is more convenient in this case. If you don't have such a device nearby, you can use flat-head screws or small nails.
Setting up a starting profile
When choosing a starting profile, you need to take dense modifications. They cost more, but you will need less of them, only 3 m per window. The dense profile holds the plastic well. The soft product bends and turns out to be ugly in appearance. Another important point is the need to press the profile tightly against the frame. Due to this, there will be no gaps or they will be minimal. In the upper part, when joining the horizontal and vertical profiles, you need to be especially careful. They must be cut at an angle of 45 degrees. If there are small cracks, they must be sealed with acrylic.
It is most convenient to start working on this technology from the sidewalls. The starting profile is not fixed, after which the panel is inserted into it. But it is better if it is equipped with a thick layer of plastic and made of dense and expensive modifications. If you take cheap ceiling models, the front wall will turn out thin. In bright light you will be able to see the jumpers. Among other things, such plastic can be easily pressed even with a finger.
The plastic panel must be wider than the slope. If the resulting area is not enough, two products are used for joining. But in this case, in the joint area it will be necessary to additionally equip a vertical bar on which the first strip is fixed. The panel inserted into the profile is usually longer than the opening. Supporting it with your hand, you need to mark the line of the opening. After removing, cut off the products along the marked line.
The panel is installed again, at the same time it is moved a little further from the wall and filled with foam, trying to avoid gaps, but also not allowing excess to form. Start from the far bottom corner. Near the nailed plank they pass from bottom to top. Once they reach the top, the foam expands slightly at the bottom.
Draw a line with polyurethane foam again, but try to stick to the edge. The closer to the outer edge, the less foam consumption, since the panel is placed under a slope. Having reached the middle, a strip of foam is laid out on the remaining surfaces and the panel is pressed as it should stand in the final version. Align and check. Secure it to the wall with masking tape. Part 2 is installed in the same way, and then the top part. You can cut it out in a similar way by cutting out a paper template and sanding the edges until they match perfectly.
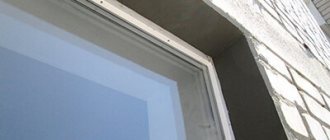
Work after installation of parts
Once all parts of the slope have been installed and secured with masking tape, the object is left for complete polymerization. In the future, to avoid puttying the gaps between the wall and the slope, glue the plastic corner onto liquid nails. The main task is to ensure a flat plane in the corners. A thin strip of glue is applied to both shelves of the corner and pressed. Run your hand along and hold for several minutes. Parts are installed around the entire perimeter. Before the glue dries, glue the corner shelves with masking tape and leave.
After a day, the tape is removed. You can consider the plastic slopes ready. If cracks are found anywhere, they must be covered with acrylic, as described earlier. Silicone is not recommended. In the light it will turn yellow. After a few years, the windows will not look very solid. The best option would be white acrylic sealant. It is ideal for masking defects.
Competent selection
When purchasing material, first of all, pay attention to the technical parameters. But, as a rule, all sizes are standard. Therefore, it is difficult to make a mistake when choosing. The exception is the use of custom-made cladding panels. In this case, it is necessary to check that their ends fit well into the grooves of the profile.
Types of profiles for PVC panels Source 100panel.ru
Installation
There are 2 ways to install a window sill profile.
Method No. 1
With this option, the window sill strip is installed first, and then the frame.
- A piece of the required size is cut.
- It is placed in the opening and leveled using a building level.
- A preliminary fitting of the window frame is done. If there is a gap between it and the top of the opening, it can be eliminated by raising the support bar. To do this, you can place pieces of timber under it.
- The space between the bar and the opening is filled with polyurethane foam.
Mr. Build recommends that to prevent the “bare” bottom profile from becoming a weak point of the entire structure in terms of freezing, it must be additionally insulated. To do this, extruded polystyrene foam, cross-linked polyethylene or other insulation in the form of a bar is inserted into one of its chambers.
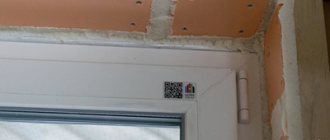
Method number 2
Experienced professionals do things differently:
- Detach the support strip from the frame.
- Insulation is placed in the profile chamber.
- Glue sealing tape to the bottom of the frame or apply mounting foam to the joint, as shown in the photo. You can use both at the same time.
Let’s assume an option using cross-linked polyethylene, which is located not in the chamber, but at the junction of the bar and the frame. But at least somewhere there must be insulation!
- The window block is installed together with the bottom profile.
Mr. Build recommends the second installation option: it is guaranteed to prevent freezing of the joint and the formation of cold bridges in the window sill area.
The window sill profile will ensure strong fastening of additional elements of the window block, and its high-quality installation will provide thermal insulation. The video below shows how to achieve 100% efficiency during its installation and not leave a single loophole for the cold, using EPS insulation, polyurethane foam and sealant.
(votes: 4 , average rating: 3.00 out of 5)
Installation work
Let's look in more detail at how the profile for slopes of plastic windows is used to create a reliable frame. And it all starts with calculating the required number of parts. Because the mounting molding is sold individually, and its length is usually standard.
Installation is as follows:
- The wall surface is analyzed for damage.
- Cracks are sealed with mortar, and bulges are cut off.
- The working plane is leveled, if necessary, with plaster.
- The sheathing is fixed to the wall. It uses wooden slats or a light steel profile.
- The starting corner for plastic panels is placed around the perimeter of the wall. Moreover, you need to make sure that there is no distortion. Otherwise, it will not be possible to position the joined elements in the same plane.
- Fastening is carried out using staples or special screws.
- Corner elements are installed according to the same principle. The main thing is to choose the right parts for the outer and inner corners.
- Intermediate I-profiles are used as needed if the length of the facing panels is not enough to cover the entire wall.
Preparing a window opening Source hammer-shop.ru
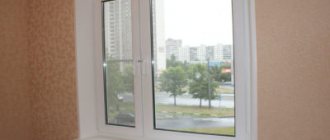
Finishing methods
There are several ways to tidy up your window. These may be the following options:
- Finishing with plaster. This method is quite old. Its main disadvantage is the complexity of the work. Plastering is time-consuming and requires careful cleaning of the area after finishing. When a house shrinks, it may crack.
- Application of drywall. This option is not bad, but it is only suitable for interior work. The room must be dry and warm, otherwise the sheet of drywall will begin to collapse.
- PVC profile for slopes is the best option. It is not afraid of moisture, temperature changes, is easy to install, and can be used both outside and indoors. This is an excellent solution for plastic windows, as it matches them perfectly in terms of material; the PVC F profile for slopes is very easy to install. It is quite possible to do this yourself. With other materials, for example, wood, the profile may not look so harmonious, although you can order wood lamination, and the differences will not be noticeable.
PVC profiles for slopes
Briefly about the main thing
When lining walls or window slopes with plastic panels, you will need various guide profiles. They come in four types and each of them performs a specific task. But their main function is common. Either serve as a connection between the joints, or hide the ends of the facing sheets.
Before installation, you need to carefully measure the area to be treated and calculate the required number of parts. Depending on the condition of the wall, either special fasteners or “liquid nails” are used. Plastic has proven itself well for interior work. But if you need to clad the outside of the house with panels, then it is better to use a guide profile made of light steel.
Improved thermal insulation
It is impossible to properly insulate the seam at the junction of the window frame using polyurethane foam alone, so a support strip is needed.
For high-quality thermal insulation, it is recommended to choose a product with at least 2 air chambers and a wall thickness of 2 mm or more. For regions with cold winters, the best option is 3 cameras. A profile that is too narrow and thin will become the weakest point of the entire structure.
Practice shows that the stand itself, even with 3 chambers, does not provide adequate thermal insulation. Additional insulation and sealing are required, which will be discussed below.
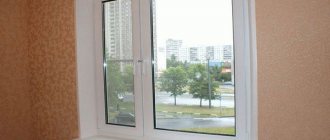
Ready solution
The F-shaped profile for slopes is a convenient solution for cladding. It creates a perfectly flat surface, free of imperfections, protects the opening from moisture and sunlight, as well as wind, dust, and other mechanical influences.
The starting profile is attached to a plastic window without the use of glue. The design not only helps to make the slopes visually attractive, but is also perfect for places where different materials meet. The starting profile is most often mounted in this way: one side of it touches the wall, the other touches the plastic structure. If the size of the material does not correspond to the required parameter, it can be cut using a stationery knife; for the same purpose, a grinder or a metal file is sometimes used.
Selecting window fasteners
Fastening elements used in the installation of PVC structures must meet the following requirements:
- Ensuring rigid fixation of the plastic window in the opening , taking into account wind and shock loads. Taking into account the impact of wind is especially important when installing blocks on the upper floors of buildings. Impact loads on the structure are most significant in large opening systems.
- Compensation of temperature loads arising as a result of seasonal changes. For example, in winter the profile bends into the room (1-2 mm per linear meter), therefore, the fastening should allow the structure to move by this amount.
What determines the choice of fasteners?
When choosing a fastener, first of all, they look at what the opening in which it is planned to install a plastic window is made of. Openings are constructed from brick, concrete, decorative stone, wood, metal, cinder block, shell rock or light porous materials (foam concrete, aerated concrete and others).
The second important factor is the type of structure and technical features of the installation. Balconies, loggias, entrance doors, hallways and windows are installed from PVC profiles.
Self-tapping screws with press washer for window
When installing windows, press washers have a number of advantages:
- Universal installation without certain difficulties.
- Increased contact area with the structure, which improves connection reliability. The area of the clamping part can reach 11 mm. This is an excellent option for flat materials with a larger area.
- There are two types of configurations - with a pointed tip and in the form of a drill. In most cases, during installation you can do without creating a hole; the self-tapping screw is screwed in independently.
- Various lengths - up to 7.5 cm.
- Galvanization. The color coating of the fasteners allows you to choose a model to match your design without disturbing its aesthetics.
Advantages
The starting profile for PVC windows has several obvious advantages:
- Ability to resist ultraviolet radiation. The profile does not fade even for ten years.
- The material is durable, looks good, and can fit into any interior without standing out.
- Suitable for use both indoors and from the facade.
- Moisture resistant.
- The chalk content in the composition is minimal.
- The semicircular end of the tail allows you to lay the profile on the most uneven wall.
- Hides wall imperfections, levels slopes without the use of other materials.
- The plank can be safely cut, no chips or cracks will appear on it.
- Installation is carried out independently; this does not require special skills.
- No glue is used.
Fasteners for PVC structures
Plastic structures are installed using anchors, self-tapping screws (in some cases with dowels) or anchor plates.
Anchors
This type of fastening is available in two versions: a classic anchor and an anchor for hollow materials.
- Classic anchor. Consists of an outer galvanized sleeve, a Phillips screw and a bushing. The principle of operation is as follows: initially the screw and part of the sleeve screwed onto it are inside the sleeve, which expands when the screw rotates in a certain direction, thus fixing the anchor in the seat. A regular anchor is great for fastening in dense materials (brick, concrete, cinder block).
- For hollow materials. In general, this anchor is similar to the classic one - the differences are in the design of the sleeve and the sleeve, which now does not expand the sleeve, but deforms, squeezing along the axis (deformation is possible thanks to special slots). When twisted, part of the anchor significantly increases in diameter, which allows it to be fixed in loose environments. In dense materials, such fasteners also hold up well.