According to statistics, they are more popular than plastic boards, sandwich panels and, of course, than budget polystyrene foam and expanded polystyrene.
There are general evaluation criteria: susceptibility to condensation and cracks, insulation, simplicity and speed of work, durability, costs.
It should be taken into account that plastic windows also have their own characteristics (tightness, density, expansion coefficient), which affect the behavior of the finishing around them.
Let's consider plasterboard and gypsum fiber for slopes near PVC double-glazed windows, in what parameters they are the best, advantages, disadvantages and features. We will also describe the features of the work, list the difficulties, indicate what to pay attention to, and how to avoid mistakes.
Can it be done on PVC structures?
External slopes are not made of gypsum fiber board , gypsum plasterboard, even waterproof ones, however, like gypsum plaster. There is no need to explain the reason: plaster absorbs moisture and becomes deformed, lags behind, slips, cardboard bubbles. Such products, unlike cement-sand mixtures and plastic panels, are not designed to withstand outdoor conditions.
There are reviews that puttyed gypsum boards with a composition for external work stood as an external slope for about 10 years without any special comments. Perhaps such cases exist, since the material is protected by finishing, but it is unlikely that specialists will give a guarantee of high-quality service in such an environment.
Important! There are two exceptions for finishing made of gypsum, lime (gypsum plasterboard, gypsum board, plaster), even if they are positioned as moisture resistant: outdoor (street) environments and wet rooms with high (above 75%) humidity.
Plasterboard slopes near PVC windows are made only internal . The owners of the premises do such external (exterior) finishing only at their own risk and peril; there is too high a probability that in a short time it will become unusable. Plastic linings or cement-sand plasters are intended for the street.
It is also undesirable to use drywall in rooms that are not wet, but where there is a strong influence of steam and other fumes, for example, in kitchens with intensive work processes (although if the mode is normal, then there are no warnings).
The standards and technical conditions of some large construction organizations specifically prescribe this limitation:
Why was there a window between the kitchen and bathroom and 3 ways to solve the problem
Not all owners want to get rid of this window; there are people who like this architectural solution. Accordingly, it would be unfair to talk only about the blind seal of the opening, so first I will tell you how to decorate the window from the bathroom to the kitchen. But replacing an old window with a plastic one is not so much expensive as it is problematic. After all, to do this you will have to re-tile the tiles or install some other finishing, which already constitutes a full-fledged renovation. It is much easier and cheaper to decorate old glass. The most affordable way out is to buy self-adhesive film. It is sold on any construction market and the price there is cheap.
If you plan to cover everything with tiles, then the drywall does not need any additional finishing. By the way, this is the easiest option for a home craftsman. In addition, it is quite possible to make the internal kitchen window part of the decor. True, for this you will have to order or make colored stained glass with your own hands.
Replacing old glass with new one is not difficult. Typically glass is secured using glazing beads:
Requirements
When arranging slopes made of plasterboard, surface preparation is less labor-intensive. Let's list the requirements :
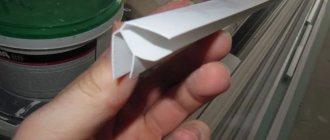
- When installed with glue, the panel is inserted into a groove in the mounting foam. It is necessary to very carefully remove the protruding mound of this substance near the frame of the PVC window and make a sample (5 mm) for the slab. Any voids and cracks near the subsequently adjacent end of the sheet should be absent.
- It is highly recommended to make expansion joints or at least install a vapor barrier membrane. At a minimum, update the foam, choose the old one, foam the gaps between the frame and the wall more carefully and densely.
- The surface of the slope is cleaned of debris, dust, and any adhering substances (old building materials, paint, etc.). It is important to degrease if grease stains are noticed or there is reason to suspect the presence of such substances in these places. This is especially true if adhesive fixation is used.
- Slopes are influenced by moisture, temperature changes, and condensation, so the surface is treated with a moisture-resistant, antiseptic, antifungal primer, preferably in 2 layers. For porous walls, deeply penetrating strengthening agents are used.
- For the glue method, it is more desirable to level the base with putty (moisture resistant).
But special precision, as when finishing slopes with plaster, is not required, the main thing is that there are no irregularities that could raise or lower the slab along its entire length, that is, you need to ensure that its edges are at the same level. However, you can completely abandon leveling, especially if the frame method is used.
Reference! For the evenness of the base wall of slopes under plasterboard there are no such stringent requirements as for plaster. The sheet is installed with some gap filled with adhesive and insulation.
Disadvantages and roughness, of course, will not appear. That is, even fairly large-scale irregularities will not affect the evenness of the panel at all; moreover, it will hide them.
Plasterboard sheets are also called gypsum board (GP). Gyproc is not the name of the material, it is a foreign trademark of a manufacturer using its own technology, sometimes it is considered to be of higher quality, but this is a separate topic, for example, the same Knauf is sometimes better.
Installation using putty
Finishing putty can be used as an adhesive material - it has better adhesion. The putty should have a paste-like consistency.
Finishing slopes with plasterboard with your own hands using putty is done in the following way:
- when the surface is cleaned of dirt and dust, it is moistened with water;
- on parts made in advance, putty should be applied in the form of separate islands;
Putty is applied to the panel in strokes - The product is placed in the required position and moved so that the adhesive mass spreads. In this position, the slope is left for 12 hours, supported if necessary;
After installing the drywall, install a support - After a while, the support can be removed and wait for the adhesive mixture to dry completely.
What types are suitable?
There are only two requirements for plasterboard/gypsum fiber sheets for slopes under plastic windows:
- Thickness: GKLV/GKLVO from 12.5 mm, GVLV – from 10 mm.
- Only moisture resistant (wall).
A simple non-moisture resistant material (ceiling; 9.5 mm or any other thickness) will quickly bubble, even if it is plastered. This solution is only acceptable in perfectly dry conditions. In extreme cases , you can reduce the thickness, but the sheet must be moisture resistant .
For window slopes we use GKLV or GKLVO (green). The last letters: “B” - waterproof, “VO” - waterproof-fireproof.
If we talk about gypsum fiber, then, by analogy, it’s GVLV, it doesn’t have color designations (however, it may be found in some manufacturers). There is also no “GVLVO” marking - this material is always produced fireproof. Gypsum fiber is stronger, so you can be satisfied with 10 mm , but the larger the number, the better.
Manufacturers have their own technologies and solutions, so the color of the material may not always correspond to those accepted according to the traditional scheme - you need to clarify and look at the markings, which must be right on the sheet.
Note. Moisture resistance does not mean that the material is not afraid of water - it simply has a reduced ability to absorb moisture and is more resistant to deformation under its influence.
For very humid rooms, GKLV/GVLV is suitable only with a caveat: there is a high probability that after some time the sheet will become deformed, swell, bubble, or crack. In addition, the above may appear when painting such a panel.
It is possible to use simple non-waterproof gypsum fiber board/gypsum plasterboard (ceiling) for slopes, but the reliability of such a finish will not inspire confidence. It is necessary to use material with a thickness of 10 or 12.5 mm of moisture-resistant type (wall).
How is it different from gypsum fiber?
In this article we will summarize plasterboard (GKLV) and gypsum fiber (GVLV), since the methods, process of work and all its features are identical.
If we compare the materials themselves, then the second one does not have the disadvantages of the first one : it is stronger, stiffer, more durable, less capricious in case of temperature changes, more resistant to moisture, can withstand 15 freezing cycles, while GKLV/GKLVO only has 4 (such temperature changes cause cracks).
Disadvantages of gypsum fiber: almost 2 times heavier, fragile, when transporting it must be handled correctly, however, there are reviews that this disadvantage is greatly exaggerated. Advantages: GVL is much stronger, it is also used for floor coverings, and it has better heat, sound, and waterproofing properties
Advice! Experts for slopes advise taking GVLV, which is somewhat more expensive, but the parameters for the interior element in question are much better.
In this article, if we use descriptions for plasterboard, then it should be understood that the same applies to gypsum fiber sheets, unless any remark is specifically indicated, and vice versa.
GVLV is produced polished and simple (rough) - the latter is taken if the finishing on the slopes will be painted or plastered or any other finishing treatment or cladding will be used.
Gypsum fiber breaks when strongly bent, and plasterboard is easier to give the required shapes, it is more plastic, so it is advisable to use it for slopes in the form of arches, for figured, curved structures.
In all other cases , the best material is GVLV; you don’t have to reinforce the corners for it, although it is advisable to do so . You can also use silicon-based paints and whitewashes, which is undesirable for gypsum boards.
Gypsum fiber is better suited for frame fastening: it holds screws much more reliably without dowels, is not prone to cracking, and does not crumble. But if gypsum board can be cut with a knife (it’s easier to work with), then a hacksaw will be required. It is GVLV that is best used in the kitchen and bathrooms where there is high humidity.
Frequently asked questions
In the process of working with a window opening between the bathroom and kitchen, the same type of questions often arise. They can be answered in advance, which will save time and eliminate the possibility of errors.
What to do if the opening is where the mounting element for the wall cabinet is installed?
There are two options here - either use a special frame on which the cabinets are hung, or plan to install an embedded element with rigid fastening to the walls. Fasteners for hanging the cabinet are installed in it.
If you insert an OSB board, will it swell due to high humidity?
OSB is stronger than chipboard or MDF. This material is able to withstand high humidity. However, it is recommended to play it safe and cover the shield with moisture-proof paint or a special primer before finishing.
How to secure the shield if the frame has already been removed from the opening?
The easiest way is to first install the trim from slats tightly fastened to the side walls of the opening. Alternatively, you can use regular furniture corners, which are then covered with an additional layer of OSB or plasterboard.
What is better, to fill the opening with bricks or fill it with concrete?
In terms of strength, these options are approximately equivalent. However, brickwork is much faster - the whole procedure will take only an hour or two. The main thing is to stock up on the required amount of materials in advance and prepare the opening.
Where is it better to open the window - inside the bathroom or into the kitchen?
This depends on the configuration of the premises and the arrangement of furniture in the kitchen. As a rule, they open into the bathroom - the window is always free, but in the kitchen wall cabinets can get in the way.
What color of corrugated glass is preferable?
In this matter they are guided by their own taste and preferences. Dark glass more effectively protects the bathroom from prying eyes. However, it is less suitable for passive lighting. As a rule, yellow or brown glass is inserted. Decorative film is often used - it can be replaced if necessary.
Considering these recommendations, you can simplify the choice of the appropriate option and avoid mistakes when installing windows between the kitchen and bathroom.
Tools and consumables
To install GKLV/GVLV sheets on slopes for plastic windows, you will need the following tools :
- For cutting panels:
- sharp knife with a thin blade. There are special tools specifically for this cladding;
- gypsum fiber is much more difficult to cut, so it is better to take a hacksaw for it; there are also special models. You can take a regular one, but with fine teeth that will not excessively deform the edges;
- jigsaw
- Grinder for cutting metal profiles. You shouldn’t bother too much, if you don’t have it, you can get by with a simpler tool – a hacksaw for metal or special scissors for it.
- If you decide to mount it on a frame, you will need a hammer drill or drill with drills, a screwdriver, or at least a regular screwdriver.
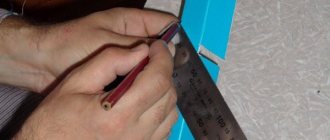
- Metal square, tape measure, level, pencil.
- Spatulas, trowel, tool and container for mixing finishing mixtures, putty, adhesive composition.
- Brush/roller/sponge for priming and final painting, if you decide to use it.
Note. The frame can be built without special tools, but there are also tongs, which are convenient if the profile is thick.
Consumables:
- Sheets GKLV, GKLVO or GVLV.
- Glue for gypsum board (Perlfix is often used) or gypsum mounting mixture (VOLMA-Montazh and the like), and you can also use gypsum putty. For 1 sq. m will take about 5 kg of dry glue mixture.
- Acrylic, silicone, liquid plastic sealant, sealing tape for waterproofing.
- Materials for arranging expansion joints (tow, felt or special means) - this will prevent freezing and the formation of condensation.
- Polyurethane foam.
- For the frame method: UD profiles (perpendicular to the floor) and CD horizontal guides, screws, screws, hardware and dowels for them. Sometimes U-shaped profiles are also used, depending on the characteristics of the frame.
- Corners for strengthening the edges of walls. They and profiles must be plastic or stainless steel.
- Construction tape or tape, polyethylene film for protecting surfaces and floors.
- Insulation – polystyrene, mineral wool. Sometimes ordinary polyurethane foam is used in this role.
- Plaster for finishing, putty, primer.
- Serpyanka tape for sealing joints.
- Supports (wooden or any sticks) to hold the crown during the glue method.
Is spray foam suitable for attaching drywall to a wall?
The classic technology of finishing walls and ceilings using gypsum plasterboard involves the method of installing drywall by constructing a frame made of wood or a bent metal profile, onto which sheets of drywall are attached with self-tapping screws. This conventional method has disadvantages:
- the frame moves the sheets of drywall away from the wall by at least 4–5 cm, thereby reducing the area of the room; this is most noticeable in small economy class apartments;
- Undesirable “neighbors” - cockroaches, bedbugs, rodents - can settle in the cavities formed between the wall and the sheets.
In order for the sheets to fit as tightly as possible to the wall, they began to glue the drywall with polyurethane foam or glue. This method allowed us to avoid problems associated with frame technology.
Installation Features
We list the important points when installing drywall on slopes near PVC windows:
There are two ways to install gypsum plasterboards/gypsum boards on slopes: on a frame and with glue.
A subtype of the latter can be called fixation not with a special composition, but with putty, usually finishing, since it is more sticky.- Installation on the frame is more labor-intensive, but also cleaner. It should be taken into account that this involves drilling holes for screws in the window frame.
- Sometimes trim sheets are simply attached to the frame or adhesive without additional insulation, creating what is called a cold finish. But it is not advisable to do this - installing insulation in the gap will reduce the tendency to form condensation, which provokes the destruction of the material and mold.
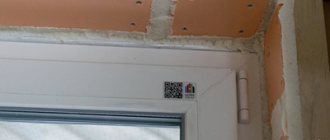
- Often, a protective factory film is left on the frames of new windows. When arranging slopes, you need to remove it altogether or 1.5 - 2 cm along its edges from the frame, as it can damage the layer of finishing putty.
- Before installation, the sheets must acclimatize - lie in the same room for a day or at least about 5 hours.
- Measurements are taken with small allowances - it is better to leave more than less, as you can then adjust the size.
- Drywall must also be primed on both sides. It is advisable to do this before working on the entire sheet at once, so you don’t have to process each piece separately.
- When fixed to the frame, the sheet should cover the protruding mounting foam near the window. With the glue method, you need to make a small groove in it so that the gypsum board goes exactly beyond the frame, and if there is too much of it, then you can raise the base surface with a strip of the same drywall.
- The sheet should be placed exactly behind the frame, the foam should slightly press it against it. It is necessary to completely get rid of any voids and cracks between the panel and the plastic of the glass unit.
- To save money, the adhesive mass can be applied to the gypsum board sheet not in a continuous strip - a few “cakes” along the edges at intervals of 2 - 5 cm are enough. The gap between the slab and the wall is sometimes left empty, but this is not a very good solution - it is better to fill it with at least the most with simple insulation, that’s what they do most often.
- Polyurethane foam can be used as insulation, but it is better to use special material. In addition, when applying it, you need to correctly calculate its amount - it expands and can disrupt the position of the panels.
- The joint between the panel and the window sill can be made invisible by lifting the slope and dripping cosmofen (liquid plastic) onto the edge.
- We must not forget that finishing is carried out by plastering or painting. But there is a particularly important point: before this, you need to seal the edges and cracks near the walls with putty or adhesive, having previously reinforced them with corners. Thus, moisture, dirt, dust will not get inside the finish and the sheets themselves.
Adhesive method of attaching drywall to slopes:
Wireframe method:
Important. Drywall is more resistant to uneven expansion of materials, unlike plaster, and it is not at risk of cracks.
But still, it deteriorates equally, if not more, from condensation (especially characteristic stains from moisture). Therefore, expansion joints that allow steam to escape, vapor-permeable insulation, sealing and insulation are also relevant.
Often window installers do not foam the gaps well (especially when performing work in the summer) and almost never install a self-expanding seal, that is, they do not install expansion joints.
Because of this, not only bridges of cold almost always appear, but also entire pockets of it. Freezing of the slope and the inside of the profile occurs, condensation occurs, then mold, mildew, and stains.
An example of insulation and insulation to prevent condensation and freezing:
- Select the foam to the middle of the profile, then pierce the remaining layer every 5 cm with the nozzle of the gun and foam properly.
This will remove voids in the old material and compact it. Then carefully foam the sample tightly so that the substance comes out in a lump. The second option (more effective): remove all the old foam and insert a self-expanding seal, then foam it. The internal profile is sealed with tape before manipulation; - After the foam has hardened, cut off the protrusion and again select 5 mm deeper than the edge of the frame. Then the slope is primed and plastered (you can add a little primer to the mixture), and if it is painted, then a small 5 mm indentation is made onto the window frame. Thus, the window is sealed from the outside and inside - nothing penetrates, the plaster does not get wet;
- Then the gypsum board is pushed into the groove and glued to the plastered surface. The joint is treated with silicone sealant.
Important! The top slope is always installed first. Its size may have slight inaccuracies, as it will overlap with the side sheets.
The final finishing of installed plasterboard slopes is done with putty, plaster, and also painting. The latter option has the advantage of better protecting the sheet from moisture.
Window decoration
Complete sealing of the opening is carried out only in certain cases - for example, if it is closed with wall cabinets. Many users prefer to save the window and even expand its capabilities.
In particular, they install not a blind frame, but an opening sash. It allows you to ventilate the bathroom and speed up the removal of excess humidity from the room.
The best option is to order a plastic frame with a vertical opening mechanism (transom). Manufacturers have many types of plastic profiles in their arsenal.
There are laminated samples that very realistically imitate wooden frames of different colors and textures. You can choose an option that harmonizes with the colors of the kitchen set or tiles in the bathroom.
In addition, glass is often replaced from regular glass to colored and corrugated glass. Many users install stained glass windows that decorate rooms, making the opening a decorative element.
Another original way to design an opening is to change its size. A common option is to expand the window, when the opening is increased in length without changing the height. A wide window appears, visually increasing the size of the bathroom and kitchen.
Here you first have to make (expand) the opening, after which you can order a window according to the existing size. You can make not one, but two doors - they will be lighter and reduce the risk for people when opening. You can also insert a blind frame that is not intended to be opened. Colored corrugated glass or stained glass is installed in it and covered with decorative film.
Some owners take the easy route. They remove the casing and glazing beads and remove the old glass. Then the frame is sanded, the surface is leveled, and potholes or flaws are repaired. After this, the frame is painted, clean glass is installed on new glazing beads.
The procedure is completed by installing neat trim made of plastic or MDF purchased in the store. This method requires some skills, but eliminates the need to dismantle the frame.
Possible difficulties and errors
Mistakes when installing plasterboard slopes:
- The joints along the edges are poorly sealed, which allows moisture and dirt access to the gap between the finish and the internal filling of the sheet.
- It is not advisable to make the frame from wooden guides - they become deformed and dry out.
- Do not reinforce the corners of the wall near the slope with a profile.
- The joints between the panels must be puttied (however, this is done for finishing cladding), and the gaps between them and the frame must be sealed with sealant.
- The sides are confused: the front side should be facing the room (it is a little rough, usually without markings, on it the factory edges point in the same direction).
- With the frame method of fastening, the heads of the hardware should not stick out - this will make puttying difficult. If you pass it with a spatula and it catches this element, then the self-tapping screw must be tightened.
- Using a hacksaw with large teeth to cut sheets will lead to loose edges, jagged edges, and the quality of the joint will deteriorate.
- Neglect of putty and primer. It is necessary to process the entire sheet, not just the joints.
- Finishing with plaster and paint is important, as it will prevent the penetration of moisture and contamination. If it is not there, then, for example, the upper slope may sag.
Important! If you do not reliably foam the gaps between the frame, seal them poorly, or install a vapor-permeable gasket, the insulation will get wet.
But condensation is not always caused by poor-quality insulation - it often occurs when the windows are poorly adjusted, the sealing elements in the double-glazed windows themselves are damaged, or the ventilation in the room is impaired.
The process of installing gypsum boards is simple: using screws on the frame or using glue. Calculations and cutting of sheets and profiles will also not be difficult to do.
But there are such difficulties :
- Situations where the adhesive method is difficult to apply, for example, when the gap between the window frame and the wall is too narrow to place a panel there. Then they use fixation on the frame, one side of the profile of which is attached with thin screws to the window frame.
- Additional and final finishing significantly increases labor intensity. If leveling the base can be neglected, then these manipulations are mandatory, and it is advisable to do them efficiently.
Practical niche on the bathroom side ↑
To make the most of every centimeter of usable space in your bathroom, you can turn an unattractive window into a beautiful and functional niche. To do this, the window opening is sealed with plasterboard from the kitchen side, and in the bathroom the recess is leveled with cement mortar and covered with the same tiles as the entire room. If you don’t like a small niche, nothing prevents you from dismantling part of the wall and enlarging the opening, which will create a spacious niche with shelves. Oval shapes look beautiful, which can be easily created using drywall.
Pros and cons of use
Strengths and weaknesses of slopes for plastic windows made of gypsum fiber/plasterboard boards:
| Advantages | Flaws |
| Simple measurements and installation itself (especially with glue). It’s easy to set the angle of dawn: just place the panel or frame profile along the marks. | Drywall is less moisture resistant when compared to plaster, since its solidity is lower, it is porous, and contains cardboard and cellulose. But it is gypsum fiber that is compared with it in this aspect. |
| We immediately get a flat surface - there is no need to carefully level the slope wall, just clean it well. Usually it is puttied, but you can get by with just a primer or even without it. | If damaged, restoration is impossible, unlike plaster. If the panel swells from moisture, it cannot be returned to its original form. |
| The opportunity to make high-quality insulation of the slope easier. Simply inserting the material between the slab and the wall reduces the need for expansion joints. | Insulation and insulation are simpler, but still required. |
| The method is cheaper than finishing with plaster. | It is not enough just to install the panels - you also need to finish them: seal the edges with adhesive, prime, putty, plaster or paint, and before that, strengthen the corners of the wall. |
| High speed of work. On average, one window will take about 45 minutes. up to 3 hours. When plastering, you need to do several layers (three are recommended for slopes) and wait until they dry. | Opening the door suddenly will damage the panel. But this can be solved with special moderators. |
| The humidity in the room should not be higher than 75%. | The strength of the material is low. |
| No special experience is required for installation. This distinguishes the material favorably from plaster, which can only be done efficiently by experienced specialists. | Over time, the finish coat may peel off. |
| The walls “breathe”. The material is completely environmentally friendly and is superior to plastic in this parameter. | |
| Hygroscopicity. When there is an excess of moisture, it absorbs it, and when there is a lack, it releases it, which has a good effect on the microclimate in the room. |
Peculiarity! The main advantages of drywall are as follows: installation does not require special experience, it is much faster (no need to do several layers, etc.), some measures can be neglected (leveling the base), the work itself is much cheaper if you use the services of craftsmen.
Finishing puttying and plastering is simplified; any cladding can be used; the aesthetics of these finishes are equal.
If the adhesive method is used, then the installation is elementary - the slabs just need to be placed on the composition. The downside is the need for finishing with the same plaster without or with subsequent painting, but, of course, this is not as difficult as if the slopes were initially finished with it.
We consider the need for insulation and expansion joints as a feature , since they are required to one degree or another for most types of materials.
How to glue it yourself?
If you use a household cylinder, it will be very simple. A tube attachment is screwed onto the cylinder - that’s it, it’s ready for use. Using professional foam is a little more complicated: a gun is screwed onto the cylinder, after which it falls through the supply valve into the barrel, where it remains until the trigger is pulled.
A few tips when working with polyurethane foam:
- It is used if the gap to be sealed is more than 1 cm. If it is smaller, then putty (similar plastic materials) or sealants are better suited for such cases.
- If the gap is more than 10 cm, then before work it is recommended to reduce it by laying any sealant (bars, bricks).
- In order for the composition to harden better and bond with the finishing material, the walls are moistened before application. And after completing the work, the seam is additionally sprayed with water from a spray bottle.
- It is not recommended to use foam on polyethylene or other greasy surfaces.
- It is important to consider expansion factors.
- Compliance with foam temperature conditions.
- Before use, shake the container for one minute.
- Until the foam has completely hardened, it is not recommended to touch it, otherwise this may destroy the structure of the material itself, and later cause incomplete hardening or expansion.
Extension of the profile walls
A striking example of incorrect work with the profile is shown in the photo below. The partition is again built from a ceiling profile, in violation of technology. And besides, for the jumpers the profile was simply bent.
And here, the supporting crossbar of the partition opening is made of a rack profile, which is also deployed horizontally, and its stiffeners are unbent.
This is extremely wrong. By unbending the walls of the profile, the rigidity and integrity of the entire structure is compromised, as the reinforcement is also reduced. Here it was necessary to use a special guide profile for partitions of the appropriate size 50/40, 75/40 or 100/40.
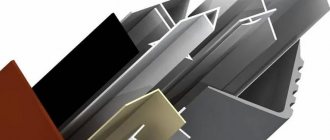
Plastic
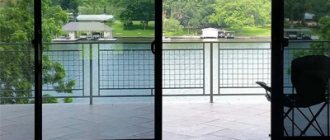
Plastic slopes are the most universal solution, because they are used for both external and internal decoration.
Important
To plaster the window opening, beacons and perforated corners are additionally used.
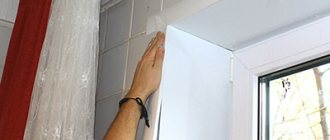
How to glue PVC slopes:
- Install the starting profile around the perimeter of the glass. For better sealing, a silicone-based sealant is additionally used. They cover the back side of the profile.
- The plastic, which is 8 mm thick, needs to be cut into parts.
- Install a frame made of timber around the perimeter of the window.
- The starting profile is attached to this frame.
- Insert the received parts into the U-shaped starting profile. In this case, apply a layer of foam on the base in waves in advance. It will fill all the voids between the frame and the beam.
- Secure the plastic elements with masking tape until completely dry.
Advantages of plastic:
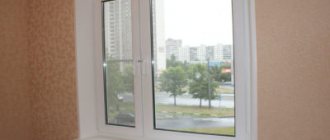
- Since plastic windows are now installed almost everywhere, the monolithic structure will look very advantageous in the interior.
- If all work is performed correctly, no accumulation of condensate will be observed.
- The installation is almost silent, leaving a minimum of debris.
- Plastic does not emit harmful substances.
- The material is not susceptible to the negative effects of moisture, does not deteriorate due to sudden temperature changes, is relatively inexpensive and lightweight, and is easy to install.
Attention
The only drawback of plastic slopes is complete replacement even with fragmentary damage.
Jigsaw
If you need to drill a hole of a large diameter or it is not possible to purchase a special drill, then you can use a simple jigsaw. To do this, markings are made in the right place. After this, you need to use an ordinary drill, the diameter of which will be slightly larger than the width of the jigsaw blade, to make a through hole on the marked line. Next, using the resulting hole as a starting point, a circular cut is made. If necessary, the inner edges of the resulting hole can be sanded.
Special drill attachment
You can make a round hole in drywall using a special drill attachment on a drill. This option can be considered the simplest and most convenient for independent implementation. To do this, you need to purchase crowns (round drill bits) from a specialized store that will correspond to the required dimensions. The element is clamped in the drill chuck, and the required holes are drilled using pre-applied markings. Such drills are most often sold in sets, so there should be no problems with selecting the right size.
One of the most convenient ways to make a hole in drywall is with a hole saw.
Wrong profile selection
A common mistake among builders of various qualifications is when the structure of the box for partitions is made from a ceiling profile, instead of a rack (PS 50/50) and a guide (PN 50/40).
The stability, reliability and sound insulation of such a structure immediately comes into question.
Using a ceiling profile to frame partitions is a complete divergence from technology. For the construction of partitions or walls, a guide profile 50/40, 75/40 and 100/40 is used (which is fixed to the floor, ceiling and wall), and a rack profile 50/50, 75/50, 100/50.
Fixing the gypsum board sheet with the wrong side
Some builders consider it unimportant to know which side to fasten the drywall - front or back? The photograph shows how, when covering a wall with gypsum board sheets, some of them are sewn with the back side facing out. The peculiarity of this plasterboard is that it is moisture resistant and these properties are contained both in the core of the sheet and in its cardboard on the front side, preventing excessive wetting of the sheet in wet rooms, as well as the formation of fungus.
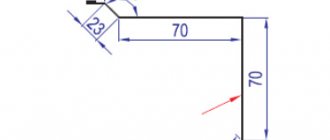
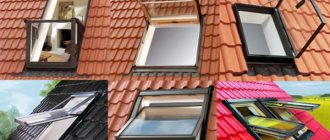
Options for finishing window slopes
There are several options.
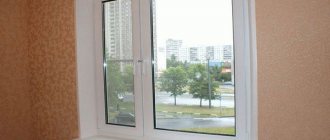
Plasterboard slopes are often used for interior work. Their main advantages are ease and speed of installation, and the absence of excessive dirt during repairs.
The second option is represented by plastered window surfaces.
Plastered ones are often used in public spaces where increased strength and wear resistance are required. They are popular for exterior finishing of plastic windows, where environmental factors are present around them.
Rectangular holes in drywall
A hacksaw is used to cut holes. Mark a rectangle on the sheet with a pencil. A hole is made in the corner of the rectangle with a drill so that a hacksaw can fit into it. The saw is held perpendicular to the plane of the sheet.