On trading floors, plastic corners for slopes are presented in a wide range. Let's consider the basic characteristics of the fittings, variety of types, and methods of application. Let's get acquainted with fastening methods and installation rules. After reading the article, it will not be difficult to make the right choice of materials and monitor the quality of installation work.
Variety of PVC corners Source akcedemir.com.tr
Description of finishing material
Plastic corners belong to construction fittings, which are often used for decorating external protrusions. These can be slopes, niches, boxes, columns and other architectural elements with 90-degree turns. The material is used to solve the following problems:
- masking installation seams;
- transition between different finishes;
- protection of corners from mechanical damage, penetration of moisture, dust, dirt.
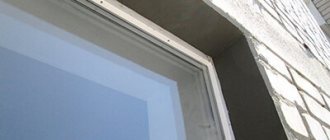
In most cases, a plastic corner is installed on slopes. This gives the opening a finished look. The polymer product is not afraid of moisture, lasts 20-25 years, and is easy to wipe clean. The advantages also include light weight, a wide range of colors and sizes, simple installation, and low cost. But scratches become a place where dirt accumulates, and if excessive pressure is applied to the workpiece, irreparable deformation of the soft strip occurs. It is worth noting the release of toxins when the polymer burns and gradual fading under ultraviolet rays.
Variety in color Source sense-life.com
How to mount a plastic corner on a door or window slope
Installation of plastic fittings begins with a preliminary check of window and door slopes for irregularities. An even rod and level will help. In case of severe curvature of the corner slope of the door, flexible PVC corners are recommended.
Regardless of the surface being treated, the installation of corner strips is the same. The main thing is that the mounting adhesive matches the surface finishing material.
- Measure the slope, cut the part to the appropriate size.
- At corner joints of the slope, the element is cut at an angle of 45˚.
- Apply glue to the finished parts.
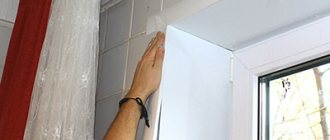
- Applying the product to the surface, press and glue.
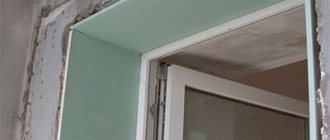
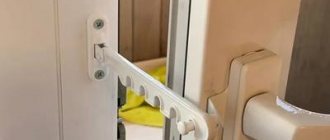
On the window opening
- For better fixation, secure the part with tape.
Kinds
The determining criteria for choosing plastic corners are color, size and types of fittings. The main classification is based on the cross-sectional shape of the products. The classic equal-flange option is most in demand. The width ranges from 10 to 50 mm in increments of 5 or 10 mm. There are three more versions:
- L – 5*17, 10*20, 15*25 mm;
- F or P - used as a profile to protect the end edges of sheet or cladding trim;
- T – connecting element of dissimilar materials in one plane (12-22*10 mm).
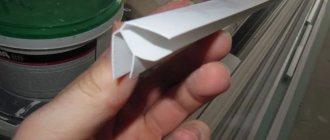
There are also 90/105 degree turns, straight/rounded/curly shelves. Separately, monochromatic (solid) corners or with a pattern (for example, imitation wood) are considered; products with a textured surface are less common. For those who like to change their interior frequently, manufacturers offer detachable fittings. The front part is fixed in the stationary part using a snap lock.
Split corner profile Source rewik.ru
For convenience, you can find samples with an applied adhesive composition, which is protected with a waterproof protective film. This option is sold in the form of rolls of 50 meters, which allows you to purchase tape of any length while minimizing excess after installation.
Types of plastic corners
The most common are PVC elements, shaped like the letter L, curvilinear. The second option is more often used for arched openings.
There are other options. For example, T-shaped. Used to hide the joints formed during installation of the slope on the window. The middle part is inserted into the gap between the wall and the window slope, covering the junction of the structural elements.
Samples
There are removable options. They are used less frequently and are more expensive than other fittings. If you need to carry out repair work (wallpapering), the corner trim can be removed and, upon completion of the work, installed back by snapping the locking element.
The wider the side of the corner covering the surface, the greater the load it can withstand.
Glue selection
Before gluing corners to slopes or other architectural elements, it is necessary to select the correct installation composition. Today there are 4 solutions to the problem. Let's look at each of them in more detail.
See also: Catalog of companies that specialize in decorative forms.
Liquid nails and sealant
In modern construction markets, sealants with liquid nails are presented in gun tubes or tubes. Moreover, they have the same volume. Buyers often get confused in this variety.
For installing lightweight plastic, only 2 options are suitable: liquid nails or adhesive-sealant. Here it is necessary to pay attention to the fact that the composition also exhibits good adhesion to the base. So, for absorbent surfaces you can use acrylic-based or neutral adhesives. They practically do not emit odor, can be wet cleaned before drying, and dry quickly. If work is carried out on concrete, plastic, metal or glass, you will have to make a choice in favor of universal compounds.
Universal composition Source stpulscen.ru
Sealants are often used to install corner profiles. This is justified by additional waterproofing. However, this approach is incorrect due to the weak adhesive ability of the material, and the dry residue can only fill the voids. A corner fixed with sealant does not always last for a year.
Liquid plastic
Liquid plastic is sold in the same containers as liquid nails. But the cost of the composition differs significantly from them in a larger direction. This is justified by high performance and technical characteristics. So, among the advantages the following are highlighted:
quality indicators and shape remain unchanged 10 years after installation of the fittings;
color change under the influence of ultraviolet rays, oxidation does not occur over time;
Due to minimal shrinkage during the drying process and good adhesion, a monolithic structure is formed, which additionally protects the base from moisture penetration.
Liquid plastic Source pvcwindow.ru
Liquid plastic belongs to the group of universal building materials. They can be used for gluing corners on slopes and filling/sealing joints between the window frame and adjacent planes. In addition, the composition is characterized by high mechanical stability, which allows it to be used for fastening window sills and sheet finishing of the opening. The only drawback against the background of numerous advantages is that the use is limited to PVC bases.
Polyurethane glue
Before gluing the plastic corner to the plastic panel, you should find out in advance about the color of the synthetic glue from light beige to dark brown. If the work surfaces are white, then the excess will be visible here. It can only be removed using organic or special solvents until it dries. Before using the material, you also need to find out about the working time of the glue in the open state.
Classic version of polyurethane glue Source sdelais.ru
The main advantages of polyurethane adhesive are as follows:
- resistance to biological damage and corrosion, which is important for areas with variable humidity;
- low thermal expansion allows the glue to be used in conditions from -60 to +150℃, which is not typical for the listed analogues;
- resistance to oils and organic solvents allows the composition to be used for finishing in laboratories and industrial enterprises;
- plasticity helps maintain the characteristics of the dry residue under vibration load;
- high adhesive ability determines the versatility of the glue to work with any substrate.
They also note the uniqueness of the polyurethane composition regarding the drying process. The higher the relative humidity, the more active it is. This allows you to install decorative corners for slopes in the bathroom without prior ventilation.
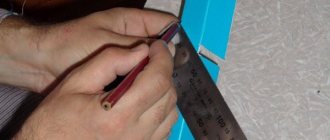
Correct cutting
Regardless of where you need to glue the corner - on a door or window, inside or on the outside, you need to take measurements and correctly cut the raw material along its length.
It is optimal to carry out the work of cutting plastic with a hacksaw with fine teeth.
First, the length of the opening is measured, then marks are applied to the corner so that the piece is consistent with this value. Then the plot that will be adjacent to the slope is cut clearly according to the marks, and the one that sticks to the wall at an angle of 45 degrees.
Installation technology
Before gluing the plastic corner to the corner of the wall, the base must be freed from dust, dirt, and debris. If old fittings are replaced, then any remaining adhesive must be removed.
Elimination of excess before installing corners Source myremontnow.ru
The profile is sold in its pure form, but it is better to wipe it with a damp cloth or degreaser (recommended) and dry it.
After trimming wallpaper, drywall with panels, and polyurethane foam, protrusions often form. It is important to inspect the corner for their presence, since depressions and chips can be hidden, but not obstacles to the tight fit of the fittings to the slope. In the case of wallpaper, it is worth noting the need to remove it by half the width of the corner shelf. Then gluing will occur to the canvas and the base, which gives a better and more durable result.
Next, the workpieces are cut. To form an internal joint, the planks are cut with the thickness of the corner subtracted. External ones are done in three ways:
- overlap;
- joined at right angles;
- cut the planks at an angle of 45 degrees.
Apply glue to the shelf in dots or in a continuous stripe. The first option allows you to save on adhesive composition and speed up installation. This approach is relevant in places with the lowest possible mechanical load. The second method gives better results in terms of strength and durability. The main thing here is not to apply a lot of glue and try to place it closer to the center.
Glue in a tube for a gun Source www.severdol.ru
Press the corner for slopes from the center with gradual pressure on the shelves. This reduces the risk of bending flexible fittings. Until it dries completely, it is recommended to additionally secure the plank in several places, especially at the ends, with strips of paper (painting) tape. It is better to use an inexpensive narrow strip, as it can be peeled off more easily without damaging the finish.
Often, in the case of a trimmed joint, the edges are not perfectly even. Because of this, dust accumulates in the gaps, and over time the seams begin to stand out due to darkening. To avoid this, you can sharpen the edges with a knife in advance or sand them with fine sandpaper after installation. The void is filled with sealant or liquid plastic in the color of the fittings.
Recommendations from the experts
Recommendations for beginners to make the task of attaching slopes less problematic.
- “Measure twice, cut once,” says the proverb. You need to take accurate measurements so that there are no gaps.
- It is not recommended to fasten joints with silicone. The composition darkens over time and stands out unattractively in relation to the plastic profile, disrupting the aesthetics of the finish.
- You need to measure the corners. An angle of 89 degrees is not straight, the joints will have to be processed differently.
- In the absence of experience, it is wise not to immediately glue the corners, but to first secure them with tape, comparing measurements, identifying gaps.
- It’s easier to make an arch using a hair dryer. The plastic profile bends well when heated.
Decorated
Gluing the corners is not difficult. No skills are required to beautifully decorate a plastic window. You need to select and install a profile according to the instructions.
Voted over 395 times, average rating 4.2
Comments
Unfortunately, there are no comments or reviews yet, but you can leave your...
Add a comment Cancel reply
We recommend reading
Finishing Modern lamination on window sills: pros and cons of the coating Most modern windows are equipped with classic window sills ...
Finishing How to putty the surface of slopes on plastic windows with your own hands High-quality putty directly depends on how exactly it was ...
Finishing How to foam all the cracks around a plastic window with polyurethane foam Sealing windows using high-quality ...
Finishing Step-by-step instructions for siding windows of various types: photos with examples of work In construction, a professional term is used - siding. IN …
Briefly about the main thing
Plastic corners come in different colors, sizes and cross-sectional shapes. They are intended for decorating external and internal corners, end edges of sheet finishing, and installation joints in one plane.
To glue the fittings, liquid nails, adhesive-sealant, polyurethane glue or liquid plastic are used. The compositions differ in technical characteristics and color.
According to the technology, installation is carried out in 3 steps: preparing the base and corners (cleaning, cutting), applying glue, fixing the planks.
Optimization of slope plastering
Hello, dear readers! I would like to start this post with an apology. What am I talking about? The fact is that in April I published a lesson “Plastering slopes”.
It’s not that everything is described there incorrectly, it’s just that all this can be done twice as fast! Yes, exactly twice, no less! And the result will be much better.
I myself don’t understand how I could work for more than two and a half years in finishing and not understand this! Damn it...
Previously, I wrote that, for example, window slopes are plastered after the entire wall is plastered. After that, rules are set on them, a solution is applied and leveled with a template.
After setting, the rules are removed, and the sagging on the walls is cramped. Then protective corners are installed on the outer corners. Which spoiled the whole plane, and we had to put up with it.
What nonsense!
In this article, I will give you an optimized method for installing a charger, which will save a lot of time, effort and give excellent results.
I will not delete the first lesson, since the template alignment technology is still relevant)
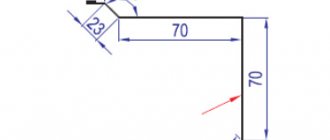
We will combine the process of installing metal corners with the actual plastering of the slopes! This is brilliant! We'll just use the corners as a beacon instead of a rule. But there will be an important caveat. Not just any memory can be used. Here, for example, are low-quality ones:
Nowadays they save on everything, and all sorts of crap comes out. You need to use Knauf ones, they are very strong and you can’t bend them that easily. Here's what they look like:
The essence of the technology is that we will install them at the stage of installing beacons, and possibly instead of them. Let's look at an example, quite simple.
Option without beacons
We have a short wall with a doorway. The left slope is wider than the right by as much as 3 cm, and besides, the wall itself does not shine with evenness. This is understandable; monkey labor was used as usual. Tell me: why the hell do developers plaster if it only makes the walls worse?! Why not remove it and save thirty thousand? Or do it straight through the beacons, we’ve already had enough.
So, on our wall, just the corners will be enough; the beacons here will be superfluous. We will place one on the edge, and three more on the slopes. All four must be in the same plane, so the outermost ones are set first, and then the central ones. Here I set the charger to the left slope, using a laser for convenience:
Installing corners as beacons is much more difficult than installing the latter. Which are exposed only in one vertical plane. The charger, which is placed on the outer corner, must set the vertical for two walls at once, that is, also for the adjacent one:
As soon as the solution (any gypsum plaster or Fugenfüller putty) has set under our extreme corners, you can set up the intermediate ones. This is a little easier to do. In a plane perpendicular to the wall, we set the vertical, and in the plane of the wall the charger is installed by pressing it with a rule, focusing on the outer “beacons”.
In our example, the width of the corner profiles was just enough for a layer of 3 cm. So, we have set the plane for plastering. Now we level the wall as usual using the rule, and the slopes using a template.
After the process is completed, we will get ideal, clear angles, and nothing will stick out anywhere and spoil the plane.
This way we saved about an hour, or even an hour and a half of time, “killing two birds with one stone” at the same time.
Option with beacons
Now let's look at the case when the corners will be installed together with plaster beacons. Let's take a window as an example this time. I’ll say right away that the window sill must already be installed to use our technology (read how to install a window sill here). Otherwise, we will not have the opportunity to properly install corner profiles on the side slopes.
First, all the beacons are set, they will give us the plane of the wall into which we will have to “build” the memory. As soon as the beacons are set, you can start sculpting. In the previous lesson, I told you how to set a solution for slopes.
Everything is the same here. The only difference is that instead of rules we have memory.
The corners are installed into the plane of the wall by pressing them with a long rule with emphasis on the beacons, and we set the vertical/horizontal using a bubble or laser level.
That's it, now we can plaster both the wall and the slopes, to choose from. And we’ll plaster around the window sill at the same time, even here it’s saving money. Ideal plane, no trimming or “pulling” with putty. We immediately get results! Damn, how long it took me to achieve this!)) And how much money I lost while I was struggling with these corners! Punishment for stupidity. I’m writing to you obvious things...
But it’s better late than never) If I come up with something new, I’ll write a post right away. To avoid missing out, subscribe to new lessons. Here is such a short but very succinct article today. See you on the pages of the site, good luck with the repair!
Source: https://siteproremont.ru/shtukaturka/metallicheskie-zashhitnye-ugolki-ustanovka.html
If the walls have curves
Recently, you can increasingly see such details in the interior of apartments. How to fix the plinth in such a place? If the radius of curvature is large and smooth, then there will be no problems. What if the radius is small and quite steep?
Try this. Using a hacksaw, make cuts on the back side of the baseboard so that the plastic on the outside is not damaged. Be careful! The sawn plinth may bend to the required circle. If this does not help, it will be necessary to break it in this area by installing plugs.
An example of installing a plastic skirting board on a rounded wall.
Most likely, this is what you will have to do. But you will need to attach the plastic plinth in the area of the rounded wall more often than in flat places. Just a few centimeters later, new fasteners!
Photo gallery of finished works
Finishing corners in an apartment should be used in cases where the family has small children or animals. Since plaster finishing mixtures do not have great strength, they are destroyed by light impact.
External corners are especially susceptible to damage. Dents often appear on wallpapered corners, and nicks appear on painted corners.
To protect corners, the use of special devices and techniques is required to protect corners from destruction.
Let us immediately note that the process of finishing corners in an apartment is a complex and important stage. Getting a smooth surface is much easier than leveling the corners. Next, we’ll look at ways to protect the corners of walls in an apartment or house from damage.