How to choose the right tile
To make the right choice and finish the slopes with such material, you need to take into account several basic criteria:
- purpose of the premises;
- sanitary condition;
- design;
- the desire of the owner of the room.
For example, in the kitchen you should not decorate with artificial stone. Its uneven surface will be difficult to clean. This material is more suitable for a living room with a corresponding design.
Laying tiles most often occurs in rooms with high humidity. Finishing door slopes in such rooms helps to obtain the desired interior and design.
Decorative textured slopes with stone-like tiles
Facade cladding using clinker tiles
For those who are wondering what and how to decorate the facade of their home, let’s consider what you need to know about clinker tiles in order to make the right choice, and the technologies for laying them.
- Properties of clinker
- Types of clinker ceramics
- Facade cladding
- Calculation of the need for tiles
- Surface preparation
- Reinforcement
- “Wet” method of finishing facades with clinker tiles
- Marking
- Clinker adhesive and tile laying
- “Dry” method of finishing a facade with clinker
- Grouting joints
- Conclusion
Clinker tiles are an excellent material for facade cladding
- calculating the need for tiles;
- surface preparation;
- methods of finishing facades: wet and dry.
- Grouting joints.
Properties of clinker
- high strength and wear resistance due to a layer of melted clay on the surface of the tile;
- moisture, heat and frost resistance (water absorption coefficient up to 2.5%);
- low specific gravity (15-20 kg per 1 square meter of surface);
- resistance to ultraviolet rays (does not fade in the sun);
- resistance to chemicals;
- environmental friendliness;
- wide choice of colors and textures;
- ease of daily care.
- fragility (vulnerable to impact loads, including after installation);
- relatively high cost.
High technical characteristics allow the use of clinker tiles for exterior finishing work in various climatic zones.
Types of clinker ceramics
Depending on the area of application, facing clinker is produced in the following types:
- technical - for paving roads;
- facing – for external finishing of facades and other surfaces;
- waterproof - for cladding bases that are in long-term contact with water (swimming pools, saunas, baths);
- special - for performing complex artistic decoration.
Clinker tiles vary in size, color and surface texture
In relation to the finishing of facades, we will consider facing clinker ceramics, which, in turn, is divided into:
- tiles;
- thermal panels.
Clinker tiles are a product made of baked clay, uniform throughout its entire thickness, laid on a base using tile adhesive.
A clinker thermal panel is a multilayer finishing tile consisting of a front clinker layer and a base insulation. Thermal panels are produced in the size of one tile or in the form of a fragment of several clinker products on a common base. The thickness of the thermal panel can be from 4 to 8 cm.
Facade cladding
Finishing a facade with clinker tiles, like any other type of finishing work, consists of several stages, the success of each of which determines the overall result. Let's look at these stages.
Finishing the facade with clinker tiles includes several stages
Calculation of the need for tiles
Each type of clinker tile includes two types of products:
- main - for cladding flat surfaces;
- corner – for laying on corners.
The amount of main clinker is measured in square meters, the need for corner material is measured in linear meters.
To independently calculate the amount of clinker tiles required for finishing the facade, you need to multiply the length of the facade in meters by its height and then subtract from the resulting value the areas that are not subject to finishing (window and door openings, the area adjacent to the porch facade).
In order for the cladding of the facade of a house with clinker tiles to be successful, you need to know exactly how much material is required
The packaging of clinker usually indicates its consumption for facing one square meter of surface, taking into account the recommended width of the joints. If this value is missing, you can lay it out on an area of 1 square meter. imitation brickwork from the selected tiles, leaving 1-1.5 cm wide seams between the products, and count the amount of material in pieces. Depending on the quality of the material, 5-10% is added to the obtained value.
The consumption of thermal panels for finishing one square meter of base is indicated on the packaging, or the area of one fragment is indicated.
To determine the need for corner tiles, measure in meters the length of all corner joints of the facade. By dividing the resulting value by the consumption of corner clinker for finishing a linear meter, the need for this material is obtained.
Surface preparation
The technology of facing a facade with clinker tiles requires preliminary preparation of the surface in the same way as finishing with other types of ceramics. First of all, everything installed is removed from the facade: drainage risers, antennas, brackets, etc. Then they begin to remove the old cladding along with the peeling tile adhesive and plaster. After removing the worn-out finish, the surface is primed with two or three layers of moisture-resistant primer with antifungal additives, after which the base is leveled.
Finishing window and door slopes with ceramic tiles
Korovin Sergey Dmitrievich
Master of Architecture, graduated from Samara State University of Architecture and Civil Engineering. 11 years of experience in design and construction.
Finishing slopes with ceramic tiles is relevant for rooms with high humidity - where this material is most often used for cladding walls and floors: in bathrooms, toilets and kitchens. Tiles on window slopes will perform not only a decorative function, but also a practical one - in quality it can be compared with natural or artificial stone.
Description of material
In the interiors of living rooms you can find openings decorated with mosaics - it always looks unusual and bright. This interior is distinguished by individuality and special beauty. The tile can be ceramic or figured, imitating artificial stone.
Ceramics
Decorative ceramic tiles can be used to decorate the slopes of windows and doors in the bathroom and kitchen. Due to its high hygienic qualities, this material is used for kitchen aprons.
Ceramic tiles are highly durable
Ceramics has many positive qualities:
- strength;
- high wear resistance;
- durability;
- minimal water absorption;
- hygiene;
- it does not allow electric current to pass through;
- fire safety;
- environmental friendliness;
- affordable cost;
- decorativeness and a wide selection of colors, shapes and sizes.
Tile
Tile is a type of ceramic, from which it differs in its durable glossy glazed surface. The cost of these products is higher than ceramic ones, but their service life is measured in decades.
The tiles are resistant to temperature changes
- has high strength;
- is resistant to chemicals and alkali;
- withstands temperature changes and exposure to direct sunlight;
- retains its appearance and quality throughout the entire operational period;
- waterproof;
- easy to care for and has a high level of hygiene;
- has a wide range of colors, patterns and shapes;
- common and affordable.
Stone effect tiles
This finish perfectly imitates masonry made of any natural and artificial stones. This material is based on fusible clay and quartz sand. Thanks to this, the products are lightweight, unlike ceramics and tiles. Finishing windows with such tiles will avoid excessive load on the window opening. In a private house, external slopes can be finished with this material. You just need to choose products for external cladding work.
The tiles on window slopes with imitation stone are different:
- light weight;
- various surface options - textured, matte, glossy;
- compactness;
- simple installation and ease of processing;
- can be used when finishing a door arch is required;
- firmly fixed to tile adhesive.
Products that imitate old masonry are expensive. This must be taken into account when choosing material.
Mosaic
Window decoration with ceramic mosaics looks unusual and original. With its help you can make interesting doorways in living rooms.
The most original way to finish slopes is mosaic
This type of window decoration is made using small ceramic elements, from which a strict ornament or a chaotic pattern is formed.
Slopes made of ceramic tiles under stone
You can make slopes made of tiles that imitate masonry made of natural or artificial stone for windows and doors with your own hands.
You can trim the slopes with tiles yourself
Before starting work with this material, you do not need to level the surface. This material is convenient because in addition to flat elements, you can purchase corner parts to make the opening look neat.
- To achieve high-quality adhesion between the product and the surface of the slope, notches are made on the latter.
Notches on the slope improve adhesion. Slopes are primed.
Primer of the slope surface The adhesive solution is applied not to the wall, but directly to the product.
The solution is applied to the tiles. Lay the tiles starting from the corner. When laying, the masonry elements are pressed tightly against each other, leaving no seams. If there is a desire to have seams, then plastic pegs are inserted between the parts.
To form a seam, pegs are inserted between the tiles. The seams are filled with grout mixture using a construction syringe. The seam is filled with grout
- The grout is distributed along the seam using a brush.
To trim some of the fragments connecting to the window frame, you can use a regular hacksaw. At the ends, the tiles can be laid freely.
Slopes made of tiles or ceramic tiles
If it is necessary to finish the slopes of windows or doors with elements with precise geometric dimensions, you must follow the instructions given below.
Laying
Before starting work, the slopes must be carefully leveled. The tiles will be laid with high quality only on a smooth, flat surface. This must be controlled using a building level.
There are several methods for leveling slopes: using plaster, drywall or chipboard.
You can line the window opening with plasterboard
Below we will tell you how to lay tiles on a previously plastered and primed slope.
Window sill made of tiles in interior design
- Peculiarities
- How to do it yourself?
- Necessary tools and preparation
- Preparation
- Technology
- Installation
- Covering wooden and plastic bases
- Mosaic cladding
- Examples
With proper decoration, a window sill can become a key element of the interior. Due to the popularity and prevalence of PVC windows, old structures are dismantled and replaced with practical plastic models. In this case, the window loses its expressiveness and decorativeness. To decorate the room and make the interior more expressive, the window sill is covered with ceramic tiles or mosaics.
Peculiarities
A window sill can perform several functions simultaneously. In a small kitchen, this is additional useful space, which is used for arranging indoor plants, cooking, placing dishes and other household appliances. Finishing using tiles is a practical, stylish and durable solution. Due to its special performance properties, this finishing material is ideal for tiling kitchens and bathrooms. The material is not afraid of water, resistant to stress and dirt.
Cladding will help increase the strength of the structure. Compared to a standard plastic product, the tiles do not lose their beauty throughout their entire service life (plastic turns yellow and gets dirty quickly). A tile window sill benefits from an aesthetic point of view and functionality. This option will harmoniously fit into various stylistic directions.
How to do it yourself?
You can decorate a window sill from tiles yourself, without having much experience in this industry. Before starting work, it is necessary to identify certain factors.
- The ideal base for tiles is a concrete window sill. It is also allowed to lay tiled finishing material on a window sill made of plastic or wood.
- Check surface integrity. It should not have holes, cracks, large scratches, chips or other defects.
- The base must be securely fixed in the opening.
- You can begin the finishing process only if the installation of the window frame and external sill has come to an end.
Necessary tools and preparation
To lay tiles, you will need a certain set of tools and compounds. The list includes:
- adhesive solution;
- grout;
- primer;
- finishing material;
- glass cutter;
- building level;
- putty knife;
- rubber hammer;
- hacksaw;
- pliers.
To decorate a window sill in the kitchen, it is recommended to choose porcelain stoneware.
This material is particularly durable, dense and durable. The finish is completely unpretentious to clean and boasts a long service life. You can place hot dishes on porcelain stoneware without fear of damaging the surface of the material and its integrity.
Preparation
Cladding work should begin with preparing the base. Old enamel, putty, etc. should be removed from the window sill. Don't forget to clean the surface from dust and dirt particles. Afterwards the window sill should be primed. Use a deep penetration composition for this.
Particular attention is paid to the choice of tiles. It is important to consider the size of the slabs. If the dimensions of the base are small, the recommended size of the finishing material is 15x15 or 10x10 centimeters. The compact finish minimizes the need for trimming and also plays an important role from an aesthetic point of view.
For larger bases, it is worth choosing larger tiles. You can choose varieties with dimensions of 30x30 or 40x20 centimeters.
Considering the rich assortment of modern stores, finding the appropriate size of finishing material will not be difficult. It is also important to take into account the aesthetic component.
Technology
- Once you have decided on the size of the tiles, you should know exactly how the tiles will be placed on the windowsill. There are two options to choose from: perpendicular or along the window. The choice is made taking into account to minimize the cutting of material as much as possible. To adjust the die to a certain size, use a glass cutter.
- Pre-mark the location of the cut using a marker. The tiles are placed on a flat and stable base, after which trimming is carried out at the designated points. While cutting, press firmly and firmly on the material.
- Next you will need a rubber hammer. They use it to tap the tile on the back side at the site where it is supposed to be cut off. If the tool is not at hand, you can use the handle of a spatula wrapped in a thick cloth or towel.
- It is necessary to break off with sharp movements, controlling the force. If your skills allow, you can trim the material using a grinder. Using this tool will save a lot of time and effort. Use this technique if you have professional skills.
Installation
At the stage of laying tiles, it is necessary to prepare an adhesive composition. The solution is applied to the base and back side of the tile evenly and carefully using a spatula. When laying tiles, ensure the integrity of the pattern. Don't forget about the gaps between the tiles. To place the tiles at the same distance from each other, you can use special crosses that differ in size.
For convenience, it is recommended to arrange a slight slope of the window sill from the window to the outer part of the structure. This will help prevent moisture buildup by allowing water to flow from the base of the frame to the edge. As soon as the laying of the horizontal dies is completed, it is necessary to begin installing the end parts. The placement technique is similar to that described above.
As you work, carefully ensure that the vertical and horizontal elements match each other at the joints.
After the entire window sill is tiled, putty is used. For greater practicality, experts recommend using the composition in dark colors. The most common options:
- beige;
- brown;
- burgundy;
- dark grey.
The choice of shade is selected depending on the color of the tile. Once the solution has completely dried, the window sill is thoroughly cleaned. Now the updated window sill is ready for use.
Covering wooden and plastic bases
The process of cladding on a wooden window sill is no different from laying finishing material on a concrete base. However, in this case it is necessary to sheathe the structure with plasterboard and then carry out installation.
You can do without plasterboard cladding. In this case, it is necessary to treat the wooden surface with an acrylic primer, and when installing the tiles, use epoxy glue. For grout, choose epoxy grout.
Work with plastic window sills is simpler. It is recommended to use liquid nails instead of glue. The reliability of adhesion is directly related to the texture of the plastic. It is recommended to use special adhesives for attaching tiles to wooden and plastic surfaces. After covering a plastic window sill with tiles, the structure will acquire only a decorative quality. A strong load will damage not only the cladding, but also the plastic itself. Use the design carefully and carefully.
Flaws
For all its advantages, this material has several disadvantages. Firstly, it is high cost. Secondly, laying tiles requires certain skills and knowledge. This facing material requires great care and a lot of time when working. However, the resulting result always compensates for all the disadvantages with its attractive appearance and reliability.
Slopes made of ceramic tiles for the entrance door opening
Description of material
Often, owners of private houses resort to decorative window openings with ceramic tiles. The design move is a continuation of the interior decoration. The most common place where the technique is used is the kitchen. Several types are used - glossy, matte, stone-look tiles, mosaic.
Glossy
It is distinguished by its attractiveness and stylistic design. Gloss transforms the window.
Gloss
Advantages
Regardless of the window opening, wide, narrow, glossy cladding material looks good:
- The reflective coating gives a mirror shine, visually expanding the window opening.
- Practically does not absorb moisture.
- Repels dirt and water. Easy to clean, no powder cleaners required.
Flaws
Daylight reveals the slightest dirt. The factor creates other disadvantages of the product:
- If there is a little dusting, you have to pick up a rag and wipe off the dust. If streaks or smudges appear, remove them using gentle means.
- High degree of light reflection. Reflected glare can blind the eyes; it is not recommended to locate dining areas near the window opening.
Matte
Gives the window opening elegance. The material has practically no disadvantages; its advantages make the decorative coating popular.
Matte
Advantages
Advantages:
- The matte surface does not reflect sunlight; you can place a dining area near the window.
- The surface is rough, practically no moisture collects.
- The appearance of dust is not noticeable; preventative cleaning must be carried out twice as often. Abrasive cleaners do not leave scratches.
- Even if small scratches appear, they will not be noticeable, and the tile will not lose its attractiveness.
Flaws
Flaws:
- The lack of a reflective surface makes the matte finish unable to expand the space. When placed in a small window opening, it will visually make it even smaller.
- There is no water-repellent layer - gloss, the product is more sensitive to moisture.
- Greasy, limescale deposits are difficult to remove.
Mosaic
The mosaic tile finish looks unusual, somewhat original. This type of design is used when lining doorways. You can create ornaments and chaotic patterns.
Mosaic
Advantages
Mosaic is wear-resistant and durable. It will not lose color, attractiveness, or begin to fall off. Tolerates exposure to direct sunlight well. The product consists of small squares and is flexible.
Flaws
The tiles are made from natural materials, expensive. Cheap analogues are made from artificial ones.
How to decorate slopes on windows: 6 original and fun ways
Often, little attention is paid to decorating slopes, so they remain white and boring. But now there are a lot of options for decorating a window in an original and interesting way.
Mirrors
One of the original ways to decorate window slopes is to decorate them with mirrors. This option is especially good for rooms with small windows, since such window openings visually reduce the space. Mirror surfaces will help save the situation.
Slopes made of ceramic tiles under stone
You can make slopes made of tiles that imitate masonry made of natural or artificial stone for windows and doors with your own hands.
You can trim the slopes with tiles yourself
Before starting work with this material, you do not need to level the surface. This material is convenient because in addition to flat elements, you can purchase corner parts to make the opening look neat.
- To achieve high-quality adhesion between the product and the surface of the slope, notches are made on the latter. Notches on the slope improve adhesion
- The slopes are primed. Primer of the slope surface
- The adhesive solution is not applied to the wall, but directly to the product. The solution is applied to the tiles
- Laying tiles begins from the corner. When laying, the masonry elements are pressed tightly against each other, leaving no seams. If there is a desire to have seams, then plastic pegs are inserted between the parts. To form a seam, pegs are inserted between the tiles.
- The seams are filled with grout mixture using a construction syringe.
The seam is filled with grout - The grout is distributed along the seam using a brush.
To trim some of the fragments connecting to the window frame, you can use a regular hacksaw. At the ends, the tiles can be laid freely.
How to calculate tile consumption
Percentage of tile waste for trimming.
It is necessary to calculate the consumption of tiles not with a calculator, but with a philosophical approach. Why? It is impossible to take into account everything!
Before writing this article, I looked at messages on the Internet about this matter. There are special calculators. There is a percentage of the cost for pruning that is approximately correct. This is 5%. Why is it approximately correct? It's very accurate.
- This percentage can be applied if all the tiles in your packs are intact. In this case, you need to print out all the packs and check each tile for broken corners and shade. It is difficult to see the different shade when moving through the tiles, but this is clearly visible in comparison with other tiles and from a distance;
- This percentage can be applied if your tiles are small in size, 20 x 30 cm, no more. Large tiles also have large scraps that cannot be used. This means the percentage of waste is growing.
- This percentage can be applied if the design on your tile is simple and not a composite of four tiles. Otherwise, the number of scraps that can be used is reduced several times.
In addition to these cases, other unaccounted issues arise. And everyone has their own.
In one place they forgot to count a small piece of the wall or did not plan to tile it when they were counting it. In another, they did not take into account that the room does not have right angles. This leads to additional consumption of tiles when tiling the floor.
What percentage of waste do I take into account? This is 7% - 10%. The last figure is a guarantee with a margin. The remaining tiles are approximately 1-2 square meters.
Mosaic slopes
To install a mosaic covering on the slopes of windows and doors, you can use special soft canvases on which ceramic pieces are glued. The base can be paper or in the form of a mesh. Their convenience lies in the fact that you can cut the canvas to the required size.
The installation process is simple. The surface of the slope must be dry, clean and level. At the preparatory stage, preliminary markings are made on the slope, according to which the mosaic canvas is then glued.
- the glue is applied with a notched trowel;
Use a notched trowel to apply the glue. - When gluing the mosaic canvas, you do not need to put too much pressure on it so that the adhesive does not squeeze out through the seams;
It is necessary to glue the mosaic canvas without strong pressure - It is recommended to use epoxy resin-based grout for sealing joints;
Epoxy resin is used to grout joints - Using a rubber spatula, spread the grout in an even layer;
To distribute the grout evenly, use a rubber spatula - After the grout has dried, its excess is removed with a damp sponge.
Window and door slopes, finished with one of the listed materials, will decorate any interior and retain their original appearance for many years.
Carrying out work
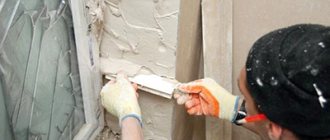
You need to approach the work very carefully. Finishing window slopes with tiles is carried out in several stages.
Preparatory stage
Preparation is one of the main stages. The strength and quality of attachment to the base depends on it. Preparation is carried out in several stages:
- prepare the workplace so that nothing interferes with work;
- plaster the slopes, which will ensure high-quality adhesion of the glue to the base;
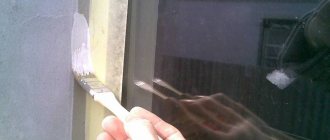
- cover the frame and glass with masking tape or plastic film so that you don’t have to clean them of the adhesive later;
- carefully prime the slopes;
- prepare glue.
To stir the glue, use a drill with a special attachment. After this, wait 15 minutes for it to brew.
Step-by-step instruction
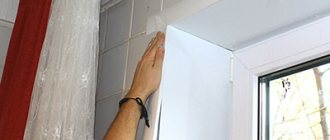
When the surface is prepared and the glue is mixed, proceed to the actual finishing.
The adhesive is applied to the back of the panel with a notched trowel. After this, it is carefully pressed against the wall. The evenness of the surface is checked using a level. Glue is added if necessary. The corners are joined using a special strip or by cutting the edges at an angle of 45°.
Final work
At the final stage, the joints are grouted. To do this, wait a day after installation.
The fugu is applied with a rubber spatula. Remove excess with a damp cloth. If the grout dries out, it will be difficult to remove.
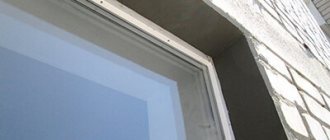
Do-it-yourself finishing of window slopes with clinker tiles
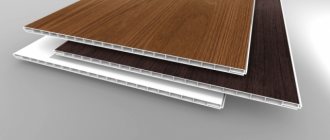
- Clinker tiles are a special type of ceramic tile fired at temperatures above 1200°C. It has enormous strength, as well as a varied texture and a wide range of colors. Slopes and other surfaces lined with this material are reliable, durable and have a beautiful appearance.
- How to make window slopes with your own hands, using clinker tiles, and without hiring hired craftsmen? First of all, you need to understand that clinker is a material for external cladding, so here we will talk about external window slopes.
So what do we need?
- Clinker tiles
- Glue
- Cutting tool (grinder, cutter, file)
- Ruler and carpenter's pencil
- Level
- Special corners (if used)
- Glue spatula
How to perform cladding?
- Take all measurements carefully and mark them on the tiles and wall.
- Start working directly from the slopes, then line the internal corners.
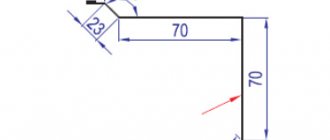
- To make the corner look beautiful, they use the chamfer method, when they cut the corner inside the tile at 45 degrees. This work requires special care and precision; thicker material is selected for it.
- You can avoid chamfering, glue the tiles end-to-end at the corners, and then use special corners that will provide an excellent appearance. This method does not require such high precision of laying and cutting, but you have to spend more on material - those same corners.
- Gluing begins from the outer corners, then the inner corners are glued, and then the even areas. It is advisable to select glue and clinker tiles from the same manufacturer.
- Carry out the work carefully following the instructions on the glue packaging.
Window and façade cladding.
Can be decorated both outside and inside . Important points:
- Before laying clinker, the slopes must be carefully leveled - plaster, use plasterboard or chipboard, and prime the surface.
- Work can be carried out if the outside temperature remains between +5 and +30°C.
- Cladding should not be carried out during rain.
- The adhesive should be applied with a notched trowel in a continuous layer. The height of the trowel ridges should be 6-8 mm for light tiles, and 10-12 mm for heavy ones.
Tiling in corners, niches, slopes
Tiling in the corners of the room
First you need to lay the tiles separately on each wall separately, working along the horizontal guide strips. Be careful when installing horizontal guides on adjacent walls - they must be at the same level. Even with a slight discrepancy in levels, the vertical rows will diverge, and when facing the wall to the ceiling, the horizontal rows will not coincide along the joint line above the door.
Tiling in the corners of the window opening
When tiling a window opening, first tiling the front wall with whole tiles, then laying the cut tiles and tiling the side walls of the niche and the window sill. If the door is in the center of the wall and you are installing tiles up to the ceiling, arrange the tiles to avoid narrow tiles near the door and in the corners of the room. If the door is in a corner, tile two walls first, then cut and install the tiles above the door.
Techniques for lining a window niche are also used for lining a doorway.
Finishing a window niche - step 1
If you are tiling a wall to the ceiling, place all intact tiles to the side of the window, but not above the window. Attach the strip to the wall so that its top edge is level with the bottom edge of the lowest row of whole tiles above the top of the window. This strip will serve as a support for the whole tiles laid above the window.
Step 2
Lay the cut tiles along the sides of the window. Start at the windowsill. To fit the tiles to the window sill, you may need to make an L-cut or use wire cutters. To make cutting tiles easier, plan your layout in advance.
Step 3
If you need to cut an L-shaped cut into the tile, mark the cut lines on the face of the tile. Clamp the tile in a vice between wooden blocks and make the first cut with a saw. Make a second cut and break out a piece of tile; Clean the edges with a file. Clamp thin tiles horizontally to prevent them from cracking.
Step 4
Let the mastic set, then remove the trim at the top of the window and lay the remaining tiles on the wall. The corner tiles may need to be cut into an L shape. To avoid having to use narrow strips that are difficult to cut, plan your tile layout in advance.
Step 5: Tiling corners
If you need to cut a narrow strip from a tile, make a notch along the cut line with a cutter, then break off the excess pieces with pliers. Clean the edge with a tile file. (Having made a curved notch with a hand cutter, you can use wire cutters to make a cutout of the appropriate shape).
Step 6
Lay whole tiles inside the window niche. If the tiles do not have spacers, use spacers to create a cemented gap between the bottom tiles and the sill.
Step 7
- Finally, measure and cut each tile for the sidewall portion of the window niche adjacent to the window frame. After the mastic has set (after about 4 hours), the joints can be cemented.
- In the inner corner, cut and lay the tiles of the last vertical row on one wall so that they fit into the corner.
- Then lay the final vertical row of tiles on the second wall, using inserts to create a cemented gap in the corner between the two vertical rows.
- On an outside corner, lay a full tile on each side of the corner.
Drawings of tiling in corners
Conclusion
Thus, the tiling in the corners and around the window is completed. That's all. Good luck to you in your endeavors!
How to work with a tile template
Tile adhesive is immediately applied to window slopes in a small layer (about 4-5 mm) without prior plastering. First we apply tile adhesive to the base, and then apply it to the tiles.
Using a special handle with suction cups, you need to move the tile up and down several times so that the tile adhesive fills the space under the tile as efficiently as possible.
You can watch the video below for details on how to lay tiles on slopes using a template. This review was created based on the author’s video from YouTube channel 9 plitok.
Corner connection
How to properly join the corners of slopes that are decorated with tiles? When carrying out preparatory work on slopes, corners are installed under the plaster - metal or plastic, solid or perforated. These elements create a rigid basis for the formation of a right or any other angle. First, the layout of the tiles is drawn on paper (observing the dimensions), trying to ensure that the width of the tiles and the seams between the tiles coincide on all sides of the slope.
In addition to fixing the corners, the slope itself can be formed manually, using plaster or grout. This method will take you more time, it is very labor-intensive, but feasting on the absence of corners is quite feasible.
And the last way to beautifully make a corner on a slope is to cover it with a special decorative plastic corner. The width of such decorative elements varies from a few millimeters to several centimeters. Therefore, with a corner of a suitable size, shape and color, you can close any joint or corner of the slope.
DIY window slopes made of ceramic tiles
This method is similar to the previous one, because the properties of ceramic tiles (tiles) and clinker are quite similar. But there are also significant differences.
First of all, ceramic tiles:
- Durable
- Wear-resistant
- Does not absorb water
- Hygienic
- Not flammable
- Eco-friendly
- Inexpensive
- Beautiful, multicolor
It is the glossy, multi-colored, glazed surface that is the main difference between tiles and clinker.
Decoration with tiles
The technology for decorating window slopes with ceramic tiles is similar to the technology for laying clinker tiles:
- The slopes are carefully leveled by plastering or sheathing with plasterboard, after which they are carefully primed.
- All measurements are carefully taken and the surface of the slope is marked according to them. It is especially necessary to ensure that the height of the tiles on both vertical slopes coincides, and the seams between the tiles are at the same level.
- The glue is diluted according to the instructions for use and applied to the slope.
- The tiles are laid out starting from the first bottom row, from the corner.
- Corners can be glued end-to-end, first removing 45 degrees of chamfer, but thin tiles simply require jeweler's precision, and a good result is not always obtained. Therefore, it is better to use special corners. They will ensure precise styling and a beautiful appearance.
- The laying of each row is controlled by a level, and equal distances between the rows and tiles in them are achieved using special cross-spacers
- After the glue has completely dried, the seams are rubbed using white cement and fine-grained sand. Instead of cement, you can use finishing putty and add a coloring compound to add color.
- After the grout in the joints has dried, the surface of the tile is wiped with a wet cloth or washed.
Recommendations
When installing tiles on slopes, you should follow these recommendations and advice from experts.
- Preliminarily estimate the location of the parts on the wall. Wide pieces should be located at the junction. Otherwise the look will deteriorate.
- Correctly join elements on different surfaces. The cladding starts with a large piece. If this is not possible, then trimmings are used.
- If the width of the slope is less than the required size, the whole figure is attached along the outer edge. The gaps between the frame and the cladding are closed with scraps.
- Heavy elements that cannot be held by glue are supported with wooden clamps. They are removed after the adhesive has completely dried.
- Grouting is carried out after the glue has dried. Depending on the thickness of application, this may take 24 hours or more.
Finishing the slopes must be done very carefully. If you have no experience in solving such problems, it is better to turn to the experts.
Tiles are a universal material that is used for finishing different surfaces. It is resistant to high humidity.
Original do-it-yourself window slopes from mirrors
To decorate window slopes with mirror materials, you can use not only tiles with a mirror surface, but also entire mirrors according to the size of the slope. This cladding creates the effect of expanded space, an endless path of images on both sides of the window. Mirrors are cut out yourself or mirror panels are ordered according to individual cutting, strictly corresponding to the dimensions of the slopes - the top and two side surfaces.
To increase space
- For gluing, liquid nails, sealant or amalgam glue are used.
- The glue is applied to the back side of the panel and to the surface of the slope, the mirror is placed at the attachment point, pressed and the glue is allowed to set.
- All work must be carried out extremely carefully and carefully, since if the fragile mirror bursts, you will have to cut it out or order a new panel; a cracked one can no longer be repaired.
- If you need to support the panel with supports, be sure to protect the outer mirror layer from scratches with a soft material.
- If necessary, the joints are covered with a decorative strip.
Do-it-yourself finishing of window slopes with mirror tiles
- This method of finishing window slopes is used when they want to visually enlarge a small room, give it more light, and “break” the usual rectangular space.
- Unlike solid mirror slopes, which are made from panels to fit the size of the window and create the effect of visually enlarging the space, mirror tiles create many facets, which is why an ordinary window seems like a fairy-tale crystal.
- In general, glass on slopes looks very beautiful and expensive, but subject to one important condition. It must be wiped daily with a rag and washed regularly with special detergents.
Beautiful mosaic for windows
Features of working with mirror tiles for window slopes:
- This tile differs from ordinary tiles in its smaller thickness, greater fragility and special delicacy of the top mirror layer. Working with it cannot be rushed and requires special care and increased attention. Such tiles are mounted using tile adhesive specially designed for this purpose, neutral sealant, and liquid nails.
- Do not use cement mortar or conventional sealant that contains vinegar.
- First of all, we select tiles by size. Cutting it is quite difficult, so it is better to immediately choose the optimal size to reduce the number of cuts to a minimum. The range of such tiles is very diverse in size.
- We carefully level the slope surfaces. Any tile requires leveling, but in this case this work must be done with special care, avoiding the slightest unevenness.
- We prime the slope with a special primer.
- We make very careful markings, making marks on the surface of the wall and on the tiles.
- If there is a need for cutting, we use only high quality diamond glass cutters.
- The tiles prepared for gluing should be placed vertically, leaning against a support, to avoid scratches on the mirror surface.
- The glue is applied to the back side of the tile, then it is applied to the installation site according to the marks, and pressed for a few seconds
- It is necessary to leave a gap between the tiles, which is achieved with special cross spacers.
- At the corners, beveled tiles are fitted end-to-end, forming an edge.
- After the glue has completely dried (usually after a few days), the joints should be grouted.
- The best material for this is neutral silicone, which is used to fill the seams, and the residue is removed with a rubber spatula and a damp cloth.
Benefits of technology
When replacing window structures or during repairs, they decide how to finish the slopes. There are several ways to solve the problem. Among the popular options are the design of different types of materials. The technology has advantages:
- beautiful view of the walls;
- variety of textures;
- surface resistance to mechanical stress and negative environmental factors;
- a wide selection of materials in color and shade, which allows you to fit the finish into the design of the room;
- meets all hygienic requirements;
- simplifies the cleaning process;
- durability.
To see all the advantages of the technology, you need to correctly finish the window slopes with tiles yourself. The appearance and durability of the coating will depend on this.