Mirrors, shelves, doors, stained glass windows and other glass objects are an integral part of the interior of a residential building. Most often, mirrors are found in the hallway and in the bathroom. And shelves, stained glass windows and doors made of such material are less popular, but are not excluded as decor. Despite their different functionality, all these products are united by increased fragility. Therefore, the standard wall fastening system is not suitable. In this case, it is necessary to use special fasteners for glass.
Benefits of using shelves in the bathroom
If you still do not decide to purchase shelves for the bathroom, considering such actions to be worthless, it is recommended to pay attention to the advantages of having these unique storage parts. The advantages of using shelves, including glass ones, include the following important aspects:
- Storage. Often in the bathroom there is a huge amount of household chemicals and related items that are so necessary for washing and comfort. If the room is small, installing special cabinets here is almost impossible. Special shelves for the bathroom will come to the rescue.
- Safety. Tubes of creams and bottles of shampoos located on shelves within walking distance from the bathtub represent a reliable and safe design, since there is no danger of slipping.
- Space saving. A corner shelf will save space, unlike large cabinets and racks.
- Aesthetics. The appearance of the shelves, which today are presented in a wide variety of stylistic solutions, will add laconicism and attractiveness to the entire bathroom design.
Having familiarized yourself with the advantages of shelves, the question involuntarily arises: can a glass shelf located in the bathroom really have so many positive aspects? To find out, you need to consider the features and types of products presented.
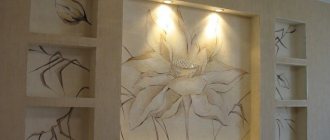
DIY LED lighting for glass shelves
DIY plasterboard wall shelves
If there are many shelves, then each of them can be illuminated in a different color.
As has already become clear from the information given above, in order to make shelves with lighting, you will need an aluminum profile for mounting.
Procedure for manufacturing LED backlight.
First you need to go to the store and buy the profile mentioned above. The main thing is that it matches the thickness of the glass from which you are making the shelf.
Next, it is cut to the required size. Do not forget that all burrs that appear during the trimming process must be carefully removed.
Now you need to perform a high-quality fixation of the profile on the wall. For these purposes, holes are made in the profile for fastening. The profile must be attached to the wall surface using self-tapping screws and special plastic plugs
It is important, when marking and attaching the shelf to the wall, not to forget about using a building level
The next stage involves installation work with the diode strip. Almost every profile has an insert made of plastic. Remember that you do not need to delete it. Such a device will protect the tape from possible contact with the aluminum surface. This will save you from possible short circuits. Get ready for the fact that the installation of LED lighting for a glass shelf, performed using an LED strip, will be labor-intensive, since tucking it inside the profile causes a lot of inconvenience, especially if there is no free access to its end ends. With open ends, inserting the tape is not very difficult, since the existing groove is intended specifically for this purpose. In another situation, various available devices can be used to place the tape inside the profile. One of the options for placing the tape inside the profile involves bending it like a “house”. Just remember that you will have to use a ruler for alignment later. The ruler can be made of wood or plastic.
At the last stage, a glass shelf with lighting already placed inside the profile requires the installation of glass. The process is not difficult, but it requires some effort on your part. Since, for reliability, the arrangement of glass in the profile is dense. If you can’t do it yourself, you can use a wooden handle and a rubber hammer.
Now you are convinced that making glass shelves with LED lighting is quite easy and quick. But if you come to the conclusion that this is a very difficult task for you, then the most correct thing would be to contact a workshop.
Vacuum
This is another version of the suction cup, but more modern. Here, using a special lever, all the air is drawn out from the space between the rubber and glass. After this, the structure will rest securely on a smooth surface.
To make the grip more reliable, you need to degrease the glass before fixing the shelf. This option is highly reliable and convenient. But only high-quality suction cups without deformation, cracks or chips that can allow air to pass through will perform their job flawlessly.
Adhesive fastening method
Bedroom shelves above the bed
For adhesive mounting, you can use either double-sided tape or glue. There is also a mechanical method of attaching glass to the wall, but we will return to this a little later.
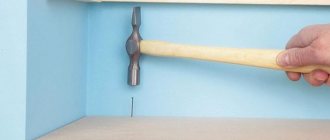
Connecting the product to the surface using tape is the simplest method. However, with this type of fastening, use only double-sided tape. First you need to peel off one protective layer from it and secure the tape along the wall. Then you apply the glass to the wall, remove the top protective layer from the tape, releasing the adhesive side, and press the glass firmly.
Although this method is simple, it also has a number of disadvantages. Often the object being strengthened is placed unevenly, and it will be very difficult to tear it off the surface and reattach it there. If this is a corridor, then you risk tearing off the wallpaper along with it; the sight will not be the best. To prevent this from happening, after gluing the tape to the intended fastening location, apply a thin layer of sealant along it. But when working with it, remember: it should not go outside. By applying a sealant, you can take into account possible gaps before securing the glass object and fix it straight and level.
If you want to use glue when attaching glass with your own hands, then we advise you to choose a silicone-based glue of the “liquid nails” type. The algorithm for working with glue will be as follows:
- Apply glue to the entire glass product in a thin layer around the perimeter.
Then, having assessed all the risks, eliminating the possibility of a crooked arrangement, we sharply press the surface against the wall; Adhesive fastening method - It is necessary for the glass to dry to the surface. To do this, it is advisable to press something weighty against it for some time (perhaps even up to a day). If we are talking about a tall mirror or glass product from floor to ceiling, then it is better to find a large box, for example, from a refrigerator and press it tightly against the wall;
- After the glue has dried, the remaining gap between the glass and the wall should be treated with sealant around the perimeter of the glass.
The surface on which you plan to mount the glass must first be cleaned not only of dirt, but also of wallpaper. Outline the area with chalk around the perimeter of the glass and work it thoroughly.
Mounting a glass shelf
Fastening polypropylene pipes to the wall. Types and methods of fastening, installation tips
So, first you need to screw the brackets to the glass shelf. To do this, brackets are inserted into the corresponding holes. They must match perfectly. If this is not the case, the glass shelf can be considered defective and in this case it is better to replace it. From the kit that comes with the shelf you need to take bolts (which I usually make with countersunk heads) and nuts of the appropriate size. Using these fasteners, the brackets are tightly screwed to the shelf. At the same time, you should not overdo it so that the load on the glass is not too strong, otherwise the shelf may crack. When the brackets are securely fastened in the holes, the shelf is placed against the wall in a strictly horizontal position. This can only be done using a building level. It is not recommended to display a shelf by eye, because even professionals are often let down by the so-called “eye”. Using a pencil or marker, mark the points that will symbolize future holes for the brackets, after which the glass shelf can be put aside for a while. Now, using a drill, holes are drilled at pre-designated points
It is very important to choose the correct diameter of the drill, otherwise the shelf may not be securely fixed in place. Finally, when everything is ready, the shelf is put back into place, the brackets are inserted into the holes and the fixing screw is tightened. Decorative overlays (plugs) are placed on the ends of the protruding brackets, at which point the installation of the glass shelf can be considered complete.
Stretch ceilings in Butovo: the beauty of the design in every home
No good renovation can be done without suspended ceilings. This trend continues to grow, as many homeowners find beauty and convenience in this decorative element. In addition, the cost of implementation is much cheaper than finishing with other means. If you intend to carry out repairs and are thinking about choosing a company to carry out this decorative element, then you should contact here https://vilok.ru/product/natyazhnye-potolki-v-butovo.
carries out a full range of installation of suspended ceilings of various designs. Note that the company offers the most acceptable options in Butovo, and the work is carried out of any complexity. The quality of services is tested by time, while the guarantee is issued by specialists indefinitely. The comprehensive service includes the following:
- Free visit of a specialist to the work site, assessment and consultation regarding the ceiling. Note that if the circumstances are positive, the employee will take measurements and enter into a contract for the work;
- At the time of concluding agreements, the client selects the most acceptable ceiling design. The company's catalogs contain a huge variety of different options. Among them are glossy, matte, satin of various colors and designs;
- The structure is installed in various ways. In this case, the most acceptable option is considered to be mounting using the harpoon method. This is the most reliable mount that copes well with basic tasks;
- Maintenance of suspended ceilings in the event of flooding or other troubles. Specialists will help correct the situation and fill the room with beauty and comfort.
As for the price and contractual obligations, you should read about this on the company’s official website. Here you can also familiarize yourself with the terms of the promotion and the possibilities of receiving a discount. The company is ready to provide quality services to the delight of its customers!
Where to buy glass shelves
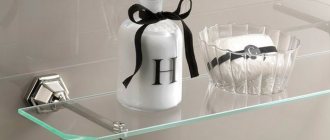
Glass shelf for bathroom
There is more than one glass shelf store on the World Wide Web. However, among all these sites, one can highlight those that offer high-quality glass shelves. An online store today is the most convenient option where you can buy glass shelves in Moscow and any other city in Russia without any difficulty.
At the Glass Workshop you can order glass shelves, which will be made according to original sketches. In this store, glass shelves can be purchased at a bargain price - from 650 rubles. for 1 sq. m.
Corner three-tier glass shelf
In this online store you can buy a glass shelf for the bathroom and any other room from manufacturing countries such as Italy, Germany and the Czech Republic.
The article “Glass shelves on the wall” will tell you what this product is and what its advantage is over traditional wooden and metal shelves. Also learn how to use glass shelves to create the design of a living space or office. How to make glass DIY shelf, read here: https://oknanagoda.com/steklo/steklo-polki/glass-shelves-selfmade.html
Glass shelves for plants
Here they make glass shelves to order (Moscow and Moscow region - delivery) in 5-10 days.
Glass bookshelf
Although you need to place an order on the website, and only after that it will be possible to clarify the final cost of the glass shelf with the manager. Which scares off many potential buyers.
Illuminated glass shelves
You can also buy fastenings for glass shelves here. For example, a glass holder, i.e. a profile, is sold for 900 rubles.
And if a sandblasted design is applied to a shelf with frosted glass, then its cost will be more - from 2,500 rubles. for 1 sq. m. For people who are not limited in finances, the store offers to buy a glass shelf with stained glass - from 6,500 rubles. 1 per sq. m.
An article on our website entitled “Sandblasted Stained Glass” tells more about sandblasting patterns and how to obtain them. And if you want to decorate your glass shelf with a real, multi-colored image, then an article on our website telling about stained glass patterns Make stained glass with your own hands is at your service The instructions posted here will help you: https://oknanagoda.com/steklo/osteklenie-steklo/vitraznoe/o-pljonkakh-na-okna-vitrazhnykh-samokle.html
Glass shelf from IKEA
Check our website for prices on the consumer market for other glass products. “Review of prices for glass partitions for home and office in Moscow” will help you decide on the purchase of glass screens and partitions. Roof windows appeared on the Russian market relatively recently, but prices for them have already been formed and you can also find them on our website With prices for glass blocks , from which you can put together anything: even a wall, even a partition, even a TV stand, check it out here: https://oknanagoda.com/steklo/steklobloki/glassblock-interrier.html
So, now you know where to order glass shelves so that they are not only affordable, but also of excellent quality.
Leafing through the catalogs
If you carefully examine the contents of the thick catalogs of leading suppliers of furniture fittings, you will find that there are no more than ten out of a thousand pages devoted to fittings for furniture made entirely of glass. We can say that there are almost no fittings for glass furniture; rather, it is produced only for products using glass.
The first to appear (back in the 60s of the last century) were plastic runners with a W-shaped cross-section, installed in a body made of chipboard. They moved sliding doors made of a single sheet of glass that did not have any frame. It is curious that in the domestic furniture industry, drilling holes for the handle due to the lack of appropriate equipment at furniture factories, as a rule, was not carried out, and during its manufacture a vertical groove was made in the sheet, by which it was moved along the guides. Plastic corner connectors have become widespread for creating glass display cabinets in retail establishments.
Today, the design of glass door sliding mechanisms has become significantly more complicated: W-shaped guides have been abandoned almost completely. For example, hollow corners are placed on all corners of a rectangular sheet of glass that does not have any cutouts or drillings and secured with screws. Of these, the lower ones each have one roller with a groove that rolls along a guide, and the upper ones each have two smaller diameters, which move in the groove of the U-shaped upper guide. With double glass in the product, the depth of this design does not exceed 40 mm. There are also mechanisms for sliding glass doors with guides in the form of metal rolling pins, placed outside the body and having additional decorative value.
Installation of glass fittings
Fittings for glass tables, doors and other similar items must be installed with great care. If there are no special skills in this matter, then it is best to entrust it to a professional
To perform this operation you will need a tool, as well as other items. The list of them depends on the type of mounted fittings.
The set of necessary tools includes:
- screwdrivers (phillips and slotted);
- hexagons;
- drill;
- a set of drills for wood, metal, reinforced concrete;
- dowels;
- special glue.
Adhesive for glass and metal
Items such as hexagons and screwdrivers are necessary in order to disassemble the mechanism into its component parts before installation. Of course, a drill and drill bits are necessary for drilling.
If fittings for glass doors are installed, you will need to secure the hinges to the door frame. This must be done using sufficiently long dowels. If it is necessary to install mechanisms for lightweight glass sheets and drilling is not required, glue is used to connect the fittings and the glass sheet.
It is necessary to remember one very important nuance when choosing glue. It must retain its transparency after drying.
Especially if fittings for glass shelves are attached. Otherwise, the appearance of the furniture may be spoiled by the appearance of ugly dried glue.
Dried glue that has changed color
Installation of fittings with glue
Fittings for glass cabinets, as well as other similar furniture and objects (doors, display cases) are most often attached with ordinary glue. In most cases, this process does not cause difficulties even for people who have never performed such operations. Installation of fittings on glass doors is carried out as follows:
- the floor or walls are marked (to secure the hinges);
- the door leaf is being tried on with the fittings not yet attached;
Trying on a door leaf with unglued fittings
fittings are being prepared;
Preparation of fittings - rubber gaskets and other elements are inspected
- special glue is applied to the surface of the fittings at the fastening point and to the glass;
- using the included mechanisms present in the device or a clamp, it is necessary to firmly press the surface to be glued;
- After drying, the fittings are attached to the door frame.
It is very important to remember that when using a clamp or other similar devices you should be as careful as possible. Excessive force can simply lead to the appearance of a crack in the glass or even to its splitting into several parts.
All operations must be performed with extreme caution
Installation of fittings with drilling
Most often, fittings for glass display cases require drilling during installation, since the weight of such structures is quite large and the glue may simply not hold it. To perform this work you will need the following tools:
- drill with adjustable speed;
- special drills for glass;
- soft surface with a large area;
- a set of screwdrivers and hexagons for working with the mechanism.
Particular attention should be paid to the drill and drill set, since the success of the work being performed greatly depends on the quality of these items. The drill must maintain a low enough rotation speed so as not to damage the glass or heat it.
The drill must maintain a low enough rotation speed so as not to damage the glass or heat it.
Set of drills for glass and mirrors of different diameters
The process of installing fittings with drilling is as follows:
the door frame is prepared - places for attaching hinges are marked, the door itself is tried on in place;
Preparing the box and fitting the door leaf in place
The door is marked and the locations for making holes are marked;
Making holes in glass for installing fittings
The mechanism is assembled and the door leaf is installed in the frame.
Glass door hardware installation completed
The process of installing glass elements in furniture is quite complicated
Maximum caution must be taken, as it is very easy to damage or even break the glass. It is best to first familiarize yourself with the video manual, which covers the process of installing hinges, handles and other accessories in as much detail as possible.
Stickers
Fastenings that are held in place by double-sided tape are considered one of the most reliable. The weight the shelf can support will depend on the quality of the adhesive material.
There is no point in hoping that office double-sided tape will work for a long time and reliably. Therefore, to attach shelves to glass, it is better to choose those products that are used in construction.
These are the most common methods of attaching a shelf to a glass surface, and are quite reliable.
Fittings for glass are different from those used for other materials; The reason is the glass itself, which not only has an exceptionally smooth surface, but is also fragile and transparent.
Therefore, if you need to clamp it with screws, drill or stick something on it, you need to act very carefully. After all, one chip can damage the entire glass surface. It is extremely undesirable to expose glass to damage and impact, which is why they use fittings that can protect the surface from impact and point loads. In the 20s of the last century, constructivist designers tried to use glass in home interiors, since then glass furniture has gained the right to life. However, there are very serious obstacles to its widespread dissemination. The main one is the impossibility of cutting out a product from a single glass monolith with an ax or chisel. Therefore, it is used mainly in the form of sheet elements, which are connected using special fastening devices.
DIY glass shelves
When horizontality is achieved, tighten the self-tapping screw. Once again, use a level to check the accuracy of the fastening.
5.
Now that the base is installed, you need to install the console itself. The console is inserted into the grooves under the base and secured with a screw. Using the same fastening screw, the shelf itself is fixed in the console, i.e. it just clamps down like a beak.
6.
In principle, after this moment the fastening is considered installed. But in order to secure a shelf in it, especially a glass one, you need to install the plastic covers supplied in the kit. Wooden or metal shelves can be fixed without them, but they must be installed under glass ones.
7.
Now all that remains is to secure the shelf itself. The thickness of the shelves may vary. This mount allows you to mount shelves with a thickness from 2mm to 20mm. But "pelicans" can vary in size. Using the console, the drawing of which was shown at the beginning of the article, you can mount shelves up to 40mm thick; this is considered a large “pelican”, while the one shown in the article is medium in size. In most cases, 3 sizes are used: small, medium and large.
So, when the consoles are secured, all that remains is to insert the shelf itself and tighten the lower, movable part of the console with a screw. You can verify the accuracy of the installation by placing a level on the shelf.
Questions and discussion on the forum:
Loops
In sliding wardrobes, it is sometimes undesirable to reduce the depth of the cabinet due to the use of large-format sliding systems. Quite a few designs of rotary (hinge) hinges have been developed for such frameless glass doors. Regardless of the design of the hinge mechanism itself, they primarily differ in the methods of attaching glass to them. There are hinges in which the glass is inserted into the gap between two plates of the body and secured with screws through an elastic gasket, and hinges that are secured in a hole or shaped groove selected in the glass. In the second case, the hinge body is secured on the front side with a nut covered with a decorative cover. This method almost completely eliminates the displacement and loss of glass during operation, but forces you to purchase quite expensive equipment for drilling glass or processing grooves in it. In addition, any holes, and especially grooves, are stress concentrators and weaken the glass. Tempered glass cannot be processed, and only a few can afford to temper it after all other influences in a furniture factory.
How to attach glass to a wall - two methods for solving the problem
Shelf holders
There are two so-called. fasteners for glass to the wall, with which you can install glass shelves - these are holders for the latter and a special aluminum profile. Both methods of fastening fulfill their assigned tasks. There is only one difference between them - a different method of installing glass.
In addition, the holders are universal, thanks to them you can attach glass of any thickness to the wall, while an aluminum profile, on the contrary, fits a certain size. However, the latest mount for a glass shelf has one significant advantage - you can insert LEDs into the aluminum profile and illuminate the glass inside. You can read more about this in the article on our website “Illuminated Glass Shelves”.
To understand which aluminum profiles are suitable for attaching glass shelves, the article “Aluminum profile - description of its various types and designs” will help you. Also familiarize yourself with the various types and configuration options of aluminum profiles. The world's leading manufacturer of aluminum profiles, including such specific ones as for mounting glass shelves with suspension - the Scandinavian company Sapa Building System. Read more about it here: https://oknanagoda.com/steklo/konstrukcii-alyum-profil/sapa-obsv.html
Profile for glass shelf
The fastener for a glass shelf is quite easy to install - it consists of two elements: a base attached to the wall, and an upper decorative support. Separating them is quite simple - the base can be easily pulled out of the upper support.
Then, when the holder is disassembled, use a level to mark the shelf mounting surface on the wall. The base of the shelf holder is marked relative to this surface using dowels, which are included with the mount.
Illuminated glass shelves
Please note that only two holders are needed to attach one glass shelf. They are used to fasten the glass to the wall end-to-end, on both sides of the shelf with a gap of at least 5 cm from the edge. However, depending on the length of the glass shelf and the planned load on it, the number of holders may be greater.
Despite the variety of fastening methods, the main requirement is reliability and perfection.
Furniture corner
This type of fastening is used to connect two parts. This is a rather fragile connection method, so it is used for fastening parts that should not be subject to heavy loads. Usually these are decorative elements, for example, the base of a cabinet or mezzanine shelves.
Figure 21. The furniture corner is used for fastening decorative furniture elements (plinths) and installing shelves. Made of plastic. Has a cover to hide the clasps. Self-tapping screws 16 mm long are used as fasteners.
Instead of metal corners, plastic ones are often used. They are no less durable, but have a more attractive appearance and the possibility of hidden fasteners. The corner of the cabinet is attached to two mating parts with two self-tapping screws. The lid is then suspended, thereby hiding the fasteners.
Figure 22. The corner of the cabinet is used for fastening lightly loaded furniture elements, as well as for installing decorative elements such as plinths, inserts, etc.
The furniture fasteners discussed in the article are the most common and frequently used, as they are the most versatile and easy-to-use types of fasteners. In the vast majority of cases, the types of furniture fastenings described are sufficient for assembling any furniture.
Assembly and installation of a suspended structure
Scheme of a hanging shelf made of slats.
We assemble the holder frame from the prepared bars. Using self-tapping screws, we attach side bars (250 mm) to the long beam at the ends, and shortened bars (170 mm) in a row between them. All frame elements must lie in the same plane. We will attach the front strip in place to make it easier to attach the holder to the wall.
Using a drill, drill holes for the screws in the rear frame bar. Using them, we make level marks on the wall where we plan to hang the shelf.
Then we drill holes in the wall according to the marks and insert dowels into them. The assembled part of the frame is attached to the wall using a screwdriver. The front block is attached to it with self-tapping screws, completing the fastening of the shelf holder.
The procedure for installing an anchor in a plasterboard wall for mounting a wall shelf.
The frame of the shelf itself is made of 3 bars (without the back) with the same cross-section as that of the mounting frame. We attach the prepared plywood strips to the frame with a stapler or self-tapping screws, depending on the thickness of the sheathing. The surface of the frame can be coated with wood glue. We cover the end parts of the shelf (except for the back) with strips of plywood or decorative trim.
The width of the U-shaped frame must ensure that the hollow structure can be placed on the holder.
The joints of the box elements and above the heads of the screws are puttied, the surface is cleaned with fine-grained sandpaper, primed and painted. After drying, the shelf box is placed on the holder frame. At the wall, the plywood is screwed with self-tapping screws to the back plank. Using a similar assembly principle, you can make shelves with side walls and a top.
Shelf supports
To install inset glass shelves, it is not advisable to use conventional shelf holders. As a rule, the body of the product is skewed, so it is simply impossible to place all the shelf holders perfectly in one plane. As a result, the glass experiences torsional stresses under load, which can eventually lead to its fracture and the fall of objects placed on it. Therefore, for installing glass inset shelves, special shelf holders have been developed, the working surface of which is equipped with an elastic suction cup that keeps them from moving in the horizontal direction. Such inserts also dampen vibrations generated, for example, from the movement of vehicles passing near the house. This prevents dishes from clanking on the shelf and prevents them from moving to the sides. As a last resort, conventional shelf holders in the form of a cylinder with a flange in the middle should be fitted with pieces of plastic tube supplied by the manufacturer along with them.
For attaching cantilever glass shelves to the wall, furniture fittings designers around the world have developed many holders that differ not so much in essence as in appearance, which have received the stable nickname “pelicans” in the jargon of furniture makers - after the name given to them by one of the first manufacturers. The holder itself is fixed to the wall of the room or to the wall of a piece of cabinet furniture with screws, and the glass is placed in its mouth, the width of which is adjusted with a screw. It is important that when installing glass, the consumer does not forget about the elastic gasket.
Attaching a glass shelf to the wall
Installation diagram for glass shelves
To install a glass wall shelf, you will need:
- Electric drill,
- Building level,
- Brackets,
- Pencil,
- Roulette,
- Insulation tape,
- Wall-glass connector
- Fastening elements (screws, self-tapping screws and screws).
After you have prepared all the necessary fasteners for the glass shelves, make sure that the wall can hold all the fasteners and the glass shelf itself with various items. It is not advisable to attach a shelf to a plasterboard partition.
You may find information on how to make other glass products yourself useful. The article “Installation of glass partitions - it just seems difficult” tells how to assemble a screen from a translucent material with your own hands. One of the most difficult products to make with your own hands is a skylight. But you can also cope with the task of assembling it by reading the tips on our website. Read about how to install a roof window here: https://oknanagoda.com/okna/mansardnie/mansard-selfmade.html
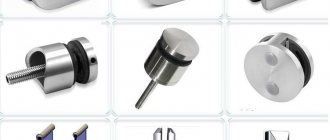
Point elements for fixing glass to the wall
Today, the most popular point mounting is “glass-wall”. Read more about this in the article on our website “Fittings for glass shelves”.
Let's proceed to the direct step-by-step installation of glass shelves to the wall:
1. Determine the place on the wall where the glass shelf will hang. To do this: carefully place the product to the planned location and use a pencil to mark the locations for fasteners and contours.
Important! If you want to attach a glass shelf to decorative stands, first mark out the locations for them. Please note that the racks must be without distortion, t
e. strictly in a vertical position.
Marking
2. Using an electric drill, drill holes for fasteners (screws, self-tapping screws or screws) in the marked places. Determine the depth of these holes based on the length of the fasteners. The greater the load on the glass shelf, the longer the fastening element should be. Typically the length of the screws is from 55 to 65 mm.
3. To make precise holes, wrap the drill bit in a certain place on the electric drill using insulating tape.
4. Insert suitable sized wooden plugs or dowels into the resulting holes.
Important! If you made a glass shelf yourself, then select special brackets that are designed for installing glass shelves with the appropriate dimensions.
5. Separate the mount or brackets from the shelf.
6. Install the brackets one by one using self-tapping screws to the places prepared in advance on the wall.
Important! Make sure that the surfaces for future glass are parallel to the floor plane and there are no distortions. Otherwise, under heavy loads, excess stress may appear on the glass plane, which will cause chips. Installing glass
Glass installation
In addition, carefully inspect the glass from which the shelves are made. The corners of the glass should be polished and rounded. And the glass itself should have a glossy surface without any cracks, scratches or chips.
7. If there are no defects on the glass, then feel free to attach it in the intended place.
Important! If the shelf has several levels, then first you need to make a fastening for the glass shelf of the upper glass, and then the lower one.
8. The shelf is attached to the wall. Place on it everything that you consider necessary.
What do you need for work?
Before you begin, make sure you have the necessary items for the job. Below is a list of what you will need to attach the glass to the surface yourself:
- roulette;
- pencil;
- bracket;
- electric drill;
- insulating tape;
- special glass-to-wall connector;
- fasteners such as screws, screws and self-tapping screws.
Glass wall decor
Now that you have everything you need to get started, turn your attention to the wall itself. You need to have confidence that it is able to hold all the elements intended for fastening, the shelf itself and what will stand on it. We do not recommend attaching the shelf to a plasterboard partition.
How to make bathroom shelves with your own hands - manufacturing instructions
You can make bathroom shelves with your own hands in different ways, and all of them are not at all complicated. Here you can go in two ways - in one case it is quite easy to build glass wall shelves, and in the other case built-in ones from plasterboard or glass. It’s up to you to choose – we, in turn, will tell you how to make them better and faster.
Let's start with glass shelves; this is the easiest option to implement with your own hands. To do this, you will need to decide on the dimensions of the shelves (length and width) and go to a glass workshop where you can order the necessary pieces of glass. Now all that remains is to securely fasten them on the wall or, if we are talking about built-in shelves, then in a niche.
How to make a glass shelf with your own hands
To attach glass shelves, as a rule, special decorative holders are used, which are attached to the wall at the same horizontal level. Glass cut out in the workshop is inserted into these holders
When approaching this issue, you need to understand the importance of the thickness of the glass used for the shelves - the best option would be ordinary glass 4mm thick. To protect yourself and your loved ones from injury from shards of broken glass, it is better to cover it with film (you can also do this step yourself)
In addition, using the same film you can decorate a shelf.
In this video you can see how to make a corner shelf for a bathroom with your own hands.
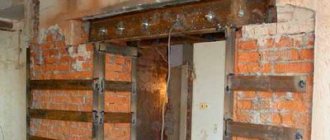
Another option with which you can make a bathroom shelf with your own hands is plasterboard - a fairly cheap and affordable method. Frames for shelves are mounted in an existing or self-made niche from ud and cd profiles, which are subsequently covered with plasterboard and covered with tiles. As a result, you get a niche with shelves that fits harmoniously into the interior. If you are not very comfortable with drywall, then you can place glass shelves in a niche lined with tiles - it will be even more interesting.
How to make plasterboard shelves for a bathroom photo
There are also other methods and materials that make it quite easy to make shelves for the bathroom. The options described above are simply the most optimal and affordable for almost every person. As they say, there is no need to reinvent the wheel and be clever with what has already been mastered by other people for a long time - almost always the simplest solution is at the same time the correct one.
Features of glass shelves for the bathroom
Glass is a complex but fairly common material used to make parts designed for human convenience. As for glass shelves for the bathroom, special plexiglass is used here, unbreakable and pre-heated to eliminate static stress. In the last few years, varieties of material have been introduced to the market that protect people from cuts. They can break if hit hard, but cannot cut a person. Such glass is most often used to make shelves in the bathroom.
When purchasing for a bathroom, it is recommended to give preference to frosted plexiglass, which will not lose its appearance in a short time, unlike simple transparent glass. On transparent products, drops of water are the first to be seen, so to maintain cleanliness, the housewife needs to constantly wipe them or wash the glass daily using cleaning products.
Accessories
Interesting solutions in the development of components for furniture using glass. For example, there are mechanisms for extending tables, in which the tabletop is made up of individual glass plates, which are moved inside the table like blinds. The cabinets use rather complex mechanisms that specifically provide for the presence of narrow glass plates in the curtain doors that open in the vertical direction.
Furniture made entirely of glass is unlikely to ever be included in the list of essential goods - at least because of the established opinion about its fragility. In addition, cabinet furniture made of transparent glass, intended primarily for use as storage, like a display case, does not protect its contents from prying eyes, which makes it necessary to maintain ideal order inside and limit its contents, which is not always convenient. Therefore, preference will always be given to combined furniture, in which glass plays a mainly decorative role. Therefore, to use this amazing transparent material, more and more special fittings will be required.