For wooden windows, slopes can be made from different materials, but the most organic looking are slopes that have the same texture and color as the frame and window sill. Solid natural wood is expensive. Ordering veneered or laminated MDF panels to size is troublesome, although cheaper. But installing a laminate slope with your own hands is quite within the power of a home craftsman. Especially when you consider that you can choose the most inexpensive type based on the installation method (adhesive) and resistance class. A wide selection of colors, shades and textures ensures an almost 100% match to the tone of the window and window sill.
In principle, the scheme for attaching laminate in a window opening is similar to a plasterboard slope. Only without puttying, sanding and painting. The material acts as a finishing decorative layer. You can even use a slope made of gypsum fiber board as a load-bearing rough base to which the laminate is glued. But this is only if the distance from the window hinges on the side or to the swing part of the window on top is sufficient to accommodate a layer of leveling and fixing adhesive solution for drywall, a sheet of gypsum fiber board and a laminate panel in thickness, plus a small technological gap for the free functioning of the swing sash . But this condition is not always met. Therefore, the panel is often attached to a layer of leveling plaster or putty.
But even when choosing a leveling composition, there are nuances. Gypsum plaster is suitable for a brick wall. It is easy to apply, has good adhesion (but a primer would still be a good idea) and dries quickly.
For a concrete wall, the use of a gypsum-based leveling mortar is not recommended (it is not “friendly” with cement and may begin to peel off over time). But on the other hand, a window opening in a concrete wall is much “neater” than in a brick one, and has relatively the same geometry in terms of bevel and angles. Therefore, they often make do with puttying of chips and cracks that may arise during the installation of the window itself.
For installation in apartments, in 90% of cases the first two options are used. Therefore, we will consider the technology for installing window sills specifically for them.
Do not think that each type of window sill requires an individual approach. There are some nuances, but there are also general provisions and recommendations that must be strictly followed.
To apply lamination on PVC surfaces, 2 adhesive structures are usually used.
- Glue brand “Augsklei 60” based on polyurethane. Used together with the hardener “Augsklei Hardener 60” using the mixing method in a ratio of 1:25. Hot melt adhesive is an adhesive system and in its composition has a dry residue size of 100%.
As a result of cooling, the glue quickly sets and forms a durable polymer mesh with moisture-resistant properties.
The technology for laminating window sills using polyurethane glue contains certain deadlines:
- holding time until the material melts – 45 hours;
- the time required for ripening in winter conditions is 70 hours;
- readiness before bending the window sill profile – 13 days;
- the period required for final hardening of the product is 60 days.
Rice. 3. Glue system for lamination
The product has excellent adhesion, a neutral attitude towards ultraviolet rays, and also tolerates plus and minus temperatures well.
Due to its characteristics, you can glue both the inner surface of the window sill and the outer surface. Solvent-free adhesives have become increasingly popular in recent years and are occupying the market at an accelerated pace.
2. Polyester based adhesive. This boostilate has been a leader in this technology for about 25 years. Gluing the film onto a PVC surface is successfully done using liquefied adhesive based on polyester.
2-7% of hardener and binders are added to it. This mixture is stirred vigorously, while preventing the entry of foreign particles. Then wait for the time specified by the manufacturer in the recipe.
The container with glue must be stored closed, and if boostilate remains, it must be destroyed in accordance with environmental regulations. Short-term storage of up to a day in the refrigerator at a temperature of 4 – 7˚С is allowed.
Rice. 4. Adhesive lamination system for window sills
Advantages and disadvantages of adhesive systems
Each composition has pros and cons, so their properties need to be considered separately.
Two-component polyurethane-based adhesive
This boostilate has certain advantages:
- Versatility. This adhesive composition can connect up to 90% of the components of a solid material;
- Strength. Connected parts can be processed as one unit;
- Lack of connecting seam after gluing;
- Budget cost. The price of the glue is quite reasonable.
The disadvantages include its one-time use. After mixing the components, the glue retains its qualities for a short time from one to six hours. And also when working with this glue you need to follow safety precautions, wear gloves and use a respirator.
Rice. 5. Polyurethane glue
Polyester based adhesive
Resin of this content is formed during the distillation of alcoholic liquids for special purposes. The source of glue is polyester. For faster hardening, different brands of solvents are used.
Depending on the area of application of the material, it has different structures and qualities. The main advantage of this glue is its ability to transmit ultraviolet rays (up to 90%).
Compounds of this kind form high-strength materials and are used in the production of window sills, shower cabins, and various partitions.
Hardening of polyester resin does not require special temperature conditions; the cost of this adhesive composition is less than its analogues, for example, epoxy resin.
Rice. 6. Polyester glue
What you need
- self-adhesive film;
- long metal ruler;
- sandpaper;
- mounting knife;
- putty for leveling the surface;
- hair dryer;
- solvent;
- primer;
- foam sponge;
- rags or napkins.
In order to properly stick the film on a wooden window sill, it is necessary to level the surface. To do this you should:
For a plastic window sill such preparation is not required; it is enough to degrease it. Now you can move on to cutting the laminate. To do this, you need to use a flat table of sufficient area, placing a sheet of plywood or plastic. If there is no such table, you can sit on the floor. They do it like this:
The next stage is sticking the film. All possible attention and accuracy will be required here. You should proceed like this:
Now comes the most crucial moment - gluing the ends and corners.
If during work the film sticks crookedly or becomes wrinkled, it’s okay. The main thing is not to smooth it in this state. You need to pull the free end evenly, without jerking, so that the film is perpendicular to the surface of the window sill, and slowly peel off the unsuccessfully adhered area. Immediately you need to apply the film in the correct direction and smooth it with a napkin, pressing it firmly.
Laminate slope for wooden windows
For wooden windows, slopes can be made from different materials, but the most organic looking are slopes that have the same texture and color as the frame and window sill. Solid natural wood is expensive. Ordering veneered or laminated MDF panels to size is troublesome, although cheaper. But installing a laminate slope with your own hands is quite within the power of a home craftsman. Especially when you consider that you can choose the most inexpensive type based on the installation method (adhesive) and resistance class. A wide selection of colors, shades and textures ensures an almost 100% match to the tone of the window and window sill.
Key holder and hanger
Leftover laminate flooring is used to make interesting household items. For example, in the hallway, a key holder that is cut from just one piece of material looks great. The key holder is attached to the wall using double-sided tape or fastenings in hooks. To prevent the ends of the key holder from becoming unusable, they are coated with transparent silicone sealant.
For a hall or corridor, a laminate hanger is suitable, especially if an ordinary wardrobe does not fit here. To make it, cut out a piece of the required size, sand the edges with fine-grain sandpaper, and secure the top through the holes of the hooks. The lower part is glued to liquid nails, but this type of hanger is only suitable for light clothes. To place any, even heavy things on the hanger, you should attach it with self-tapping screws directly to the wall.
Features of laminate slopes
For a concrete wall, the use of a gypsum-based leveling mortar is not recommended (it is not “friendly” with cement and may begin to peel off over time). But on the other hand, a window opening in a concrete wall is much “neater” than in a brick one, and has relatively the same geometry in terms of bevel and angles. Therefore, they often make do with puttying of chips and cracks that may arise during the installation of the window itself.
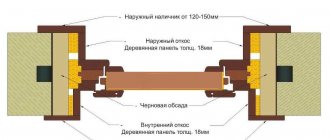
It is necessary to organize a line of support for the laminate into the window frame. You can, of course, secure the inner edge with dowels and screws, but covering them with a plinth, as they do on the floor, will not work. Therefore, a groove is cut out in the installation seam of the window on three sides: on the sides and on the top. For a plastic window, this would contradict the principle of “warm installation” (there must be a vapor-proof membrane), but for wooden windows, with their ability to self-regulate humidity levels, this is acceptable. The width of the groove should be slightly larger than the thickness of the laminate. The outer edge of the frame along the groove is cleaned of dried foam residues.
Then follow the preparatory work: cleaning the opening, priming, leveling the surface with mortar or gypsum plasterboard (to the level of the edge of the groove) and re-priming.
After the glue has dried, cut the laminate for the sidewalls and install each side in turn using spacers.
In order to cover the side end, you can order a narrow trim or corner to match the material.
Dimensions
Laminate boards are not always the same size; the length is most often 126 or 138 centimeters. For obvious reasons, elongated blocks (up to 1.84 meters long) can be more difficult to use; their precise fitting and installation causes difficulties. The fewer cuts are made on the material, the better its original appearance is preserved.
Laminate 9-16 cm wide reproduces the look of parquet, most often oak. Such boards are considered narrow (according to the generally accepted classification). They mainly use panels from 18.5 to 19.5 centimeters, which imitate ordinary wooden boards; this type of coating is the easiest to lay. Their low cost also attracts consumers.
A thicker panel, all other things being equal, will be more stable and durable. Even with a strong impact, it almost never deforms, and the thicker the laminate layer, the lower its thermal conductivity.
When producing thick panels (from 1.2 centimeters), minimum tolerances are used, so deviations in its value will be small.
Laminate of category 32 is available from 0.7 to 2.2 centimeters thick, and it lasts quite a long time. Although no one will walk on the door, it makes sense to choose a coating of a higher group - 33rd, 34th, since it has better sound absorption and will retain more heat in the house. Do not be afraid of overpaying, because you will need very little material.
DIY laminate window sills
For wooden windows, slopes can be made from different materials, but the most organic looking are slopes that have the same texture and color as the frame and window sill. Solid natural wood is expensive. Ordering veneered or laminated MDF panels to size is troublesome, although cheaper. But installing a laminate slope with your own hands is quite within the power of a home craftsman. Especially when you consider that you can choose the most inexpensive type based on the installation method (adhesive) and resistance class. A wide selection of colors, shades and textures ensures an almost 100% match to the tone of the window and window sill.
Main types of materials
PVC slopes on plastic windows
The finishing of doors, windows, loggias and balconies is carried out using different panel-type materials. The main types include:
- MDF panels.
- Plastic wall panels.
- Sandwich panels.
MDF is not often used for windows; as a rule, it is used to cover a door and is used as cladding. MDF panels have their own characteristics:
- Slopes require meticulous work. Moisture can get in through cracks and crevices, which means everything needs to be carefully sealed.
- The size of the panels is factory-made, due to which it will not be possible to use MDF everywhere. If the width of the slope is large, then MDF will do.
- Small selection of colors and textures.
- Plastic windows will not always be combined with MDF.
It is better to use the material by carefully considering the interior of the house. Goes well with wood or wood-look materials.
Advantages of PVC slopes
Plastic panels for slopes are the most popular choice of people. They have many advantages:
- The material is cheap compared to other types.
- Installation is simple, even without experience.
- The choice of colors is huge, so you can match any design inside or to match the facade of the house outside.
There are also difficulties during work:
- If the slope is more than 25 centimeters, then additional clamps are installed, otherwise the cladding will “walk”.
- It is recommended to use insulation, because insulation will not allow cold to pass into the house.
- Plastic panels are easy to damage.
Despite the disadvantages, plastic panels for slopes are an excellent option for window design. Cutting, installation and insulation are very simple, the appearance is decent. Slopes made of sandwich panels are a type of plastic material, but the characteristics of such raw materials are better, of course, this differs in the price of the product.
PVC sandwich panels for slopes
Sandwich panels for window slopes have their own characteristics:
- The product is made from two pieces of plastic, and there is already insulation between them. Due to this, there is no need to insulate the slopes.
- Installation work does not require large financial costs, the main thing is to calculate everything correctly and install the slopes carefully.
There is also a disadvantage of sandwich panels for slopes - if the window sealing is poor, moisture will begin to penetrate, the material will deteriorate and collapse, in other words, it will peel. You can also find other panel elements on sale:
- Natural wood is highly expensive and difficult to install.
- Composite panels based on gypsum, lined with PVC.
- Metal panels are used more often outside and require certain knowledge when installing slopes.
Although the materials are different, their installation instructions are almost always the same.
Features of laminate slopes
For a concrete wall, the use of a gypsum-based leveling mortar is not recommended (it is not “friendly” with cement and may begin to peel off over time). But on the other hand, a window opening in a concrete wall is much “neater” than in a brick one, and has relatively the same geometry in terms of bevel and angles. Therefore, they often make do with puttying of chips and cracks that may arise during the installation of the window itself.
It is necessary to organize a line of support for the laminate into the window frame. You can, of course, secure the inner edge with dowels and screws, but covering them with a plinth, as they do on the floor, will not work. Therefore, a groove is cut out in the installation seam of the window on three sides: on the sides and on the top. For a plastic window, this would contradict the principle of “warm installation” (there must be a vapor-proof membrane), but for wooden windows, with their ability to self-regulate humidity levels, this is acceptable. The width of the groove should be slightly larger than the thickness of the laminate. The outer edge of the frame along the groove is cleaned of dried foam residues.
Then follow the preparatory work: cleaning the opening, priming, leveling the surface with mortar or gypsum plasterboard (to the level of the edge of the groove) and re-priming.
After the glue has dried, cut the laminate for the sidewalls and install each side in turn using spacers.
In order to cover the side end, you can order a narrow trim or corner to match the material.
Frame mount
Slopes can be installed in several ways. If the home owner wants to do without plaster, you can veneer the front door using frame technology.
Preparation for installation of a wooden frame is carried out in strict sequence. Any failure to comply with the technology will lead to loss of originality and appearance of the front door. The preparatory stage includes the installation of a wooden frame. It must be performed in the following sequence:
- the door contour is freed from excess foam;
- vertical installation of wooden blocks is carried out;
- Dowels and self-tapping screws are used for fixation;
- During work, you need to ensure that the vertical is maintained and the general plane is maintained. The inspection is carried out at the building level;
- To give rigidity to the entire structure, horizontal cross members are installed.
After assembling the frame, the laminate is installed. Fastening can be done using several methods.
Conventional self-tapping screws are screwed directly into the board. Their caps are closed with special furniture plugs of a suitable color.
Decorative plugs for self-tapping screws
You can use hidden clamps. To maintain a tight connection, the plates are trimmed slightly. Of course, such work will require more time, but no traces of fastening will be visible on the installed slopes.
DIY window sill made of laminate
To turn a balcony into a truly cozy, functional room, you need to pay attention to every detail. This also applies to the window sill, because it can perform many functions. For example, serve as a shelf for books, a stand for flowers, in some cases even a table. Therefore, the window sill must be reliable and withstand the load. In addition, it protects the room from heat loss. In the article we will tell you what materials they are usually made from, how to install a window sill on a balcony with your own hands, and what features need to be taken into account.
Balcony window sills are made of wood, plastic, chipboard or natural stone. Which material to choose depends only on your preferences and financial capabilities.
Tree
They are well-compressed wood shavings covered with a laminate. They are strong and rigid, wear-resistant and easy to maintain, but you need to ensure the integrity of the laminating layer. There is a choice of color and pattern, which can also imitate natural wood, granite, marble. A significant advantage is their lower price compared to natural materials.
Chipboard window sill
A window sill on a loggia or balcony made of this material looks rich and elegant. Marble, granite, onyx, labradorite and others can be used. The most durable stone is granite, but you should know that it tends to accumulate radiation, so when purchasing such a product you need to ask the seller to show a certificate of its safety. Natural stone window sills are resistant to abrasive cleaning agents and colored liquids, such as tea or coffee.
Window sill made of natural stone
Its properties are in no way inferior to natural, and in some cases even surpasses it. Dyes are used in production, so you can choose any color. Balcony window sills made of artificial stone are very strong, durable, not afraid of impacts, and are also cheaper than their natural counterparts. Disadvantage: not resistant to abrasives. But scratches can be eliminated using polishes.
Window sill made of artificial stone
Whatever material you choose, the installation technology is almost the same. However, wood products and chipboards additionally require good waterproofing. Usually, where the window sill board comes into contact with the wall, it is insulated with a polypropylene sheet gasket.
The length of the window sill should be equal to the full width of the balcony. The width can be any depending on your needs, usually 5-8 centimeters wider than the wall.
You can install the window sill on the balcony using polyurethane foam, on brackets or using retaining brackets. But even if you secure the window sill with foam, the use of brackets is still necessary, otherwise the window sill may simply fall off if you lean on it. Their number depends on the length of the window sill board. They are attached to the stand profile using self-tapping screws with a press washer at a distance of 20 centimeters from each other.
Photo background
A photo backdrop is a background surface for creating beautiful photographs. This product is ideal for people who are interested in the art of photography. The photophone will also be useful for needlewomen who prefer to take photographs and post the results of their work on social networks, and for culinary bloggers.
Nowadays, aged wood is a very popular material for photo backdrops, so you can easily find a suitable laminate. Also suitable for making a photophone is a material with colors that imitate leather, marble, and other types of stone. Textured laminate looks best. Smooth lamellas look less impressive, but are still used in design.
To make crafts, they look for pieces of laminate of a suitable size of one type or combine several textures together. The dimensions of the photophone depend on the needs of the user. To photograph small works (jewelry), items with a side of 15–20 cm are made. To display medium-sized objects (toys, hats, dishes), it is better to make a larger photo backdrop (50 x 50 cm or 60 x 60 cm). Large items are photographed using photophones up to 1 x 1 m.
Photophone made of laminated parquet
Making a photo backdrop is quite simple. You just need to connect the lamellas together, leave them in their original form or scratch them a little (aging them) and treat them with acrylic paint. To enhance the effect of aging, it is worth rubbing the half-dried paint with a sponge or cloth in certain places. Since the edge of the stand still does not fall into the frame, it is not necessary to process it, and defects in the middle can be hidden by the exposed objects.
Sequencing
- remove peeling paint, burrs, and other protrusions with sandpaper;
- fill cracks and depressions with putty;
- sand with fine-grained sandpaper;
- degrease and prime.
- measure the window sill, apply its outline to the back surface of the film, adding 20 mm on each side;
- add a strip covering the front end and extending to the bottom of the window sill at least 5cm (or to the wall if it is closer)
- construct a development of the side surfaces so that they are adjacent to the main piece;
- if the corners of the window sill are rounded or have a curly shape, you need to leave a rectangular allowance for them; you will have to adjust it according to the location;
- if the pattern is regular (for example, an ornament or tile imitation), then you will have to cut it from the front side in order to align the edges of the pattern element with the edges of the window sill.
- from the edge adjacent to the window frame, separate the film from the protective paper layer by 4-5 cm;
- straighten the sheet, press the film to the surface of the window sill;
- smooth the glued strip from the middle to the edges;
- separate the next 5 cm strip from the paper, press and smooth;
- repeat until the end of the window sill;
- If an air bubble appears, pierce it in the center with a needle and smooth it out.
- cut the film at an angle of 45°;
- trim the curly parts in place with straight nail scissors;
- stick the film;
- heat it with a hairdryer and finally press it so that the film follows all the bends of the end and corners and fits tightly to them.
If you act carefully and carefully when cutting and gluing, the updated window sill will serve the owner for many years.
To apply lamination on PVC surfaces, 2 adhesive structures are usually used.
As a result of cooling, the glue quickly sets and forms a durable polymer mesh with moisture-resistant properties.
- holding time until the material melts – 45 hours;
- the time required for ripening in winter conditions is 70 hours;
- readiness before bending the window sill profile – 13 days;
- the period required for final hardening of the product is 60 days.
The product has excellent adhesion, a neutral attitude towards ultraviolet rays, and also tolerates plus and minus temperatures well.
2. Polyester based adhesive. This boostilate has been a leader in this technology for about 25 years. Gluing the film onto a PVC surface is successfully done using liquefied adhesive based on polyester.
The container with glue must be stored closed, and if boostilate remains, it must be destroyed in accordance with environmental regulations. Short-term storage of up to a day in the refrigerator at a temperature of 4 – 7˚С is allowed.
Advantages and disadvantages of adhesive systems
Two-component polyurethane-based adhesive
- Versatility. This adhesive composition can connect up to 90% of the components of a solid material;
- Strength. Connected parts can be processed as one unit;
- Lack of connecting seam after gluing;
- Budget cost. The price of the glue is quite reasonable.
Rice. 5. Polyurethane glue
Resin of this content is formed during the distillation of alcoholic liquids for special purposes. The source of glue is polyester. For faster hardening, different brands of solvents are used.
Compounds of this kind form high-strength materials and are used in the production of window sills, shower cabins, and various partitions.
Rice. 6. Polyester glue
For wooden windows, slopes can be made from different materials, but the most organic looking are slopes that have the same texture and color as the frame and window sill. Solid natural wood is expensive. Ordering veneered or laminated MDF panels to size is troublesome, although cheaper. But installing a laminate slope with your own hands is quite within the power of a home craftsman. Especially when you consider that you can choose the most inexpensive type based on the installation method (adhesive) and resistance class. A wide selection of colors, shades and textures ensures an almost 100% match to the tone of the window and window sill.
In principle, the scheme for attaching laminate in a window opening is similar to a plasterboard slope. Only without puttying, sanding and painting. The material acts as a finishing decorative layer. You can even use a slope made of gypsum fiber board as a load-bearing rough base to which the laminate is glued. But this is only if the distance from the window hinges on the side or to the swing part of the window on top is sufficient to accommodate a layer of leveling and fixing adhesive solution for drywall, a sheet of gypsum fiber board and a laminate panel in thickness, plus a small technological gap for the free functioning of the swing sash . But this condition is not always met. Therefore, the panel is often attached to a layer of leveling plaster or putty.
For a concrete wall, the use of a gypsum-based leveling mortar is not recommended (it is not “friendly” with cement and may begin to peel off over time). But on the other hand, a window opening in a concrete wall is much “neater” than in a brick one, and has relatively the same geometry in terms of bevel and angles. Therefore, they often make do with puttying of chips and cracks that may arise during the installation of the window itself.
The laminated window sill cover can be installed by you yourself. This process will not take much time, will not require you to disassemble anything or use a tool that you usually do not have at home. This approach will help you quickly put your window in order, spending the minimum possible amount on it.
Installation of window sill trim
Results
As is clear from the instructions, it is very easy to install slopes on a laminate front door yourself, after watching a video with step-by-step installation.
The use of laminate allows you to implement original solutions for the design of the front door. Slopes finished with laminate panels look aesthetically pleasing and retain their appearance for a long time. You can clean them with a damp soft cloth and soapy water, which allows you to maintain the good condition of the material for many years. Laminate, as a material, has high strength and wear resistance, which allows manufacturers to claim a service life of up to 20 years. The main thing is to study the features of the finishing material in advance. After all, laminate does not like moisture, which makes it unsuitable for installation in the bathroom. However, for the front door and interior openings this is the most convenient and suitable finish.
Instead of output
As you can see, making window slopes from laminate is not at all difficult, and they look very presentable. Moreover, this finishing method can also be applied to plastic windows covered with decorative film that imitates wood. The richness of the color range of the material makes it possible to show your imagination in a combination of shades and solutions. Don't be afraid to experiment.
For wooden windows, slopes can be made from different materials, but the most organic looking are slopes that have the same texture and color as the frame and window sill. Solid natural wood is expensive. Ordering veneered or laminated MDF panels to size is troublesome, although cheaper. But installing a laminate slope with your own hands is quite within the power of a home craftsman. Especially when you consider that you can choose the most inexpensive type based on the installation method (adhesive) and resistance class. A wide selection of colors, shades and textures ensures an almost 100% match to the tone of the window and window sill.
Work begins with measuring the length and width of the slopes and drawing up a plan for laying the laminate. The panels can be directed lengthwise or crosswise. Depending on this, the amount of materials needed is calculated.
To cover the door slope you will need:
At the preparatory stage, the slopes are cleared of loose plaster, leveled, if necessary, sanded and dust removed. A few hours before the start of work, the surface is primed. Laying begins from the bottom of the slope.
- The lamellas are cut and cut depending on the selected length. If laying is done horizontally, the locking spike is cut off from the narrow edge of the lamellas. All actions must be as careful as possible so that the decorative coating is not damaged.
- Liquid nails are applied to the lamella.
- Place the board against the wall and press it to increase adhesion to the surface.
Preparation
Next you need to go through the preparatory stage of construction. Preliminary plastering of slopes requires the formation of a recess for the panel. Markings on the walls are necessary to avoid surface distortion.
To do this, cut the corner at the same level as the bottom of the block. The distance between the bottom of the structure and the red line of the device is measured with a laser. Then the dimensions are transferred to the outer corner.
Afterwards, remove dust and debris from the surface with a construction vacuum cleaner.
It is impossible to make a high-quality concrete window sill with your own hands without the correct first stage. Processing of slopes, the front side of the wall, as well as marking are required.
Materials
The construction mixture contains several components.
First, take cement grade 400 or 500. The solution requires 2 parts. Use 3 parts of purified sand for preparation. A polymer-based plasticizer is added.
The mass of the additive should be less than 5% of the mass of the mixture, but more than 5 g per 1 kg of dry solution.
To create a marble-like concrete window sill, the crumble effect is achieved by adding dry pigment. Additionally, they use resources for decoration (wood). To protect against mechanical damage, overlays are used.
When forming a concrete slab, the amount of building materials is planned and calculated in advance.
Tools
It is impossible to make a concrete window sill with your own hands without the necessary tools. During construction they use:
- jigsaw (grinder);
- grinding machine;
- level and tape measure;
- formwork board;
- mesh;
- putty knife;
- drill, screwdriver;
- self-tapping screws
It is important to remember about safety - be sure to wear protective equipment.
Without a set of indispensable tools, it is impossible to achieve the desired success in your work.
Installation procedure
Then follow the preparatory work: cleaning the opening, priming, leveling the surface with mortar or gypsum plasterboard (to the level of the edge of the groove) and re-priming.
After the glue has dried, cut the laminate for the sidewalls and install each side in turn using spacers.
In order to cover the side end, you can order a narrow trim or corner to match the material.
Installation can be carried out in one of two ways, each with its own advantages.
This method is convenient because you do not need to plaster the walls first - you can leave everything as is. First, a frame structure made of wooden bars or a metal profile is installed on the wall.
- Remove the remaining foam along the contour of the window or door.
- Install wooden blocks vertically.
- Mount the horizontal part of the sheathing if it is necessary to obtain greater structural rigidity.
- Slats are attached.
- regular or decorative screws. The hats of the former are hidden under furniture plugs or special stickers;
- clampers. This method is more difficult because the boards will need to be cut to ensure the locks fit together tightly. But the fasteners will not be visible.
Without frame
As you can see, making window slopes from laminate is not at all difficult, and they look very presentable. Moreover, this finishing method can also be applied to plastic windows covered with decorative film that imitates wood. The richness of the color range of the material makes it possible to show your imagination in a combination of shades and solutions. Don't be afraid to experiment.
Preparatory work
All types of finishing of door slopes require surface preparation. However, it will be the same in any case.
You will need to do the following:
- Cover the door and frame with masking tape and film. This measure is necessary to protect them from damage and various contaminants.
- Trim off any protruding elements that may interfere with installation. If necessary, you can apply a thin layer of plaster.
- Then the surface should be primed. It is advisable to purchase a deep penetration primer. Of course, its price is a little higher, but it is worth it since it is very practical.
What advantages does the product have?
- High strength. The products are made of solid PVC, are not afraid of moisture, and are resistant to temperature changes.
- Increased rigidity, due to which you can put various objects on the windowsill or sit down; At the same time, the product has minimal weight.
- Ease of care. The design does not require any special actions to maintain its attractive appearance. If desired, the film can be updated, ridding the window sill of external defects or changing its color.
- Laminated PVC window sills are visually attractive; they can be decorated to resemble other materials: for example, wood or marble, which makes them universal for any interior.
- The material does not emit harmful substances and can be used in residential premises, children's institutions, hospitals, and public catering establishments.
You can learn more about window sill covers on our website. Such overlays are used if the appearance of the window sill has deteriorated.
Whatever material you choose, the installation technology is almost the same. However, wood products and chipboards additionally require good waterproofing. Usually, where the window sill board comes into contact with the wall, it is insulated with a polypropylene sheet gasket.
The length of the window sill should be equal to the full width of the balcony. The width can be any depending on your needs, usually 5-8 centimeters wider than the wall.
You can install the window sill on the balcony using polyurethane foam, on brackets or using retaining brackets. But even if you secure the window sill with foam, the use of brackets is still necessary, otherwise the window sill may simply fall off if you lean on it. Their number depends on the length of the window sill board. They are attached to the stand profile using self-tapping screws with a press washer at a distance of 20 centimeters from each other.
- We lay the lining under the window sill. For this, bars are used; they will take the load from the window sill.
- We install the window sill itself and secure it, for example, with polyurethane foam.
- We position the window sill using a building level so that there is a slope from the window for free drainage of moisture. For this we use wooden beacons, placing them at a distance of 50-60 cm from each other. We fix it with foam.
- We install the brackets and attach the front part of the window sill to them using screws.
- We place a weight over the entire surface of the window sill so that the foam does not lift it when it increases in volume.
- We foam all the cracks and voids under the product. Let the foam dry for 2-3 days, during which it is better not to touch the window sill. Excess foam is cut off with a construction knife.
- At the final stage, if you installed a plastic window sill, you need to install end caps.
Installation instructions
Fixation is performed using 2 methods. Let's consider the most popular option when you need to use sealant and wooden spacers. This is the most reliable way to install a plastic window sill at home with your own hands.
The operating procedure is as follows:
- We insert the plate into the prepared place. For fitting we use wooden beacons and a building level. We arrange the elements in increments of no more than 80cm.
- We place wooden support blocks at the front end. The distance between them is no higher than 50cm, and from the side slopes to the blocks - 10cm.
- Checks the angle of inclination a second time with a level. If there are discrepancies, then we adjust the thickness of the bars.
- We fill the hole between the slab and the concrete base with sealant. There is no need to completely seal the opening; we simply fix the aligned product.
- We place the load evenly on the window sill board so that the foam does not lift the window sill. Enough for 3-4 tanks of 5 liters each.
- Blow out the free space with foam. We use a construction gun to do the job neatly.
Advice! The slab should fit tightly with the window, and the gap between the wall and the window sill should not be higher than 4mm. - We give the structure 2-3 days for the foam to dry. Remove excess with a utility knife.
- If you find any cracks, seal them with acrylic sealant.
- We close the ends of the plate with plugs. For fastening you will need regular PVA glue.
All that remains is to remove the protective film from the product.
Window sill lamination technology
Materials for window sill lamination
Basically, Russian manufacturers use film from foreign manufacturers:
Films for plastic window sills are available in four colors: marble, white, gold and light oak. Among the promising developments, the following points can be highlighted:
- Processing and advertising of film with 3-D Effect, production of expanded wood colors;
- Improving the durability of the film itself, its parameters and properties.