A mosquito net on the windows is reliable protection against unwanted insects - mosquitoes, flies, wasps. Often, after 3-5 years, holes appear in the structure fabric. The reason for this is birds. They tear the mesh, getting building material for their nests or thinking that it is edible. Sometimes the canvas is torn by pets - cats or birds released from the cage.
Photo: birds tearing the mosquito net fabric What to do if the mosquito net is torn? Can I repair it myself or do I need the help of a specialist?
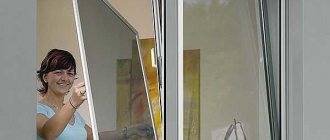
Let's look at how to replace a mosquito net
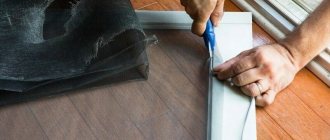
First, the cord is removed - I simply pry it with a thin tip of a screwdriver at the junction and pull it out, trying not to stretch it out in length. (Perhaps this is unnecessary - it is not so elastic). The mesh came free and I removed it.
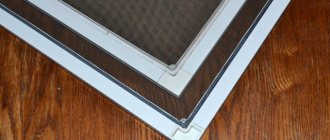
Two photos at the stage of disassembling the mosquito net.
Now it was necessary to install a new mesh cloth. I roughly oriented it and began, from the top profile, to gradually lay the cord in a circle into the gutter, fixing the mesh in it. I used the same screwdriver. It turned out not to damage either the mesh or the profile, although a couple of times the screwdriver dangerously jumped off. For anyone who wants to repeat this, I recommend working with something less dangerous, for example, the blunt end of a ballpoint pen.
The most important thing is the stretching of the third and fourth sides of the mesh fabric - I had to redo the corner so that the mesh would not wrinkle. Finally, I cut off the excess mesh with a sharp knife flush with the profile.
This is the result. The lower mesh is overstretched.
It turned out fine. The photo shows in comparison that the quality of workmanship is inferior to the factory one. But assemblers use some kind of special roller to place the cord in the groove, and there, of course, it turns out more neatly.
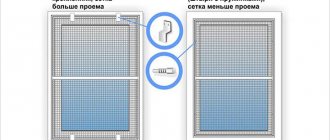
Reducing overall dimensions
The repair with the second mosquito net was easier - I pulled out the cord in the same way and removed the mesh. I disassembled only two diagonal corners of the frame, carefully pulling out the plastic connecting corner from the aluminum profile. It is held in place only by friction, but is pressed in with force.
Next, I sawed the frame profiles to length, ran a file along the edges a little, and began reassembling them. Although the corners were held tightly, just in case, I lightly smeared them with Moment glue. And then everything follows the proven scheme for installing the grid, as I wrote above.
After everything that was done, it became clear to me that the service life of the mesh itself is much shorter than that of its aluminum frame, but anyone can replace the mosquito net fabric of a plastic window. You just need patience and accuracy.
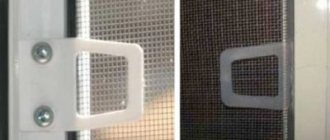
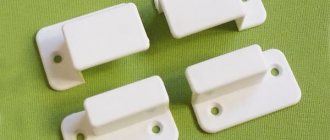
How to replace screen handles on plastic windows?
So, the mesh has been dismantled, the handles can be replaced. Classic repair - install new spare parts. Prudent owners of plastic windows, having heard about the problem, purchase them at the time of installation of the mentioned ones. Small spare parts cost nothing.
If you are not so prudent, try to find new handles in a furniture fittings store. The shape and color may not be the same as on your windows, but the fastening point in the form of a “step” for overhead nets should be as in the photo.
As for structures that are installed inside the opening, in this case the handles are often attached to the plastic frame using self-tapping screws. In this option, you need to unscrew the screws, remove the fragment, install a new handle and tighten the screws again.
If we are talking about an overhead frame, then you will have to work a little to remove the fragment and install a new part. For work we will need:
- a set of new holders;
- flat screwdriver or mild knife;
- a special roller for rolling the seal into the groove, instead of which you can use scissor rings.
If all of the above is present, the frame with the mesh must be laid on a flat surface and you can proceed:
- Next to the broken holder, you need to remove the rubber seal using a screwdriver or knife. Please note that you will have to thread it back, which is not easy, so you should not take out an unnecessarily large piece.
- Now you can remove the unusable part.
- We put a new handle in its place.
- Finally, you need to press the sealing rubber into place using scissor rings. To make work easier, the groove can be moistened with water.
Setting the clamping mechanism
Before you start fixing anything, you need to know if it needs fixing. We close the window and use a lighter to identify the presence of “through” areas. If the flame flutters, we get down to business. If you look at the window sash from the end, you can see three oval (most often) eccentrics. Try to turn the window handle - and you will see that ex. So, they need to be tightened, but just a little, often a couple of millimeters is enough. Plus there will be a reserve for a few more twists: do not forget that the seal also wears out. And, most importantly, do this so that the eccentrics are strictly in one position. To work with them you will need either pliers or a hexagon. It is very useful that there are certain marks on the eccentrics themselves: if you see that they are “looking” towards the street, you need to press harder, but if the lines are directed towards the house, the pressure is very good.
Setting the clamping mechanism
Now let's look at different types of adjustments, which have their own significant differences. In order to move the frame to some extent or get rid of the bevel, horizontal adjustment is necessary.
It is carried out as follows: a hexagon is inserted alternately into the upper and lower loops (there are special holes there). When you begin to rotate the hex clockwise, the window will noticeably rise. When rotating in the opposite direction, that is, counterclockwise, you will see that the window, on the contrary, lowers. This procedure must be done strictly with the window open and the sash must be moved no more than 2 mm, so as not to “tighten” the mechanism and damage it.
AdjustmentWindows made of metal-plastic can be adjusted using the bottom hinge. In this case, vertical adjustment is used. You need to remove the plug and open access for the hexagon, then turn it clockwise. As you can see, there are no difficulties here either.
Ventilation of PVC windows
I would like to briefly describe the principle of ventilation for plastic windows. 90% of such windows do not have the good old vents, but they do have the ventilation mode everyone loves. For three seasons this regime makes you happy, but in the fourth – frosty – a person finds himself in a difficult situation: either freeze or don’t ventilate at all. If you are not the lucky owner of a plastic window with self-ventilation, you can use a comb, which will one hundred percent perform the function of a ventilation regulator (and it costs a penny). This simple device fits almost every plastic window and has 4 modes (or rather, 4 “arches” to regulate the flow of air into the room).
Features of the “dismantling” operation
It is necessary to follow the rules, therefore, before removing the screen from the window, you need to become familiar with them.
- It is strongly recommended to dismantle the anti-mosquito frame in warm, windless weather, otherwise, if there is a gust, the structure can fly away and break “on the rocks.” Rain will also make the process much more difficult.
- They remove the device not alone, but together. During the operation, it is not recommended to lean on the canvas itself. All actions require maximum caution, otherwise damage cannot be avoided.
- The dismantled structure is washed and thoroughly dried. Products should be stored exclusively in a horizontal position; any load on them is prohibited. Installation is carried out only in the warm season.
All designs have their own requirements, so we need to look at them in more detail. But before dismantling any product, you must first make sure that the handles are reliable. Otherwise, they may fail, and the dismantled mesh will fly and fall.
Mosquito cloth: nuances
Proper installation of a mosquito net begins in the store. When selecting a grid.
There are many types of mosquito nets. The main task is to choose the best one for your region. First of all, they differ in cell size: from 0.5 to 1.2 mm. The small cell protects not only from insects, but also from dust. There is a big disadvantage - it needs to be washed often, otherwise it will transmit less light and will also collect a large amount of dust. A large cell allows a lot of dust and dirt to pass through. In connection with the above, experts recommend choosing a mosquito cloth with a mesh size of 0.8 to 1 mm.
The next important parameter is strength, which means the material from which the mesh is made is important.
- cotton;
- nylon;
- fiberglass;
- steel;
- nylon
Cotton mosquito nets are practically not used, but the rest are in use. The most common are nylon ones because they are cheap, durable, can withstand weight up to 4 kg, and are durable.
Note that mosquitoes of different shades have recently appeared on the market (green, blue, beige and others). So if you have a window of a non-standard color, you can easily select a decent mosquito net for it.
The importance of winter-summer modes
Despite the fact that in warm weather the windows are opened for ventilation, adjustment of the sash in summer mode is required to create a good microclimate in the room. It is also effective when there is a need to leave for a certain period of time. Then there will be no musty smell in the house due to a small draft through the cracks of the sash. When setting modes, you should lubricate the mechanisms with machine oil or Vaseline so that their operation is smooth and of high quality.
Experts recommend adjusting the pressure density to the winter position gradually to reduce the load on the seal and not deform it. Before this, you should thoroughly clean the window frame from dust and debris, which can form a draft due to the loose fit of the sash. In winter, blowing is excluded, so the tightness of the closure is checked with a lit match. Its attenuation or fluctuation of fire indicates the presence of cold bridges.
Types of grids
Sliding
On wide duralumin sliders. Even make the main » windows » how to install a mosquito net. Like a grid for. They move easily and silently from side to side. Cost from 200 rubles per sq.m.
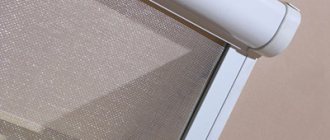
Roller shutters
They have a successful and convenient roll mechanism. This mesh does not have to be removed in winter; you just need to roll it up. Knowing how to attach a mosquito net to a wooden window, you can do it yourself. Cost from 2500 rubles per sq.m.
Framework
A common type of mosquito nets. They are perfect for installation in apartments and offices, country houses and suburban cottages. How to put a mosquito net on a plastic window. Cost from 650 rubles for a standard window (1300x1400)
When repair of mosquito nets on plastic windows is required: the main causes of breakdowns
Photo from the site: miremonta.ru
There is a humorous saying about computers, which is quite suitable for our case, when repairs of windows and window screens may be required, it says that the gasket between the computer and the chair, that is, the person himself, is most often to blame for all major problems. It is the incorrect installation and operation of mosquito nets that can cause their breakdowns. However, there may be other reasons that are also worth studying in order to find out how to prevent troubles, as well as understand the means and methods of repairing them.
To ensure that questions arise as little as possible, such as how to repair a mosquito net on a plastic window, you must take care of its correct installation, as well as timely care and proper operation. It would be optimal to remove the mosquito net for the winter and install it back by the time the temperature rises above fifteen degrees Celsius.
- Plastic is a fairly strong and durable material, however, it also loses its properties and qualities over time. The mosquito net frame, made of plastic, deteriorates over time and may break.
- Failure can also be caused by constant temperature changes, prolonged exposure to frost in winter and hot sun rays in summer.
- Birds and animals can also easily break a mosquito net.
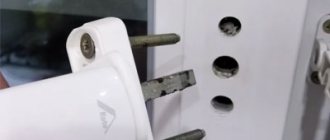
Most often, emergency repairs of nets on plastic windows are required when the plastic corners or installation handles, holders on the outside and inside, depending on the design, break, and the net itself breaks. It is these cases that we will consider in more detail.
Assembly
Frame assembly
- Fasten the main profile using corners so that the grooves for fixing the mesh are on one side inside the frame (Fig. 2-3).
- Install the brackets into the impost (cross member) on both sides (Fig. 4).
- Connect the impost (cross member) to the frame profile. Align the cross member with the center of the frame (Figure 5).
Installing a mosquito net in the frame
Place the mesh on the assembled structure from the side of the groove in the frame. Using a seaming knife, thread the cord into the profile groove. The rolled fabric should not sag or form wrinkles. Cut off excess mesh and cord (Fig. 6).
Installation on wing flags
This is another convenient installation method, which is not yet used very often.
They are also mounted externally. However, the rarity of their use is due to the fact that the mesh cannot be inserted into them so easily - the “flag” can only be rotated from the outside, so this option is usually used when installing windows on the ground floor.
The advantage of this option is that the number of “flags” is not limited, they hold the frame well and secure it tightly on all sides.
Alternative to sizing
Patch
In addition to a liquid patch, which is essentially a type of glue, you can restore a mosquito net with a regular patch. It is made from the same material as the mesh or similar to it.
For repair you will need:
- The needle is curved, you can take a surgical one,
- Thin fishing line or nylon thread. It is better if it is the same color as the mosquito net.
Restoration is carried out as follows:
- Remove the screen from the window and place it on the table so that access to the work area is convenient.
- Cut a rectangle around the hole to line up its edges.
- Cut out a patch whose sides are not 5 mm larger than the hole.
- The patch for the mosquito net can be made from a similar material or thick tulle.
- Apply the patch overlapping the prepared area of the mesh.
- Sew so that the thread (or fishing line) covers both layers. You shouldn’t pull the edges too tightly, but you don’t need to sew too loosely either. The patch should hold firmly, but not wrinkle the mesh. It is important to carefully secure the thread at the end of sewing, forming at least two knots.
The advantage of such repairs is low cost. All the necessary materials can be found in any home. And to make a patch, no special skill is required. Anyone can do this job. The negative side is that it is not very decorative. However, if the question is about saving money, this option is the most budget-friendly.
Artistic darning and embroidery
Needlewomen who master this art have certainly noticed that the mosquito net resembles stitching - embroidery fabric. Therefore, it is not surprising that some housewives successfully use their skills to repair holes in window screens.
Repairing holes in a mosquito net using embroidery is the most decorative type of repair.
The difficulty of the work lies in the fact that the embroidery area cannot be pulled onto the hoop. Therefore, you have to fix the frame in a vertical position. Otherwise, all actions are the same as the usual execution technique. If the damage to the mesh is large, it is better to mend it first with threads of the same color. After this, start embroidering:
- Prepare threads of the desired color in sufficient quantities.
- The drawing is transferred to the grid using a pencil with a soft lead.
- When embroidering, the frame is placed vertically, this makes it easier to tighten the needle.
- At the end of the work, it is better to spray the finished drawing with hairspray. This will protect the embroidery from encroachment by birds.
The result of such a repair is so impressive that those who do not know about the former hole believe that this is an original decoration for a mosquito net.
Those who do not have access to the art of embroidery should not despair. They can mend the hole. After all, every housewife had to repair knitted clothes at least once in her life. If this is not the case, then mastering the darning technique is much easier than embroidery.