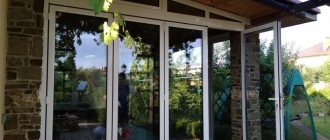
Hello readers of my blog! Today we will talk about how to install plastic entrance doors with your own hands. It would seem that this is not a tricky matter, but when you are faced with this problem, you have to think about how to do it correctly, what preparation to do, what materials to choose. Thus, I decided that this article would be useful to someone, and I am devoting my efforts to this topic. In it I will answer a number of questions that will arise immediately before installing plastic entrance doors with your own hands, and some even after that. This topic is quite broad, because before work, thorough preparation is necessary, but how to do this? And this is a separate topic. You can learn about all this in great detail in the article below. How to install plastic entrance doors with your own hands Today I will tell you how to install 8 plastic windows and an entrance door with your own hands in one day. To perform this work you will not need special skills or expensive equipment. But, of course, there are many nuances that are definitely worth paying attention to. And of course there are several secrets on how to save money when ordering. Let's get started! We have a newly built aerated concrete house in which we need to install 8 windows and one entrance door. First of all, we take all dimensions from the openings. As you remember, I made overhead quarters around the perimeter of the openings on three sides (a quarter is not needed at the bottom - the window sill will be there). For the quarters, I used standard 5 cm thick aerated concrete blocks, which were installed, like the rest of the masonry, on polyurethane foam. The recess of windows during installation should be at least 1/3 of the wall thickness. It is also worth noting that you should not try to make openings to fit standard window sizes - the technology for their production is automated and there is no difference in cost between a standard size or a custom-made window. We calculate the final window dimensions taking into account the following factors. On the side and top from the frame to the wall there should be a gap of 1 to 2 centimeters on each side, which will be filled with polyurethane foam. At the bottom of all windows from the factory there is a 3-centimeter high stand profile, which is needed for convenient installation of the window sill. Plus, under the delivery profile there should also be a gap of about 1 centimeter for the mounting foam. In total, roughly speaking, you need to subtract 4 centimeters horizontally and 6 centimeters vertically from the internal dimensions of the opening. You shouldn’t get too carried away and push the frame into the opening without a gap, because... It will be extremely inconvenient to pour polyurethane foam into a gap of less than 5 mm.
Installation of plastic doors
Contents of the publication: Installation of plastic doors: preparatory work
Installation of a plastic door: two ways to attach the door frame
The final stage of work: assembly and sealing of the door block
Despite the fact that wood is an exclusively natural and environmentally friendly material, most people prefer it as a product of modern chemistry.
This can be seen from how zealously people are replacing old wooden windows and doors with modern plastic analogues. There are many reasons for this, but the main one is reliability and dimensional stability depending on temperature and changes in humidity. Paying tribute to the fashion trend, in this article from the site dveridoma.net we will study the question of how to install plastic doors with your own hands and consider this process in all the smallest details.
Conclusion
The door in the screen under the bathtub is very convenient. Making it with your own hands is not difficult, it will take a little time and materials. The whole process will take hardly more than a couple of hours.
Voted over 253 times, average rating 4.8
Comments
Unfortunately, there are no comments or reviews yet, but you can leave your...
Add a comment Cancel reply
We recommend reading
Slopes, Miscellaneous Types of materials for slopes of door structures: installation of sandwich panels In the house, doors and windows must be resistant to loads. On the street …
Miscellaneous How thresholds are made between rooms with different floor heights Any door that is installed in a house consists of two parts: ...
Miscellaneous Old door frame: methods and algorithm for dismantling During repairs, when replacing doors, the frame is dismantled. ...
Platbands, Miscellaneous Design of Finnish-type door/window trims for special tasks A typical Finnish-type dwelling is laconic, its refined simplicity ...
Installation of plastic doors: preparatory work
Let's face it - any preparatory work associated with the installation of something is aimed at achieving two main goals. On the one hand, this is the assembly of the product being installed (in our case, these are plastic doors), and on the other hand, these are steps designed to facilitate the process of installation work itself.
If you properly think through the entire technology from start to finish, assemble the product to the maximum and use additional devices, then installing a plastic door with your own hands will be easy.
What do I need to do? Just four things.
- Adjust and tidy up the doorway. In most cases, the opposite is true - plastic doors, as a rule, are made to order, and their dimensions (in particular, width and height) almost always perfectly match the dimensions of the doorway.
Therefore, within the framework of this point, it will be enough to clean the installation site of the plastic door from crumbling plaster, remove dust using a deep penetration primer, and you can move on.
- Disassemble the doors. In most cases, all plastic doors are supplied from the manufacturer already assembled. Only double-glazed doors can be supplied disassembled, and not always - generally the manufacturer prefers to remove only double-glazed windows (if any) from them.
Here you will need to separate the door leaf from the frame - such separation will greatly facilitate the process of installing doors and will allow you to cope with it even alone.
- Install fasteners. Installation of plastic balcony or entrance doors, or rather their fastening in the opening, can be carried out in two ways - using special brackets mounted on the back side of the frame in a special groove or using conventional anchors installed directly through the door frame on pre-drilled holes. I think there is no need to explain that in the latter situation, the appearance of plastic doors suffers significantly.
Depending on the chosen method of fastening the door block in the opening, at this stage of work you will need to either install brackets or drill holes in the frame. Both brackets and holes are made in three pieces on each side. How to install a plastic door photo
- Mount the device. This, of course, is said loudly - in fact, you will only have to hammer a couple of nails into the opening or tighten the same number of screws, which are assigned the function of a stop.
First you need to decide on the location of the plastic door in the opening - decide where it will be located (in the middle of the opening or at one of its edges). Taking into account the thickness of the door frame, you need to make appropriate marks on the sides of the openings at the top and install two stops in these places by tightening a pair of screws or driving in dowels. We perform exactly the same operation at the bottom of the doorway - four hammered dowels will completely define the installation plane of the door block in the opening.
Having completed all these simple operations, you can begin to directly address the issue of how to install a plastic door. Further work should not cause you any difficulties.
Advantages and disadvantages
It is not difficult to make and install such a door. Especially for those who were able to make decent repairs in the house on their own. In addition, such a door has a number of significant advantages over conventional doors.
Due to the ability of such doors to occupy a very small space, they are very popular in narrow rooms. For a corridor or hallway this is an ideal option.
The design of such doors is universal - they can open in any direction; to do this, you just need to swap the outer panels. If necessary, you can change the width of the door by adding or subtracting sashes.
Accordion doors have a special latch on the guide that prevents accidental opening. Such doors are also not afraid of drafts; they will not be able to close or open due to a random flow of air. Such doors are silent in operation and do not have a characteristic creaking sound, like conventional swing door leaves. In addition, the folding structure can be easily automated.
They can be installed in showers and bathrooms, provided that the doors are made of waterproof material.
Among the disadvantages of such doors are low resistance to impacts and a relatively short service life.
Anyone who knows how to use a tool at least a little can make accordion doors with their own hands. The assembly process does not take much time, the materials are inexpensive and can be purchased at any hardware store.
Installation of a plastic door: two ways to attach the door frame
As mentioned above, there are two ways to secure doors in the opening.
If we talk about choosing one or another of them, then only the presence or absence of brackets can play a decisive role - in general, both in terms of labor intensity and ease of installation, they are approximately the same. But if we consider this point from the aspect of aesthetic qualities, then, naturally, it is better to give preference to installing an opening with brackets - subsequently they are hidden by slopes and do not cause any problems.
So, let's begin the process of installing a plastic door on a balcony or some other place and present it point by point for a better understanding of the essence of the issue itself.
We insert the door into the opening and lean it on the dowels hammered at the top of the opening.
To begin with, it is better to place the door frame at a slight slope and orient its position in the opening so that approximately the same distance to the opening remains along the edges of the frame.
Now we prepare a couple of wedges, nearby we place a rack level up to half a meter long, the necessary fasteners, a hammer and a hammer drill connected to the network with a drill at the ready.
We place the level on the door threshold and, using wedges driven under the threshold, achieve a clear position of the air bubble of the level. Installation of plastic balcony doors photo
Now, using the same wedges installed on the sides of the frame, we fix the door first at the top of the opening, and then at its bottom. Do not forget that the box must be pressed tightly against all four stops (dowels driven into the opening).
Now that the door frame is stable, we check its orientation relative to all possible levels.
If necessary, we adjust its location. Only after you are sure that the box is installed correctly, you can take a hammer drill, drill holes and install fasteners. It’s better to start from the top, on the side where the awnings are located. First, fasteners are installed on one side of the box, and then on the other.
It should be noted that immediately after installing dowels or screws, you should not completely tighten them. Only then, when they are all installed, the final rigid fastening of the box is carried out - this process should be controlled by a level, especially if you use the method of fixing directly through the box.
It is necessary to ensure that anchors, dowels or screws do not bend the profile of the door frame and do not disturb its orientation in space. Installing a plastic door on a balcony photo
That's it, the box is standing, now you can relax. The bulk of the work has already been done, and there is not much time left until the end of this process. You can see how to properly install a plastic door in this video.
Box fastening
The holes on the box itself are already ready, so now you need to make them in the wall. To do this you will need a hammer drill with a set of drills. Holes are made using a drill with a diameter of 11, the distance between which should be 30 cm around the perimeter.
Dowels are installed in the resulting holes, but the screws are not screwed into them completely, because first you need to check the evenness of the installation of the box and only then tighten the screws tightly.
Once the box is installed, you can begin hanging the canvas on the hinges. If it turns out to be a little skewed, then this problem can be easily eliminated by adjusting the hinges. If the sash sags, the hinge at the bottom of the structure is tightened, and if it is not pressed tightly against the frame, then the hinges are twisted alternately from below and from above.
The final stage of work: assembly and sealing of the door block in the opening
The first thing you need to do is hang the door leaf on the frame - it all depends on the type of door. It should be understood that a balcony door and an interior or entrance door have slight design differences, which are expressed in the hinges used - on a balcony door, due to the presence of a ventilation function, they have a more complex design and, naturally, differ in the installation principle. It is produced approximately as follows.
If we are talking about door canopies of a standard design that does not provide a ventilation function, then everything is simple here - the door leaf is put on the hinges of the frame without any complex operations.
Installation of plastic entrance doors photo
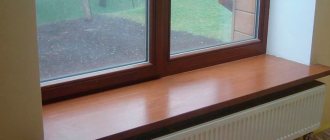
In conclusion, a few words about the last stage of work, which involves the installation of plastic entrance or interior doors. This is the sealing of the door frame in the opening - it is carried out using the well-known polyurethane sealant, which is better known as polyurethane foam.
For high-quality sealing of the door block, you only need to take into account a couple of points: firstly, the door leaf must be closed until the foam has completely dried and, secondly, the sealant must be applied to surfaces that have been previously moistened with water.
With increased humidity, the polyurethane foam polymerizes faster and better - in addition, its adhesion to the frame and opening will be more reliable. Well, in all other respects, the sealing process looks quite simple, and all that needs to be controlled here is the uniform filling of the seam.
As you can see, installing plastic doors is not much different from installing metal entrance doors or interior wood products.
There are differences, of course, but they are all observed at the level of subtleties and nuances. The only other thing that can be added is regarding the polyurethane foam - it is better to use a sealant that has a small pressure force when hardening (for example, Macroflex 65). It will guarantee that even if you overdo it with the amount of foam, it will not squeeze out or bend the door frame pillars.
Do-it-yourself finishing of entrance door slopes
The apartment has already installed entrance doors. Reliability, safety, high-quality protection that protects against heat loss and all kinds of external sounds and noises is ensured.
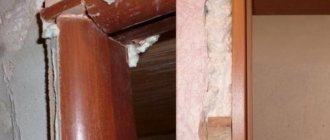
Now all that remains is to clean up the mess. On the outside, entrance doors are most often decorated with platbands or sealed with mortar by professional installers or independently during installation. On the inside, everything is much worse.
Bare concrete, bricks, and door fastenings are visible. It is necessary to organize slopes to hide all this disgrace. The finishing of the entrance door slopes can be done by installers, however, not every company undertakes this.
In this case, you will have to do this work yourself. The process itself is not particularly complicated with any method of forming slopes. Below are detailed instructions on how to make slopes with your own hands.
Adjusting the pressure of balcony doors and door handles
If the handle does not turn well, sometimes it is enough to lubricate the lock with a special material that does not contain resin or acid. In the event of a complete breakdown, you should buy a handle for plastic balcony doors, unscrew the screws, remove the old part and put a new one in its place.
Useful advice! A good option is to install a magnetic latch on the balcony door. This will allow you to avoid too much impact on the door handle every time you close and open the door, which will have a beneficial effect on its durability.
If there is blowing from plastic balcony doors, this is a sure sign that the sash is not pressed tightly.
It is necessary to adjust the pressure of the plastic balcony door. To figure out how to adjust plastic balcony doors for pressure, look for locking elements on the door leaf. They are responsible for the pressure density.
Using a wrench or pliers, rotate the locking elements until the door is in the desired position. Professionals recommend periodically self-adjusting plastic balcony doors depending on the season.
Just figure out how to adjust plastic balcony doors for the winter, and you can easily loosen the pressure in hot weather and tighten it in the cold season.
Sometimes adjusting the hinges does not help solve the problem, and then the leakage of the clamp can be eliminated using a pin.
To do this you will need pliers. To achieve maximum door pressure, install the trunnion perpendicular to the profile. To, on the contrary, achieve minimal pressure, position the trunnion parallel.
Methods for making slopes
The main purpose of the slope is to give a normal appearance to the doorway and reliably cover the fastenings of the door frame, thereby increasing the burglary resistance of the entire structure. There are several ways to form slopes:
The division is made precisely according to the method of forming the slope, because you can choose a wide variety of materials for cladding: laminate, MDF, plasterboard, plastic panels, wooden slats, cellulose panels and much more. The main thing is to decide how to fasten the slopes of the front door with your own hands.
Sealing the entire slope with mortar is the most acceptable option in terms of protection and sound insulation.
Moreover, the result is a slope that does not bend and has no voids. However, this option is somewhat cramped in terms of design. As an option, you can decorate the slope using textured plaster and painting.
If, in addition to filling with mortar, you also install various finishing materials, you can achieve absolutely any appearance. So this option, when fully executed, combines the advantages of the first method and has no actual disadvantages.
Without good slopes, even the most luxurious door loses all its appeal.
The third way to make a front door slope involves mounting a finishing material, such as MDF, plasterboard or plastic, on a pre-constructed frame made of wooden blocks or a metal profile.
This option is ideal when forming slopes using another method requires an prohibitively large amount of solution to completely fill it. As a result, money is saved and it is possible to make the slope more aesthetically pleasing. Moreover, with a frame structure it is easier to achieve evenness and maintain all levels, which is not unimportant for visual perception.
This option for slopes is great for installing lighting and switches directly into or above the doorway. This way it will be possible to illuminate the hallway directly at the entrance to the apartment. In addition, with a frame construction of the slopes, it will be easier to subsequently carry out such communications as wired Internet or cable television.
Prevention of malfunctions of balcony doors
If you had to build a house yourself, adjusting the balcony door fittings is more important, because you want the result of your work to last longer. To minimize the risk of future problems, try to follow these rules:
Adjusting the door hinge in three planes (shown by hexagons)
Useful advice! Microlift is especially relevant in the case of double-glazed windows, which are distinguished by their impressive weight and size. The design of the microlift can be different, representing a small lever on the side of the sash or a roller at its bottom.
Remember that adjusting the door yourself is possible, but requires attention, caution and careful diagnosis of problems. Therefore, if you have a valid warranty on your balcony door, if you identify the slightest malfunction, you should contact specialists who will quickly determine the causes of the problems.
If you are sure that the malfunctions are due to manufacturing defects or installation problems, it is also better to turn to professionals - tightening the bolts yourself in this case will not correct the situation.
If you decide to adjust the door yourself, be sure to follow the instructions, and if you replace the fittings, choose products from the same company as your balcony doors.
Balcony door
By and large, choosing balcony doors is not so difficult - if you look at it, there are few existing options. In addition to the classics familiar to everyone with a solid bottom and a glazed top, you can count a couple at most.
But the point, by and large, is not this - one way or another, a choice between them will still have to be made, and this choice must be fully conscious.
You will have to decide on literally every little detail: the correct profile, the correct opening system, and so on - this is the guarantee that you will get exactly what you need.
Preparatory work
For any method of forming a slope, the preparatory stage is the same. Before any work, the door leaf and door frame should be covered with film and masking tape to avoid damage. First of all, all particularly protruding parts are combed off, which may interfere with the installation of the frame of the future slope or will protrude above the plastering level.
Then the entire surface is swept and primed. It is better to use a deep penetration primer. Only if the wall is made of foam concrete or similar loose material, a surface primer is used.
At the preparation stage, you can also lay a power cable to connect a switch that will light the lamps in the hallway. If you plan to use the option with a frame fastening of the slope, then it is better to postpone laying the wire until the frame has already been installed.
Tip: For clarity, display the outline of the future slope on the floor. Subsequently, it will be easier to navigate using these marks.
Replacing the seal and adjusting the door when the frame is scratched
It may turn out that adjusting the door pressure did not bring the desired result. This happens because the rubber seal has worn out, and any adjustments to the door are pointless without replacing it.
Useful advice! To make work easier, remove the sash from the frame: this will give access to the rubber gaskets from the hinge side. It is better to choose a seal from the same manufacturer as the installed doors.
If the balcony doors do not close well and touch the frame, scratching its center, follow these instructions for self-adjusting plastic balcony doors:
Plastering the slope
Beacon profiles are installed on the prepared and primed surface.
With their help, it is easier to create a smooth surface for the applied solution. Beacons can be secured using mortar. It is better to use gypsum mortar, it sets quickly and you can proceed to the next stage sooner.
Place small piles of mortar in two or three places along the length of each end and install beacons. Using a bubble level, adjust the position of the beacons in one plane.
When the solution under the beacons has hardened, you can begin to fill the slope with cement-sand mortar.
Cement and sand are mixed in a ratio of 1:4 and thoroughly mixed with a mixer attachment inserted into a drill at low speed. The solution should be similar in thickness to curd mass. You can add a little gypsum.
Using a trowel and spatula, apply the solution to the doorway slope and level it along the beacons.
As soon as the solution has dried, which is at least a day, you can begin applying the starting and finishing putty. The dried finishing putty is finally compared using an abrasive mesh. After this, you can open the slope with paint.
How to identify installation defects
An ordinary piece of paper from a school notebook will help you determine the moment when your balcony door requires adjustment.
Place the paper on the open door frame, then close the door and pull the paper towards you. Repeat this experiment around the perimeter of the door frame. If you easily pulled out the piece of paper, the door frame is not tightly pressed against the frame.
To identify the distortion of the door, you need to outline it with a pencil. The door must be closed.
Then, after opening it, check whether the drawn line is parallel to the frame or not. If not, then the door is misaligned.
By using these simple methods, you will identify problems in time and begin to eliminate them. If the warranty period has not expired, it is better to call a specialist.
Formation of a slope using finishing material for mortar
In this case, materials such as drywall, MDF, plastic slopes, etc., are strengthened using cement-sand mortar or adhesive. The surface has already been prepared: leveled and primed.
It is best to indicate the level of the future slope and provide normal support for the sheathing material.
To do this, screw the screws into the wall so that their heads form one plane. In this case, the thickness of the sheathing material is taken into account, because it will rest on the heads of the screws. After this, you can fill the entire space of the slope around the perimeter with a solution.
For reliability and for the sake of economy, the first layer is a cement-sand mortar, which forms a layer slightly smaller than the height of the supporting screws. Next, select an adhesive composition suitable for your sheathing material. The adhesive solution is applied in an even layer over the surface of the slope and onto the strips of material on the reverse side.
Carefully placing the sheets of material on the slope, they must be pressed down until they rest on the caps of the screws. The correct installation is checked using a level; if necessary, you can correct the position while the solution has not yet set.
If there is a gap between the sheathing sheets and the wall, it must be sealed with mortar. After this, you can attach the platbands, if any.
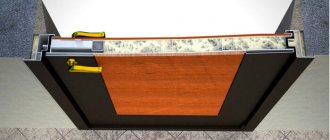
What is a screen and why is it needed?
You need to start with the screen under the bathtub, because it becomes the basis (frame) for the door, which is installed in this false wall.
The screen is a barrier element that hides pipes behind a thin wall; its frame is lightweight and does not require special construction skills to create.
The screen creates the integrity and organic appearance of the room, complements and transforms its design, becoming a logical extension of the walls of the room.
Purchased screen covering pipes
Screens are available in different designs: sliding or fixed, with a recess for feet or shelves.
Installation of swing doors is inconvenient. They successfully hide the pipes from view, but take up too much space in the limited bathroom space when opened. Usually they are simply impossible to accommodate.
As for fixed screens, they do not serve an important functional purpose. They hide the pipes and make the bathroom look presentable, but you won’t be able to get to those very pipes or the meter - you’ll have to remove the entire frame, and this is difficult and time-consuming.
Screens with a recess for the feet are convenient because they allow you to get close to the side, which is convenient when bathing children, while the pipes are protected and hidden from view. However, creating a frame for such a structure is more difficult, because you need to calculate the dimensions and position of the recess, etc.
Shelves on the screen are also convenient, but such options do not provide doors, which again looks nice, but does not provide access to the pipes. Plus, the size of the shelves forcedly increases the size of the screen; this option is not feasible in all bathrooms.
Mounting slopes on a frame
Even though the solution will not be used, the entire surface of the wall under the slope should still be primed. This will prevent it from crumbling over time. Next, parts are prepared for mounting the frame.
As a material for the frame, you can use wooden bars and slats, or a metal profile, which is used for the construction of plasterboard walls and ceilings.
Given the thickness of any of these materials, care should be taken to level the wall on which the frame will be mounted so that the frame elements fit snugly against the wall.
The frame elements should be secured using plastic dowels and impact screws of the required length.
Along the entire perimeter of the doorway, two slats or profiles are attached in parallel, placing them on both edges of the future slope. To strengthen the structure, jumpers are fixed between the main load-bearing elements. This is especially important at the corners between the sides of the doorway and the top.
Before sheathing the frame, you can just start laying the cable to the installation site of the switch.
Fastening the sheathing is slightly different for each type of material:
How to determine if a door leaf is skewed
If you suspect the structure is skewed, close the sash, and then draw a pencil around the perimeter of the closed door.
Open the door and compare its outline with the drawn line. The presence of unevenness indicates that the door is warped. For accurate results, use a building level.
Table of values for door leaf adjustment
Let's say, as a result of measurements, you find out that the width of the drawn strip is 8 mm (an error of 1 mm is permissible). This means everything is in order and the door is not warped. If the width of one strip is 12 mm and the other is 4 mm, this clearly indicates that the door is skewed by 4 mm.
Please note! Sometimes it turns out that on the hinge side the width of the strip is 3-4 mm, and on the handle side 6-7 mm. Such indicators indicate that the door is narrowed by 4-6 mm - this is a manufacturing defect, and there is no point in moving such a door.
Also check the width of the opening on all sides of the frame.
The difference in measurements should not be more than 1 mm. Otherwise, the opening will have the shape of a barrel - this happens when installed incorrectly, when the middle of the frame is pulled towards the wall more than the top and bottom. Such errors also lead to loose clamping.
By measuring the width of the sash on all sides, you will determine the correct length of the impost. The difference between the three measurements should not be more than 0.5-1 mm. If the indicators differ from the norm, the length of the impost differs from the required one and causes the door to skew.
To adjust the door leaf you will need a hex wrench
Drywall
It is enough to secure it with self-tapping screws around the perimeter of the slope. The gap between the sheet of drywall and the wall is filled either with mortar, or sufficiently wide platbands are installed. The edges of plasterboard slopes are reinforced with special perforated corners.
The joints between the pieces of drywall are sealed with construction tape. The entire surface is puttied and leveled with a float using the finest abrasive. After this, you can paint the slopes or wallpaper them.
Balcony door: what it can be
First of all, modern people divide the entire existing range of balcony doors by material - it’s no secret that in addition to plastic products of this type that have become fashionable, you can also equip your balcony with a wooden balcony door, which, by the way, has little in its characteristics will be inferior to newfangled metal-plastic doors.
Both are now equipped with any type of double-glazed windows, modern fittings and even sealing gaskets. Moreover, wooden doors can be assembled from laminated veneer lumber, which makes them unaffected by changes in humidity and temperature. By and large, high-quality wooden balcony doors can even outperform their plastic counterpart in all respects.
In addition to this division, all balcony doors can have other varieties.
According to the opening method, they are divided into swing balcony doors and sliding balcony doors. Almost everyone is familiar with the first option, but, alas, few are familiar with the second - there is an opinion that they allow you to tightly close the opening, which is not entirely acceptable for a door that directly contacts the street.
In fact, this is a little different, and sliding balcony doors are completely airtight - in addition, they are very convenient products to use, especially when it comes to sliding systems.
What it is? These are sliding doors, the leaves of which open parallel to each other, regardless of their number - by and large, with the help of such a system it is possible to glaze balconies of infinitely long lengths. If, of course, this becomes necessary.
If we talk about swing doors, then the most you can count on is two opening halves of the doors - double-leaf balcony doors. To install them in a standard apartment, you will have to remove the window located next to it and knock out the partition on which it rests. If we consider the option with sliding systems, then the number of sashes may not be limited to two pieces, despite the fact that this is the optimal number.
To install more, you will have to remove the entire wall between the balcony and the living spaces, which is almost never possible due to the fact that it is a load-bearing wall.
According to the glazing method, which we briefly discussed above. Here, at the customer’s discretion, manufacturers of wooden and metal-plastic balcony doors offer either full glazing, or half, or rather tertiary - the lower third of the door is solid, and the rest of the top is transparent. As an option, you can even order completely blind balcony doors.
Naturally, we should not forget about other points that modern people pay little attention to due to the fact that the assembly and installation of products of this type is carried out by professional craftsmen. But if you plan to install a balcony door yourself, then you should not ignore these points. First of all, these are the dimensions - you will have to remove them yourself.
Secondly, the profile and fittings - the more chambers in the window profile, the better, but the fittings must be of high quality and proven. It's better not to skimp on these things. Thirdly, double-glazed windows - life has shown that single-chamber windows for windows in residential premises are unacceptable (they quickly freeze and become covered with perspiration).
MDF
This material undoubtedly has the best aesthetic qualities, and also greater strength and wear resistance than other materials.
The elements are secured using small nails, clamps or self-tapping screws.
The main thing is that each type of fastening does not interfere with the installation of the following slope elements.
Corners and fastening points are covered with platbands or corners, which are glued throughout the entire structure using liquid nails.
MDF is the most popular material for slopes, and the maximum number of ready-made solutions is produced from it. Therefore, installation of such slopes is usually the simplest.
Blinds
If you don’t want to make doors, there is another original option on how to hide the pipes without installing a frame, drilling into the walls, etc. - installing blinds.
Blinds as a screen that covers the pipes
You will have to order blinds, since the height of the space from the side of the bathroom to the floor is small. But it won't cost much. The height of the blinds is equal to the distance from the floor to the installation site. Since the blinds are lightweight, a solid frame is not needed. The hanging bar is made of wood and installed just below the level of the side using corners. The method of installing blinds is the same as when installing them on a window.
The option with blinds is affordable and easy to implement; in addition, the space under the bathroom is well ventilated, while maintaining aesthetics. The blinds do not interfere with coming close to the side to wash the bathtub or the child in it, without having to create intricate frames.
Idea for a screen under the bathroom
Laminate
Laminate strips can be laid both across and along the ends of the doorway.
When laying transversely, it is enough to fasten the first lamella to the frame from below along the edges. Subsequent elements are installed with a snap lock. The last lamella must be secured.
All intermediate ones can be secured, for example, through one or even two elements. Along the upper horizontal slope, all laminate strips must be secured at the edges. The longitudinal strips of the laminate are attached in at least three places: along the edges and in the center.
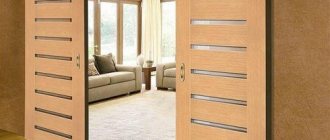
Accordion door - what is it?
This is a folding door consisting of a large number of narrow sections connected by hinges or hinges. Such a door is usually installed in wide (from 1 to 1.5 m) doorways. When the door is opened, its individual elements follow a guide, which is most often fixed at the top and, like the bellows of an accordion, are folded against the wall.
Accordion doors fit well into almost any interior, as they take up little space. They are easy to choose for any opening. When folded they are almost invisible.
Plastic slopes
Installation of slopes made of plastic, as well as plastic lining, is carried out in almost the same way as laminate.
Since this material is less durable than laminate, it needs to be fixed more often. The fact that near the front door the material will be subject to heavy loads and frequent impacts is taken into account. Therefore, the fastenings of the strip of plastic cladding of the slopes are located every 10-15 cm.
Plastic slopes are well suited for interiors in a modern style. But the interior decoration of the door must, of course, match.
After the slopes are mounted, switches and lighting fixtures are connected.
The film and masking tape are removed from the door leaf and door frame. This completes the work. The whole process of forming the slopes of the front door is quite simple, choose the option that suits you and start implementing your plan.
Well, now it's time to finish the article. All the material I wanted to share has been reviewed. I hope it will be useful to you, and you will use it if you need to install plastic entrance doors with your own hands. Improve your own practical skills and gain new knowledge, they say: “It’s never too late to learn!” That's all, thank you for your attention, successful and easy repair!
Saving Tips
Installing an entrance door structure with your own hands is already saving money. If you are confident in your abilities, you will be able to avoid resorting to the services of a measurer. When choosing the cheapest materials, the quality of fastening may suffer, so choose foam, dowels and other consumables of the mid-price category.
If your budget is limited, pay attention to suppliers from China; it will be cheaper than PVC structures from popular brands. It is important to avoid a situation in which it becomes necessary to dismantle an incorrectly installed structure and then reinstall it.