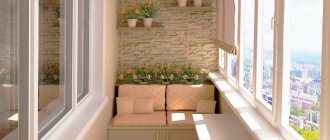
The part of the apartment that needs priority and thorough insulation more than others is, of course, a balcony or loggia. Because not all owners use these premises exclusively for storage or storage. Modern views are such that balconies and loggias are increasingly being transformed into personal offices, kitchens, or simply into rest rooms. This is what forces the owners to carry out competent, and therefore high-quality, insulation of these premises.
With this publication, we set ourselves the goal of conveying to the reader information about how to properly insulate a loggia from the inside, what is needed to insulate a loggia from the inside, etc. This will provide significant savings, since you won’t have to hire expensive specialists, and learning something new is always useful and exciting. The basis for success here is avoiding the most common mistakes, as well as strictly following the sequence of actions.
The most common mistakes
Let's start with a few points that are considered the most common mistakes made by inexperienced builders when they decide to insulate a balcony with their own hands.
- Rush. Quite often, insulation work is carried out at an accelerated pace or hastily. Usually in these cases, all work is limited to installing a new warm double-glazed window, covering all visible cracks with putty and plugging in the oil radiator. Meanwhile, precious heat was still leaving the apartment. There is no way to insulate the walls, floor and ceiling of the loggia this way. To insulate the loggia you need to make a little more effort.
- Use of low quality materials. In order to avoid this common mistake, the question of how best to insulate a balcony from the inside must be approached responsibly and approached in advance. Since balconies have a fairly large area, incorrectly selected insulation for a balcony or loggia will cause a fairly serious heat leak from the apartment.
To ensure maximum insulation of the balcony, and ultimately the entire apartment, from the cold, a clear sequence of actions must be followed in performing the work. This will allow you to achieve high-quality insulation, saving effort, money and time. So, next we consider the question of how to do the interior finishing of a balcony with your own hands and step-by-step instructions for this process.
What materials are used for thermal insulation?
There are many materials on the construction market today that can be used as insulation. They differ from each other in technical and operational characteristics. To buy the right option, several factors are taken into account:
- resistance of thermal insulation to unfavorable conditions, such as high humidity, sudden temperature changes, frost and others;
- price;
- climate in the region where the apartment is located;
- type of house;
Before insulating a balcony in an apartment building, it is worth studying the features of each thermal insulation material and assessing the pros and cons.
Expanded clay
The material is made from clay, which is why it is considered the safest and most environmentally friendly of all insulation materials. Only cork can compete with it. Externally, expanded clay looks like small, light brown granules. Due to the use of special firing technology (heating up to 1000 degrees) during the production process, they are porous.
Expanded clay is suitable for insulating balcony floors.
| pros | Minuses |
|
|
Styrofoam
In terms of weight, this is the lightest thermal insulation material, therefore it is ideal for insulating a balcony room. Externally, polystyrene foam is a mass that is 90% filled with air.
Kinds:
- liquid;
- sheet;
- in balls;
- foam formwork;
- extruded polystyrene foam.
| pros | Minuses |
|
|
And if ordinary polystyrene foam or polystyrene foam has several disadvantages, then the new generation material LOGICPIR Balcony from TECHNONICOL has practically none. It has high thermal insulation properties, does not support combustion and does not emit harmful substances at elevated temperatures. It is also distinguished by an increased service life (more than 50 years) and environmental friendliness, which has been proven at the Institute of Solution Chemistry of the Russian Academy of Sciences.
Polyurethane foam
Polyurethane foam is a synthetic foam with a cellular structure. Rigid (sprayed insulation) is more suitable for creating excellent noise and heat insulation in a private or apartment building.
| pros | Minuses |
|
|
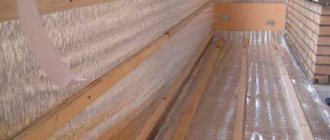
Penofol
The material consists of 2 parts - foamed self-extinguishing polyethylene and a foil (aluminum) layer. It “works” on a slightly different principle. Due to its shielding properties, penofol does not absorb the heat coming to it, but reflects it back into the balcony room.
Kinds:
- “A” – one-sided foiling;
- “B” – double-sided foiling;
- “C” – the sheets have a self-adhesive insert.
| pros | Minuses |
|
|
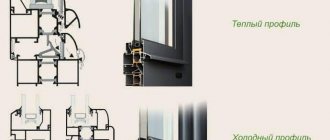
Installation of warm windows
The beginning of insulation work in any room, including on the balcony, is the installation of new double-glazed windows. The presence of old wooden frames is one of the main reasons for the evaporation of a large amount of useful heat from the apartment. Unlike other rooms, installing a metal-plastic double-glazed window requires taking into account one nuance: the reliability of the parapet.
Especially on old-type balconies, the parapets are quite flimsy and their strength may not be enough to install fairly heavy metal-plastic double-glazed windows. Under such conditions, it is necessary to take care of additional reinforcement of the parapet. The most suitable method for this is reinforcement with thick metal rods and subsequent filling with cement mortar. Along with insulation work on other surfaces of the balcony, insulation of the parapet is no less important and must be approached very responsibly.
How and with what to insulate a balcony
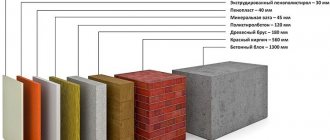
Probably the most important point when insulating work on a balcony is the choice of the thickness of the material used to insulate the internal surfaces. Most often, internal insulation of a balcony involves covering not only the walls, but also the ceiling and floor with insulating materials. Therefore, what is the best way to insulate a loggia from the inside is the most important issue. And it is necessary first of all to decide the question of how and how to insulate the balcony inside with your own hands.
The main criterion when choosing such materials is their thermal conductivity.
This indicator is inversely proportional to the heat it retains, or rather, its quantity. It is for this reason that the question arises more often than others: how to insulate a balcony from the inside? Mineral wool, polystyrene foam or polystyrene foam?
The most common insulation for these purposes is extruded polystyrene foam. Combined with its lightness and thinness, it is also easy to cut and install, and is also very inexpensive. Has good resistance to corrosion and moisture. However, it is very, very expensive. If necessary, it can be replaced with a budget option - polystyrene foam. The latter has similar properties, but is not as durable.
Next, we offer a fairly detailed guide on how to properly insulate a balcony from the inside.
Preparatory work
Before you begin the insulation itself, a number of preparatory measures should be carried out.
Stage 1. Preparation of the parapet
A parapet is an external fence, which is the most vulnerable point of the structure. The parapet is in direct contact with the street and in most cases is a reinforced concrete slab. Before insulation, you need to seal the cracks in the parapet - for example, lay it with bricks (laying ½ brick will be enough so as not to load the floor).
Parapet preparation
If the parapet is metal, and its level does not coincide with the upper ceiling, then the masonry of this element and the side walls is carried out first. It is advisable to use foam blocks for this, although ceramic bricks are also suitable. The outer surface is finished with siding, which will also slightly insulate the loggia.
Note! All wooden elements should be treated with an antiseptic to prevent the appearance of bacteria and, as a result, rotting of the material.
Stage 2. Glazing
First, the loggia should be glazed. It is advisable to install plastic double-glazed windows, and entrust the installation to experienced specialists. The packages must have at least two chambers, the thickness of the glass (total) must be at least 3.2 cm. If installed correctly, the double-glazed window will be surrounded on all sides by special expansion profiles.
Preparation of the parapet. Glazing
After installation, all joints are filled with polyurethane foam (the latter must be laid evenly, without differences or cracks). After this, the foam is masked on the outside with strips to protect it from ultraviolet rays.
Note! Sometimes at this stage a heating device is installed. In reality, this makes no sense, because without proper insulation of all structural elements, the temperature in it will be only two to three degrees higher than outside.
Loggia insulation scheme
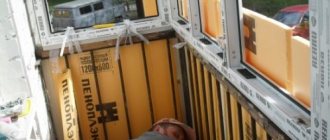
Stage 3. Preparing everything you need
To insulate the loggia you will need the following materials:
- insulation (preferably polystyrene foam);
- wooden slats 2x5, 3x5, 2x4.5 or 3x4.5 cm;
- polyurethane foam;
- galvanized hangers;
- vapor barrier;
- guides;
- plastic dowels;
- timber for logs 5x7 cm;
- reinforced tape;
- antiseptic.
Loggia floor insulation scheme
You will also need a number of tools:
- perforator;
- foam gun;
- building level;
- electric jigsaw;
- level;
- pliers;
- metal scissors;
- screwdriver;
- roulette;
- marker.
Sealing cracks
Any old enough or even not very old balcony has cracks. That is why, even after installing the most modern and warm double-glazed windows, you will notice that the heat still escapes somewhere. It is best to seal cracks in insulated surfaces with polyurethane mastics and sealants. They are the most flexible, resistant to natural influences such as wind or frost and seal cracks longer.
Such sealants and mastics are most often sold in small cans, and the cracks are sealed with a plastic nozzle or a special gun, which are often included with the cans. As soon as the sealant or mastic has completely dried, you can begin the next stage - attaching the insulating material.
Frameless glazing
Frameless glazing seems beautiful and modern, and also takes up minimal space. But. This is single glazing, which in winter will turn the loggia into a branch of the refrigerator, and frost will penetrate into the cracks between the frames. Therefore, this option should be discarded immediately. Double glazing only. Plastic windows with double-glazed windows and hinged sashes will be the right solution. In addition, they do not take up much space, they are easy to clean, and you can install mosquito nets in them. But if you still don’t like plastic windows, you can look at new technologies: these are lift-and-slide windows with thermal insulation.
We insulate the balcony floor and walls
The insulation has been selected and purchased, and now the only thing left is how to cover the surfaces with it. There are 2 fairly simple options for how to insulate a loggia from the inside with insulating material, or rather, how to attach this very material: glue, which must not contain toluene (since the latter can corrode the insulation boards), and dowels. If you decide to fasten the slabs with dowels, then their arrangement should be such that there are about 10 dowels on each square meter of the slab.
Polystyrene foam or polystyrene foam
These materials are produced in slabs with a thickness of 5 to 15 cm. Polystyrene foam has better heat-saving properties, and extruded polystyrene foam is more durable. These insulation materials are hygroscopic and do not suffer from moisture. They have been used in construction for about 40 years.
The general sequence of work when attaching polystyrene foam and expanded polystyrene to the surface:
- the surface must be isolated from moisture, and penetrating waterproofing must be applied;
- Next comes the insulation itself;
- as additional fastening you can use plastic dowels (mushrooms);
- vapor barrier for these materials is not necessary;
- A reinforcing mesh is glued onto the slabs, and plaster or paint is applied on top.
Stages of insulation of balcony walls
- Insulation of balcony walls begins with installing a vapor barrier film and gluing its joints with construction tape;
- A sheathing made of bars or profiles is installed. Both wood and metal are suitable for these purposes;
- Insulation is installed: polystyrene foam, mineral wool or polystyrene foam. The seams between the plates are blown with polyurethane foam. When the loggia is insulated from the inside, this stage is the main one;
- The sheathing is covered with moisture-resistant plasterboard, plywood, chipboard or other sheet materials;
- The resulting surface is finished. For these purposes, among other things, you also need finishing material, which is used to decorate the walls on the balcony.
Stages of insulating a balcony floor
- A concrete screed is poured, the thickness of which varies between 3-5 centimeters. If desired, you can install a heated floor system into the screed;
- A waterproofing film is installed, followed by treating its joints with sealant or moisture-resistant mastic;
- Thermal insulation is installed in the form of, for example, penoplex;
- The finishing of the flooring is carried out by laying ceramic tiles, laminate or linoleum.
Arrangement and insulation of the balcony floor is possible without the use of screed. In this case, longitudinal wooden logs are laid on the waterproofing layer. The latter are attached directly to the concrete base of the balcony. Next, the floor is insulated with a gasket between the joists of basalt wool, expanded clay, penoplex, etc. This is all covered with boards or some sheet material (chipboards, plywood, etc.). The insulation work is completed by laying the finishing coating.
Choice of insulation
The choice of insulation materials is very wide. To navigate this diversity, you need to know what criteria to use to choose a coating.
Criterias of choice
- It is optimal if it is non-hygroscopic or at least with minimal values for this indicator.
- Fire safety. Still, no one is immune from emergency situations, so I would like to ensure maximum safety for myself.
- Durability is important in order to insulate the room as little as possible.
- Another important nuance is the safety of the material. It should not release toxic substances under any circumstances. If the manufacturer warns that this is possible when certain temperatures are exceeded, you should refuse the choice.
- Biostability makes the material a reliable barrier against the formation of microorganisms and mold that are dangerous and harmful to human health.
All insulators are divided into several groups.
Roll insulation
Loose coatings produced in the form of rolled strips. For the most part, these are various wools: slag, mineral, glass. Before installation, they are cut and mounted into a prepared frame. Due to their loose structure, they can become deformed over time, losing their insulating properties. A significant plus is the low price.
Instagram @interer_lux
Among the roll coatings there are thin foil materials, for example, penofol. They are used as an addition to the main insulation. The metallized coating reflects heat waves and prevents them from leaving the room.
Slab
Dense plates of various thicknesses. This group includes very different insulators. These are polystyrene foam, polystyrene foam, penoplex, compacted cotton wool, etc. They are easy to install and do not deform during operation.
Sprayable
Liquid polyurethane foam is applied to the base using special equipment. After it hardens, a seamless insulating layer is formed. Ecowool is laid in almost the same way using the wet method. Both insulators have minimal thermal conductivity and last for decades. The main disadvantage is the need to use special tools for installation.
Insulation of balcony ceiling
When deciding how to insulate the inside of a balcony, you should consider one more thing. If there is no neighbor’s balcony above your balcony, that is, the ceiling of your balcony is not the floor of the neighbor’s, then a slightly special approach to its insulation is required. Here you will need high quality roofing material with sound insulation applied to the inside in the form of a film or spraying.
The following layers are also laid:
- Waterproofing - polyvinyl chloride film or polyester;
- A windproof membrane that allows steam to escape from the insulation, but does not allow droplets to penetrate inside with the wind;
- An anti-condensation layer that prevents water vapor from condensing and flowing onto the insulating material;
- Wooden frame holding the roof;
- Insulation, which, in fact, performs thermal insulation;
- Vapor barrier of the insulation itself, helping to preserve its properties. It prevents water vapor from penetrating inside it.
Additional insulation
In order to ensure comfort, warmth and coziness on the balcony even in severe frosts, a well-thought-out additional balcony insulation scheme may be required. Part of this can be: an air conditioner, a radiator or a heated floor system. In fact, insulating a balcony from the inside is limited only by the imagination of the apartment owner and his financial capabilities.
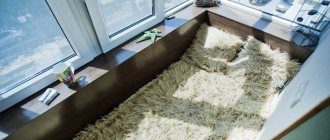
If the balcony is connected to the apartment, then it is quite possible to do without an additional insulation scheme. In this case, even an apartment air conditioner can easily cope with the role of an additional heater. However, there is one “but”. It will be warm on the balcony, but the floor will remain cold, even if there is carpeting.
External insulation
- Pipes with a square cross-section are welded onto the upper edge of the parapet, onto which the window sill will be fixed and insulating material will be mounted on the outside of the balcony.
- The insulation is laid in two layers, with some shifting so that the top layer overlaps the joints of the first. This is done so that cold air does not penetrate inside the balcony through the joints of the insulation. Insulating the walls of the loggia from the outside helps ensure that there is no condensation in the apartment, or more precisely, on the loggia.
- The fastening of penoplex slabs (namely, this insulation material is used when insulating a loggia from the outside) is done with mushroom screws directly to the surface of the parapet and to the tubes welded at the upper end of the parapet.
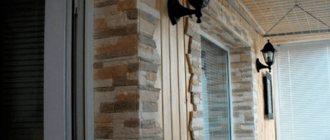
- The outer side of the balcony is covered with either metal corrugated sheets or plastic. The first one is more reliable and durable, the second one looks better aesthetically.
During the insulation of the balcony from the outside, potholes and splinters may appear on the parapet, on its outer side. There is no particular need to worry about this, since these defects on the outside will be covered with insulation and sealed inside with polyurethane foam.
Once again, I would like to repeat that for questions about how to insulate a balcony from the outside, it is better to contact professional construction organizations. Working outside the apartment at height (from the facade) is very dangerous, and it is better to trust specialists in this matter. Be prudent and don't take risks!
In this article we tried to show in as much detail as possible the procedure for insulating a balcony. Of course, we cannot say that the tips we have given will suit absolutely every balcony owner. After all, everyone has their own approach to the question of which materials for insulating a balcony from the inside are better and which are worse. The choice always remains with the dear reader.
We can only clarify the situation and help you take a slightly different look at the internal insulation of a balcony. Please know that there are many insulation options for balconies, balconies and loggias. The choice is yours.
Comprehensive insulation of the balcony below in the video
Ten things you shouldn't do
There are common mistakes in arranging a balcony space. They are committed out of ignorance and inexperience. Let's correct this circumstance and consider all possible mistakes.
Table 1. Errors in landscaping a balcony
| Error | Consequences |
| Spontaneous redevelopment | Ill-considered impact on load-bearing walls can lead to catastrophic consequences. In addition, redevelopment without permission from supervisory services usually results in a hefty fine and the need to eliminate the results of all the work done. |
| Transferring radiators | Exiting the heating system to the balcony is not officially permitted. In addition, this is a pointless event, fraught with an emergency situation. If the pipes freeze, they can burst and repairs will be too expensive. |
| Glazing without frames | The panoramic view, not limited by frames, is without a doubt very attractive. But this option will not insulate the balcony and will not allow installing mosquito nets to protect against annoying insects on hot days. |
| Removing the double-glazed window frame outside the balcony | In addition to the fact that such a structure looks unsightly from the facade, a cap of snow accumulates on it in winter and the noise of rain. Are ten centimeters of extra space worth such troubles? |
| Thin layer of insulation | High-quality insulation is carried out in two layers: foam blocks and mineral wool. This option guarantees heat retention. |
| No vapor barrier | If you do not use a vapor barrier, condensation will form under the insulation and, as a result, mold. |
| Excessive use of construction foam | First of all, foam bubbles do not look aesthetically pleasing. Over time, the foam will collapse and open all the cracks. |
| Floor overload | Thick concrete screed and stone tiles will put an increased load on the balcony floor, and this is dangerous. |
| Using insulation between the room and the balcony | Insulating the balcony from the side of the room is pointless. If you make a warm balcony, then its outer wall becomes the outer boundary of the room. |
| Haste and minor mistakes | It’s better to measure seven times, this also applies to insulating the loggia. You need to think through all the little things: where the window handles will be located, the size of the window sill, the fastening of the mesh. |
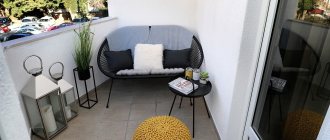
A well-insulated balcony can turn into a winter garden