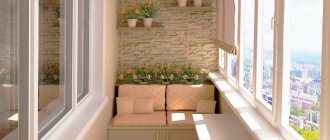
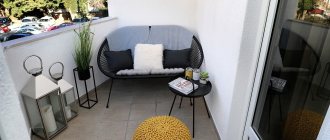
The balcony is the most vulnerable room in an apartment, which often suffers from severe frost and wind. And if earlier it often served as a kind of storage room, storing all the necessary (and often even unnecessary) things, now many people turn the loggia into a full-fledged room.
The only difficulty that residents face is that in winter it is almost impossible to be on the balcony - frost and strong wind create a beautiful picture outside the window, but a cold atmosphere on the loggia. However, today this problem can be prevented. A huge amount of thermal insulation materials make it easy and quick to insulate a balcony with your own hands.
Understand the basics
How does a balcony differ from a loggia?
First of all, let's clearly separate these concepts. Both are glazed, so most people call the resulting space a balcony, although this is incorrect. And some people mistakenly believe that if you install windows on the balcony, it automatically turns into a loggia.
Balconies on the left, loggias on the right
The key difference between the two designs is that the balcony has no walls and protrudes beyond the facade, while the loggia has side walls and, on the contrary, is recessed deep into the building. In other words, outside air affects the balcony from three sides, but the loggia only from one or two, if the apartment is corner.
What result should you expect?
You can insulate both, but the final effect will vary greatly. A well-insulated loggia is no different from a room. If there is a heat source, it becomes a full-fledged living space for year-round use.
Due to the absence of solid walls, the thermal resistance of an insulated balcony is much worse - it is comfortable to stay there until late autumn at most. A sufficient level could be achieved with an additional layer of thermal insulation, but this is irrational due to the small area of the room. After insulation there will be almost no free space left.
What about glazing?
Since 25% of heat loss occurs through windows, it makes sense to insulate a loggia or balcony only if you have energy-saving windows. If wooden frames with one glass are installed, you will first have to replace them with modern ones.
Double-chamber double-glazed windows with higher thermal resistance weigh a lot, and they can only be installed on loggias. Balcony floors have weak load-bearing capacity, and it will most likely not be possible to install such windows there.
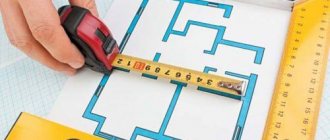
Preparing for insulation
If you decide to refurbish and insulate your balcony, you must:
- Glazing the balcony or replacing single-glazed windows with modern double-glazed windows with low thermal conductivity;
- Select materials that will be used for insulation and finishing;
- Calculate the amount of required materials (insulation, waterproofing), antiseptic, fasteners, glue, polyurethane foam, etc.
- Decide how the balcony will be heated (heater, infrared heater, or “warm floor” will be used);
Quartz heater Tepleya
Think over the design
Before starting work, you need to decide on the type of insulation, choose the option for wall finishing and finishing flooring, and also decide how the room will be heated. All this will determine the design and the algorithm for its installation.
Insulation
Since the insulation of a balcony or loggia is done from the inside, it is important to use a vapor-tight material to avoid the formation of condensation and the appearance of fungus.
instrumentgid.ru
Extruded polystyrene foam (EPS) is best suited for this. When installed with sealing of joints, it allows you to turn the room into something like a thermos, which will retain heat well by cutting off the outside cold. At the same time, with EPS you can achieve sufficient thermal insulation, taking away a minimum of precious space from the room.
Some people consider polystyrene foam to be toxic. This is not entirely true. The material is indeed flammable and releases harmful substances when heated above 60 °C, but this does not make it dangerous, since EPS is always covered with finishing.
Wall decoration
After good insulation, any type of finishing can be applied to the loggia or balcony. Depending on the chosen coating, the technology for thermal insulation works is slightly different.
- Wooden lining, PVC or MDF panels - to attach to the wall you will need to first make a sheathing.
- Decorative plaster or putty followed by painting - this type of finish can be applied directly to the insulation.
- Wallpaper - the easiest way to glue it is on drywall attached to a wooden sheathing.
Flooring
The floor of an insulated loggia is no different from the floor of a room, so all existing finishing coatings can be used there. However, for each type you will need one or another version of the subfloor.
- Laminate, linoleum, carpet are laid on sheets of plywood, chipboard (chipboard), CSP (cement particle board) or OSB (oriented strand board) fixed over wooden joists.
- Tiles and porcelain tiles are laid on a concrete screed.
Balcony floor slabs have low load-bearing capacity, so only floors on wooden joists are allowed on them. On more durable loggia bases, in addition to this, you can also pour a screed under the tiles.
In both cases, if desired, you can equip an electric floor heating system. The only difference is that a film infrared floor is used for the construction on the joists, and a heating cable or heating mats are used for the screeds.
Heating
It is important to understand that insulating a balcony or loggia will only prevent the walls from freezing and slightly increase the temperature compared to the street temperature. To maintain a comfortable microclimate in winter, you cannot do without a heating source.
There are three main ways to heat a room:
- Electric underfloor heating is the most expensive and difficult to install option, but at the same time the most effective and convenient.
- Convector - a heater installed near an external wall can be turned on only on the coldest days or only when there are people in the room.
- Central heating radiator - according to the law of the Housing Code of the Russian Federation, Article 25. Types of reconstruction and redevelopment of premises in an apartment building It is prohibited to move the device to a loggia or balcony, but if the partition is removed or the door is constantly open, the battery will cope with heating even from the room.
How much money did it cost us to insulate the balcony with our own hands?
- Double-chamber window with lamination (installation, installation) - 20.700
- Nails, switches, sockets, cable, foam, sealant - 4,800
- Insulation, bars, drywall, plywood - 11,600
- Window sills, slopes, laminate, wallpaper, lamps - 4,000
- Master's work - 10,000
Total for our loggia with an area of 3.43 sq.m. It took us 51,100 rubles. The amount of costs depends on the size of the area to be insulated and what materials will be used for this. As you understand, insulating a balcony in a Khrushchev-era building will cost much less than insulating a large balcony with panoramic windows.
Prepare surfaces
Take things out, remove shelves, hangers and other items. Clean the walls of old paint and plaster. If there are areas of fungus, remove it and thoroughly treat the areas with a special antiseptic, and then dry all surfaces thoroughly.
YouTube channel “We build for ourselves”
To prevent blowing, seal all cracks around the perimeter of the fence slab, as well as in areas adjacent to the side walls, floor and ceiling. Remove old plaster from the joints and fill them with foam.
The point is to cut off any flows of cold air from the street and make the room as airtight as possible.
What to insulate
When calculating the required amount of materials, the question will arise: is it necessary to insulate the wall of the room adjacent to the balcony? After all, it is adjacent to the room and therefore should be warm! Actually this is not true.
The outer walls of houses contain a layer of insulation inside them, which will not allow heat to pass out through the wall. But after insulation, this wall inside the balcony will warm up a little due to the air passing through the doorway from the adjacent room, but the corners around the perimeter of the balcony will remain cold because they are in direct contact with the frosty air of the street.
Condensation or even frost may appear in these places. The same applies to the ceiling slab. Even if the upper and lower neighbors have insulated their balconies, the ceiling and floor should still be carefully waterproofed and insulated. Only with such measures can, in addition to eliminating heat loss, also ensure good sealing of the room and avoid the appearance of condensation or even mold.
Install sockets and lighting
If you plan to use the insulated space as a work office or recreation area, you must install the electrical wiring in advance. To do this, install sockets, lighting and switches in the right places.
YouTube channel “We build for ourselves”
It is better to run the cables along the internal wall adjacent to the room. It is not insulated, so all the wiring will be easy to hide inside the frame or layer of plaster. Sockets and lighting can be connected from the nearest outlet in the room. But to power the heated floor, it is advisable to run a separate cable from the distribution panel.
Learn the technology of working with EPS
Expanded polystyrene is sold in the form of slabs measuring 60 × 120 cm and thicknesses from 20 to 150 mm. The sheets have an L‑shaped lock along the contour, which simplifies installation and prevents blowing through the joints.
You can attach EPS to walls in different ways. The most common is foam adhesive in cans, which is applied around the perimeter of the sheet and in the middle. Another option is to fix it in the corners and in the center with umbrella dowels with a plastic or metal core. Also, polystyrene foam is attached over the entire sheet area using adhesive mixtures for insulation.
To form a single thermal insulation contour, all junctions must be sealed. It is important to leave 10-15 mm gaps at the walls in the corners, under the ceiling and at the floor, so that you can fill them with polyurethane foam later. It is recommended to coat the joints in the locks between the plates with foam adhesive or seal them with foil tape.
YouTube channel DendenTV
The required thickness of insulation can be achieved either with one sheet or with a combination of two. In this case, the second option is even preferable, since the fragments of polystyrene foam are tightly adjacent to each other and form a single layer, and by shifting the joints between the plates, maximum protection against blowing can be achieved.
After completion of the work, you should end up with an inextricable structure, where each EPS sheet fits tightly to the adjacent one, and all joints between them in the corners, under the ceiling and near the floor are sealed with polyurethane foam.
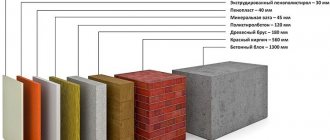
Insulation materials
The market offers a very large selection of materials for insulation, having different properties of thermal conductivity and strength.
The most commonly used are the following:
- Penoplex (extruded polystyrene foam) is a durable and lightweight material that does not allow moisture to pass through and has low thermal conductivity. For insulation, slabs with a thickness of 40 - 60 mm are sufficient.
- Polystyrene foam (expanded polystyrene) is a very light material with similar properties, but does not have high strength. Therefore, when using it as insulation, a strong finishing coating is required.
- Penofol is a very effective insulation a few millimeters thick applied to aluminum foil, which performs the functions of vapor barrier and heat reflection.
Thermal insulation characteristics are equal to a 10 cm layer of mineral wool. Sometimes it is used in conjunction with other insulation, such as expanded polystyrene or mineral wool.
Vapor barrier of the loggia with penofol - Mineral wool is the general name for a group of fibrous thermal insulation materials that have good thermal insulation and low cost; a thickness of 50 mm of such insulation is quite enough to create good protection from the cold.
Mineral wool is produced in the form of a soft material, rolled into a roll, or in the form of semi-rigid slabs.
A common disadvantage of mineral wool is the need to protect exposed parts of the body and respiratory organs from small particles emitted by this material during installation.
Also, when using it as insulation, special attention should be paid to the meticulous installation of waterproofing, since mineral wool adsorbs and accumulates moisture, which can subsequently negatively affect the entire insulation structure.
Current prices for your city:
Insulate the parapet
The fence slab borders the street and is exposed to cold air the most, so the thickness of the thermal insulation here is maximum - 80 mm. It is better to use not one 80 mm sheet, but a “pie” of slabs: 50 + 30 mm.
YouTube channel “We build for ourselves”
If dimensions allow, the wooden sheathing is mounted on top of the second layer of EPS, securing the bars with anchors or dowels directly through the insulation. When the width of the window sill is limited, the sheathing is attached to 50 mm polystyrene foam, and the second layer of insulation is laid between the frame bars.
If plaster is chosen as a finish, you can do without constructing a frame. In this case, the mixture is applied directly to the surface of the EPS. For better adhesion, the sheets must be treated with a grater or scratched with a regular hacksaw.
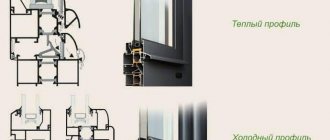
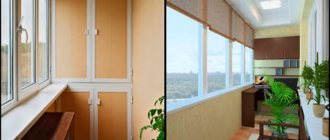
Balcony glazing
The thermal conductivity of glass is much higher than that of concrete or brick walls, so the choice of glazing design and the material from which the frames are made is very important for heat conservation.
The advantage of warm plastic glazing over aluminum is obvious!
Installing new frames is a rather complex and painstaking process, so you should not do such work yourself.
In this case, it is safer to hire professionals for installation, although this is not cheap.
Insulate the walls
YouTube channel “We build for ourselves”
For walls, a 50 mm layer of EPS is sufficient. The work is carried out according to the same principle. If necessary, the sheets are cut to the required size with a sharp knife. To join the pieces together, an L-shaped lock is formed at their ends using the same knife.
It is better to insulate in two layers (30 + 20 mm), and attach the frame on top of the EPS. But if the window is installed without additions and the space is limited by the width of the frame, the second layer of polystyrene foam can also be laid between the frame bars.
YouTube channel "XPS TechnoNIKOL"
If you are going to plaster the walls in the future, then lathing is not needed. It is enough to secure the sheets and roughen their surface with a grater or hacksaw.
Insulate the ceiling
The ceiling borders the neighbor's apartment, not the street. Therefore, the same layer of EPS as on the walls is sufficient here - 50 mm. Laying is done according to a familiar principle. Fastening of your choice: glue-foam, dowel-umbrella, adhesive mixture. Expanded polystyrene is a very light material and is securely attached to the ceiling solely with glue.
YouTube channel “We build for ourselves”
When installing, pay attention to the height of the windows. If the frame is installed right up to the ceiling without additional profiles, then due to the thick layer of insulation, the window sashes may not open. Take into account the thickness of the sheathing and finishing so that after installation there is a gap of at least 5–7 mm to the sash.
Common mistakes
Insulating walls from the inside is a very important technological process that has no room for error.
If insulation was carried out incorrectly, condensation will form on the walls of the loggia (the so-called “crying walls” effect). This is explained quite simply: upon contact with a cold wall, warm air condenses. If too much moisture accumulates, the thermal insulation material will begin to lose its properties, and fungus will appear on the surface, gradually destroying the structure.
If the loggia periodically leaks, then all seams between the panels should be carefully sealed.
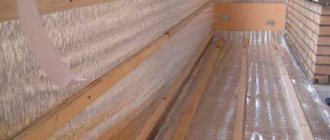
Insulate the floor
To insulate the floor, you will need EPS with a thickness of at least 50 mm, or better yet, 80 mm in two layers. Extruded polystyrene foam has a high density and can withstand loads of up to 30 tons per square meter, so it can serve as a floor base.
YouTube channel "XPS TechnoNIKOL"
After installation on the EPS, it is enough to lay down plywood, chipboard, DSP or OSB - and on top you can lay a finishing floor covering like laminate or linoleum. When installing a heated film floor, you must first lay penofol or other heat-reflecting substrate.
YouTube channel “Vladimir Odorov”
For laying tiles or porcelain tiles, a reinforced cement screed is poured directly onto the EPS, into which, if desired, cable underfloor heating or thermomats can be installed. If the heating elements are small in thickness, they can be easily placed in a layer of adhesive when laying tiles.
The floor on a balcony or loggia is always lower than in the room, so many people prefer to bring them to the same level and remove the step. This is done using logs made of wooden beams 50 × 50 mm or 40 × 40 mm.
YouTube channel “We build for ourselves”
First, transverse logs are laid in increments of 40–60 cm and secured to the slab with anchors. Then the gaps between them are filled with insulation and foamed, and longitudinal logs with a similar pitch are attached on top and leveled. Next, a second layer of insulation filled with foam and plywood or other sheet material is laid.
Finish
At the very end, the ceiling, walls and floor are finished. If plaster is chosen, then a reinforcing mesh is glued onto the sanded EPS surface, and then two layers of plaster and paint are applied.
YouTube channel “Vladimir Odorov”
When covering with clapboard, plastic or MDF panels, molded materials are attached to a wooden frame on the walls and ceiling.
YouTube channel “Loggias. bye"
For wallpapering, the easiest way is to cover the walls with moisture-resistant plasterboard. Use the sheathing as a frame, seal the joints between the sheets with putty and, having primed the surfaces, stick the wallpaper.
What types of insulation are there?
- The most common and economical way to insulate a balcony is from the inside.
All installation of thermal insulation is carried out indoors, which allows you to carry out most of the work yourself with minimal construction skills. - External insulation - the insulation is attached to the outside, covered with reinforcing mesh and plaster.
This is quite an expensive method, as it requires the involvement of specialists. It justifies itself in the case when high-quality repairs have already been made inside the balcony without insulation.
Lay the flooring
The final stage of finishing is installation of the finishing floor. Laminate or linoleum is laid on the previously prepared base. If you plan to have a warm floor, then it is installed first. Next, the baseboards are installed.
YouTube channel “We build for ourselves”
The exception is tiles. Due to wet processes during installation, it is better to install it at the stage of floor insulation and before starting to work with the walls.
Additional video on the topic
A full range of works - from glazing and insulation to attaching the loggia to the room:
Main insulation mistakes:
Installation of film heated floors on the loggia:
Construction of a warm balcony and loggia is a technologically complex process that includes several key stages. Only trained craftsmen with a sufficient base of knowledge and tools can perform such turnkey work. Therefore, if you lack the necessary experience, and also do not want to spend money on correcting mistakes, entrust the installation of glazing, insulation and floor heating to professionals.