There is an opinion that it is not possible to make sliding doors with your own hands at home, but this is not so. A sliding door is not such a complicated thing, and then we will talk about what sliding doors are like, we will go through the pros and cons of compartment doors, and most importantly, we will give step-by-step instructions on how to make a sliding door with your own hands, in 2 options.
Sliding structures in houses are not only beautiful, but also convenient.
Types of sliding systems
To decide on the design of the door block, you need to know the main differences between sliding systems. There are four groups of them:
- Coupe. The simplest type of mechanism. Easy to do yourself without complicated tools.
- Radius. It is impossible to assemble such a structure without experience and specialized tools.
- Cascade. The complexity of the system is not inferior to the radius.
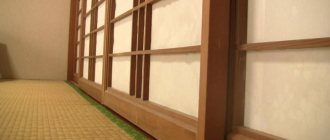
- Harmonic. The simplest hinged door, sliding on top rollers. The disadvantage is poor vapor and sound insulation.
All sliding systems are based on rollers and a guide profile, but differ in the way the sash moves :
- Along the wall. The best option is to make compartment doors yourself. Disadvantage: free space is required on the wall adjacent to the opening.
- Driving inside the partition. It is more difficult to make such a design. The advantage is saving space along the wall.
- Retractable. The principle of operation is similar to a system where the sash moves along the wall, but special fittings allow it to change its position. Disadvantage: it’s difficult to make and expensive.
Any sliding system consists of a set of rollers, guides, and rails. The mechanism differs in the material of manufacture :
- Steel. For an interior door, a system made of this durable material is chosen. The mechanism is designed for heavy loads. Disadvantage: loud noise.
- Aluminum. Guides from this material are chosen if you need to make a lightweight sliding partition from polycarbonate, plastic, or glass. Advantage: quiet operation.
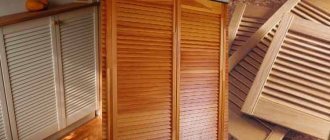
- There is even a plastic mechanism . It is usually used on accordion folding doors. The frameless device is attached to the frame of the doorway. The sash moves on the upper rollers.
An aluminum guide and steel rollers are often used. This mechanism is inexpensive, but long-lasting.
Aluminum
The optimal material for guides, but at the same time expensive. High strength allows you to withstand any weight of the structure. The rollers move along the aluminum guides smoothly and silently.
Aluminum guide
Required materials and tools
To make a sliding door yourself, you will need carpentry and plumbing tools :
- electric drill, screwdriver;
- a milling machine, but if you don’t have one, you can use a chisel;
- wood hacksaw;
- level;
- screwdriver, open-end wrenches for adjusting the rollers of the sliding system;
- pencil, ruler, tape measure.
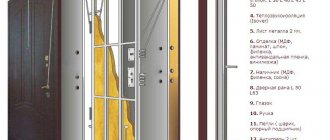
If you decide not to buy a kit, but to make a compartment door yourself, the materials you will need are guides, rollers, and fittings . To fix the top rail, prepare a beam with a section of 50x50 mm . The length of the workpiece is equal to twice the width of the sash. You will need a door frame, trim, anchors, and screws.
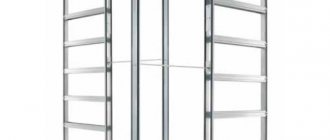
Assembly of top-hung structures using the example of “Puerta”
Suspended structures are silent and comfortable. Such systems are sometimes used in residential premises as sliding partitions. For assembly you will need:
- sets of lower and upper rollers;
- profile;
- stoppers.
Top-hung system "Puerta" assembled
In addition, it is worth preparing guides, purchasing wooden beams, stoppers, appropriate fittings, and, if necessary, trims and false panels. It is important to leave space between the partition and frames. The contact of such elements is unacceptable.
Suspension systems provide for a number of restrictions on dimensions, as well as weight. Sometimes a frameless option is used, in which the doors seem to float above the floor. The absence of a threshold will be an unsurpassed solution for a dressing room, or a partition designed to separate different rooms.
For reliable assembly, it is recommended that you read the information provided on the page. Using her example, it’s easier to understand all the nuances.
Features and installation procedure
To properly make a compartment door between rooms, you need to know when to install a sliding system :
- When choosing the “in the wall” , the mechanism is installed during the rough finishing work of the room. For the niche, a false wall is made of plasterboard. It is important to provide for fastening the embedded beam in the opening in advance. The guide rail is fixed to it.
- If the sash goes behind the wall , the mechanism is installed after finishing. Before starting work, check the condition of the walls adjacent to the opening. They must be strictly vertical without bends, slopes and parallel to each other. Identified deficiencies are corrected, otherwise the coupe will not work correctly.
The leaf must match the size of the doorway. It is important to pay attention to the height of the canvas . The parameter also depends on the chosen method of mounting the mechanism. The roller rail is fixed to a beam or a special profile, but this element can be fixed above the opening or to the ceiling . The height of the canvas also depends on how to make the guide from below . This implies the location of the rails, as well as the presence of a knife or lower rollers.
Component manufacturers
It is not difficult to purchase components for assembling a cabinet door today. Just look at the price list of any specialized store.
Range of profiles
Inexpensive but good component options include Slider-Volkhovets products, complemented by Italian accessories, as well as guides, rollers and other wardrobe parts from Herkules and Rollan. Take a closer look at Framir products - they are quite durable and made of aluminum profiles of the correct geometry.
The leading manufacturers of accessories for sliding wardrobes include the following companies:
- Absolute: provide consumers with lightweight and high-strength structures; There are four types of profiles with different shapes and finishes; another significant advantage of such products is ease of installation;
- Divendoor - fairly inexpensive and elegant steel components for bronze, silver, gold, wood;
- Stanley - reliable products with almost ideal performance characteristics;
- Raumplus: German quality at affordable prices; The warranty covers all components down to the last screw;
- Komandor: another successful tandem of quality and reliability; warranty up to 30 years;
- Ramtrack: In the global market, products from Canada are the standard of quality; This company was no exception; their steel products with durable anti-corrosion coating can be called a quality standard in all respects
Components for sliding wardrobes are less known on the Russian market, but this does not affect their quality in any way:
- Geze Rollan: silent wheels, durable profile, long warranty; but these products, unfortunately, are expensive
- Ducase: the manufacturer claims that their components can last up to 27 years, 100,000 opening-closing cycles; however, these products only have a 12 month warranty
- Laredo: Value for money is almost perfect and they look very decent
Self-installation of sliding interior doors
Recommendations on how to make a sliding door with your own hands, if the mechanism was purchased separately from the door, consist of the following points:
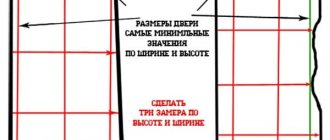
- The sash is leaned against the opening, where a mark must be made with a pencil on top of the wall. A horizontal line is drawn 7 cm above it. The beam will be located here. The horizontality is checked with a level so that the canvas does not move spontaneously.
- A guide rail is attached to the bottom side of the beam with self-tapping screws. The fixation step is 15 cm. The beam is fixed to the wall with anchors where the mark was made. Rollers are inserted into the rail, and the ends are covered with shock absorbers.
- For smooth opening and better operation of the mechanism, a second guide rail is installed from below. It is cut into the end of the sash or the lower lintel of the frame. The second option is worse due to the formation of a threshold.
- The brackets (the main fastening of the rollers) are fixed to the upper part of the canvas with self-tapping screws. With their help, the sash is secured to the roller carriage, moved completely to the open position, and the location of the lower guide element is measured.
- The canvas is temporarily removed. Depending on the choice of system, a roller or guide knife is fixed to the lower jumper of the box.
- When hanging a sash, a guide knife or roller is first inserted into the rail from below. The brackets are connected to the carriages. Next, use a wrench to adjust the bolts, ensuring the door is horizontal.
- After checking the functionality of the system, side racks are made to serve as a stop for the open and closed door. Then they hide the entire mechanism with extensions and platbands.
We install cassette-type sliding doors in a pencil case
For a cassette door you need to make a pencil case. Depending on the width of the opening, one or two sashes are installed. In the second option, two pencil cases are assembled on opposite walls. The cassette is installed instead of the partition. The structure is a hollow false wall. If the opening is located on a load-bearing wall, it cannot be dismantled. The cassette is simply attached. The septum thickens, but there is no other way out.
The production of the pencil case begins after laying the floor covering. The false wall frame is assembled from a profile or timber. The guides are attached to the floor and ceiling. 2 rows of racks are fixed to them. If the cassette is adjacent to a load-bearing wall, then it is enough to make 1 row of racks. An embedded beam is provided for the top rail. The depth of the pencil case corresponds to double the width of the sash. A gap of 5 mm is maintained between the end of the blade and the guide rails. The thickness of the pencil case exceeds the sash by 2 cm. Usually this value is 8 cm. Installation of the sliding system is the same as for a door that slides behind the wall.
Size calculation
When assembling a wardrobe door yourself, there are two options. The first is to measure the opening, think about how many doors you need, and communicate that information to the door manufacturer. Just make sure they sell the parts without the assembly fee. The manager will calculate all the necessary materials for you, name the dimensions and announce the amount. It's simple. But you will have to buy everything in this office, that is, choose from what is there.
The second way is to calculate everything yourself and select the necessary components for different companies. More complicated and more expensive, but the choice is wider. For those who do not like simple methods, we will describe the calculation of the components.
Doors
Calculate the width of the doors so that when closing only one handle is visible, but it should not cover the door itself. For a double-leaf sliding door, calculate as follows: measure the width of the opening, add the width of the profile and divide it in half. This will be the width of the door.
For example, the opening is 1600 mm, the width of the handle profile is 26 mm. We get 1600mm + 23mm / 2 = 811.5mm. Please note that the width of the handle profile is arbitrary. It can be different in shape and, of course, in width. In the calculation, replace the width of the structure you choose.
Profiles may be different, so they must be measured individually
To calculate a tri-leaf, you will need to add twice the profile width and divide by 3.
Example: opening 2100 mm, handle width is the same - 26 mm. We count: 2100 mm + 2 * 26 mm / 3 = 717 mm.
Everything is easier with height. 40-45 mm is subtracted from the height of the cabinet and the desired door height is obtained, in addition to the length of the side profiles. Everything about the valve size.
Filling
Since the filling is in a frame of profiles, we subtract double the width of the profile from the total width of the sash. We do the same with height: subtract the height of the lower and upper profiles.
Measuring the width of profiles
Thus, the width of our door is 811.5 mm. The measured width of the handle profile is 18 mm. Since the handles are located on both sides, we double this figure. We get 36 mm. Total filling width 811.5 mm - 36 mm = 775.5 mm.
We also take into account the height: both the original one is 2350 mm, the width of the upper profile is 12 mm, and the width of the lower one is 48 mm. Total filling height 2350 mm - 12 mm - 48 mm = 2290 mm. This is if the filling is solid and is chipboard, which does not require a silicone gasket. If the sash is a solid mirror or glass, the thickness of the sealing rubber must be subtracted from the found height. It is 1mm, but since it is worn around the perimeter, 2mm is required overall - top and bottom. In this case, the filling height is 2290 mm - 2 mm = 2288 mm.
If the sash filling consists of fragments, the thickness of the connecting profile is also subtracted. This is also about 1 mm.
Profiles
The height of the vertical frame profiles is equal to the total height of the sash. The width of all horizontal ones is calculated based on the width of the handle: from the width of the door we subtract twice the width of the handle (there are two of them).
How to measure handle width
The width of the handle should be 26 mm. We get the width of the vertical profiles: 811.5mm - 26mm * 2 = 759.2mm.
Sources
- https://mebel-sovet.ru/shkafy/kupe/616-dveri-svoimi-rukami
- https://krrot.net/dveri-dlya-shkafa-kupe-svoimi-rukami/
- https://1PoMebeli.ru/spalnya/prostye-dveri-dlya-shkafa-kupe-svoimi-rukami.html
- https://legkovmeste.ru/remont-i-izgotovlenie-mebeli/shkaf-kupe-svoimi-rukami.html
- https://infomebli.ru/spalnya/shkafy/kupe-dvercy-svoimi-rukami.html
- https://stroyday.com/dveri-dlya-shkafa-kupe-svoimi-rukami/
- https://VseMe.ru/svoimi-rukami/dveri-dlya-shkafa-kupe
- https://delairukami.ru/mebel/schkaf_kupe_svoimi_rukami/
- https://mblx.ru/shifoner/razdvizhnye/434-dveri-dlya-shkafa-kupe-svoimi-rukami.html
- https://stroychik.ru/mebel/dveri-dlya-shkafa-kupe-svoimi-rukami
How to make compartment doors with your own hands?
Complete installation of compartment doors from scratch involves not only the installation of the working mechanism, but also the manufacture of the leaf. To make a sliding door with your own hands, step-by-step instructions look like this:
- The door leaf is made 2–3 cm larger than the opening in height and width. It is better to make the sash frame from timber. The elements are connected using a tongue-and-groove locking method. For cladding, it is advisable to use lightweight materials: MDF, plywood, fiberboard, plastic. You can insert glass, laminate and even a mirror.
- When the sash is ready, the installation of the sliding system begins. The beam is attached to the upper guide rail. Measure and install the lower guides. Hang the canvas and adjust the mechanism. A homemade compartment door is made at will, opening behind the wall or going into a pencil case.
The installation principle of sliding systems is the same. The only difference is the way the sash moves. For a novice craftsman, it is easier to make a compartment with an opening behind the wall.