Before we begin to figure out how to foam a window, we need to understand under what circumstances foaming of a plastic window will take place. That is, is the polyurethane foam correct? What time of year is it winter or summer? And so on. I am posting detailed instructions with photos and videos on how to properly foam a plastic window.
First of all, let's talk about preparing for foaming. Then, in order, I will talk about the facts that influence foaming methods. Next, directly about how to foam a window. Then we will touch on the topic of foaming auxiliary elements, such as window sills, slopes, ebbs, additional profiles and connections. And at the end of the article, I will share ways to train for foaming.
Proper foaming when installing PVC windows
Oddly enough, the use of foam during window installation is not practiced everywhere.
Moreover, it is considered a sign of unprofessionalism and the desire of the contractor to hide defects of the measurer or the installer himself. This is typical for countries with warm climates. However, in the Russian climate, the use of foam is not only extremely desirable, but also absolutely necessary. After all, this ensures proper thermal insulation at the junction between frames and walls. But the foam copes with its functions successfully only if all technological subtleties are observed during its application.
It is difficult to reflect all our experience and the quality of our services on the website. Each case is individual, so don’t waste time searching, it’s better to ask your question directly!
We will advise you on services, terms and prices over the phone - leave your number below on the “Request a call” button.
The correct distribution of foam can be influenced by many random factors: the degree of moisture in the wall, air humidity at the time of application, the type of gun, the qualifications of the technician, the type of foam itself, temperature conditions; the temperature of the cylinder, shaking the cylinder before use... And taking all these factors into account can sometimes be very difficult. So it is important to trust foaming work only to truly competent professionals in their field.
Installation of a window sill block
Now we have come to the answer to the main question, how to install a plastic window sill. First you need to adjust the material; the best and easiest way to do this is with an electric jigsaw. After cutting to the required size, place the slab in the desired location to make sure everything is done correctly.
In order not to make a mistake and not damage the slab, first cut off a little with a margin, attach and accurately measure the area that needs to be removed. Then make a control cut and again check the compatibility of the slab with the opening of your window.
Window sill installation diagram
If there are no recesses in the walls, they must be made using a hammer drill. Do not make them very deep at once; knock out the holes evenly and slowly. Even if there is excess space, it can be easily sealed using polyurethane foam.
If you have adjusted the window sill plastic plate and prepared the recesses for it, you can proceed to the next installation stage.
Next, you need to place the plastic board in place and begin wedging its front edge using wooden wedges. The wooden wedges should be hammered in gradually every thirty to forty centimeters. This way you will ensure maximum load distribution and uniformity. The maximum height of the wedges may not exceed two to three centimeters.
If you use wedges of long length and with a small angle, then they are able to distribute the load well and take most of it upon themselves. Thus, the installed window sill will be able to withstand more weight on its plane.
When you have firmly secured the window sill using wooden wedges, you need to measure its position using a construction bubble level. Using such a tool, make sure that the slab is installed level with respect to all planes. If there are deviations, they must be adjusted by controlling wooden wedges. Minor deviations from the level can be left as is; they will not affect the quality.
Correct and incorrect installation
The final stage of installation will be reliable fixation and insulation of the window sill. This is done using polyurethane foam and a special gun with an extension for applying this very foam. It is necessary to foam the entire empty space under the slab so that there are as few voids as possible. If you can't get to the farthest edge, carefully seal the part closest to you.
Tips for improving quality
If during installation a too large void is formed under the window sill, then it can be filled with polystyrene foam or mineral wool. So, you will save on significant costs of polyurethane foam. It is better to use mineral wool, as it will be possible to install it more tightly. You also seal the edge with polyurethane foam.
To make the installation of the slab more dense, after foaming, you can put something heavy on it and leave it there until it dries completely, ideally for the whole night. In the morning, the weights can be removed and the window sill will be completely ready for further use.
To protect yourself and the surface of the product, do not remove the protective film during the installation process; it will protect the surface from scratches and the installation will be of the highest quality. Slopes and window sills must meet smoothly so that there are no cracks or gaps.
How foam works
The foam itself consists of several components, each of which is “responsible” for something different. Everything would be fine, but you just need to always remember that these components do not tend to mix with each other during storage of the cylinder. This is why it is extremely important to ensure that the can is thoroughly shaken before application. To do this, be sure to turn it upside down and shake vigorously 30 times. It is also necessary to periodically shake the container during operation so that the components do not have time to settle and are in a constantly mixed state.
Immediately during the departure of the foaming mass from the nozzle, the so-called primary expansion begins. This happens by mixing chemicals with oxygen. Then comes the secondary expansion phase - diisocyanates and polyurethane are mixed. At the same time, household foam expands approximately twice, while professional foam expands only by 50%.
Good foam does not spread, but only inflates, since a hard thin film immediately forms on the outside, preventing it from spreading. It is extremely undesirable to pierce the film to avoid the formation of so-called fistulas inside the mass after it dries. The polymerization process itself lasts up to two days. At the same time, the foam gradually decreases in volume - it “shrinks”. The shrinkage percentage of good foam sprayed through a gun, and not through the supplied plastic tube, should be no more than 7%.
Removing a plastic window sill
Removing a window sill is a simpler procedure than installing it. Initially, you need to very carefully remove the layer of plaster under the window sill.
After this, you need to use a knife that has a hard blade to cut off the foam layer. This action must be performed as carefully as possible so that the foam layer does not break. Next you need to pull the window sill towards you, where the dismantling will end.
The second option for dismantling the window sill does not require removing the plaster and slopes. To do this, you need to take a regular hacksaw for wood, with which you can cut the polyurethane foam.
Next, you need to remove the liquid plastic from the joints of the slopes in the same way. In this case, the window sill must be pulled towards you as carefully as possible.
If it is not possible to dismantle the plastic window sill in this way, then it is necessary to saw through the layer of polyurethane foam that is located under the window.
After this, the window sill must be pulled towards itself again. If the window sill does not give in, you should not exert maximum physical effort, as it may break.
In order to dismantle the window sill you need to apply a minimum of effort. But all actions must be performed as carefully as possible so as not to damage the structure of the window sill.
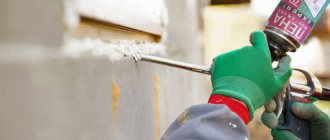
How to foam a window correctly
Of course, only professional foam should be used to foam windows and doors. After all, the household expands 2 times, as already noted, and then rapidly contracts. Because of this, it is quite difficult to calculate the total volume of foam required. There is also a high risk of deformation of the structure. In addition, spraying through a tube is extremely inconvenient. It is advisable to use a special gun for these purposes.
Although professional foam is less susceptible to dependence due to changes in air humidity, this factor should also be taken into account. And before applying foam, be sure to spray the bonded surfaces with water. In addition, this will improve the adhesion of the foam to the surface itself and will contribute to its more uniform distribution throughout the volume.
Humidification should be carried out not only during hot weather, but in general - in any weather. At the polymerization (hardening) stage, if possible, fluctuations in ambient humidity should be excluded. But it is important not to overdo it - to prevent the formation of puddles.
For gaps larger than 6 cm, the foam is applied in several stages - 2-3 layers. If everything is done in only one layer, the foam will simply settle down under its own weight.
Preparatory process
At this stage, the opening is being prepared for installation of the structure. The entire list of work comes down to ensuring the strength and reliability of the future site for installing the window. To do this, you need to inspect the perimeter of the opening. If serious distortions, potholes and other defects are discovered after dismantling the old window, you need to take appropriate repair measures. Deep potholes and other openings are covered with concrete mixture. Poorly fitting fragments of concrete or plaster are removed and also leveled. You will also need to remove any old paint or coatings that may reduce the adhesion of the applied foam. If leveling was carried out using a large amount of cement mortar, then before further work it is necessary to wait for the strength to gain.
How and with what to seal cracks in windows
In this note we will not talk about the windows themselves, but about the gaps between the window frame (whether PVC windows or wooden ones) and the wall (wood, brick, concrete). This is a common disease of a post-installation installation: the cracks are poorly foamed or completely empty, after a year or two fungus and mold spread, the wind blows, or even a nasty insect breeds (this can also happen).
If your hands are growing from the right place (a prerequisite), then you need to take care of your windows as quickly as possible - before frost sets in. All images in the article are clickable.
The first part of “caring” is preparatory work. The cracks need to be cleaned and the brown dry foam removed. If a window is blowing inside the apartment from under the window sill, then you need to hang from the street side, unscrew the ebb (2-3 screws), clean the subframe/substitute profile and the gutter and foam it (be sure to wait until the foam comes out and dries, then you need to cut it off and paint over it).
The second part of the work is to find material to eliminate the gaps between the wall and the frame. For some reason, the majority of the population is firmly convinced that polyurethane foam is the key to sealing, whereas it is just insulation
,
fasteners
and
seals
that are resistant to dampness, moisture and direct exposure to ultraviolet rays. Nowadays you can find anything you want on the RuNet, but we live in the real world, so what is sold in a nearby hardware store or the nearest construction market is much more relevant.
The best idea is to make external slopes with your own hands and sleep peacefully by the window in winter. If you are too lazy to bother with plastic, there are options with cement mortar and even simple painting of building plaster (concrete). All this is good and better than nothing, but first you need to get rid of the inter-frame gaps.
And the necessary belongings:
- Newspaper
- White spirit (kerosene)
- Rubberized gloves (preferably the smallest ones so that they crack on your hand)
- Spatula (you need a clean one, but mine is dirty)
- Rag (wipe the nose of the sealant gun so as not to stain everything around it)
Essentials of the second order (hidden advertising of Tytan polyurethane foam):
Not everything that stands here is suitable for harsh winter conditions.
Can:
- Acrylic frost-resistant sealant (tested!)
- Roofing rubber-bitumen sealant (tested!)
- Cork or polyurethane sealants (tested!)
- Bitumen mastics - possible, but will probably have to be heated before use
It is forbidden:
- Polyurethane foam - it is needed only for sealing seams, but not for final sealing
- Silicone sealant - rolls off after winter; however, if it becomes overgrown with dirt, it will turn into a real piece of gum
Let's focus on acrylic sealant
. It has been tested and holds up well (no matter what anyone says; although, of course, acrylic shows the best result on a thick seam, a thick layer + paint on top - it turns into concrete, not subject to frost, ice, or water).
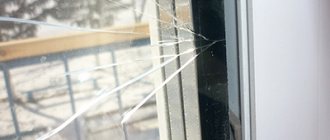
And here is the gap itself from different angles. Sound familiar?
Due to the fact that it is quite thin and the nose of the gun will not fit there without an attachment, the gap between the PVC frame and the wall remains empty.
Or this misfortune (future moisture collector), which needs to be dug deeper in order to put a layer of sealant there:
The third part of the work is practical. We drive the tube with acrylic into the gun. It is advisable to cut the spout at an angle so that you can rotate it in slots of different widths:
Portal about construction
Installing a window sill is usually the final stage of installing a plastic window, which is usually carried out by professionals - the company where you ordered this window. However, installing a window sill is quite simple compared to installing the window itself, and it is quite possible to do it yourself, without special skills. We will consider installing a window sill made of plastic, since this material is quite popular - it is cheap, durable, non-corrosive and easy to clean.
So, we will need the following tools:
- jigsaw or circular saw;
- level;
- a gun for polyurethane foam and the foam itself (if you don’t have a gun, you can do without it);
- tape measure and pencil or marker;
- a hammer drill with a chisel (if you have to make holes for the window sill).
Getting started - measurements
Of course, any installation work of anything begins with careful measurements. Decide how wide your window sill will be - it depends on the thickness of the load-bearing walls and how much it will protrude beyond the wall. The recommended protrusion is a maximum of 10-15 centimeters, otherwise it will simply get in the way. You need to add 2 centimeters to the total width of the window sill, since this part will be located under the window.
We add 5 centimeters on each side to the length of the window sill - this part will go into the side slopes of the window so that the cut edges of the window sill are not visible. By the way, if the slopes are already installed, you will have to break their lower part in order to insert the window sill there. If there are no slopes, you need to make grooves 5 cm deep with a hammer drill.
Window sill installation
We measured, checked all the calculations - you can cut off the excess from the window sill, which you should have already purchased. Of course, you need to purchase it when you already know the dimensions, and you will only have to cut it in length, and certainly not in width. You can cut plastic with an electric jigsaw or a hand-held circular saw - which is what you have on hand.
Reinstalling windows: possible and necessary
If you are thinking about the question of whether it is possible to remake a plastic window, it means that some difficulties have arisen during use
If you are thinking about the question of whether it is possible to remake a plastic window, it means that some difficulties have arisen during use. The circumstances that forced you to pay attention to this problem may be different. The most common situations are:
- Deformation of the window frame or distortions. This problem can arise both in the event of an attempt to break into the structure, and due to poor-quality installation. Also, the occurrence of such a malfunction can be caused by a fire in the room or exposure to high temperatures observed due to other factors. The result will be a window unit that rests crookedly on the window sill, has moved out of the opening, window sashes that do not close or open, or the occurrence of other problems.
- Poor quality installation. Perhaps it can be considered as an independent reason. The question of whether it is possible to remake a plastic window will certainly worry those who have used the services of crooked installers. Moreover, the result can be different - from the above-mentioned distortion and deformation to the formation of condensation on the glass in the room, ice on the double-glazed window, blowing from under the structure and even rainwater flowing into the room. In some cases, flaws in such an installation can be corrected yourself. For example, if there is a lack of sealing foam somewhere around the perimeter. In particularly “difficult” situations, rewiring is indispensable. Moreover, if you need to reinstall a plastic window, then, knowing that problems with operation arose due to the fault of the company that carried out the work, you can go there again for rework, and they will be obliged to eliminate their own defect free of charge.
- Transfer of structures. Sometimes the question of whether a plastic window can be reinstalled worries those citizens who would like to carry out work not in one window opening, but in different ones. In short, we can talk about moving previously installed structures to another location. And usually they are quite good. The reasons are different. Maybe you recently installed expensive new windows throughout your entire apartment, and now it’s finally time for the house to be demolished, and it would be a shame to lose these products? Or, for example, the structures in your home that have already lost their luster, but are quite strong, could be useful for a summer cottage.
Ways to remove the structure
Removing a window sill from a plastic window is a simple task that can be done by an amateur if armed with a simple set of tools and patience. First of all, you need to remove the trim, if any. If they are made of plaster, then using a drill or other tool you need to carefully knock it off in the area of the window sill. Carefully inspect the structure: old window sills may not hold very firmly and may wobble; this will make dismantling much easier.
Cutting through the foam
The joints between the structure and the window profile are usually filled with polyurethane foam. The window sill needs to be freed from it first. To do this, you will need a stationery knife; excess foam is cut off. If possible, raise the window sill, insert a metal saw blade under it and cut through the foam, being careful not to touch the plastic. In addition, under the window sill you need to destroy the old putty; a special cut is made for this. You can use a jigsaw to cut the window sill.
If you can’t lift the window sill with your hands, you can carefully push a crowbar under it: by creating a lever, you can easily tear it away from the remaining foam. After this, you can carry out all the necessary procedures. If the window sill is intact, it can be removed from the foam, the window opening can be cleared of it and other debris, and the part can be installed back.
Removing the window sill
How does the reinstallation work?
Dismantling must be done very carefully. The procedure is the reverse of window installation. First, the sash is removed, then the double-glazed window is pulled out from the blind parts. The foam in the assembly seams is cut and the fasteners are unscrewed.
It is better to work together so that the components do not fall on the installer or on the street - this could result in careless glass breaking or injury. Before reinstalling, you will need to clean the frame a little to avoid problems with sealing later.
Source: www.oknarosta.ru
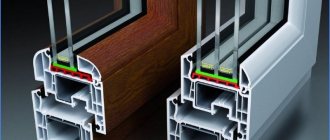
Waterproofing seams from the street
Polyurethane foam is an excellent thermal insulator. The material does not allow hazardous moisture to pass through and is not destroyed when exposed to direct rays. The seal requires complete external waterproofing, as well as internal vapor barrier of all window seams. Thanks to this, a specialist can seal all the cracks around the glass unit as tightly as possible.
For high-quality waterproofing, multifunctional sealing or vapor-permeable waterproofing tape is actively used. This material is neatly fixed to the front side of the frame without overlap. A carefully taped PVC window is carefully inserted into the prepared opening. Care must be taken to ensure that the adhesive strip does not move.
The vapor-permeable material is attached under the equipped ebb. The tape is measured and cut along the length of the double-glazed window with a margin for installation under external slopes. If there is not enough width to properly close the mounting seam, then you need to cut another tape and glue it to the first strip.
Waterproofing product
From plasterboard
Drywall is a panel made of gypsum, covered with cardboard on both sides. This material makes the cladding strong and durable. The main advantage of drywall is its low price, which makes it very popular among craftsmen and even beginners.
For plasterboard slopes, experts use moisture-resistant plasterboards, since this is the place that is most affected by temperature changes and condensation forms. Gluing slopes from plasterboard is not difficult, but there are still differences from working with the plastic version.
Algorithm for working with drywall:
- Make all the necessary measurements: width, depth and height. Measure the latter twice - near the window and wall.
- Taking into account the results obtained, cut out the necessary parts from the drywall with a construction knife.
- Apply polyurethane foam to the slope and press the drywall for a couple of seconds. Separate the part and wait for the foam to fully expand a second time.
- Reattach the part and secure it. Can be strengthened with self-tapping screws.
- Attach metal perforated corners to the corners of the drywall.
- Finish the corners with putty. Wait until completely dry.
- Paint the slopes.
Advantages of plasterboard slopes:
- Low price.
- Long service life.
- Small amount of waste.
- Obtaining a smooth surface.
- No additional tools required.
- Versatility.
- Does not require additional use of putty or plaster.
- Protects well from environmental influences.
- Mold and mildew do not grow on it.
- Environmentally friendly.
- Easy to use.
Working with the cylinder with the valve down or in a horizontal position
The bottom of the cylinder should be directed upward, so the propellant gas will put pressure on the contents. This will ensure a high yield of material. This rule is often violated with household foam.
Working with a household cylinder
Working with professional polyurethane foam
For household foams, a disposable tube is used. All work must be completed in one go. You can install a mounting gun on professional foam.
With professional foam, the most common mistake is when holding the container in a horizontal position. This often happens due to uncomfortable working conditions. For example, when the cylinder rests on the ceiling. In this case, you can install a thin flexible tube at the end of the gun, which will allow you to hold the cylinder upside down.
Polyurethane foam sealant: a little theory
How to work with sealant without a foam gun? Very simple. But first, let's talk a little about the main character of this article - foam. For what? And then, to understand the principle of operation of polyurethane foam. I think no one wants to ruin the substance and the home. It is so? Great. Then let's get started.
Story
The sealant was born thanks to the German chemist-technologist Otto Bayer. He invented the substance back in 1937. Or rather, he discovered polyurethane. And in 1970, specialists from an English company invented polyurethane foam sealant.
It has been tested and improved over the years. In 1980 it was used by construction workers in Sweden. The invention was to the liking of many maestros of architectural art, since it had a number of positive properties.
Today, of course, sealant is produced in many countries. For its production, exclusively innovative technologies are used.
Concept
Polyurethane foam or polyurethane foam sealant is a substance that consists of two components - polyols and methyl...ate (you'll break your tongue there). In addition, in the manufacturing process of the product, stabilizers, catalysts, a mixture of butane and propane, etc. are used.
What to look for when choosing?
Characteristics requiring increased attention:
- Secondary expansion coefficient.
- Density.
- Viscosity.
- Degree of shrinkage.
- Final output volume.
- Adhesion to various materials.
- Time for complete hardening.
- Weight.
It is impossible to verify the quality of a product in a store, but it is recommended to pay attention to the following signs:
When choosing foam, it is important to choose a reliable, well-known manufacturer. It is best to buy popular brands, because they value their reputation and will not lower the bar. This only applies to quality. After all, they pay a lot of money for a big name, so their products are much more expensive than others.
Sandwich panels
Sandwich slopes are very similar to ordinary plastic ones. There are 2 and 3-layer:
- The first consists of a decorative plastic layer, and the second is foamed polystyrene.
- Three-layer ones have decorative layers on both sides, which gives the structure good strength and helps keep its shape.
The main layer of the sandwich performs an energy-saving function. It does not conduct heat, which means it does not allow condensation to occur.
It is for slopes that two-layer panels are used so as not to additionally insulate the inner layer of plastic. To install sandwich panels you will need: screwdrivers, a jigsaw, a tape measure, liquid nails (+ a gun) and a furniture stapler. Stages of work:
- All necessary measurements are taken and the necessary parts are cut out.
- All panels are fixed in place with low-deformation foam.
- After the foam has completely hardened, the slope on its inner part is cut. The platband is glued onto liquid nails.
- The joints between the slopes and the window sill are sealed with silicone.
Advantages of sandwich panels:
- Excellent strength at fairly low weight.
- Good insulation (find out what else you can use to insulate slopes here).
- Suitable for any interior.
- Resistant to changes in environmental conditions.
- Do not rot or spread mold.
- Noise insulation.
- Easy to install and maintain.
Making slopes is not that difficult. Any man who has held tools in his hands at least once in his life can cope with this task. No special equipment is required. Everyone has the opportunity to choose finishing materials based on appearance, characteristics and price.
After installing the plastic window into the opening, you need to fill all the gaps with polyurethane foam. Its main property is the ability to increase in volume many times over.
This is done to increase the noise and thermal insulation of the structure. Reliable sealing protects against blowing and street noise.
But not everyone knows how to properly foam a plastic window. Our article will be useful to everyone - those who install the window themselves, and those who supervise the installers.
Classification by seasonality
Any foam has its own temperature regime for use. Therefore, before purchasing, the temperature inside or outside the room is taken into account, depending on where the work is performed. Manufacturers indicate this parameter on the cans. There are three varieties:
- Summer (5–35 °C).
- Winter (from -10 to -35 °C).
- All-season (from -10 to +35 °C).
It is important to maintain temperature conditions. But if you do not adhere to it, this will affect the characteristics of the foam itself, its hardening time, and the density of the seam. The expansion coefficient and the quality of all work depend on temperature.
What are the benefits?
Repair is not an easy task, so many people prefer to turn to professionals for help. Yes, installing a new double-glazed window is difficult and too responsible, but any man can foam the slopes.
Thanks to the foam, the seams between the window and the wall are hermetically sealed and in the future will not let in either cold air or noise from the street. People often encounter a situation where the master did not fill the space well enough, voids were formed, which then led to heat leakage.
It is impossible to see these errors visually, so experts advise checking the quality of the work performed with matches. You need to bring the flame to the seam: it should not tremble or even tremble slightly. If deficiencies are nevertheless found, the foam is re-filled so that the seams become completely sealed. On the second or third day, the excess foam is cut off and finishing of the slope begins.
The design of slopes is carried out both from the outside and from the inside . Without completing the exterior finishing, you should not move on to the interior.