Finishing
Sealing windows using high-quality polyurethane material is one of the most important stages of installation. That is why this work should be carried out exclusively through strict adherence to important stages.
The foam sold today has characteristic features, since with its help it is possible to significantly improve thermal insulation, as well as protect the house from street noise and adverse weather conditions. Poor sealing of cracks significantly reduces the service life of a PVC window due to possible bending and breaks.
Seam formation
Classic scheme for foaming a double-glazed window
The master must approach the solution of this problem as responsibly as possible, since the durability of the entire structure depends on this. Filling existing gaps is quite simple if you know the basic steps:
- It is necessary to thoroughly moisten the surface of the window opening using a regular spray bottle. Care must be taken to ensure that no smudges or large drops of water form. Otherwise, the master simply will not be able to foam the slopes efficiently.
- If the planned construction work does not involve the construction of special seams, then it is necessary to cut a small piece of vapor barrier tape along the width of the opening with a slight allowance.
- Along the edges of the material involved there are two adhesives, which are hidden from dust by small strips of paper. It is necessary to remove the protective coating from the adhesive tape and carefully glue it to the frame. At this time, the second edge remains unused.
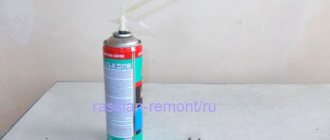
- The bottle should be heated to the optimal temperature, which is indicated by the manufacturer on the bottle. The container must be shaken at least 16 times. It is also worth shaking the composition periodically during use.
- The tape should be held by the unused edge so that it does not get dirty. It is necessary to slowly foam the free space between the double-glazed window and the internal compartment of the wall. All openings must be tightly closed to a maximum of 3⁄4. This is directly related to the fact that after some time the foam will gradually increase in size and fill all the defects. If the holes are too deep, then they are filled in two approaches. The pause before applying subsequent layers should be 15 minutes.
- You need to glue the free end of the adhesive strip to the structure, but only so that it is not stretched. The tape will smooth out as much as possible during the natural expansion of the foam composition.
- It is necessary to gradually seal the seams without any gaps on the outside. Particular attention is paid to the areas around the nails. Otherwise, the windows will freeze in the winter.
- To thoroughly seal the slopes, you need to apply thin strips of material 25 mm wide. The distance between them should be at least 1 mm. Consumption depends on the initial state of the structure. Foamed areas harden in 140 minutes, but it is best to let the structure stand for two days. After this time, you can begin further work on the seams. During this process, the foam is partially trimmed.
Construction of a reliable structure
How to foam auxiliary window elements?
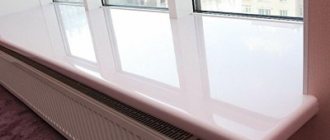
How to foam the ebb and window sill?
As mentioned above, the ebb and window sill are foamed at the same time. In this way, the best joint filling density is achieved. We cut the ebb and window sill to size in advance. First we apply foam from the street side. We cover the support pads with foam, foam half of the window sill profile, apply foam to the platform under the ebb and screw the ebb.
If installers first install the flashing and then foam it from the inside, then in most cases it will turn out that the support pads will not be completely covered with foam. Technically, this can be done from the inside, but it is very difficult. The result is freezing of windows, fogging, condensation, and so on. From experience, 90 percent of such cases are precisely a variant of poor-quality foaming of the ebb. Here is a photo.
Then, while the foam has not yet dried, we continue to foam the bottom seam, but now from the inside at the junction of the window sill and the window. And we actually install the window sill.
When expanding, the foam first of all fills all the voids directly in the area of the junction of the ebb and flow with the window and the window sill with the window. Then, the excess foam seems to spread on both sides of the window into the free space, inward under the window sill and outward under the ebb. Thus, a perfectly correct, foamed, bottom assembly seam is obtained. Naturally, the main thing is not to overdo it with foam. Although a slight swelling of the window sill or low tide is compensated by warmth and comfort in winter))).
How to foam slopes?
The slopes are foamed in the same way. If the width of the installation seam is less than 5 cm, then the slope is installed simultaneously with foaming of the main installation seam. Here, too, the main thing is not to overdo it with the amount of foam. It is enough to foam 2/3 of the profile of a plastic window and foam a section of the wall 10-15 cm from the frame into the room. Then we simply insert the slope into the fresh foam before it dries. After expansion, the foam tightly presses and glues the slope to the frame.
How to foam profile connections?
To be honest, I think it's better to coat most joints with sealant. Foaming is certainly cheaper, but requires some skill. Although there is a good video on this topic by Alexey Zemsky, a famous builder. The method is not fast, but effective.
Foam the first layer, wait a while until the foam sets. Then, apply a second layer and immediately connect the products. All types of plastic joints can be connected in this way:
- Additional profile
- Connecting profiles (straight, bay window, 90 degree)
- Window sill profile
Extra hydration
Climatic conditions play an important role in the natural polymerization process. The intensity of moisture affects the correct reaction between all elements, as well as the adhesive properties. Good humidity minimizes the likelihood of foam sagging and also helps form a durable base.
Before you start foaming the opening, you need to properly moisten the surface with a spray bottle. The sprayed moisture hits selected areas, leaving certain parts of the slopes clean and dry. It is to them that the vapor barrier tape is subsequently glued. The master should not overdo it with water. Tiny fragments of fine foam are simply not designed to be exposed to the specific gas. It evaporates extremely quickly and settles, and voids form in its place.
The contents of a standard cylinder include several different components that do not mix even during long-term storage. Manufacturers also provided the presence of gas, due to which the substance is squeezed out. To figure out how many cylinders are needed to seal all joints, you need to correctly assess the actual condition of the structure.
Using a spray gun
During the chemical reaction, the foam expands again. As a result of this, it gradually inflates, but does not crack due to the crust that forms on the surface. It should take 48 hours for it to dry completely. Upon completion of this process, shrinkage occurs, which can range from 30 to 48%. For professional material, this figure is only 6%, which indicates high quality.
It is worth noting that if the cylinder has not been used for its intended purpose for more than 24 hours, then you need to release just a little foam into the trash by briefly pressing the lever. This situation is especially relevant in frosty weather. If this is not done, then at first the holes will be covered with a mixture that is too viscous and fluid.
This material will not adhere to the surface, but will simply flow out. After hardening, too large voids will form in the foam. The seal exits completely silently. In a normal situation, this process should be accompanied by a characteristic sound.
You can learn the foaming technology from the video:
How to foam windows and slopes correctly
Sealing a plastic window using polyurethane foam is considered a critical window installation process, so it must be performed through a clear sequence of specific actions.
Polyurethane foam has its own characteristics, and its correct use during window installation provides the necessary thermal insulation, protection from noise and weather conditions. Poor quality sealing reduces the life of a plastic window due to possible distortions and sagging.
In some European countries, it is considered inappropriate to use polyurethane insulation to foam window slopes, so they prefer silicone or mortars.
In fact, silicone does not withstand severe frosts, which leads to freezing of plastic windows and the formation of mold on the openings, while polyurethane foam can provide better thermal protection. And the use of mineral wool and tow during window installation is generally inapplicable. Thus, foaming a PVC window using polyurethane foam insulation in countries with very cold winters is an ideal option.
It is a mistake to consider the main reason for freezing of a plastic window to be the foaming of large gaps between the opening and the window with mounting sealant, thus hiding the mistakes of the measurer. In fact, the thermal conductivity of foam is several times lower compared to plastic windows, which increases thermal insulation by the same times if the window is foamed correctly.
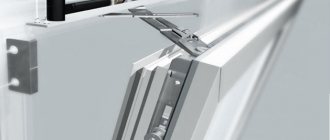
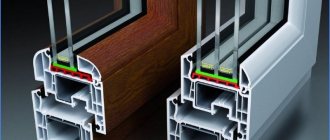
The quality of a polyurethane seam is affected by a combination of a number of reasons, which can sometimes lead to negative consequences. This includes the quality of the polyurethane foam and thorough shaking of the can before use, the volume of foam extruded, the level of humidity of the window opening and air, and the temperature of the can. The window opening must be completely foamed, without through holes. The cut seam is homogeneous, finely porous, without voids. When pressed, the surface of the foam should straighten out and not crumble or crunch.
An important feature is the high-quality adhesion of the foam to the contacting surface, which allows the foam to withstand temperature loads in all weather conditions.
Assembly seam diagram
The composition of a container of polyurethane sealant consists mostly of polyurethane, a foaming agent - diisocyanate and other components that do not mix with each other for better preservation. The top layer of the cylinder is a gas that displaces these components out
Therefore, it is very important that the components of the cylinder are constantly thoroughly mixed together.
The process of action of polyurethane insulation is as follows. Household or professional foam, when extruded with gas, comes out in foamed form, after which the polyurethane, entering into a chemical reaction with diisocyanates, re-expands several times if it is household foam. At the same time, the soft crust that forms on the surface of the foam prevents it from spreading.
It may take two days for the polyurethane insulation to completely harden, and it is accompanied by shrinkage of the sealant by 50% when using household foam and up to 7% when using professional foam, extruded through a dispenser gun.
It is quite difficult to determine the amount of foam to fill the required volume after secondary expansion. An insufficient amount of foam poured into the opening will cause the window to freeze and skew the slopes, and its excess will cause the window sill to bend or the vapor barrier tape to peel off.
The appropriate foam is used for each season of the year. Summer polyurethane sealant is designed for use at temperatures from 5 degrees, and winter - up to -10°C. All-season polyurethane foam works in a wider temperature range, anywhere from -10°C to +40°C.
Waterproofing seams from the street
Polyurethane foam is an excellent thermal insulator. The material does not allow hazardous moisture to pass through and is not destroyed when exposed to direct rays. The seal requires complete external waterproofing, as well as internal vapor barrier of all window seams. Thanks to this, a specialist can seal all the cracks around the glass unit as tightly as possible.
For high-quality waterproofing, multifunctional sealing or vapor-permeable waterproofing tape is actively used. This material is neatly fixed to the front side of the frame without overlap. A carefully taped PVC window is carefully inserted into the prepared opening. Care must be taken to ensure that the adhesive strip does not move.
The vapor-permeable material is attached under the equipped ebb. The tape is measured and cut along the length of the double-glazed window with a margin for installation under external slopes. If there is not enough width to properly close the mounting seam, then you need to cut another tape and glue it to the first strip.
Waterproofing product
How to properly foam a plastic window in a brick house
Non-standard window sizes in a brick house, wide internal slopes, and almost half-meter window sills increase the amount of PVC material, and therefore the amount of polyurethane foam. Sometimes, in order to save foam and reduce costs, the slopes are not completely foamed, but insulation is used.
Before installing the slopes, the frame is foamed around the perimeter. Polystyrene foam or other insulation is attached with foam to the slopes (right, left and top), then the remaining space is filled with it. Next, the slope is assembled as usual.
To prevent the window sill from blowing out in advance in a brick house, a piece of foam plastic is also placed under it.
It is quite possible to foam a plastic window without special training. The choice of foam is one of the most crucial moments in this matter. You can quickly get confused in the variety of cylinders with different markings
But the main thing is to pay attention to several criteria:
- professional foam;
- temperature conditions for foam application;
- foam output volume.
When performing work, it is important to follow the sequence of foaming the opening:
- clean the opening from dust and dirt;
- moisten the work surface;
- carefully apply foam to ¾ of the crack;
- foam the external seams.
The foam will harden within two hours. But if you have time, it is better to leave it for a day.
Polyurethane foam is useful not only during window installation. There are cases when plastic windows were installed a long time ago and require repairs. Replacing foam under slopes, window sills and outside under drainage will help eliminate freezing and blowing.
It must be remembered that the foam does not tolerate direct sunlight. It must be protected from the sun by applying sealant, paint, plaster on top or by installing trim.
Thanks to the properties of polyurethane foam, the window structure is reliably protected from deformation and can withstand high temperature loads.
Internal work with seams
For reliable sealing, specialists are accustomed to using a duplicated adhesive strip based on ordinary aluminum foil, which is covered with a protective non-woven fabric. This product allows you to protect the seam from the inside from the negative effects of moisture. To ensure reliable and quick fixation of the tape, manufacturers have provided two adhesive strips located on opposite sides. Experts recommend gluing tape around the perimeter of the glass unit.
No less popular is the vapor-tight sealing material, which is made of a special fabric and coated with a self-adhesive plastic mass. The key feature of such tapes is that they are quite bulky.
Important! Tapes with reinforced foil have optimal adhesion only to a well-cleaned and thoroughly degreased entire surface of the slope.
To perform internal vapor barrier, you must adhere to the following scheme:
- Use sharp scissors to carefully cut the ribbon to the appropriate length.
- It is necessary to remove the protective paper from the product and press it against the window profile.
- The edge of the adhesive coating must coincide as closely as possible with the dimensions of the glass unit.
The vapor barrier material is highly resistant to temperature fluctuations without reducing adhesive characteristics. Lack of quality adhesion can only occur when purchased acrylic products have been stored in improper conditions for a long period of time with the protective paper removed.
High-quality vapor barrier of the structure
Step-by-step instructions for sealing
The technology for sealing installation joints depends on the wall material, window design, selected consumables and scope of work. The main operations that the contractor must perform when sealing and sealing assembly seams and gaps between the surfaces of structures:
- After fixing the frame and installing the window, all mounting cracks are foamed with construction foam.
- PSUL is installed between the quarter and the frame.
- There is a diffusion tape between the frame and the ebb.
- Between the frame and the window sill there is a vapor barrier tape.
- Between the frame and the internal slopes there is a duplicate vapor barrier tape.
- Slopes are made with insulation and waterproofing.
- Next, they begin to seal the gaps between the PVC window frame, slopes, drainage and window sill board.
- Prepare a syringe for sealant and a vessel with water.
- Construction tape along the edge of the seam is used to protect all mating surfaces.
- Before starting work, clean the work area from dust.
- Window sealant is applied with a syringe at an acute angle, squeezing it into the cracks and at the same time using the spout to smooth out the seam.
- The protruding areas of the seam are smoothed with a wet finger, trying to evenly distribute the sealant along the entire length.
- Excess sealant is collected with a damp sponge, which must be constantly cleaned of glue in a container with water.
Final foaming of seams
To properly carry out this construction work, you need to gradually heat the container with foam to the temperature indicated on the package. Shake the container thoroughly at least 15 times. Only in this case can all the seams be properly filled. Craftsmen must foam the joints between the double-glazed windows and the formed slope. During this, the adhesive tape must be moved away so that unnecessary particles do not fall on it. If the recesses exceed 60 mm, then foaming will require several layers.
Craftsmen do not recommend adding too much expanding material, since a huge porous layer may simply fall out of the opening over time. The second end of the vapor barrier sheet is fixed to the moistened base with foam. It is best to perform these procedures before the material hardens. Thanks to this, the foam will slightly level the tape, which will make plastering the slopes much easier. Particular attention must be paid to corner joints. The master needs to achieve maximum tightness.
Sealing cracks
Mounting foam for plastic windows
Having reached the foaming stage, you need to have already purchased a container of foam. It must be a professional foam gun. From all the variety, choose the marking of 65 or 70 liters. These numbers indicate the final volume of foam at the exit if all conditions are met. But in reality this figure decreases by 10-15 liters. With this balloon it is easiest to foam the top seams and inconvenient places when you need to tilt the container strongly.
It is imperative to take into account the temperature at which the work will be carried out. At +5 it is best to use winter foam.
Before use, you need to carefully study everything that is written on the cylinder. Make sure that this particular foam is suitable and start foaming. All work must be performed with gloves. Furniture that is located in close proximity to the window must be removed or covered with film.
If some type of foam is unfamiliar, then it must first be tested under conditions as close as possible to those in which foaming will occur. For example, conduct an experiment on plastic cups.
Foaming the structure during planned installation
The most favorable conditions for working with the material being sold are a temperature of +18 C and a humidity of 60 to 80%. In such an environment, foam can fully demonstrate all its positive characteristics. Careful and thorough application is the key to warmth and comfort in a living space. Before starting work, the surface must be moistened with clean water, regardless of the time of year. This procedure is extremely necessary in winter, since in cold weather the humidity indicator is significantly lower than the optimal indicator.
Some property owners suggest that a large amount of sealant around the built-in window unit allows professional builders to hide gross mistakes, which makes it difficult to avoid freezing of the structure. But in practice this has not been confirmed, because the standard thermal conductivity of foam is 3-4 times lower than that of PVC double-glazed windows.
Novice craftsmen cannot achieve the desired result, since they incorrectly combine various factors and do not follow the basic rules for using building materials:
- Temperature of the cylinder.
- Reliability of the purchased seal.
- The intensity of shaking the can before spraying.
- The amount of sealant placed in the recesses.
- Indoor microclimate.
The structure of a durable seam created after complete hardening should be as uniform as possible. There should be no large voids on the formed cut. Through recesses are simply unacceptable. The material must be resistant to various deformations. Excellent adhesion and resistance to mechanical stress allows the foamed hole to cope with adverse factors at any time of the year.
Important! Installation of PVC windows is most often carried out together with the finishing of slopes. But in this case it is simply impossible to check the reliability of the seam after hardening.
Sealing all joints
Choosing polyurethane foam
Polyurethane foam can be professional and household, for summer and winter use, flammable and fireproof.
Foam is usually divided depending on technology, conditions of use and composition.
Household and professional
Professional foam is used with a special gun, which is screwed onto the cylinder valve. Using a gun it is easy to adjust the direction and pressure of the foam.
Household foam has much worse properties; there is less of it at the exit. The cylinder has a plastic disposable adapter. And this is not very convenient for work. It is better to spend money once on purchasing a pistol.
If you plan to foam windows, doors or window sills, it is best to use professional foam. For small and one-time tasks around the house, it is better to purchase household foam.
Temperature
Different foams are used for warm and cold weather. It all depends on the temperature of the surface that will foam. Summer foam is used at temperatures from 5 to 35 degrees Celsius.
In the cold season, they switch to winter foam; it can be used until the temperature drops to -18 degrees. But the volume during expansion will be significantly less. It is important here that the cylinder itself is not cold. Before starting work, it must be heated to 10-15 degrees.
There is all-season polyurethane foam. As the name suggests, it can be used at any time of the year. But the lower threshold for use is only -10 degrees. Maximum +40, depending on the manufacturer.
In any case, you should always rely on the information on the cylinder; the manufacturer always accurately indicates the temperature limits for their product.
Foam flammability classes
Foam cylinders must be marked with a flammability class. B1 is fireproof, B2 is self-extinguishing, B3 is flammable. It is logical that it is best to use class B1.
Description of the problem
To open the swing/flap flap, you need to move the handle to the horizontal position.
If, when the window is open, the handle is set vertically upward (in ventilation mode), the sash falls out and hangs on the lower hinge.
This can also happen if, when opening/closing a window, the handle is in an intermediate position. An intermediate (middle) position is any state other than the following:
- 1. the handle is turned vertically upward (recline/ventilation mode)
- 2. located horizontally (mode for opening the sash)
- 3. turned vertically down (locking mode)
Terms of Use
Before starting work, you must familiarize yourself with the operating temperature range of a particular type of material .
The process of its hardening directly depends on air humidity. It is different at different temperatures. For example, if the air temperature is -10°C, then one cubic meter of air contains only 3 g of water. When the mark rises to +25°C, the amount of moisture in 1 cubic meter. increases to 20 g.
Moisture deficiency leads to slow hardening of the foam and disruption of the structure . Therefore, you need to use the substance only in the temperature range recommended for a particular type of foam.
What are the dangers of a hanging sash?
Such use of a plastic window significantly reduces the service life of the fittings and can cause injury to health.
The weight of the sash can reach 30 kg or more; in some cases, the lower hinge cannot support it and the sash can completely fall out and seriously injure a person.
The lower and upper loops have different designs and purposes: the lower loop resists vertical load, and the upper loop resists horizontal load. When a window falls off the top hinge, the bottom is subject to multidirectional loads for which the hinge is not structurally designed. As a result, it may become deformed or fail altogether.
Adhesive foam PENOSIL Premium Fix&Go Montage
Ready-to-use, one-component polyurethane adhesive in an aerosol can. Designed for quick and durable gluing of various building materials.
- Economical
- Quick drying
- Has high adhesive strength for various materials, including unprimed ones
- Can be used at sub-zero temperatures
- Resistant to mold and mildew
- Replaces most adhesives (foam, liquid nails, adhesives for ceiling tiles and plasterboard, mounting adhesives for blocks, slabs and MDF panels)
- Comfortable in using
SPECIFICATIONS: Color:
white
t° Use:
from –5°С to +30°C
t° Operation:
from –50°С to +90°C
Surface drying time:
10 – 12 min.
Complete drying time:
60 min.
Volume:
750 ml
Shelf life:
10 months.
Packing:
12 pcs.
in a box Availability: IN STOCK
Please check with our managers for the price for your volume.
For more information on the use of Penosil adhesive foam, see the training video
News
- Happy New Year 2022! Schedule. 12/23/2020
- Arrival of window sills “Stained glass” economy 08/26/2020
- May holidays 2022, work schedule 04/30/2020
- Opening hours from March 30 to April 30, 2022 03/30/2020
Catalog
- Professional mounting foam
- Household
- Fireproof
- Silicone For aquarium
- For foam
- Contact glue
- laminated VIP-VPL
- Sealing
- Professional rubber seal (ARTI)
- Seam inserts
- Laminated F, P and N PVC profile
- Window handles Roto, HOPA, HERMO
- Cosmofen (Cosmofen)
- Anchor plates
- HB gloves
Label cloud
GC Hermetik-Center 603058 Nizhny Novgorod, st. Shakespeare, 1 "B", building 4. Tel. +7 831 218-7000, Cell. Cell.
Gap sizes
So, what will the clearance values be? When installing independently, gaps on the sides are allowed, which fall in the range from 2 to 4 centimeters, regardless of the type of structure.
But for the distance between the quarter and the frame, the permissible value will be in the range from 5 to 20 millimeters.
Checking the surface level
In principle, the permissible gap widths for plastic windows should be specified when you sign an agreement with the manufacturer (provided that the installation was carried out by this company). There is a specific document for this - a technological map for installing plastic windows, where everything will be described, even for a balcony room.
Before making a plastic window, the opening is measured. The specialist is responsible for the design parameters. When measuring, the reception features, the structure of the slopes, the design of the lintel, and the deviation of surfaces from the vertical and horizontal are taken into account. After measuring the opening, other parameters of the PVC structure are determined: the number of sashes, opening, type of profile and glass unit. Finished windows are delivered by special transport and carried into the apartment by qualified movers.
Installation work is carried out in the following sequence.
- The old window is being dismantled.
- The opening is prepared, excess plaster is cut down, and surfaces are cleaned.
- The structure is prepared for installation: mosquito net fastenings are installed, anchor plates are attached, and the sashes are removed. If necessary, double-glazed windows are removed.
- The window is installed in the design position, verticality is checked. The anchor plates are fastened to the walls.
- The sashes and double-glazed windows are installed. The structure is wedged in the opening.
- The seams are foaming.
- Insulation of plastic windows is carried out, a window sill and ebb are installed, and slopes are finished.
It is important to carefully foam the seams and fill the cavities under the window sill and mauerlat with mortar. Thermal insulation of plastic windows will be incomplete if the slopes are not finished inside and outside. For internal insulation, it is rational to use polystyrene foam or sandwich panels.
Self-installation Measurements for ordering plastic windows can be made by the customer. Our company will manufacture PVC structures according to the specified parameters. We will deliver to the address and bring the products to the floor. You will install the windows yourself. Most customers who order PVC products without installation know how to properly install a plastic window. Some technical nuances can be watched in videos on YouTube or read on construction forums.
Messages [ 18 ] 040 [Closed]
1 Topic by stasone 08/19/2013 13:47:29 (6 years 7 months ago)
- stasone
- Unemployed
- Topic author
- Inactive
- Experience: 10 years 3 months
- Messages: 9 607
- Reputation: [258 | 3]
Topic: Refoam windows, how much does it cost?
The bottom line is, it’s cold at home in winter. I looked and poked around and discovered that there was a gap between the windows and the wall and it was blowing from there, in some places the polyurethane foam had turned to dust, in short, everything had to be picked out, re-painted, foamed, etc.
In short, where can we get people for this business, how much does it cost, and does it make sense to do it all yourself, having more or less direct hands but no experience in the construction business?
2 Reply from Dim76 08/19/2013 13:52:54 (6 years 7 months ago)
- Dim76
- Participant.
- Inactive
- From: pick up goods - Yurina 202B
- Experience: 9 years 2 months
- Messages: 21 537
Re: refoam windows, how much does it cost?
it makes sense to do it all yourself
3 Reply from 99999 08/19/2013 14:29:42 (6 years 7 months ago)
- 99999
- moderator
- Inactive
- From: Vzletnaya – Uskova
- Experience: 9 years 11 months
- Messages: 13 205
- Reputation: [385 | 6]
EuroStrip technology
Another name for this method is groove sealing. This insulation method is suitable exclusively for wooden windows. To implement this, all frames are removed from their hinges. Using a milling cutter, recesses are made around the perimeter of the sash, into which a special silicone sealant is placed with a roller. For reliable operation of the entire system, it is necessary to adjust the fittings, adjust the frame folds to each other with the smallest gaps, and fill cracks and crevices with silicone sealant. The result is high-quality, long-term insulation.
The downside is that the cost of such work can be almost the full cost of replacing a window with a plastic one.
Closing the gap with a profile
This method is based on creating additional protection for the sealed seam using a plastic profile.
For work you will need the following materials:
- Transparent silicone sealant;
- Stationery knife, sharp scissors;
- Plastic profile in internal corner configuration.
Armed with everything you need, get to work.
Algorithm of actions
- First, measure and cut the profile to the length of the window frame with a margin of 2-3 cm.
- Then cut off its perforated part so that there is a distance of about 1 cm from the curved plate, and 2 mm from the bend of the right angle.
The profile cutting line must be sharpened
Using a utility knife, sharpen the cutting line by scraping off the corners on both sides. This is done so that this part of the profile easily fits into the crevice, thereby creating a barrier for air entering the room. Make holes in the lower corners of the window with a depth of one to one and a half centimeters.
It is necessary to make holes in the lower corners of the window. Clean the joint between the frame and the window sill from debris, wash, degrease, and wipe dry.
The joint between the frame and the window sill must be clean and free of grease. Seal the gap by filling it with sealant.
The gap is sealed with sealant
Apply an even layer of sealant into the holes made and onto the joint. Apply a thin layer of sealant to the profile, insert one end into the hole, and insert the pointed edge of the cutting line into the slot.
The profile is installed in the joint between the window and the window sill
This way the entire profile is adjusted. Its opposite edge is inserted into the second hole. Press the corner tightly and hold for several minutes for better fixation. Sealant that has squeezed out can be carefully removed after hardening.
The disadvantage of this method is that it is labor-intensive and time-consuming. However, the result is impressive: a beautiful, durable corner in place of the black gap.
Now you know exactly what to do when it blows between the window sill and the plastic window. But sometimes this knowledge is not enough, since the source of the draft may be under the windowsill. A completely different method will be used here.
What are the benefits?
Repair is not an easy task, so many people prefer to turn to professionals for help. Yes, installing a new double-glazed window is difficult and too responsible, but any man can foam the slopes.
Attention
Doing the slopes yourself will allow you to save on workers’ salaries and do everything according to your own wishes.
Thanks to the foam, the seams between the window and the wall are hermetically sealed and in the future will not let in either cold air or noise from the street. People often encounter a situation where the master did not fill the space well enough, voids were formed, which then led to heat leakage.
It is impossible to see these errors visually, so experts advise checking the quality of the work performed with matches. You need to bring the flame to the seam: it should not tremble or even tremble slightly. If deficiencies are nevertheless found, the foam is re-filled so that the seams become completely sealed. On the second or third day, the excess foam is cut off and finishing of the slope begins.
The design of slopes is carried out both from the outside and from the inside . Without completing the exterior finishing, you should not move on to the interior.
Types of foam material
Professional
The choice of foam is varied. There are two types:
Professional ones always come with a nozzle in the form of a pistol. It is used more often by masters.
Household
If a nozzle (a thin plastic tube) is attached to the cylinder, then this is a household type.
How household foam differs from professional foam:
- The first difference is volume. And while manufacturers offer cylinders with a capacity of about 300 ml for everyday use, professional ones already sell cylinders with a capacity of 750 ml or more.
- The amount of mixture leaving the container. The household version, like an aerosol, does not come out completely; some of the material remains in the container. Because of this, you will have to buy additional material, which means additional expenses. Therefore, it is better to buy a professional one, since the cylinder is used almost to the end, the costs are minimal.
- The third indicator in the differences between these two types is the coefficient of secondary expansion. For household foam, it is high: before it dries completely, it increases in volume up to two times, while professional foam practically does not change in size. In the case of home installation of slopes, it is better to use one with a low coefficient, in order to later prevent distortion of the surface.
In such cases, only professionals risk using household foam. When working, they fill the seams by a third, knowing that, having increased in size, the mixture will fill the entire space and will not damage the geometry of the surfaces adjacent to the slopes.