Why do you need an electric drive?
Installation of automatic blinds is recommended in large buildings, residential or non-residential buildings. This is necessary so as not to waste time adjusting the entire system. By programming the device, you can control all windows. In this case, each individual window is adjusted independently of the others. Automatic models have another undeniable advantage. The wear and tear of the structure occurs much slower, since the same force is always expended during adjustment. Electric roller blinds can cost significantly more. In addition, it is necessary to pay for the work of a specialist who will install them if the buyer cannot do it himself.
Limit sensors of automation circuits
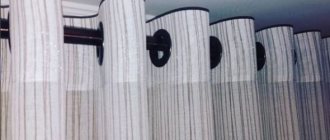
To operate the automation circuit, I installed limit reed sensors. The sensors were controlled by a powerful magnet installed in the bottom bar of the curtain. The magnet was removed from the old HDD (read more here). The sensors are triggered when a magnet approaches. The upper position is controlled by one sensor, but for the lower point there are two reed switches connected in parallel for reliable “signal catching”. It is better to mount plastic sensor housings with proven double tape or, better yet, with construction adhesive.
Upper sensor
Bottom sensor
Hard drive magnet
The curtain is closed
See below for the diagram of the automation unit.
Kinds
There are 2 ways to control automatic roller blinds:
- Remote. The curtains are controlled using a specially programmed remote control. You can set a timer on the device, which will allow the remote control to issue commands at a certain time. This system works on the same principle as an alarm clock;
- Stationary. To activate such a mechanism, you need to press a button that is mounted next to the window.
The most expensive models of blinds are equipped with photocells. They react sensitively to natural or artificial light, rising and falling at the right moment. There is a misconception that automatic curtains create too much noise when operating. In fact, the presence of noise can only indicate poor quality of installation. If the structure is installed correctly, the movement of the curtains will not bother you.
There are other classifications for motorized blinds, for example, according to the installation location:
- Ventilation. They are installed in the ventilation system. Such curtains are often used in industrial enterprises to protect the premises from extraneous noise or unpleasant odors;
- For generators. Necessary to protect the generator from dirt and dust. Despite its name, this type of curtain is actively used in everyday life. There are built-in and overhead models. This design is necessary where particularly high demands are placed on safety;
- External. The main function is to protect premises from entry by unauthorized persons, that is, burglary. In addition, the model protects from low temperatures and direct sunlight.
When making blinds at home, you can focus on the types of electrically driven roller blinds given above. However, we should not forget that for outdoor use it is advisable to purchase ready-made designs. Our own roller blinds are suitable for indoor use only.
Remote control control
Controlling a window mechanism using a remote control is one of the simplest. Connecting such a movement scheme is very simple.
Connecting the remote control
To assemble the automatic blind control mechanism, you need to have the following:
- drive unit;
- infrared sensor;
- remote;
- control unit (controller).
Do you need to be a professional?
Not only a specialist with the appropriate education can construct an automatic system with his own hands. The assembly and installation technique is much simpler than it seems. Master classes presented on thematic resources and books on construction topics indicate step-by-step actions. However, certain skills are still necessary. If you have never had to carry out repair work, you should contact a specialist. This will avoid unpleasant consequences associated with incorrect installation and unnecessary costs.
Do-it-yourself roller blinds
To make roller blinds you will need:
- fabric for sewing;
- paper template;
- a simple pencil;
- a piece of soap or chalk;
- ruler;
- adhesive pad;
- fringe;
- special glue for fabric.
Master class on making them:
- First you need to make a pattern. It is done in the same way as for regular roller blinds. But there is also a difference - you need to leave an allowance of 25 centimeters. This is necessary to finish the edge.
- Now make a template. It is made from plain paper. Its width is equal to the height of the carved edge, and its length corresponds to the length of the roller minus one centimeter. On the resulting rectangle, make the pattern you like.
- The rectangle must be folded like an accordion. Draw the desired pattern on the first strip. Using this pattern, cut the remaining stripes. So, the pattern will be the same across the entire width.
- Make a drawstring. Insert the tube into it and sew up the edges.
- Place the paper template under the drawstring and secure with pins. Trace the pattern with a piece of chalk.
- Glue the fringe along the bottom edge.
- Attach the resulting roller blind to the roller.
Now you know how to make roller blinds with your own hands, as well as how to make roller blinds yourself without the help of a specialist. Good luck!
Curtain material
In most cases, high-density fabric is chosen for making blinds. However, other materials can also be used.
Advice:
If the interior of the room allows, non-working floppy disks or CDs will be used to make curtains. This idea is suitable for a teenager’s room, where excessive severity would look inappropriate. In an interior that suggests informality, you can use calendar cards or postcards. Even strips of leather may work.
First stage of work
If the decision to create a structure with your own hands has already been made, first of all, you need to decide on the size of future curtains. To do this, measure the window frame, since the length of the future product must match its parameters. Curtains can be large. But the difference usually does not exceed 12 cm. The width of the blinds must match the width of the frame. About 2 cm should be left for attacks.
When cutting the material, you need to prepare 2 patterns, since one of them will become the wrong side, and the other the front side. The patterns are folded right sides inward and sewn together. The resulting workpiece is turned inside out. The remaining hole in the bag must be sewn up. If desired, you can choose different materials for each side. But according to experts, both blanks should be made of the same material.
There is no need to make curtains yourself. You can upgrade ready-made ones that include a plastic rod in the mechanism.
Second stage of work
At the next stage, the blinds need to be attached to a wooden beam. The width of the curtains should be 1 cm greater than the length of the beam. Curtain material should be laid out with the wrong side up. At the top of the workpiece you need to make an indent of at least 5 cm. After which the pre-prepared timber is laid. The material is tightly attached to it. You can use a stapler to secure it. The rail should pull the curtain. To make this possible, you need to make a small pocket. The material must be wrapped 3 cm. A beam is threaded into the resulting pocket.
How to make with garter ribbon
To make such a roller blind you will need:
- textile;
- sewing machine;
- iron;
- weighting agent;
- block and lath.
- First you need to make a pattern from the fabric. Measure the desired width and length of the future curtain. Cut out the resulting rectangle and sew it on three sides. Turn the fabric inside out and iron it.
- Insert the strip into the unstitched side, and then sew it up. This will be the bottom.
- Attach the top of the roller blind to the block.
- Now prepare the ribbons. They should be twice as long as the roller blind itself. There should be two of these tapes.
- Attach the ribbon to the block.
- The roller blind is ready.
Third stage of work
An electric drive can be bought in a store. However, some prefer to create it themselves. To assemble it yourself, you will need a bit extension and an electric screwdriver. The last element is powered by three rechargeable batteries. First you need to disconnect the battery compartment. The power cables need extension. They are increased by 2 or 2.5 m. The gearbox and electric motor should be modified. The need for this arises due to the fact that the electric drive will be installed in a limited space. The essence of the modification is to reduce the body size.
Device details
The transistors use silicon medium or high power npn structures. Relay series RES9 passport RS4524200. VD ordinary rectifier diodes are required to be installed. Any buttons to open. Capacitor in the filter with a capacity of 500-100vra for 50 volts. Any bridge rectifier for a current of 3-4A.
The installation was carried out by hand using a hinged method on the relay contacts; the relays themselves are installed on a textolite board. The controls, transformer and electronics are housed in a suitable housing. A DB9 type socket is installed on the case for connecting a connector with a cable for supplying signals from sensors and powering the motor motor. See photo.
The homemade curtain has been working reliably for three years now. The automation circuit can be successfully used to control other devices, for example, electrified overhead garage doors of various designs can be controlled using this circuit. In the future, it is planned to make automatic control of the Roman blind on the Arduino board with the implementation of remote control via an IR remote control and automatic operation from a light sensor. An example of how the curtain works in its current state is shown in the video
The fourth stage of work
The drive is connected to the blinds. The bit fixation extension is provided in a special gland. It is necessary to remove the standard plug. The first element is installed at the end of the winding body. You need to make sure that the seal at the end is secured tightly enough.
A special bracket must be attached to the frame, on which the device will be secured. For initial fixation of the electric drive to the blinds, ties are required. Subsequently, the elements used for fastening must be replaced with brackets. Installation is carried out in a horizontal position after the engine is mounted in its place. There is a reversing switch on the power supply. With its help, the operation of the entire finished structure is controlled.
Important:
The electric drive can be presented in the form of a motor with a gearbox. To select the right model, you should take into account the shaft rotation force and speed. You need to purchase a unit with a power of at least 12 W. The shaft rotation speed, according to experts, should exceed 15 revolutions per minute.
Next, the engine is installed in the plastic box. Then you need to run the cable. The next step is to press the buttons, which completes the process of making electric curtains. The finished design can be supplemented with the help of automation and stationary power supply. Models that include such elements can move right/left if it is a vertical model, or up/down if it is a horizontal model.
Assembly and installation process
An electric curtain rod works thanks to a drive that moves the curtain along given coordinates. To do this, you need to follow the following instructions.
The sliding electric curtain rod is assembled according to the following instructions:
- Before assembly, you need to find all the parts and also make sure that all fasteners are present.
- An aluminum support is required for installation. An aluminum “U” shaped profile is best suited. This is an affordable element that can be used in an automatic curtain rod system. There are profiles of different parameters on sale; 2x3 or similar sizes are suitable.
- The drive is built in on the left. It is better to use a ready-made drive from a car window lifter. It is cheap, sold in any auto store, small in size and connects from 12 volts, that is, you can use a regular power supply.
- A carriage with wheels is mounted on the right.
- A cable is stretched between the carriage and the drive unit. You can use a regular steel clothesline or buy a rope at a hardware store.
Below is a diagram of the power section assembly. It is important to note that it is better to use a printed circuit board or breadboard for its layout. This requires soldering skills and a basic understanding of electrical engineering.
The diagram below also shows a sensor for detecting indoor lighting, which can be a photoresistor. It should be positioned so that it constantly faces the street. It should not be hampered by tides, curtains, visors or other obstacles.
A regular remote control is used for control. It is already included in ready-made control units, so there is no need to assemble it yourself.
It is best to use a radio remote control that can operate from any room.
There are two ways to connect blinds:
- Batteries. The convenience of this power supply is the absence of wires. But periodically the batteries run out and constant heating from the sun will lead to a gradual loss of capacity.
- BP. The unit will create constant voltage without interruption, but you will have to hide the wire and pull it to the outlet.
Useful tips
- Professionals advise purchasing an Arduino module. Experts highly value this device. With its help, not only blinds can be controlled, but also gates, heaters and some other devices and devices. You can regulate the operation of the device using the module after a special program has been written for it. This is especially necessary in cases where the system will be installed on 2 or more windows. By lightly pressing the buttons, you can set the required closing or opening speed, raise the curtains completely or partially, and also carry out other necessary manipulations. The Arduino module allows you to program additional functions, including the security mode. This function is necessary in order to promptly notify that certain malfunctions have occurred in the operation of the module;
- Give yourself the opportunity to control the design of the blinds manually. No matter how high-quality the electric drive mechanism is, sooner or later a malfunction may occur. Failures are possible in which a new drive will have to be installed. Manual control allows, in case of imbalance, to synchronize the operation of the structure. The absence of dependence on the electric drive allows you to use the curtains while the motor is disconnected for replacement or repair;
- Protect the mechanical part of the structure from dust and moisture that may enter the room through the window. In the kitchen, the electric drive is exposed to the adverse effects of soot and steam that are released during cooking. The mechanism will fail sooner or later. However, the period of its operation can be significantly extended;
- curtains yourself
- Since the electric drive will require repair in any case, do not glue together the plastic boxes that contain the moving elements. To fasten them together, use staples. They can be removed if necessary.
Just curtains yourself further text
Offer curtains yourself for the test
Electric roller blinds are another step towards coziness and comfort in your home. By taking care of their installation, you get the opportunity not to waste time adjusting the mechanism. In order to make and install curtains yourself, it is not necessary to have a technical education; a new key for the test. Just be careful and be patient.
Electronic unit design
Let's consider the operating principle of the automation system circuit. Let's say the curtain is in the open state and the Limit Switch GC2 is in the on state. If you press the KH2 button “↑”, then nothing will happen, since the button is shorted to ground by the closed contacts of the reed switch GC2. If you briefly press the KH1 “↓” button, the transistor VT1 will open with the current flowing through the resistor R1. Relay P1 will operate. Using contacts P1.1, the relay will supply power to the electric motor and the curtain will begin to lower. At the same time, contacts P1.2 will break the power supply circuit of the KH1 button and block the operation of the KH2 button. When the curtain is lowered to the lower position, sensor GC1 will operate and turn off relay P1 - the device will stop in standby mode. The device operates in a similar mode and when moving upward when contacts P2.1 are triggered, the motor will rotate in the other direction. If you need to stop the curtain in any intermediate position, then pressing the KH3 “Stop” button will de-energize the relay, respectively, turning off the engine and setting the device to standby mode. The circuit is powered by a bridge rectifier that rectifies an alternating voltage of 18 Volts from the secondary winding of transformer T1. A 0.5 A fuse is installed in the mains voltage supply circuit. The electric motor was powered by a separate stabilizer on a KREN5 microcircuit mounted on a powerful radiator. Subsequently, a 24-volt electric motor from the printer was installed and the circuit took the form shown. It turns out that all motors in electric screwdrivers, screwdrivers, toys and printers are unified in size and mounting.