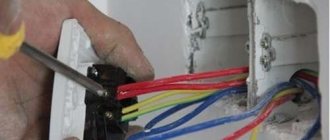
The development of an indoor electrical network can be planned both during its initial design and during the operation of ready-made wiring. In any case, you want to connect distribution boxes, mounted socket boxes, and switches with each other with minimal material costs. Disconnection of the power cable is not necessarily carried out exclusively in installation boxes, which are hub splitters. For example, there are many ways to connect a switch to an outlet, and vice versa. Some of the switching can be done in any box, the main thing is that there is no danger of shorting the contacts.
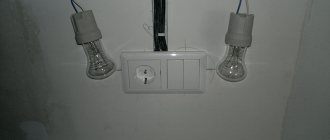
A typical example of combining a socket and a switch in one unit
Often in a corridor or hallway there is a need to combine a network connection point (socket) and a switch for several lighting groups. This method solves several problems:
- An extensive electrical outlet network in the corridor is usually not needed: there are no constantly used electrical appliances. However, there is a need to connect a vacuum cleaner or charger. In addition, a radiotelephone base unit can be installed in the hallway.
- There is little space on the walls in this room; there are wardrobes, a mirror, and a hanger. Part of the corridor is usually occupied by the input switchboard and metering device (meter). Therefore, compact placement of switching equipment is a key issue.
- By combining the socket and switch, wiring is saved and installation of an additional junction box is not required.
- If you additionally connect a second device: a switch to a socket, or vice versa, there is no need to damage the wall or organize a route for the power cable. The connection is made with minimal impact on the room.
As can be seen in the illustration, to implement the entire circuit you will need one circuit breaker (in the panel it can be called “corridor: lighting, socket”), and one distribution box.
The zero bus N (blue color) passes through a kind of transit to the lighting groups and to the socket. The PE grounding is inserted into the socket body, and (if one of the lighting groups is in the bathroom) into the lamp body. The phase after the machine is connected to the socket through the distribution box. The disconnection occurs in the socket box. In this case, any terminal block is used: for example, WAGO.
A small section of wire connects the phase terminal in the socket and the input terminal of the two-key switch. Next, a phase is laid from the output terminals to each lighting group.
This scheme is usually used during design, since you still have to lay cables to different lighting groups. If such a solution is optional, you do not install additional boxes. The hole for the switch or socket box is made next to the already mounted device. All that remains is to install additional wiring.
If there is a need to connect the socket and lighting to different circuit breakers (for example, a power socket is used for a powerful electrical appliance), the phase is initiated along different power lines.
There is no need to use an additional distribution box; the phase wire passes through it in transit, without disconnection.
Tip: Leave a loop on each phase wire in the distribution box. With the future expansion of the network, you can cut the wiring and quickly organize the connection using the blocks.
In any case, this installation method saves both wiring and wall space. For example, let's look at the classic version of connecting a socket and switch to a distribution box.
Two cable routes were laid, the connection was in the junction box. Looking at the diagram, it becomes obvious that connecting the switch directly to the outlet is more efficient.
Principle of operation
Unlike a standard two-gang switch, the pass-through switch does not have an “on” and “off” position. Due to the different principle of operation of the mechanism, each key in it controls a changeover contact, that is, voltage is supplied to one outgoing contact and the power is simultaneously turned off from the other outgoing terminal. Two two-key devices control two different lamps/groups of luminaires from two different locations in the room.
The main feature of installing a pass-through switch with two keys is that one four-wire cable or two two-wire cables are laid between such switches. At the same time, it is enough to lay a two-core cable between single-key pass-through switches.
How to connect a single-key switch from an outlet
The classic option: a common zero bus from the distribution box is connected to a light point.
Grounding goes through the same cable channel (if used). But the phase wire does not go directly to the lighting fixture. A single-key switch (located in the same housing as the socket) breaks the circuit between the phase contact in the socket box and the light source. Quite a common scheme. Such a block can often be found in lighting stores.
Another application for such a module is a switchable socket. Let's say you have an electrical appliance that should be turned off at night or when leaving the room. This could be a router that distributes Wi-Fi. The unit itself is located high, so it is not always possible to use the standard power button. By clicking the switch key, you will de-energize the equipment without touching the circuit breaker in the distribution panel. Or, on the contrary: the device must be powered under certain conditions. For example, power supply for an alarm system.
In this case, the phase wire inside the block is simply opened by a switch, and the power wiring is connected as to a regular socket.
Consequences
If you use the parallel method of connecting an outlet, certain features appear:
- due to the fact that two consumers will be involved (the socket itself and the light fixture), overheating of the wires and an emergency may occur;
- there is no way to connect powerful devices;
- When the system is turned on, the voltage may decrease and other electrical appliances may switch off for a short time.
If you do not connect it, but replace it with a socket, then all the shortcomings are to some extent leveled out, however, such solutions should be resorted to only after deliberation and with certain skills and experience in working with electrical equipment.
If the switch is being added to an existing outlet
Minimizing the consequences - replacing the socket with a block. The procedure itself is simple; we drill a hole nearby for the box and carefully install the new module.
There is no need to install a power incoming cable; it is already in the socket. But the output wiring, to the lighting device, will have to be extended. This is an individual decision, there is no universal way. The connection diagram is very simple: both the neutral and phase wires are laid not from the box, but from the socket box.
Naturally, you will have to install contact blocks. Although many connect the output wire directly to the socket contacts: some models allow such a connection.
If there are several sockets in a group, you can replace any of them with a common block (socket - switch). You simply choose a convenient location (from which you can run the wire to the lamp) and connect the switch to the outlet.
If you need to organize an additional light point in the hallway, you can use wall sconces. They are placed in close proximity to the outlet-switch block, and you do not have to destroy a large piece of the wall for wiring.
General safety rules
Of course, before starting such work (especially on a completed power supply system), you should de-energize the line and check that there is no voltage. Selecting a power cable will not cause any difficulties: a cross-section of 1.5 mm² is sufficient for organizing lighting. Since we are connecting the switch to the socket, and not vice versa, the primary (socket) cable will be more powerful: 2.5 mm².
Changing the purpose of an electrical point and connecting one to another
Knowing the features of connecting socket devices and lighting control boxes, you can replace one element with another or make a connection between them. When performing any connection work, it is first necessary to de-energize this line, as well as the cables of adjacent lines that may be unintentionally touched.
Replacing a socket with a switch
Replacing a socket with a switch is done without grounding.
Of all the operations reviewed, this procedure is the most simple. After removing the old socket, a trinity of cables remains - phase, neutral and ground. It is necessary to identify each of the elements by the color of the protective winding. For reliability, you need to use a multimeter (it will be able to show the phase - the cable through which the current flows when connected to the probes of the device), since during installation work the regulation of wiring colors is sometimes ignored. In apartments with an old layout, where the electrical network has not been modernized, instead of three conductors, there will most likely be two (phase and zero), since grounding was almost never used before.
Having determined which wire performs which function, you need to connect the phase component to the input of the switch, and the zero to the output. Then work is carried out in the distribution box: the zero, which was previously drawn to the socket housing, is turned off and then connected to the lamp phase. Grounding is not involved in the operation, regardless of whether it was used in the previous outlet or not. After this, the neutral cable of the chandelier or sconce is connected to the network.
Replacing a switch with a socket
Replacing a switch with a socket requires additional cables
For proper operation, additional cables must be installed. To connect the socket, three wires are required, and after removing the switch housing, there are only a couple of them left. But it is quite acceptable to connect an outlet box to this place, and the socket will work, but during its operation you will have to come to terms with some restrictions.
First, switches are made at the site of the future location of the outlet box. Two wires remaining from the switch need to be connected to its power contacts. One of them will have to be transformed from phase to zero: in the distribution box, turn off the cable that was going to the phase wire of the lamp before dismantling the lighting control device. It must be connected to the zero terminal of the group's power cable.
Is it possible to connect an outlet to the switch?
Imagine the situation: you have renovated your premises, all the electrical wiring is walled up in the walls, and there are no backup boxes or socket boxes. An outlet needs to be installed in one of the rooms. Placing it next to the distribution box is irrational, the location is too high. But I don’t want to lay open wiring (especially, ditch the wall).
There is a switch in a convenient location that clearly has voltage. How to make a socket from a switch if it is possible to aesthetically place them next to each other?
To answer this question, let’s remember: what types of lighting schemes with switches are there?
Classic connection: tap from the distribution box.
The neutral conductor is inserted into the lamp from the box. In the box itself, a break in the phase cable is organized (it is opened using a switch), then the phase enters the lamp along the same path as the zero.
With this scheme, only the phase conductor is present in the body (installation box) of the switch. It will not be possible to organize a closed electrical circuit to connect an additional electrical appliance (via an outlet). You can use the phase from the switch, but you still have to lead the zero from the distribution box, which makes the idea pointless.
Conclusion: With this type of lighting arrangement, it is impossible to connect the socket to the switch.
The switch is located between the power source and the lighting fixture.
This scheme is less common, but in some rooms it is used. If at the design stage it was decided not to use distribution boxes in the lighting network, you are in luck. The switch wiring box contains both neutral and phase wires.
The sequence of work is as follows:
- We dismantle the existing switch without touching the installation box.
- We determine the routes for laying the input and output cables. If you have a diagram and plan for the electrical supply of the room, this is not difficult to do.
- Carefully drill a hole for the socket box.
- We install terminal blocks in the switch box and connect the socket according to the following diagram:
Safety regulations:
Since the current wiring is intended for lighting, most likely the cable cross-section is no more than 1.5 mm². The maximum possible load for such a cable (provided that it is copper): 3.3 kW. That is, not very powerful electrical appliances can be plugged into this outlet. The maximum is a vacuum cleaner. Well, phone chargers, a power supply for a router or an antenna amplifier - no problem.
We mount installation elements
Since each of them is based on different connection schemes.
The socket is supplied with phase through the switch if the switch is activated. In wooden houses, it is necessary to prevent their interaction with wooden walls during the laying of wires; the electrical wiring is laid through special insulators. You should also pay attention to the level of security of the device - this is the IP code on the packaging.
I think this information will be useful to everyone, and even worthy of bookmarking. The socket can be checked using any electrical appliance; we insert its plug into the socket and check its functionality. Moreover, you don’t want to lay open wiring because you don’t want to pierce the wall.
The connection diagram for pass-through switches is a very good article in which I provide the basic connection diagrams for pass-through switches. To work you will need tools and consumables: a new switch; distribution box and switch; wires for connection made of the same material as high-voltage wiring in the general network, copper or aluminum; pliers, Phillips and flathead screwdrivers, knife, insulating tape, electric soldering iron.
By combining the socket and switch, wiring is saved and installation of an additional junction box is not required. Usually, a certain wire has its own color.
Varieties, designs and average prices
Connect the second core to the output contact of the switch. It’s easy to connect an outlet with a switch yourself; minimal electrical skills will be enough for this. Devices of the second type are traditionally used in wooden buildings where open wiring is present. Ideally, current should flow to the light bulb in the following sequence - phase goes to the central contact of the light bulb, zero goes to the base.
Electrical wiring project
To begin with, they draw up an electrical wiring project; it is best if the project is drawn up for you by professionals. But if you have experience and the necessary knowledge, then you can draw it up yourself.
You need to know that Russian standards are very different from foreign standards, which means that foreign wiring diagrams cannot be used in our country. All electrical installations in the house are planned at the initial stage; for this purpose, draw a house plan and indicate on it the places where there will be switches, sockets, chandeliers, etc.
At this stage, it is very important to create a diagram where the locations of the devices will be indicated.
The next step will be to indicate where the wires will be laid in the house.
After all the above manipulations, carry out the wiring.
There are three types of wiring and connections:
To make their work easier, they distribute the load. For example:
This option is a simple ungrouping of electricity consumers and the fewer groups, the more economically the material will be used. In order to simplify the installation of wiring, its installation is carried out in floor slabs. In the diagram, such wiring is marked with dotted lines.
When conducting wiring, it is necessary to take into account the current strength that will have to flow through the network, that is, this is the ratio of the total power of all consumers to the voltage. In houses and apartments, the maximum current consumption does not reach twenty-five Amperes.
All materials must be selected according to this parameter. The cross-section of the wires depends on the current strength.
If you calculate that your current consumption is 16 Amps, then you cannot install fuses with the same operating current value.
It is necessary to take a larger standard value than the calculated one.
Do-it-yourself electrical wiring in the house
To install the wiring yourself, you need to know which cable you need and use it. After all, it is produced with different cross-sections; it is selected based on current parameters.
At this stage, you will need to calculate the amount of materials that may be needed for installing the electrical wiring. Work such as drafting, wiring, and installation can be done quickly, but there is some difficulty in calculating the amount of wire required for wiring. But measurements can be made by taking a tape measure.
Expert opinion
Viktor Pavlovich Strebizh, lighting and electrical expert
Any questions ask me, I will help!
You will need tools: a Phillips and flat-head screwdriver with an indicator, an electrician's knife to remove the insulation, as well as side cutters and a level. If there is something you don’t understand, write to me!
How the apartment or house electrical network works
Before you start trying to make any modifications and improvements to the electrical network, you need to understand how it works and functions. We are now interested in how the wiring in the house or apartment is routed. The connection diagram is usually classic and here are the components it includes.
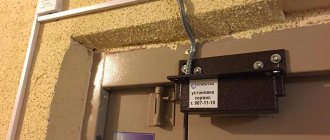
- The first element in the intra-house network is always the input panel. It is located in the apartment, on the landing or on the street, if we are talking about home ownership. Looking inside, you will see an input machine, which is connected to a power cable from the public electrical network, various protection devices and, most likely, an electric meter. Sometimes, instead of an input machine, a switch or batch switch can be installed, but this is in very old houses.
- From the input machine there are wires that are routed to the meter. A group of other machines (single-pole, differentiated, and so on) is connected from it. These devices are combined into groups, of which there are usually 2 or more , depending on the potential loads that may be placed on the intra-house network.
- Dividing into groups is a very convenient way to connect electrical points in the house. This allows you to separate specific rooms and, if necessary, turn off the power supply only to them; the remaining rooms will not be de-energized.
It will be impossible to get confused in this panel - a smart electrician has signed the purpose of each machine
- The electrical network can be divided into parts according to several criteria. This may be the ease of installation or the nature of the loads - there is no strict regulation, but the master always follows the same logic chosen by him. However, there are regulations regarding electrical appliances in the kitchen and bathroom - they must always be connected in separate groups.
- Next, long wires begin their journey from the machines, which are threaded throughout all the rooms to the distribution boxes. These boxes are nodes in which one line branches into several. This is where the wires that go to the sockets and switches originate.
Interesting to know ! Previously, boxes were mounted in walls, under the ceiling. Now their location can vary radically - they are moved to the ceiling, hidden behind installations, and so on. If you order installation of wiring, we recommend installing them where access will subsequently be available. Yes, this part of the circuit is passive and, in principle, there is no need to maintain it, but sometimes access is still required, for example, when connecting new branches or correcting electrician errors.